Showing posts with label panna cotta. Show all posts

Sunday, 12 February 2012

Apricot, almond and panna cotta tart


I was fairly restrained this Christmas with purchasing food frippery. Yes OK, there’s an unopened large tin of Roses, plus a couple of giant toblerones lurking in a cupboard somewhere and we still seem to have half a pot of twiglets (honestly, I think they multiply whenever you put the lid back on), but with regard to those odd purchases that only seem like a good idea for two short weeks in December, I didn’t do badly...except for this jar of apricots in amaretto syrup.


What can I say? I lost my mind. I’m not mad about apricots...ditto amaretto. But the jar was nice and it was a special price if you bought a matching jar of cherries in port (expect to see these featured in future weeks/months!).


I fancied making pastry this weekend and chose this almond pastry to compliment the amaretto. I thought about making a crème patisserie filling but wanted something more set – so opted for panna cotta.


Panna cotta is so easy to make and has such a lovely creamy flavour and texture that I wonder why it isn’t used more in baking. It is a perfect filling for tarts as it sets and then cuts into lovely clean slices. Plus, unlike some crème patisserie or custards, when cut it doesn’t all squidge into an untidy mess. I think it looks rather elegant!


Yes, this tart tasted as heavenly as you’d expect; if you want to know just how heavenly, Mr CC had a second slice...Mr CC never has a second slice of anything (until now!). While I wasn’t overly keen on the amaretto apricots on their own, when eaten with the pannacotta and pastry all the flavours balanced out so that the fruitiness tempered the creaminess and vice versa.


I only used the apricots as I’m determined to exhaust my Christmas stocks before Easter arrives (for me this is traditionally the next period of grocery madness on the calendar). It would work well with any fruit; I already thinking of raspberries perhaps setting some in the base of the panna cotta itself.


Ingredients

For the almond shortcrust pastry:

170g plain flour
60g ground almonds
110g unsalted butter, cold
50g icing sugar
2 egg yolks, plus 1 further egg yolk when baking
2 tablespoons cold water

For the panna cotta:
6 gelatine leaves
500ml milk (anything but skimmed – does that even contain milk?)
500ml double cream
1 vanilla pod, cut open and seeds scraped out
50g caster sugar

To finish the tart: apricot halves in amaretto syrup


Method

Start by making the pastry: Place the flour and ground almonds in a food processor and briefly pulse until they are combined.

Add the butter, diced into small cubes, and blitz until the mixture resembles bread crumbs. If you don’t have a food processor you can use the rubbing in method.

Add the sugar and blitz briefly.

Add the 2 egg yolks and water and pulse the processor until the dough just starts to come together.

Tip the dough out onto a sheet of clingfilm and bring together into a soft ball.

Flatten the ball into a disc shape (this will make rolling out easier) and wrap in the clingfilm.

Refrigerate for 30 minutes.

Preheat the oven to 190°C/ fan oven 170°C/375°F/Gas mark 5.

Roll the chilled pastry out between two sheets of clingfilm and use to line a 23cm loose bottomed round flan tin. No need to grease the tin as the pastry is buttery enough not to stick. It is very important that your pastry has no holes in it so patch carefully if need be! Don’t trim the pastry yet – leave the excess hanging over the side.

Line the pastry with a sheet of baking paper and weigh down with some baking beans.

Bake the pastry case for 15 minutes, then remove the beans and paper.

Brush with the remaining egg yolk (this seals up any tiny cracks and ensures the pastry won’t leak when you fill it with panna cotta) and bake for a further 5 minutes or until the pastry is golden and cooked. The pastry will not be baked again so must be fully cooked at this stage.

Leave to cool on a wire rack – do not remove from the tin until you serve the tart.

When cool, trim the excess pastry away; some will have already dropped off during cooking. (BTW, don’t throw the offcuts – they are delicious! Cooks perks and all that....)

Now make the panna cotta: Soak the gelatine leaves in a bowl of cold water until they are soft.

Place the milk, cream, vanilla pod, vanilla seeds and sugar in a saucepan and bring to a simmer.

Discard the vanilla pod.

Squeeze as much water as you can out of the gelatine leaves and whisk into the creamy mixture. It will dissolve pretty quickly but make sure you’ve thoroughly whisked it in as you don’t want lumps.

Leave the panna cotta mixture to cool for about 20 minutes.

Ladle the mixture into your cooled pastry case.

Refrigerate for several hours (overnight is best).

On the day of serving place the apricot halves on top of the set panna cotta and drizzle some of the amaretto syrup over the top.

Bask in the glory of the wonderful thing you have made.

Eat.

Wednesday, 29 December 2010

Raspberry jelly and panna cotta


A little while back I remember posting a teaser photo of a dessert I was working on for Christmas – well this is it! It’s a raspberry jelly with vanilla panna cotta. In my family we either don’t like Christmas pud or at that age where it “sits on you” when you’re trying to sleep at night. So I picked this as a light and fruity (but still calorific – don’t fret!) alternative.


Using the gorgeous copper mould Mr CC bought me for Christmas last year I set about making the jelly. Here it is setting in the fridge:


The recipe needs to be started 2 days before serving as you must ensure you’ve left enough time for both layers to set. If you don’t have that much time you could make exactly the same thing in individual moulds and these will set quicker.


It’s by no means a cheap dessert – the raspberries are expensive and all that dairy for the panna cotta isn’t exactly pennies but, for a celebration, it’s worth it. If you consider the price of a good quality dessert from a top food retailer (such as M&S or Waitrose etc) it’s comparable and you know exactly what’s gone into yours – all good stuff! Plus, it’s very rich so serves lots of people.


Homemade jelly is divine; it’s soft and intensely fruity. It’s also a lot less sweet than packet jelly so the fruit really shines through. One thing I would like to point out and I’m sure a science boffin can explain the answer, the liquid jelly mix tastes much sweeter than when it’s set. First time I made this I panicked that it was going to be too sweet so don’t worry if you think the same...it will all be fine!


The fruit in the pan looks glorious; an explosion of colour:


Simmer until it breaks down:


The key to a nice jelly texture is straining out all the fruit seeds. I used a metal sieve – what’s gathering in the bowl is the basis of the jelly:


A piece of equipment I find particularly useful is a straining mushroom. It drives the juice through the sieve. It looks like a darning mushroom (does anyone still use those?) and, when I bought it, I didn’t think I’d ever use it – it’s so effective though, that I use it whenever I sieve fruit:


I love the crisp line where jelly meets panna cotta; it’s important to let the jelly set fully before pouring over the panna cotta otherwise you won’t get this crisp delineation.

Sorry if some of the photos are a bit murky – Christmas day was rather gloomy (weather-wise) and it was impossible to get good light.

Ingredients

Note – this is the basic quantity for the jelly – you can scale it up as required but allow extra setting time. For my giant mould I doubled up the quantities.
5 leaves gelatine
500g raspberries – fresh or frozen, plus an extra punnet to set in the jelly
150g caster sugar
400ml cold water

For the panna cotta recipe click here

Method

Start by soaking the gelatine leaves in cold water until they are soft.

Place the raspberries, sugar and water in a saucepan and heat gently until the sugar has dissolved.

Simmer further and mash the raspberries with a spoon or – and I found this really productive – the masher you’d use to make mash potato.

Pass through a sieve and return the liquid to a clean pan.

Heat gently and then remove the pan from the heat.

Squeeze all the water from the gelatine and whisk into the raspberry juice – it will dissolve very quickly.

Leave the jelly to cool a little.

Pass through a sieve into your chosen mould – sieving again will strain out any seeds that passed through first time.

Drop the extra raspberries into the jelly.

Chill until set – I left overnight.

Now make the panna cotta - for the panna cotta method click here

Pour the panna cotta over the set jelly and press a sheet of clingfilm onto the panna cotta – this stops a skin forming.

Refrigerate overnight to ensure it has set.

To turn out of the mould, dip for 5-10 seconds in warm water then press a plate against the mould and flip. You will hear a release squelch when the jelly has freed itself.

Bask in the glory of the wonderful thing you have made.

Eat.

Sunday, 19 September 2010

Blackberry panna cotta birthday cake


Since he saw me make it for the CCM back in May, my nephew (The Boy Wonder) had only one request for his birthday cake – a
panna cotta filled sponge … but with a twist; the panna cotta had to be blackberry.


The
recipe and method is the same as the cake I made in May but with added blackberries (200g punnet of blackberries pureed and sieved, then heated until reduced by half to make a thick syrup with intense flavour; add sugar to taste – I added 2 tablespoons). I made the panna cotta as usual then added the blackberry syrup just after whisking in the gelatine.


The idea with this cake is that you carve out the sponge to make a bowl and then fill it with panna cotta – it’s simpler than it sounds (as you will see if you click on the link to the method, given above).
From the outside, the cake doesn't look all that, but I think this photo gives you a visual idea of the magic within:


Now you might be thinking that this would be a nightmare to cut but – surprisingly – it isn’t and you can get beautifully crisp slices:


The colour of the panna cotta was a delicate lilac and the fruitiness worked very well.
At first I thought I hadn’t added enough fruit to the panna cotta as the initial taste was creamy and rich; then the fruit came through and was unmistakable. I’ve tried to capture how the sponge turned lilac as it soaked up the panna cotta before it set:


Happy birthday Boy Wonder!


Sunday, 9 May 2010

Sponge and panna cotta birthday cake


Virtually all of my family’s birthdays fall in April and May; this week it’s the CCM’s turn.
I wanted to make her something that was clearly a cake but, at the same time, I know she has a passion for panna cotta.


This cake is my own invention – it’s effectively a hollowed out sponge filled with creamy panna cotta and then topped off with beautiful fruit, including luscious English strawberries.


My main concern was that as the panna cotta is liquid until set it would leak through the sponge.
By lining the inside of the tin with plenty of clingfilm it meant that none of the liquid could escape – and it was rather tasty how it set in the sponge making it succulent; the best way to describe it is like an even creamier tres leche cake.


I will admit that for an hour after I put the panna cotta filled sponge into the fridge I couldn’t walk by without gingerly opening the fridge door and peering in to make sure none had escaped.
It’s amazing how much tension you can build into making a cake!

Any spare panna cotta that won’t fit in the sponge can simply be poured into ramekins and enjoyed as a bonus dessert. The quantities I provide below filled my cake and four ramekins.


You can fit more panna cotta in the cake if you make a double tier of sponge around the side of the cake (I realise I sound a total gutbucket saying that but, let’s be honest, the only thing better than panna cotta is
more panna cotta!). As sponge is soft and bendy you can keep cutting the sponge in concentric circles and then pressing these into the sides – they will shape to the curve of the tin. This is one of those things that’s quite wordy to describe but a picture will make it clearer.

Here’s the single tier sponge bowl:


You can see how much extra height you get by adding a second tier.
Here it is in progress:


My lovely sponge bowl (not to be confused with the Superbowl, which is far less interesting):


The only sponge I had left at the end was the top I cut off to level the cake and a tiny disc.


Happy birthday CCM!


Ingredients

For the cake:
250g unsalted butter, at room temperature
220g caster sugar
1 teaspoon vanilla extract
4 eggs
80ml milk
300g self raising flour

For the panna cotta:
12 gelatine leaves
1l milk (anything but skimmed – does that even contain milk?)
1l double cream
4 vanilla pod, cut open and seeds scraped out
100g caster sugar

To decorate: whipped cream and fresh fruit

Method

Preheat the oven to 180°C/fan oven 160°C/350°F/Gas mark 4.

Line the base of a 20cm springform deep baking tin with baking paper.

Start by making the sponge: Beat together the butter, sugar and vanilla until light and fluffy. Don’t skimp on this stage as this is when you get lots of lovely air into your sponge.

Beat in the eggs gradually, add some of the flour if it looks like it might curdle.

Beat in the milk.

Stir in the flour until the mixture is smooth and well combined.

Spoon into the prepared tins and level the surface.

Bake for approximately 30 minutes or until a skewer inserted into the centre of the sponge comes out clean. Another good sign is if the sponge is just pulling away from the edge of the tin.

Leave to cool in the tin for about 20 minutes before turning out and leaving to cool completely on a wire rack.

You can make the sponge the day before the panna cotta. In fact, this is a good idea as it gives time for the sponge to firm up.

Cut a slice, about 2cm thick off the base of the sponge - this will be the bottom to your finished cake.

Line the springform tin you baked the cake in with clingfilm, then wrap the outside in foil. This is so no panna cotta can escape while it’s setting.

Sit the disc of sponge in the bottom of the lined tin.

Level the sponge by slicing the top off. This off cut will not be used in the cake so either eat, or use for a trifle base etc.

You will now have the middle disc of sponge. Cut a circle out of this, careful not to damage the sides. The size of the circle you cut out will determine how much panna cotta you can fill the sponge with – I aimed to leave an edge of approx 1.5cm thickness.

Sit the “O” shaped outer piece in the lined tin above the base sponge. You now have your ‘sponge bowl’ to fill with panna cotta. You can build a second tier by cutting another ring out of the remaining sponge – it is soft enough to mould to the curve of the tin.

Now make the panna cotta: Soak the gelatine leaves in a bowl of cold water until they are soft.

Place the milk, cream, vanilla pod, vanilla seeds and sugar in a saucepan and bring to a simmer.

Discard the vanilla pod.

Squeeze as much water as you can out of the gelatine leaves and whisk into the creamy mixture. It will dissolve pretty quickly but make sure you’ve thoroughly whisked it in as you don’t want lumps.

Ladle the mixture into your sponge bowl and press a sheet of clingfilm onto the surface of each – this stops a skin forming. If the sponge comes up above the height of the tin (mine did, as I had a double tier of sponge) ensure that you only fill up the top of the tin – not the sponge.

If you have any panna cotta left over, spoon it into ramekins and eat these as dessert! I had enough left over for four full ramekins.

Leave to cool before refrigerating for at least a couple of hours (overnight is best).

When ready to serve decorate with whipped cream and fruit.

Bask in the glory of the wonderful thing you have made.

Eat.


Saturday, 2 January 2010

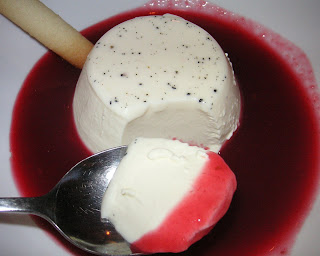
Vanilla panna cotta with raspberry sauce


The CCD (Caked Crusader’s Da) isn’t really a huge dessert fan so when he requested this for Christmas dessert I knew he must have fallen for it in a big way – and I can understand why. He struggles with overly sweet things and panna cotta manages to be satisfying and rich and creamy but with hardly any sugar at all.

This recipe made the silkiest, smoothest most divine panna cotta I’ve ever tasted...and I’ve tasted plenty! Very easy to make – much easier than say, a crème brulee but very impressive when served.

Here they are just made, about to set. The vanilla seeds look so pretty:

The one thing I’d say about this recipe is that – for my tastes – there was far too much raspberry sauce; you can probably see that from the photos. I’m setting the recipe out as I made it but next time I make this (oh yes, there will be many ‘next times’!) I’d halve the raspberry sauce amount. It does need the raspberry sauce but I served far too much – it needs just a little swoosh on the plate, like you get in restaurants.

One other thing – the recipe said to serve with a sprig of mint...I think you know my view about that!

Ingredients

For the panna cotta:
3 gelatine leaves
250ml milk (anything but skimmed – does that even contain milk?)
250ml double cream
1 vanilla pod, cut open and seeds scraped out
25g caster sugar

For the raspberry sauce:
175g caster sugar
175ml water
350g raspberries

Method

- Soak the gelatine leaves in a bowl of cold water until they are soft.

- Place the milk, cream, vanilla pod, vanilla seeds and sugar in a saucepan and bring to a simmer.

- Discard the vanilla pod.

- Squeeze as much water as you can out of the gelatine leaves and whisk into the creamy mixture. It will dissolve pretty quickly but make sure you’ve thoroughly whisked it in as you don’t want lumps.

- Ladle the mixture into your ramekins (4 large or 6 small) and press a sheet of clingfilm onto the surface of each – this stops a skin forming.

- Leave to cool before refrigerating for at least a couple of hours (overnight is best).

- For the sauce, place the sugar and water into a pan and bring to the boil.

- Reduce the heat and simmer until the sugar has dissolved. You can tell this by dipping a spoon into the liquid and then checking the back of the spoon for crystals; there shouldn’t be any.

- Take the pan from the heat and add the raspberries. Using a hand blender pulp the raspberries until you have a sauce.

- Sieve the sauce to remove the raspberry pips.

- Refrigerate until required.

- To serve turn the panna cotta out into a bowl or onto a plate. I found the easiest way to turn them out was to rapidly shake the ramekins from side to side.

- Spoon the raspberry sauce around the panna cotta and serve.

- Bask in the glory of the wonderful thing you have made.

- Eat.