Showing posts with label toffee. Show all posts

Sunday, 10 June 2012

Toffee topped banana and brazil nut cake


This cake is massive!  When I spooned the batter into the tin it filled it to the brim and I had a horrible feeling that one of my tasks that afternoon would be scraping cake from the bottom of the oven!  But it didn’t overspill – I think that’s due to the long, slow cooking time.


It’s the only large cake I’ve made that has a muffin top to it!  The cake came up well above the height of the tin.


I don’t make a lot of banana cakes as a large percentage of my family won’t eat them; however, when I saw this beauty selfishness took over and I knew we had to become better acquainted.  I’m not sure if it was the toffee covered nut topping or the fact that it just sounded so great from the ingredient list.  Whatever the reason, we’ve had a very successful first date and are now going steady!


I cut the nuts finer for the cake than I did on the top.  I don’t mind chunky nuts on top of a cake where they can be seen, but when hidden in sponge a large nut can be a nasty surprise for delicate teeth.


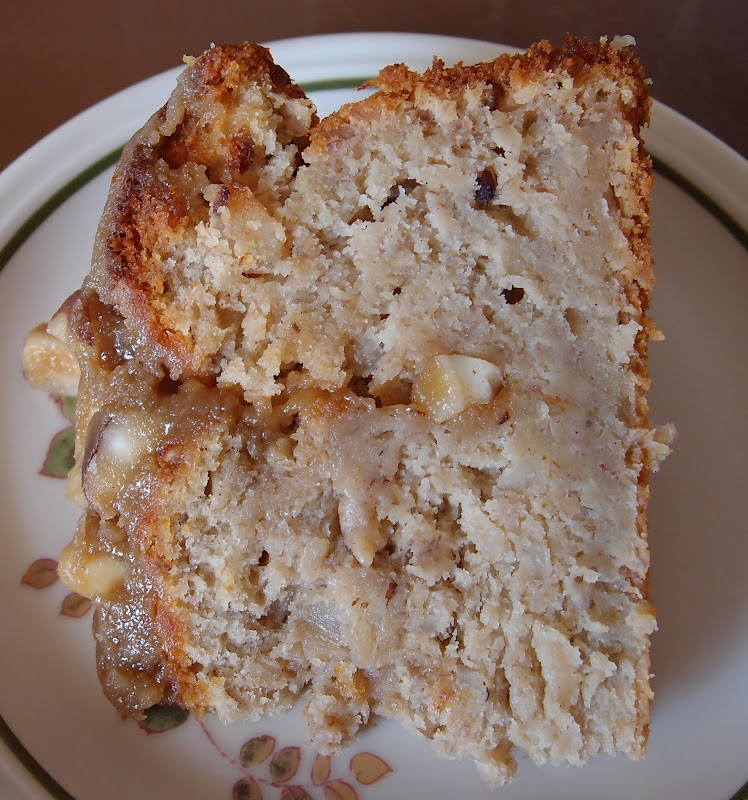
This cake keeps for days getting better and better – so no need to panic about how huge it is – and is lovely for breakfast, an accompaniment for your mid-morning or mid-afternoon tea, and, if you cut a large enough slice, will do very nicely as a meal in itself!  This next photo show why it’s worth piercing the cake with a skewer before pouring on the toffee topping – look at how it’s oozed into the cake:


Ingredients

For the cake:

175g unsalted butter, at room temperature
175g light brown sugar
4 eggs
125g brazil nuts – chopped quite small
3 large bananas – peeled and mashed
½ teaspoon mixed spice
350g self raising flour
1 teaspoon baking powder
300ml plain Greek yoghurt
1 tablespoon runny honey

For the topping:

75g unsalted butter
175g light brown sugar
2 tablespoon double cream
75g brazil nuts – roughly chopped

To serve: thick cream


Method

Preheat the oven to 180°C/ fan oven 160°C/ 350°F/gas mark 4.

Line a 20cm round springform tin with baking paper.

Beat together the butter and sugar until light and fluffy.

Beat in the eggs, gradually.  The mix might start to curdle a little on the fourth egg but that’s fine.

Stir in the brazil nuts and spice.

Mash the bananas and stir into the mix.  I find the most efficient mashing technique is to use my potato ricer.

Stir in the flour and baking powder.

Stir in the yoghurt and honey.

Spoon into the prepared tin and don’t panic – the tin will be full to the brim!

Bake for approximately 1 hour 20 minutes (mine took exactly this time) or until a skewer inserted into the cake comes out clean.

Leave to cool in the tin until you can safely remove the tin.  Then leave to cool completely on a wire rack.

Pierce the cake with a skewer.

Now make the topping: Place the butter, sugar and cream in a pan and gently melt together.
Bring to simmering point and stir well.

Remove from the heat and stir in the chopped nuts.

Pour the mixture over the cake letting it drizzle a little down the sides.

You can if you wish put the whole cake under the grill for 1- minutes to toast the nut topping but I didn’t bother as my grill is erratic and I didn’t want to risk burning the cake.

Serve the cake with thick cream.

Bask in the glory of the wonderful thing you have created.

Eat.

Sunday, 13 June 2010

Caramel apple loaf cake


I don’t make that many loaf cakes which is a shame as they have to be the easiest cakes to portion (I think I’ve mentioned my cake-cutting phobia in the past)!
They also have a rustic look to them that I find inviting.


This week’s cake muse was the CCD who chose the ingredient of “apples”.
I love a good apple cake and picked this recipe as I was intrigued by the caramel topping . Here’s a close up of the topping oozing over the top of the cake:


Having said above that, in theory, loaf cakes are easier to cut, this one was a terror. It was crumbly and soft but I forgive it as it made it divine to eat!


I am very disappointed by the sweet eating habits of society these days. Where I live there are two large supermarkets, a well stocked newsagent and an off licence - not one of them sold toffees, which are needed to make the topping for this cake. What’s wrong with people? Why have they fallen out of love with the humble toffee? Are people too lazy to chew? Luckily, Mr CC found a bag for me further afield - cake crisis averted!


We all loved this cake; it delivers a lot flavourwise. The almost-bitter walnuts cut through the sweetness of the caramel topping and the juicy pockets of apple work nicely with the crumbly light sponge. The sponge contains yoghurt and is therefore extremely soft and light. Here are the cakes when baked (i.e. pre topping):


Add some sinful topping:


The recipe set out below makes one loaf cake; I doubled it to make two.

Ingredients

For the cake:

175g unsalted butter, at room temperature
175g golden caster sugar
1 teaspoon vanilla extract
2 eggs
225g self raising flour
½ teaspoon ground cinnamon
4 rounded tablespoons Greek yoghurt
2 eating apples, peeled, cored and diced – I chose Cox’s, as they are small I used 2 ½
50g walnuts – roughly chopped

For the topping:

50g soft toffees (I used Werther’s chewy toffees)
2 tablespoons double cream
handful of walnuts – chopped

Method

Preheat oven to 160˚C/fan oven 140˚C/320˚F/Gas mark 3.

Line a 900g loaf tin (2lb in old money!) with baking paper.

Beat together the butter, sugar and vanilla until it is pale and smooth.

Beat in the eggs one at a time.

Stir in the flour, cinnamon and yoghurt.

Add the chopped apples and stir just enough to combine.

Spoon into the prepared tin and level the surface.

Scatter the walnuts over the top – I kept them centralised, like a walnut Mohican.

Bake for approximately 1 hour 20 minutes or until a skewer inserted into the loaf comes out clean.

Place the loaf, still in the tin, on a wire cooling rack.

Now make the topping: place the toffees and cream in a saucepan and gently heat until they melt and combine – stir the whole time (this is very important as the mixture will burn quickly if left unattended)

Leave to cool a little, about 3 minutes or so.

Turn the cake out of the tin and gently pour the topping over the top.

Scatter the extra walnuts on top – they will stick to the toffee.

This cake will keep in an airtight container for 3 days.

Bask in the glory of the wonderful thing you have created.

Eat.

Sunday, 20 December 2009

Sticky toffee cake


One of THE foods of Christmas must be the humble date. Big fat juicy medjool dates with the texture of fruit but the taste of toffee – heaven!

I have made a couple of versions of sticky toffee pudding but this is a sticky toffee cake. The difference is that instead of toffee sauce you have toffee buttercream. This is a seasonal cake without being obviously so – a nice option for those who are fed up with fruit cakes and mince pies.

The smell of the dates when you boil them is gorgeous. I made the cake on a freezing cold snowy day but inside my home it was paradise! Here’s the dates when they’ve broken down in boiling water:

Look what happens when you add the bicarbonate of soda – it’s alchemy!

What surprised me most about this cake, was the texture. It was light and spongy – just like carrot cake, but the flavour was unmistakably sticky toffee. It’s quite one of my favourite cakes that I’ve made recently.


Ingredients

For the cake:
225g stoned dates (I used Medjool)
300ml water
1 teaspoon bicarbonate of soda
115g unsalted butter, at room temperature
175g soft light brown sugar
2 eggs
1 teaspoon vanilla extract
175g self raising flour

For the toffee icing:
90ml (6 tablespoons) double cream
80g soft light brown sugar
25g unsalted butter
25g golden icing sugar

Optional decoration: toffee nuggets

Method

- Preheat the oven to 180°C/fan oven 160°C/350°F/Gas mark 4.

- Line a 20cm square loose bottomed tin with greaseproof paper.

- Using scissors (I find this the least messy way) snip the dates into pieces – about the size of a small grape.

- Place the dates and the water in a saucepan. Pick a large saucepan because the mix will bubble up considerably when you stir in the bicarbonate of soda.

- Bring the dates and water to the boil and then boil, uncovered for 10 minutes.

- Remove from the heat and stir in the bicarbonate of soda.

- Leave to cool.

- Cream together the butter and sugar until smooth, pale and airy. Don’t skimp on this stage.

- Beat in the eggs and vanilla extract.

- Fold in the flour and the dates.

- Spoon into the prepared baking tin and level the surface.

- Bake for approximately 35 minutes or until a skewer inserted into the centre of the cake comes out virtually clean – it won’t be perfectly clean because of the gooey dates.

- Check the cake 10 minutes from the end to ensure that the top is not burning – the dates can catch. If necessary, cover the cake with foil for the last 10 minutes.

- Leave to cool in the tin until you can comfortably handle the tin and turn the cake out. Leave to cool completely on a wire rack.

- For the icing heat the cream, brown sugar and butter over a gentle heat until the sugar dissolves i.e. you cannot see the granules on the back of the spoon.

- Bring to the boil and cook, uncovered, for 4 minutes until it turns golden. Do not stir. If the mixture darkens too quickly simply remove it from the heat before the 4 minutes is up.

- Leave to cool.

- Beat the icing sugar into the icing until smooth.

- Spread over the top of the cake – you might find this easier with a wetted palette knife.

- Decorate as required.

- Bask in the glory of the wonderful thing you have made.

- Eat.

Sunday, 21 June 2009

Toffee apple and almond tart


Today is Father’s Day so my baking took on a CCD-friendly (Caked Crusader’s Da) twist. The CCD likes toffee, apples and, unsurprisingly, toffee apples so this tart looked a winner for him. I adapted the recipe from one of Richard Corrigan's so knew it would be good!


None of the stages of this recipe are difficult but there are a lot of stages so make sure you have enough time to make it. The pastry is buttery and delicious. I thought it was going to be tricky to work with as it was a sticky dough but it was incredibly well-behaved; it didn’t tear at all. Look at the buttery colour of it:


The bed of almond sponge puffs up around the apples when it cooks and takes on the juicy flavour of the dulce de leche. It really is a treat for the tastebuds. I think this tart was professional standard – you’d be delighted to get this in any restaurant or patisserie.


I used apples from the fruit and veg box kindly provided by Abel & Cole. As these were sweet red apples, I mixed them with some Granny Smith’s to increase the tartness of the apples.


As always I like to provide serving suggestions.....


....and a ‘spoon shot’:


Ingredients:
For the pastry:
250g plain flour
125g unsalted butter, straight from the fridge and cubed
50g caster sugar
2 eggs

For the almond cream:
100g unsalted butter
100g caster sugar
2 eggs
100g ground almonds
25g plain flour

For the apple layer:
4 dessert apples, peeled and cut into slices (I cut each apple into 8 wedges)
1 tablespoon caster sugar
4 tablespoons dulce de leche

For the topping:
35g unsalted butter
15g plain flour
65g Demerara sugar
25g ground almonds
Handful of flaked almonds

To serve: custard or thick spooning cream


How to make:
- Start by making the pastry. Place the flour, butter and sugar into a food processor and blitz until you have breadcrumbs. (You can do this by hand with the old rubbing the butter into the flour method)
- Add the eggs and blitz again.
- Tip out onto a sheet of clingfilm and, with a little extra flour if necessary, bring the mixture into a dough.
- Wrap in clingfilm and chill for at least 30 minutes.
- Preheat the oven to 150°C/fan oven 130°C/300°F/Gas mark 2.
- Roll out the pastry between two sheets of clingfilm until it is large enough to line a 25cm loose bottomed flan tin. There is no need to grease the tin as the pastry is so buttery. I found the pastry behave really well and there was no tearing thus no patching needed. Leave any surplus pastry hanging over the edge
- Line the pastry with a sheet of baking paper and fill with baking beans and bake blind in the oven for 45 minutes. This sounds a long time but the light is very low so the pastry won’t burn.
- Remove the paper and beans and, when cool enough to touch, trim away the excess pastry.
- Increase the oven to 180°C/fan oven 160°C/350°F/Gas mark 4.
- Now make the almond cream: cream together the butter and sugar until pale and fluffy. Beat in the eggs, then the ground almonds then the flour. Put to one side.
- Now cook the apples. Place the apple wedges in a pan and cook over a high heat so that they soften and release some juice.
- Add the sugar and ensure that the apples are all coated. They will start to caramelise.
- When the apples are soft and golden, but not falling apart, remove the pan from the heat and leave to cool a little.
- Now make the topping: rub the butter into the flour until you have breadcrumbs.
- Stir in the sugar and almonds.
- When the apples are cooled stir in the dulce de leche.
- Now assemble the tart for final baking. Spread the almond cream into the pastry case. It will look like there is too much but, with careful spreading it will easily fit.
- Arrange the apples on top making sure you scrape all the lovely dulce de leche out of the pan as well.
- Sprinkle the topping over the apples along with a handful of flaked almonds.
- Bake in the oven for 30-40 minutes, making sure the topping doesn’t burn. Mine took just over 40 minutes.
- Serve either warm with custard or at room temperature with cream.
- Bask in glory at the wonderful thing you have made.
- Eat.

Sunday, 19 April 2009

Individual sticky toffee puddings

Whenever there are polls in magazines or on TV shows to find Britain’s favourite dessert you can always bet that sticky toffee pudding will nab a place on the podium. As it should– it’s divine!


A lot of people don’t seem to realise that what gives the pudding its luxuriant, rich toffee flavour is the humble date. But if you eat a date and really concentrate on the flavour it suddenly seems obvious! Dates are just like toffee but, as they're fruit, you can pretend they're healthy.

This recipe is particularly nice as you can make the puddings and sauce a couple of days in advance and leave the puddings to steep in the thick creamy sauce. The puddings are luscious and airy and I’m certain, that if they could talk, they would sweetly call “eeeeeeaaaatttt meeeeeeeeee”.


I’ve made this recipe before and posted it on my site but in the very early days when my readership comprised of family and a couple of friends. You can find the recipe by clicking here.

Would it be naughty to confess that I have had one of these puddings each day over the weekend?

Sunday, 11 January 2009

Sticky toffee pudding


I have made individual sticky toffee puddings before but this is a larger version and the sauce recipe is quite different.


There seems to be something about Christmas-time in Britain that makes everyone wildly over-estimate the amount of dates their guests will wish to eat. Most of us can happily get through the year without thinking much, if at all, about eating dates but, come December we’re buying boxes of the things as if Christmas would be ruined without them. I can hear the CCM (Caked Crusader’s Ma) bristling whilst reading this so I’d better confess – it was me who grossly over-bought dates this year. But who could blame me - aren’t they beautiful?


This was my thought process: it’s colder than Antarctica in England this week and I need to get rid of lots of dates. Voila! Sticky toffee pudding. If there was ever a better reason to stock pile dates I’m interested to hear it!

Here’s the cake fresh from the oven:


I can’t even try to argue any health benefits on this one; it’s as sinful as pudding can be. The sweet, light sponge is dotted with dates, releasing their beautiful toffee flavour in every mouthful. Add to that the thick, creamy sauce stoked up with brown sugar and black treacle and it’s an assault on the taste buds! Yum.

A piece of cake....


...only truly becomes sticky toffee pudding once the sauce is added:


Ingredients:
For the cake:
175g stoned and chopped dates (I used Medjool)
300ml water
1 teaspoon bicarbonate of soda
50g unsalted butter
175g caster sugar
2 teaspoons vanilla extract
2 eggs
175g self raising flour

For the sauce:
300ml double cream
50g Demerara sugar
2 heaped teaspoons black treacle


How to make:

- Preheat oven to 180°C/fan oven 160°C/350°F/ Gas mark 4
- Grease a 22cm square tin.
- Boil the dates in the water for 5 minutes until the dates are soft. Make sure you use a large saucepan – larger than you think you need.
- Stir in the bicarbonate of soda. It will bubble up a lot, hence the need for a large saucepan. Put to one side until needed.
- Cream together the butter and sugar until well combined. It won’t become light and fluffy because the sugar far outweighs the butter.
- Beat in the vanilla extract.
- Beat in the eggs one at a time.
- Stir in the flour.
- Pour in the contents of the saucepan i.e. dates AND liquid.
- Stir until well combined. The batter will be very runny so don’t panic.
- Pour into the prepared tin and bake for 35-40 minutes or until a skewer inserted into the centre of the sponge comes out cleanly.
- Leave to cool on a wire rack.
- Now make the sauce: put all the ingredients into a saucepan and stir, over a low heat, until smooth.
- Bring to the boil.
- Cut the sponge into squares and ladle the sauce over the top. Serve with either ice cream (my favourite) or custard.
- You can make both the sponge and the sauce in advance and re-heat when required. I re-heated the sponge, still in the tin, in a fan oven temperature of 130°C . The sauce can be re-heated in a saucepan on the hob – simply stir until smooth and then bring to the boil.
- Bask in glory at the wonderful thing you have made.
- Eat.

Sunday, 7 September 2008

Toffee apple cake

What grabbed my attention with this cake was that the toffee apple topping was on both sponges, not just the top layer. The apples bake in brown sugar as the cake cooks and you end up with caramelised apples not dissimilar to tarte tatin but with absolutely none of the faff!

Here are the apples in the tins before being topped with cake batter:


These shots shows the ‘tarte tatin’ look of the cake:


I think that sponge, apple and cream is a marriage made in heaven and it shows that – British Royal family aside - three in a marriage can sometimes work. But I digress...

The toffee oozes into the sponge and is sticky, sweet and scrummy. You may also notice that I don't believe in skimping on the filling:


The recipe said to sandwich the layers with whipped double cream. I’m sure that would be divine, but I tweaked it slightly and added some good quality fresh custard. I use custard cream a lot for accompanying cakes – basically it’s whipped cream with spoonfuls of custard beaten in to it.


This cake defines “squidgy”. When you cut slices the cream gently oozes out at the edges


One tip – when the cakes are baking, some of the brown sugar leaks out of the tin (if you use a loose bottomed tin). Stand the tins on a baking sheet to stop this making a mess.

Note to optimistic work colleagues: you won’t be seeing this cake tomorrow. Sorry.

Ingredients:
For the cakes:
3 small eating apples (I used Pink Lady)
6 tablespoons dark brown sugar
175g unsalted butter
175g caster sugar
3 eggs
175g self raising flour

For the filling (and also serving cream):
600ml double cream
500ml fresh custard
Dash of vanilla extract

For the topping:
2 tablespoons icing sugar
1 teaspoon ground cinnamon

How to make:

- Preheat the oven to 180°C/fan oven 160°C/350°F/Gas mark 4.
- Line the bases of two 20cm sandwich tins with baking paper.
- Peel and core the apples then slice them thinly. Toss them in the brown sugar until well covered.
- Arrange the apple slices in the base of each tin.
- Now make the sponge: Cream together the butter and sugar until pale and fluffy.
- Beat in the eggs one at a time, adding some of the flour if the mix starts to curdle.
- Beat in the remaining flour.
- Divide the batter between the two tins and spread carefully so as not to disturb the apple slices. Level the surfaces.
- Bake for 30-35 minutes or until a skewer comes out cleanly. Mine took 37 minutes.
- Place the tins on a wire rack and leave to cool before turning out of tins. If you turn the cakes out too soon the toffee apple won’t be set and could slide off the top of the cakes!
- Lightly whip the cream then gradually add spoonfuls of custard. This is not an exact science – add as much as you think the cream can hold without turning runny. It’s not difficult though and there’s no need to be frightened!
- Sandwich the cakes together with as much of the custard cream as you think necessary. Put the rest in a bowl for people to help themselves when you serve the cake.
- Mix together the icing sugar and cinnamon and sprinkle over the top of the cake.
- Bask in glory at the wonderful thing you have made.
- Eat.

Sunday, 11 November 2007

Sticky Toffee Puddings

Having recently enjoyed a work trip to the Middle East I pondered what I could make to reflect the sights I had seen – how to capture the essence of my travels. If you have been to the Middle East you will very quickly pick up two themes on which a lot of the tourism and merchandise is focused – camels and dates. I didn’t fancy using any camel products – whilst out there I tried the camel’s milk rice pudding and can vow that it will never pass my lips again. Strange that the milk can actually taste camel-y.

So that left dates. And what better use of a date than sticky toffee pudding? Here is my packet of the plumpest, juiciest, biggest dates I have ever seen. These are from the Kingdom of Saudi Arabia but all the Emirates also seem to produce dates – I bought quite a selection.


Without a doubt, these are the biggest, most succulent dates I have ever had the good fortune to come across. Look at the size of them (missus!):


Sticky toffee pudding, to me, is up there as one of the greatest comfort foods; what I love about this recipe is that you get the sweetness but the little puddings are not stodgy – quite the opposite in fact. I think this is because they are baked rather than steamed.

The batter is lumpy and loose and that’s how it should be! Don’t panic.


While these can be made and served straight away, they are much better if left to stand for 1-2 days as they soak up the sauce and seem to get even more squidgy. There is no need to refrigerate them while they are maturing, covering the dish with foil is adequate.


I like to serve them warm with ice cream but purists may prefer custard. I defy you to eat one without smiling! And try not to think about the calories......


This photo captures the light spongy texture:


Ingredients:
For the puddings:
225g stoned dates
175ml boiling water
1 teaspoon vanilla extract
175g self raising flour
1 teaspoon bicarbonate of soda
2 eggs, beaten
85g unsalted butter
140g Demerara sugar
2 tablespoons black treacle
100ml milk (whole or semi-skimmed)

Custard or ice cream to serve

For the toffee sauce:
175g light brown sugar
50g unsalted butter
225ml double cream
1 tablespoon black treacle

How to make:

- Chop the dates quite small and put them into a heatproof bowl. Pour over boiling water and leave to stand for 30 minutes until cool and soft. Mash lightly with a fork (leave some lumps as this gives a nice texture to the finished puds) and add the vanilla.
- Preheat oven to 180°C/fan oven 160°C/Gas mark 4 and grease 7 mini pudding tins. They should have a capacity of approx 200ml. Sit them on a baking sheet.
- Cream the butter and sugar together until well combined. Because the sugar is gritty you won’t be able to get the mixture smooth.
- Add the beaten egg gradually beating well between additions.
- Beat in the black treacle.
- Weigh out the flour and add the bicarbonate of soda to it.
- Measure out the milk.
- Using a metal spoon fold about a third of the flour into the butter and egg mix. Then fold in a third of the milk. Then a third of the flour etc until all the flour and milk has been added.
- Stir in the soaked dates, including any liquid in the bowl. The mixture will now be soft and lumpy.
- Spoon it into the pudding tins and bake for approximately 25 minutes or until a skewer comes out clean. Allow to cool in the tins as, initially, the puddings are very soft and will tear if you try to handle them at this stage.
- Meanwhile, make the sauce. Put the sugar, butter and 125ml of the cream into a saucepan and bring to the boil over a medium heat, stirring all the time, until the sugar has dissolved. If you see grains on the back of the spoon the sugar has not dissolved.
- Stir in the black treacle and turn the heat up slightly. Let the sauce bubble for three minutes stirring occasionally to ensure nothing is sticking or burning. Take care as the sauce is very hot – it won’t spit or do anything nasty but you could hurt yourself if careless.
- Take the pan off the heat and stir in the remaining 100ml of cream.
- You can now assemble the puddings and sauce and serve now if you wish, but I recommend letting them mature for a couple of days.
- Pour half the sauce into a deep ovenproof dish, then stand the turned-out puddings on the sauce. I invert them for stability and look.
- Pour the rest of the sauce over the puddings and loosely cover the dish with foil. You don’t have to refrigerate them.
- When ready to use, warm the puddings in the oven 180°C/fan oven 160°C/Gas mark 4 for 15-20 minutes or until the sauce bubbles. To keep them moist when re-heating, keep the dish covered with foil.
- Serve with ice cream, custard or cream.
- Bask in glory at the wonderful thing you have made.
- Eat.

