Showing posts with label history corner. Show all posts

Sunday, 24 June 2012

History corner – brown cake and patriotic biscuits


Time for a delve into history corner and, for this visit, I’m baking from “Isobel’s Home Cookery” from 1916.  Isobel’s Home Cookery was a monthly publication and, at the end of the year, a bound volume was produced, which is what I have.


1916 was slap bang in the middle of World War 1 and, while Britain didn’t have rationing until the very end of the war, care was taken to avoid waste and flamboyance in recipes.


I chose brown cake because it seemed such an unglamorous name for what is effectively a chocolate sponge sandwich.  Unusually, the recipe requires you to make chocolate milk and this provides not only the flavour, but also most of the moisture as the recipe uses only one egg.  For a modern version of this cake I would expect three eggs.


The cake rather divided my eatership –some finding it too dense and cloying in texture.  Interestingly, they don’t like brownies either for the same reason.  I do like brownies and think that this cake is similar to a squidgy brownie...which is no bad thing, but don’t make it expecting a light crumbly sponge.


The icing is particularly austere in that it contains cocoa, sugar and water.  No buttercream here!  Surprisingly, it tastes very good and rich – a cocoa hit for the chocolate lovers out there.


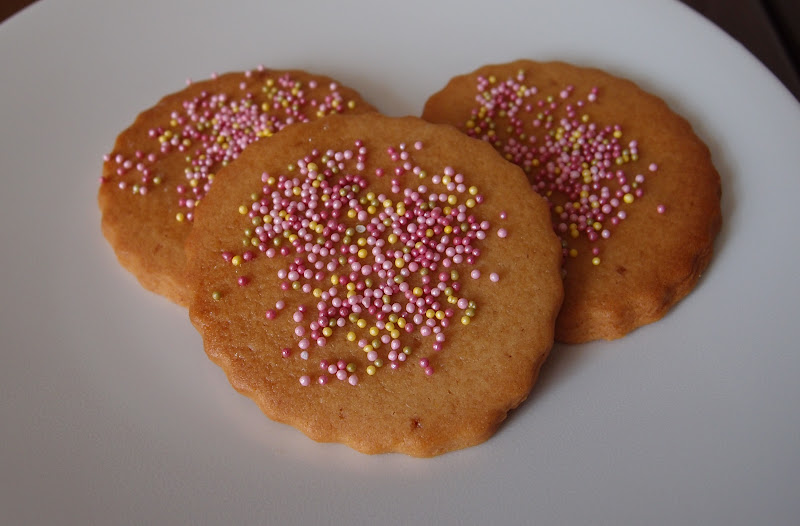
The patriotic biscuits are a light gingerbread which manages to be crunchy and chewy at the same time.  The only patriotic element seems to be using red, white and blue sprinkles but, as I didn’t have any, I opted for pastel shades.


What I love about old recipe books is the insight they give you into ordinary people’s lives and views; the hot issues and health scares of the day.  Here are some of my favourite examples:


I had never considered that the piece of cheddar lurking in my fridge was plotting to do me harm!


In an age where we’re bombarded with statistics on childhood obesity and TV chefs are launching crusades about poor school lunches, I find it refreshing (and a tiny bit comforting, if I’m honest) that there was an age when mothers were advised to give their children sugar, especially in cake form.


This is less than 100 years ago but look at how old age is portrayed.  I’d love to know how old the lady was in this photo and then compare her to women of her age nowadays – I think we’d be shocked.


This is one of my favourites.  March is the month when youngsters are apt to get ‘out of sorts’.  I’m sure with this Mrs Danvers-esque woman bringing them trays they’ll be motivated to get well and out of her clutches in no time!


While most of the book focuses on running the home and looking after the family, some sections are rather more poignant, like this one about husbands coming home from the front.  Wives are recommended to give their husband food they wouldn’t get in the trenches and pastry is suggested as an achievable luxury.


There is a section on cakes and biscuits you can always have on hand so that you can offer unexpected visitors something a little more exciting than bread and butter.  What I love is the dress the lady is wearing.  If I have unexpected visitors (which I don’t because anyone who knows me knows better than to turn up unannounced!) they will find me in slippers, jogging bottoms and a t-shirt.  This lady looks rather more groomed!


This boy is pale and thin because he has the same kind of sandwiches every day!  Not fair.  I had ham sandwiches practically every day at school – how come the affliction of thinness passed me by?  I think I will stick with ham sandwiches rather than the suggested raisin and nut sandwiches.  What next – ham flapjacks?


I end on a note of caution and advice – feed up when you feel run down.  Be safe out there people......


Ingredients for the brown cake

For the cake:

285ml / ½ pint milk
45g / 1 ½ oz cocoa, mixed with enough cold water to make it into thin cream – I added 8 tablespoons
115g / 4oz unsalted butter, at room temperature
170g / 6oz brown sugar
1 egg
½ teaspoon vanilla extract
340g / 12oz self raising flour

For the icing:

Equal quantities of cocoa and icing sugar – I used 8 tablespoons of each
Enough boiling water to make a glossy icing

Method for the brown cake

Preheat the oven to 180°C/fan oven 160°C/350°F/gas mark 4.

Line two 20cm round loose bottomed sandwich tins with baking paper.

Place the milk in a small saucepan and bring the milk to the boil.

While the milk is heating, mix together the cocoa with enough cold water to make it the consistency of thin cream.  I found this to take 8 tablespoons.

When the milk boils, remove from the heat and stir in the cocoa.

Put to one side to cool.

In a mixing bowl beat together the butter and sugar until smooth and well combined.

Beat in the egg and vanilla.

Stir in half the flour along with half the cocoa milk.

Repeat with the remainder.  Don’t worry – the batter will be runny.

Ladle the batter into the two prepare tins.

Bake for 20-25 minutes or until a skewer inserted into the cakes comes out clean.

Place the tins on a wire rack to cool and de-tin the cakes as soon as you can safely handle the tins.

Leave the sponges to cool completely before storing in an airtight container.

Now make the icing: Place an equal quantity of cocoa and icing sugar into a bowl – I used 8 tablespoons of each as I only planned to sandwich the cakes, not decorate the top.

Add boiling water, a teaspoon at a time, and beat into the dry ingredients.

Keep adding tiny amounts of boiling water – the icing should be glossy and thick.  Adding too much water will make it dull. (Mine took 9 teaspoons in the end)

Place one sponge on a serving plate and spread the icing over the top.

Place the other sponge on top.

Bask in the glory of the wonderful thing you have created.

Eat.


Ingredients for the patriotic biscuits

57g / 2oz unsalted butter, at room temperature
170g / 6oz plain flour
1 teaspoon ground ginger
57g / 2oz light brown sugar – the recipe called for ‘moist sugar’ which I think is dark brown sugar i.e. sticky and treacly
115g / ¼ lb golden syrup
To decorate: 1 egg white and hundreds and thousands (ideally red, white and blue)

Method for the patriotic biscuits

Preheat the oven to 200°C/fan oven 180°C/400°F/gas mark 6.

Line two baking sheets with baking paper or non stick foil.

Beat the butter until it is soft and creamy.

Add the flour and beat until the mixture resembles breadcrumbs.

Stir in the ginger and sugar.

Stir in the golden syrup and bring the mixture into a firm, moist dough.

Roll out between two sheets of clingfilm and aim for a thickness of approx 0.5cm.

Using a 7cm round cutter I got 18 biscuits.  The dough re-rolls easily but when rolled out the golden syrup starts to rise to the surface so work quickly.

Place the biscuits on the prepared sheet (they don’t spread that much) and bake for 10 minutes or until a darker golden colour.

Leave to cool for 5 minutes when out of the oven.

Brush with beaten egg white and sprinkle with hundreds and thousands.

Bask in the glory of the wonderful thing you have created.

Eat.

Sunday, 4 December 2011

History Corner - Coconut and almond cake


I am well aware of the old adage, “you can’t judge a book by its cover”, but I completely disregard it when considering the purchase of a vintage cookbook. The cover for “Home Cookery illustrated” is so fab I wouldn’t have cared if the book was just blank pages. Except for the child with the red horns at the front, this picture could be a portrait of Mr CC and me when I’m preparing dinner. I still can’t work out the husband’s expression; is it one of delight, horror or surprise at what’s in the pan?


There is no date anywhere in the book but online resources place it in the region of 1955-57. I like the subtitle of “A practical guide for the beginner and the experienced housewife” and wonder what purpose it serves, why not just “a practical guide for housewives”?


Published in the 1950s this book highlights that Britain, even post rationing, was still an austere place. The introduction to the book, which covers buying, preparing and cooking food stresses:
“Nowadays it is more a question of making the most of what is available than choosing what we prefer.” It goes on to suggest it is the housewife’s duty to ensure that shops sell all their stock: “Whenever you see a plentiful supply of any kind of perishable food, buy that in preference to goods that will keep. If the shopkeepers do not sell that food it may mean that it may have to be wasted. Help avoid that by buying.”


I chose this recipe because I am a fiend for coconut, plus I loved the inclusion of ratafia essence in the ingredients list. I’d heard of ratafia biscuits but not essence; some hunting around online told me that ratafia essence is made from peach, almond and apricot kernels and is no longer available. The closest modern substitute is good quality almond extract as that contains ground up bitter almond kernels – so that’s what I used!


This is a versatile cake – you can have it, as we did today, plain with a cup of tea, but Mr CC was mooting adding some jam to it. Tomorrow night I’m going to warm two slices and serve as dessert with custard.


Coconut and almond is a lovely combination and this flavoursome, light, cumbly sponge is a worthy teatime treat in any era – austerity or otherwise! It is a plain cake...but in a good way! The coconut is the dominant flavour with a hint of almond coming through at the end. The one aspect of austerity cooking I couldn’t let lie was the meagre quantities; my quantities below are double those of the book.


Ingredients

230g / 8oz unsalted butter, at room temperature
170g / 6oz caster sugar
2 eggs
1 teaspoon almond extract (or ratafia essence – but good luck finding it!)
340g / 12oz self raising flour
115g / 4oz desiccated coconut
6 tablespoons milk

Method

Preheat oven to 180°C/fan oven 160°C/350°F/gas mark 4

Line a 20cm round springform tin with baking paper.

Beat together the butter and sugar until you have a soft, whippy, pale cream. Don’t be tempted to skimp on this stage as this is where you get the air into the sponge.

Beat in the eggs one at a time, followed by the almond extract.

Beat in the flour.

Beat in the coconut and milk.

Spoon into the prepared baking tin and level the surface.

Bake for approximately 1 hour. It’s done when a skewer, inserted into the centre of the cake, comes out clean. Mine took 1 hour 5 minutes.

Leave to cool, still in the tin, on a wire rack.

Remove from the tin and store in an airtight container.

Bask in the glory of the wonderful thing you have created.

Eat.

Sunday, 9 October 2011

History Corner – Empress cakes


Miss Tuxford’s “Cookery for the Middle Classes” was – despite its rather exclusive title – a big hit. Originally published in 1902, my copy is the 11th edition dating from 1930. That’s quite a lifespan for one cook book.


The subtitles of this book highlight how far food and food preparation has come in a short period of time. The full title is “Cookery for the Middle Classes (including a few vegetarian dishes) and Useful hints on Gas Stove Cooking Including the New Automatic Control”. This book is set in the time when having a temperature control on your oven was cutting edge innovation. There is a section at the back of the book instructing you how to set the oven properly depending on what you’re cooking. Sponge cakes need to be baked at 5E, if you’re interested.


One wonders what Miss Tuxford would’ve done had any of the lower classes dared bake from this book? It seems a crazy thing to limit your market in such a way especially when Miss Tuxford had an entrepreneurial streak. At the back of the book she has a page of items for sale included food essences such as vanilla, and also “useful and inexpensive utensils”, my favourite of which is the “Straining grid for use in deep fat frying or boiling fish and cauliflowers whole (designed by myself)”. A whole boiled cauliflower. Imagine it. Are you imagining it? Well, you don’t have to – here is the least appetising illustration of a cauliflower ever (with a strange looking thumb thrown in for free) :


And a close up:


I chose the Empress Cakes recipe as they were probably a well-known recipe at the time the book was originally published. Queen Victoria died in 1901, only a year before publication. No doubt these little cakes were named in honour of her, as one of her titles was Empress of India.


Lining the pan with nuts wasn’t as fiddly as I thought it might be. The recipe gave no indication as to the amount of nuts to use so I guessed (my guess is in the recipe below) – feel free to use less if this looks too nutty:


The cocoa is delicate; I wouldn’t call these a chocolate sponge, more sponge with a hint of cocoa. The idea of lining the pans with nuts so that they bake into the sponge works surprisingly well and creates a nice look. However, I wasn’t sure which way to serve them – nuts up or nuts down? On this blog post you’ll see a mix of both!


As you’ll notice my cakes came out a touch on the large side – that’s the problem with old recipes; they don’t tell you what size pans to use or guidelines. I know I should’ve trimmed the mushroom top off to make them look daintier but, let’s be honest, the mushroomy top is often the best bit of a cake!


They were also delicious warm with custard – a cake or a pud; what’s not to love? One thing I would say, they definitely dried out a couple of days after baking (tasted lovely though) – still fine to serve as pud with custard, but if you had them with a cup of tea if would be a good idea to add a dollop of cream.


Although Miss Tuxford wrote the preface well over 80 years ago it shows how nothing really every changes. Except for the old fashioned phrasing, this could’ve been written today:

“During recent years the cost of living has greatly increased and many ladies have sought a cookery book giving recipes which, whilst ensuring dainty, wholesome and nourishing dishes, are withal modest in cost.”


Ingredients

½ lb / 227g unsalted butter, plus extra to grease the pans
½ lb / 227g caster sugar
1 tablespoon cocoa powder
4 eggs
¾ lb / 340g plain flour
1 teaspoon vanilla extract
½ teaspoon baking powder
Milk, if needed
Chopped almonds to line the tins – I used a mixture of ground almonds and chopped hazelnuts totalling 120g

Method

Preheat the oven to 150°C/ fan oven 130°C/300°F/ Gas mark 2, or as the recipe calls it – “slow”.

Generously grease a cupcake pan – if you have a deeper, more ‘muffin-y’ pan that will be better. Take a second pan and grease half the holes – the mix will make 18 cakes. I made 12 from mine and they were too big!

Sprinkle the chopped almonds into the pans ensuring that they stick to the bottom and sides. This can be a bit fiddly but is worth the effort.

Place the butter, sugar and cocoa in a bowl and beat together until light and whipped.

Add two of the eggs and beat well.

Add half the flour and stir in.

Add the remaining two eggs and beat well.

Add the remaining flour, along with the vanilla and baking powder and stir well.

If the mix is dry i.e. not a dropping consistency, add a little milk – do this with caution so you don’t add too much.

Carefully spoon into your almond-lined cake pans and level the surface. Fill them more than you would a cupcake case because the low baking temperature means they won’t rise as much. I filled mine to the top because the recipe gave no guidance – I think the ideal would have been somewhere between 1/2 - ¾ full.

Bake for approximately 20 minutes or until a skewer inserted into the cakes comes out clean. Mine took much longer – just over 30 minutes, so don’t worry if yours take longer too!

Leave to cool – in the tins – until cool enough to handle and safely remove. Leave to cool completely on a wire rack.

The cakes will store for several days in an airtight container but note they will dry out – best to have some cream on hand!

Bask in the glory of the wonderful thing you have created.

Eat.

Sunday, 26 June 2011

History corner – Pineapple and walnut cake


Good Housekeeping’s “New Cooking” was published in 1964 and the cover couldn’t scream “1960s” any louder if it tried! It’s hard to believe, but the couple on the cover could be well into their seventies now! The back cover shows their swanky and covetable kitchen/diner. At the time it was probably cutting edge but now looks rather kitsch and retro. I suppose all our kitchens will look that out of date in 50 years’ time!


As soon as I found this gem of book, priced at a meagre 50p, on a second hand bookstall in my local market I knew it was coming home with me. What instantly struck me was that, even though the book acknowledges that young couples are likely to both work, matters of running the household and cooking fall squarely on the wife’s shoulders.


One section is brilliantly titled “how much will he eat?” and provides guidance as to the quantities of food you should give your husband. No offence to the fragrant and delightful Mr CC, but I would not look forward to an evening where I had given him ½ lb of cabbage for dinner!


All the feminists out there will love the section titled, “Wife at work”. For your entertainment I shall quote directly: “the career-wife really has to put her back into the catering problem, or she will find herself eternally serving fish fingers and frozen peas. Feeling a bit of a bristle yet? Let me continue: “Try to organise some of your cooking ahead. An hour’s baking on Saturday can provide flan cases for mid-week puddings, a meat or fruit pie for Monday or Tuesday, a fruity cake to eat with coffee instead of having to make a sweet.


The chapter covering entertaining does at least manage to patronise both the husband and wife: “Slick cooperation between husband and wife makes all the difference to smooth running dinner parties...and it you have trained him to make the coffee and to wash up afterwards – well, good for you!


This is actually a really good cook book packed with some lovely and unusual recipes. I found it hard to select just one for this post but eventually went for the pineapple and walnut cake simply because it uses two of my favourite ingredients.


The recipe was written in ounces so I include those in the listing below. The glace icing is my own addition.


I also made English Madeleines this week; I’ve made them before (recipe can be found here
) but this time used my new Dr Oetker cake release spray. Dariole moulds can be a terror for turning out cakes but they just slid out! Great product.

No post from me next weekend as I’m off on hols; expect a ‘cakes I ate whilst abroad’ type update on my return!

Ingredients


200g / 7oz unsalted butter, at room temperature
140g / 5oz caster sugar
3 eggs
255g / 9oz self raising flour
225g / 8oz drained canned crushed pineapple – save the juice for the icing
55g / 2oz walnuts, chopped
2 tablespoons warm water

Optional glace icing:

200g/ 7oz icing sugar
3 tablespoons pineapple juice, from the can of pineapple

To decorate: walnut halves

Method


Preheat the oven to 180˚C/ fan oven 160˚C/350˚F/Gas mark 4.

Line a 20cm round springform tin with baking paper.

Beat together the butter and sugar until light and fluffy. This will take several minutes so don’t skimp and move on too quickly.

Add the eggs, one at a time, beating as you go. If the mixture looks like it might curdle add a little of the flour. (If you spent long enough whipping up the butter and sugar, the mix shouldn’t curdle).

Fold in the flour.

Stir in the pineapple, walnuts and warm water.

Spoon into the prepared cake tin and level the surface.

Bake for approximately 1 hour – 1 hour 15minutes or until a skewer inserted into the cake comes out cleanly.

Place the cake, still in its tin, on a wire rack and leave to cool.

Remove the cake from the tin when it is cool enough to safely handle, and then leave the cake on the wire rack until cool.

The cake will store for several days in an airtight container.

If you wish to make the glace icing simply combine the icing sugar and pineapple juice in a bowl and whisk until you have a thick white icing.

Pour onto the cake, it will run down the sides a little but not too much.

Place walnut halves on top for decoration

Bask in the glory of the wonderful thing you have created.

Eat.

Sunday, 17 April 2011

History corner – Golden crunch cake


This history corner is the ‘youngest’ book I’ve featured – it’s “A Spoonful of Sugar” issued by the British Sugar Bureau in 1973. Two very good things happened for the world of cake in 1973; firstly, this booklet was published and, secondly I was born! Now you see why I opened with how this is the most recent book I’ve featured in history corner......


This cake is a simple sponge with a coconut meringue topping baked onto it. It’s far less complex to make than you might think because both the cake and topping bake at the same time. I was sceptical as to how well this would work but I shouldn’t have worried – it’s a doddle, a very delicious doddle!


The booklet features a surprising number of savoury recipes and, while we all know that a spoonful of sugar can help regulate the acidity of tomatoes and bring out the flavour of carrots I’m not sure I want to add sugar to dishes such as devilled prawns with egg mousse...even I think that’s taking things too far!


Sugar has many uses beyond eating; I think the British Sugar Bureau was just (some might suggest cynically) trying to get people to use as much sugar as possible so I can’t vouch for any of the following “Sugar Hints” printed inside the cover:

  • A cube of sugar in your biscuit tin will help keep biscuits fresh and crisp

  • A cube of sugar is just the answer if you’ve run out of candles for a birthday cake. Drain a small can of apricot halves and arrange them around the cake, putting the cut side uppermost. Soak some sugar lumps in lemon essence, put one on each apricot and light with a match [I love the notion that you’re so disorganised you’ve run out of candles, yet will have tinned apricots, sugar cubes and lemon essence in your cupboard! They might as well have suggested that you use albatross feathers!]

  • A spoonful of sugar added to the water in a vase of flowers will make them stay fresh longer

  • Three of four cubes [they really increased the “hard sell” with this one!] of sugar put in a suitcase will prevent damp odours when storing

  • A spoonful of sugar in water used for washing a linoleum floor will give it an extra shine [and no doubt attract all the neighbourhood ants and wasps!]


The quantities looked a bit mean so I’ve doubled them; the doubled amount is what’s set out below. I also made two tweaks to the recipe; firstly I added coconut extract to the sponge (but vanilla or almond would work just as well) and secondly, I dotted some jam on top of the batter to add an almost bakewell vibe to it. Feel free to leave both out if you want to be a purist about it (but, when I make the cake again, I will definitely repeat both those modifications). It didn’t need much jam:


The cake sunk a little in the middle during cooling but the topping didn’t. I wonder if that was caused by my adding jam to it – whatever the reason it had no effect at all on flavour.


This cake is awesome! It’s the sort of cake that, however much of it you eat, you want just a tiny slice more. The topping is crunchy and coconutty and the cake is soft and spongy – the extra egg yolks make it wonderfully golden in colour and give it an almost custard-like flavour. I think it’s one of the best cakes I’ve eaten in a long while as it packs so much flavour and texture into such a simple recipe.


I finish how I began: 1973 was a very, very good year for cake!


Ingredients

For the cake:
170g unsalted butter, at room temperature
170g caster sugar
2 eggs
2 egg yolks (keep the whites for the topping)
230g self raising flour
2 tablespoons milk (either whole or semi skimmed)
Optional: 1 teaspoon of coconut, vanilla or almond extract

Optional: 2-3 teaspoons raspberry jam

For the topping (which bakes at the same time as the cake):
2 egg whites
115g desiccated coconut
115g Demerara sugar

Method

Preheat the oven to 160°C/fan oven 140°C/325°F/Gas mark 3.

Line a 20cm round springform tin with baking paper.

Beat the butter and sugar together until they are pale, light and fluffy. Don’t skimp on this stage as it’s where you get all the air into your sponge.

Beat in the two eggs and two egg yolks along with one tablespoon of the flour.

Fold in the remaining flour and milk and – if using – coconut extract.

Spoon the mixture into the prepared tin and level the surface.

If using, dot the jam over the surface of the batter.

Now make the topping: whisk the egg whites until they are stiff and then fold in the coconut and sugar.

Spread on top of the cake batter.

Bake for approximately 30 minutes or until a skewer inserted into the cake comes out clean. I found this far too short a time and mine actually took 55 minutes – although, thinking about it, I did double the quantities so it actually makes sense!

Leave to cool, in the tin, on a wire rack until the tin is cool enough to remove safely.

Leave the cake to cool completely on a wire rack.

Serve in thick slices – no accompaniment is needed.

Bask in the glory of the wonderful thing you have created.

Eat.