Showing posts with label crumble. Show all posts

Sunday, 8 November 2015

Oat and pear traybake with pecan crumble topping


I’m such a clichĂ© but the first whiff of winter and I’m cracking open the spice jars like nobody’s business!  I found the recipe for the oat sponge and crumble topping on a recipe sharing website and decided that it needed an extra element.  Oats, spice and pecans led me to the very easy decision to add some pear to the mix.  Pear is one of my absolute favourite fruits to bake with.


The pear is fruity and juicy and stops the sponge being too dry or heavy.  The nutty crumble topping adds texture and richness; the dark sugar seeps into the cak almost like a sauce.  I served the cake at room temperature with a cup of tea but it would work so well warm with ice cream or custard.  You could even bake it in individual pudding moulds for a fancy dessert (but reduce the cooking time accordingly).


Adding fruit to a batter always increases the wetness during baking so it’s worth draining the tinned fruit and patting it dry with kitchen paper.  I think that without the addition of the fruit the sponge may have been a bit dry; the juice was absorbed by the oats making an almost fragrant sponge – imagine an oaty bread pudding and you’re pretty close.  Have I mentioned how much I love baking with pears?


I suspect it won’t be an issue, but the cake keeps really well for several days.  The pear keeps the cake soft, and the nuts in the crumble topping improve with age (unlike the baker!).


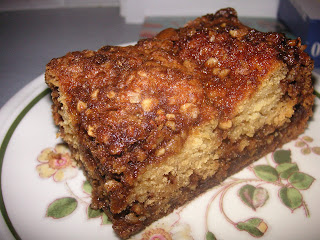
I took a photo of a slice and went for my obligatory ‘fork shot’.  Then I went for another...and another....and it ended up like this:


NB.  The crumbs were left on the plate for artistic purposes and were polished off the moment I put the camera down!  Waste not, want not etc.......


Ingredients

For the cake:
100g porridge oats
330ml boiling water
115g unsalted butter, at room temperature
220g dark brown soft sugar
2 eggs
2 teaspoons vanilla extract
1 teaspoon cinnamon
1 teaspoon baking powder
½ teaspoon bicarbonate of soda
215g plain flour
1 tin diced pears – the tin was 410g with a drained weight of 225g

For the crumble:
100g dark brown soft sugar
10g plain flour
½ teaspoon cinnamon
½ teaspoon grated nutmeg
40g unsalted butter – cold
100g pecan nuts – roughly chopped


Method

Preheat the oven to 190C/ fan oven 170C/ 375F/ gas mark 5.

Grease a 30cm x 20cm traybake tin.

Cover the oats with the boiling water and put to one side.

Now make the crumble topping: Mix together the sugar, flour, cinnamon and nutmeg.

Rub in the butter until you have lumpy crumbs.
Stir in the chopped pecans.

Place in the fridge until needed; a cold crumble is always easier to scatter over the top as your hands won’t melt the butter as much.

Now return to making the cake: Beat the butter and sugar until soft and well combined – it will never go fluffy and whippy when you’re using dark sugar.

Beat in the eggs, vanilla and cinnamon.

Fold in the baking powder, bicarbonate of soda and plain flower.

If there is any, drain any unabsorbed liquid away from the oats and fold them into the mix.

Spoon the batter into the prepared tin. 

Drain the pears and pat them dry with some kitchen paper.

Scatter the diced pears over the batter and gently press down into the batter.

Sprinkle the chilled crumble over the top of the batter.

Bake for approximately 30-40 minutes or until a skewer inserted into the cake comes out clean.

Leave to cool in the tin before de-tinning and storing in an airtight container.

Bask in the glory of the wonderful thing you have created.

Eat.


Sunday, 5 February 2012

Rhubarb crumb cake


One of the few cheering sights during this sudden cold snap of weather has been the appearance of the wonderfully pink forced rhubarb. Seriously, is there a better colour anywhere in the world of fruit and veg than this:


My local market sells better quality rhubarb than any supermarket – I do think rhubarb is a product that supermarkets can never compete on; maybe it sits around for too long in their warehouses?


Anyway, I digress! I wanted to make a very simple cake that complimented the rhubarb but in no way competed with it – this cake is it. The sponge is soft with a small, close crumb as it uses icing rather than caster sugar; I think this photo shows the texture well:


It has a hint of vanilla and the rhubarb bakes into the batter and the juices sink into the sponge. The crumb topping adds some texture and a further pop of sweetness to balance the sharp, tart rhubarb. A brief note re the crumb – when you make it, it won’t look like a crumble topping; it’s more like a biscuit dough and can only be crumbled after chilling. This is what it looks like:


As I stand in my kitchen baking on a Saturday afternoon I realise that I am now officially old. Why? Because there’s a forecast of heavy snow overnight and I’m praying the forecast is wrong. I don’t want it to snow [Sunday update: too bad what I wanted – it DID snow. Lots.] I have never felt like that before...suppose all I can do now is plug in my heated slipper boot, boil up some fish for tea, dye my hair a silvery lilac colour and play some bingo.......


Sunday update: Because of the snow, no one is travelling – and rightly so, I hastily add. However, I baked two of these rather large cakes and am now wondering what to do with them! I’ve already decided that I can heat slices and serve with custard as a pud, and I reckon the rest should freeze well.


It is always the joke in my family that I am cake obsessed and see cake in things where no cake should be seen. I would therefore like to point out that it was the CCD (Caked Crusader’s Da) and not me who thought these looked like little iced cakes:


Ingredients

For the crumb topping:

90g unsalted butter, melted
100g brown sugar – I used half light, half dark
125g plain flour

For the cake:

250g rhubarb, cut into 1.5cm chunks
1 tablespoon light brown sugar
185g self raising flour
170g unsalted butter, at room temperature
185g icing sugar
3 eggs
1 teaspoon vanilla extract

To serve: thick cream (I used clotted cream)


Method

Preheat the oven to 180°C/fan oven 160°C/350°F/gas mark 4.

Line a 20cm square tin with baking paper.

Start by making the crumb topping: mix together the melted butter and sugar then, using a fork, press in the flour until you have a firm, almost biscuit dough type mixture. I know it doesn’t look very crumbly at this point but keep faith!

Place in the fridge until needed.

Now make the cake: Mix together the rhubarb, brown sugar and 30g of the flour. Put to one side.

In a large bowl, beat together the butter and icing sugar until light and fluffy. It will look like whipped butter as the icing sugar seems to almost dissolve.

Beat in the eggs one at a time.

Stir in the vanilla.

Fold in the remaining 155g of flour.

Spoon the batter into the prepared tin and level the surface – take care to ensure the batter goes right into the corners.

Add the rhubarb on top of the batter. If any flour has pooled at the bottom of the dish you kept the rhubarb in, don’t use it – you only want the flour that has stuck to the rhubarb.

Take the crumb mix from the fridge and crumble it over the rhubarb.

Bake for 45-50 minutes or until a skewer inserted into the cake comes out virtually clean (you may find it has rhubarb juices or crumb topping on it).

Leave the cake to cool, on a wire rack, but still in its tin.

Cut into generous squares and serve with thick cream.

Bask in the glory of the wonderful thing you have made.

Eat.

Sunday, 31 July 2011

Cider crumble slice


To some people, apples conjure up an Autumnal feeling.
However, I saw on the BBC news this week that English apples are being picked now, in July, and it’s the earliest they’ve been harvestable for decades. It’s probably something to do with the odd sunshine-and-showers (ok, downpours) summer we’re having but I got distracted by images of lovely apples and forgot to listen to “the science bit”!


In tribute to English apples, I decided to make this traybake; however, there’s a small confession that I couldn’t find any for sale yet (I guess picking takes a while!) so have used imported Granny Smiths.
I make no secret that apple is my favourite fruit to bake with – I love the flavour, the texture, and the look of it.


Cider works so well in cakes – it adds a warm, well rounded, fruitiness to any cake and doesn’t have a harsh alcoholic flavour. I used an oak matured still cider made by H. Weston & Sons
based in Much Marcle, Herefordshire. They’ve been making cider since 1880 so – as you’d imagine – it was pretty good stuff! Much Marcle is a brilliant name; it sounds like it would be a kind hearted character in a Dickens novel.


Buy good cider, it really is worth the extra money, particularly when it will flavour the whole cake. Plus, this recipe only uses 150ml whereas bottles tend to be 500ml...you want something decent to polish off!


I’ve used sultanas and walnuts, but you could substitute raisins, or even dates if you wished, and I’m sure any nut would work!
Apple’s so versatile that there are few other fruits or nuts it won’t compliment.


Ingredients

For the cake:

20g unsalted butter
1 ½ tablespoons golden syrup
150ml cider
250g self raising flour
½ teaspoon ground ginger
45g soft brown sugar
75g sultanas
75g walnuts, chopped
1 egg

For the topping:

1 large Granny Smith apple – or any other tart eating apple
40g unsalted butter
2 ½ tablespoons caster sugar
60g plain flour
75g walnuts, chopped

Optional: a dusting of icing sugar before serving
Thick cream

Method

Preheat the oven to 170˚C/fan oven 150˚C/325˚F/Gas mark 3.

Line a 20cm x 30cm baking tin with baking paper. I used a disposable tin traybake cases and used spray on cake release.

Start by making the cake: place the butter and golden syrup into a saucepan and melt together over a gentle heat.

Remove the pan from the heat and stir in the cider – put to one side.

In a large bowl, stir together the flour, ginger, sugar, sultanas and walnuts.

Add the golden syrup mixture along with the egg and stir until well combined.

Spoon into the prepared tin and level the surface.

Now make the topping: peel, core and chop the apple into rough chunks about 1.5 cm big.

In a saucepan (use one larger than you need just for the butter as the other ingredients will be added) melt the butter then stir in the sugar, flour, chopped apple and walnuts. It will be a dry mix.

Spread this topping over the cake batter already in the baking tin – I found this easiest to do by hand.

Level the surface then bake for approximately 30 minutes or until a skewer inserted in the cake comes out clean. Mine took exactly 30 minutes.

Leave to cool in the baking tin, on a wire rack.

A dusting of icing sugar just before serving really “pretties them up”!

Serve in generous squares with thick cream.

Bask in the glory of the wonderful thing you have made.

Eat.

Sunday, 28 June 2009

Fresh cherry cake with a hint of cinnamon


Summer is now in full swing with scorching temperatures in England this weekend. Unfortunately, the heat is coupled with high humidity which always makes baking a little trickier but us mad-keen bakers soldier on!


If asked to name a summer fruit I’m sure most of us would answer “strawberry” but in terms of sheer flavour and juiciness not much can beat a big, dark cherry. Perhaps I was a little extravagant in using Bing cherries, as they are quite expensive, but I do believe that – for a simple cake like this – quality ingredients are the key to flavour.


Stoning the cherries makes the cake much more pleasant to eat. I only use my cherry stoner about once a year but, when it’s needed, it truly is worth its weight in gold in terms of timesaving. I made two of these cakes thus had to stone 700g of cherries. It took less than 10 minutes. I do find that it splatters a bit though and my work top (and me) ended up looking a bit like the CSI team should be called in!


Ingredients:
For the topping:
25g plain flour
¼ teaspoon ground cinnamon
25g golden caster sugar
25g unsalted butter, chilled

For the cake:
350g ripe cherries, stoned
280g self raising flour
½ teaspoon ground cinnamon
100g golden caster sugar
2 eggs
8 tablespoons milk, plus more if needed
170g unsalted butter, melted

To serve: a dusting of icing sugar and thick spooning cream

How to make:
- Start by making the topping. Place all the ingredients into a food processor and blitz until you have crumble. (You can do this by hand with the old rubbing the butter into the flour method).
- It was very hot when I made this and the crumble started to form into big lumps. Don’t panic – refrigerate until needed then it will crumble between your fingers on to the cake.
- Preheat the oven to 180°C/fan oven 160°C/350°F/Gas mark 4.
- Line a 20cm round springform tin with baking paper.
- Stone your cherries.
- Melt the butter and leave to one side.
- Combine the flour, cinnamon and sugar into a bowl and make a well in the centre.
- Add the egg, milk and melted butter and whisk until well combined. You’re looking for a heavy, thick batter that will drop from the spoon/whisk. I needed to add a little extra milk to achieve this.
- Spoon the batter into the prepared tin and level the surface.
- Scatter the cherries over the top and press lightly into the batter.
- Take the crumble topping from the fridge and using your fingers crumble the lumps into finer pieces and scatter evenly over the cherries.
- Bake for approximately 35 minutes or until a skewer inserted into the centre comes out clean.
- Leave to cool in the tin until you can comfortably handle the tin.
- Turn out onto a wire rack and leave to cool completely.
- Serve at room temperature with thick cream.
- Bask in glory at the wonderful thing you have made.
- Eat.

Sunday, 7 June 2009

Strawberry buttermilk cake


English strawberries are really coming into their own right now – it’s hard to imagine a tastier, better looking fruit.

I have often used strawberries on top of a pastry base but can’t recall baking with them so I was intrigued as to how they would taste in this recipe. The short answer is: delicious!


As the cake bakes for a long time at a medium heat the strawberries break down into a fruity, syrupy consistency that creates an almost ripple-like effect in the cake. The flavour also intensifies to such a degree that they were similar to very sweet rhubarb. I now understand why rhubarb and strawberries are seen as a classic combination. This slice was photographed the day the cake was made – you can see how some strawberries retained their shape, whereas others collapsed into syrupy goodness:


The next day, the cake firmed up and became almost scone-like:


The crumble topping adds a delicious light, crumbly, biscuity crust to the surface which is lovely to push your fork through.


You can serve this warm with custard but I went for room temperature with clotted cream. I mean – come on! Strawberries have to be served with cream...we’re in England for goodness sake!


Ingredients:
For the crumble topping:
40g plain flour
50g unsalted butter, chilled and cubed
95g soft brown sugar

For the cake:
125g unsalted butter, at room temperature
2 eggs
225ml buttermilk
250g self raising flour
225g caster sugar
375g strawberries, washed and hulled, halve any large ones

How to make:
- Preheat the oven to 180°C/fan oven 160°C/350°F/Gas mark 4.
- Line one 20cm loose bottomed square tin with baking paper.
- Start by making the crumble topping: rub the butter into the flour until you have the consistency of fine breadcrumbs.
- Stir in the sugar.
- I then put the crumble in the fridge until needed as this stops it becoming soft and retains the lovely crumb texture.
- Put the butter, eggs and buttermilk into the food processor and blitz until smooth and well combined.
- Add the flour and sugar and blitz again until well mixed.
- Transfer all the mixture into a large mixing bowl and gently stir in the strawberries.
- Spoon the batter into the prepared tin and sprinkle the crumble over the top.
- Bake for approximately 50 minutes or until a skewer inserted into the centre of the cake comes out cleanly. Mine took 55 minutes.
- Leave to cool in the tin before removing as the strawberries make the cake quite fragile when warm.
- Serve either warm with custard/ice cream or at room temperature with your choice of cream.
- Bask in glory at the wonderful thing you have made.
- Eat.

Sunday, 18 January 2009

Rhubarb and apple streusel

Serendipity – happy coincidences – isn’t just a rather weak romcom starring John Cusack (not that it’s stopped me from watching it about six times – like everything else John Cusack’s in) it actually exists in real life. “How so?” I hear you ask; well a week ago I was walking around Borough Market in my lunch hour and saw some beautiful forced rhubarb. I didn’t buy it because I didn’t have a recipe. Then, during the week, I came across this one so went back and bought my rhubarb!


I hate the name forced rhubarb, as it sounds a bit violent – I always wonder what the poor rhubarb was forced to do. Of course, I’m being silly; “forced” in this context means that it is grown out of season and indoors - it is also the most glorious shade of pink imaginable. Usually all my cakes are made with garden (free range?) rhubarb which is a summer crop.

This is an interesting cake as there isn’t actually any ‘cake’ part to the dish! It’s fruit sandwiched between crumbly streusel, the bottom layer of which bakes down into a base that is part cakey and part biscuity and totally delicious. You can see what I mean in these photos:


As it bakes the fruit releases juices into the bottom layer of crumble. In order not to lose any of these I used a cake tin liner which is an all in one liner i.e. no joins or gaps. It’s a good idea to use one of these not only to catch all the fruity juices but also because this type of cake is always quite fragile until it has cooled and a liner makes it easier to pick up and move.

The other curious thing with this cake is that it’s bigger going into the oven than coming out – which is the opposite of practically every other cake. Going into the oven the cake is piled up to the top of the tin, but as it cooks the fruit breaks down.

The cake is so packed with fruit you can see it trying to burst free in this photo:


The tart acidity of the rhubarb teamed with the sweet apple and almond crumble is a delightful combination. You could serve the cake warm with custard for dessert or at room temperature with whipped cream. I added a little custard to my cream as rhubarb and custard is a classic that must be adhered to whenever possible.


Rhubarb Crumble on Foodista

Ingredients:
For the fruit:
4 eating apples, peeled, cored and diced
300g rhubarb
80g golden caster sugar

For the streusel:
250g plain flour
125g ground almonds
125g golden caster sugar
250g unsalted butter, diced – use it straight from the fridge, the colder the better

To serve: custard or cream

How to make:

- Preheat oven to 190°C/fan oven 170°C/375°F/ Gas mark 5.
- Line a 20cm round springform tin.
- Chop the rhubarb into approximately 3cm chunks and place in a bowl with the diced apple.
- Sprinkle over the sugar and stir through the fruit so all of it is coated. Put to one side.
- Put all the ingredients for the streusel into the bowl of a food processor and blitz to fine crumbs. It is vital that the butter is cold otherwise you will get a dough rather than a crumble. If this does happen, all is not lost – simply refrigerate and then grate.
- Press a smidgen over half of the streusel mix into the prepared cake tin.
- Place the rest of the streusel in the fridge – I found this stopped it getting warm and clumpy.
- Tip all the fruit on top and then, using the palm of your hand, press down quite firmly. There is a lot of fruit and you need to compress it in order to fit the rest of the streusel on top.
- Scatter the remaining streusel on top. It should come up to the very brim of the tin.
- Bake for approximately 1 hour or until the top is golden and crispy and you can see juices bubbling up. Mine took a little longer at 1 hour and 20 minutes.
- Leave to cool in the tin on a wire rack.
- Serve either at room temperature with some whipped cream or warm with custard.
- Bask in glory at the wonderful thing you have made.
- Eat.

Sunday, 2 November 2008

Dorset apple cake

I have fond memories of family holidays in Dorset; Bridport to be more exact. We’d load up the car with everything from sandwiches for the journey (the sausage and ketchup would always go first) to the dog’s basket and hope that we’d get there without Dinky (the dog) puking over one of us. Waiting for us was Mallards, the fabulous shop in Bridport High Street that sold a thrilling array of pies including big pork pies with crimped tops. We were Blackadder obsessed at the time so the shop instantly became known to us as “Miggins” after Mrs Miggins’ Pie Shop. Ahhhh, memories.


What that little jaunt down memory lane is meant to indicate, other than most of my memories involve food, is that I have a fondness for anything with a Dorset connection. In my mind Dorset is a place of lovely pies and cakes, thus when I saw this recipe I gave it my full attention.


The cake is moist because of the apple. As there is sugar in both the cake and the extremely crumbly topping I chose a tart apple – a Granny Smith – to provide some contrast. It worked very well.


I served the cake at room temperature with Chantilly cream. It would also be lovely hot with custard.


Ingredients:
For the cake:
110g unsalted butter, at room temperature
150g light brown sugar
2 eggs, beaten
175g self raising flour
1 teaspoon baking powder
1 ½ teaspoons ground cinnamon
3 tablespoons milk (whole or semi skimmed)
1 apple, peeled, cored and diced (I used Granny Smith)

For the crumble:
25g unsalted butter, cold
75g plain flour
50g Demerara sugar
Pinch of cinnamon

How to make:

- Preheat the oven to 160°C/fan oven 140°C/315°F/Gas mark 2-3.
- Grease and line a 20cm square tin. It’s easier if the tin is either springform or loose bottomed.
- Cream the butter and sugar until light and fluffy. I always find this takes longer when using brown sugar.
- Gradually beat in the eggs. If the mix looks like it’s curdling add some of the flour.
- Fold in the flour, baking powder and cinnamon.
- Stir in the milk.
- Stir in the chopped apple.
- Spoon the batter into the prepared tin and put to one side.
- Now make the crumble topping: Rub the butter into the flour until the mix resembles fine breadcrumbs.
- Stir in the sugar and cinnamon.
- Scatter the crumble over the top of the cake and bake for approximately 40 minutes or until a skewer comes out cleanly. Mine took 45 minutes.
- Serve either hot with custard or cold with cream.
- Bask in glory at the wonderful thing you have made.
- Eat.

Sunday, 6 January 2008

Soured cream and hazelnut crumble cake

After the excesses of Christmas I felt it was time for a simple cake; one that didn’t need a side serving of cream and wasn’t smothered in, admittedly delicious, buttercream. A sort of ‘detox’ cake (Disclaimer: the owner of the site makes no health claims about this cake)

This is an interesting cake (aren’t they all.....sigh) as the actual cake part of the mix isn’t very sweet. However, the crumble part is and so an interesting contrast is created. The cake is seriously succulent:


One thing I would say, I followed the recipe and made the cake in a 23cm square tin. Next time I think I’ll make it in a 20cm square tin to get it a bit deeper. I’m not mad about shallow cakes and would rather have a smaller, but more cube-like, shape.


The slice just glistens with juicy goodness:


Ingredients:
For the crumble element:
225g dark brown sugar
2 teaspoons ground cinnamon
115g finely chopped hazelnuts (you could also use walnuts)
55g unsalted butter, cold and cut into pieces

For the cake:
115g unsalted butter, at room temperature
125g caster sugar
3 eggs
215g plain flour
1 teaspoon bicarbonate of soda
1 teaspoon baking powder
250ml soured cream
Optional: dash of vanilla

How to make:

- Preheat the oven to 180°C/fan oven 160°C/350°F/Gas mark 4.
- Grease and line a 23cm square tin or a 20cm square tin if you prefer a deeper (albeit smaller) cake.
- For the topping mix the brown sugar, nuts and cinnamon together and then rub in the butter. It won’t go to breadcrumb consistency but rub until you sense the butter has been evenly distributed among the dry ingredients. Put to one side.
- To make the cake, cream the butter and sugar together either in a mixer or by hand. Cream until the mixture turns pale and looks fluffy.
- Beat in the eggs one at a time. The mix may start to curdle but it will not affect the outcome. If it bothers you add a little of the flour to stop it (NB. Add the flour from the recipe’s allocation – not extra flour!)
- In a separate bowl, combine the flour, bicarbonate of soda and baking powder.
- Fold one third of the flour mix into the creamed butter and egg mix. Then fold in one third of the soured cream. Continue to alternate until all the flour and soured cream is incorporated.
- Spoon half the batter into the cake tin. Sprinkle half of the crumble mix on top of this.
- Spoon the remaining batter onto the crumble mix and gently spread so that no crumble is visible. Sprinkle the remaining crumble mix on top of the cake.
- Bake until a skewer comes out clean. This will take somewhere between 60-70 minutes. Mine took exactly 60 minutes. If you make the cake in the smaller tin it may take a little longer as the mix will be deeper.
- Let the cake cool for 15 minutes or so in the tin, before turning out and letting cool completely on a wire rack.
- Bask in glory at the wonderful thing you have made.
- Eat.

Thursday, 27 December 2007

Things to do with Mincemeat.....

It’s Christmas so it must be time to entomb some mincemeat in pastry i.e. make mince pies. Bored with the idea of doing this for what felt like the millionth time I sought different options; well, I am a Crusader after all even if it is just the ‘Caked’ variety. Here are two ideas for mincemeat that aren’t radically different but just different enough to whet one’s jaded taste buds.

The first is a large mincemeat tart.


We’re going to have it for dessert on Christmas day with some lightly whipped sweetened vanilla cream. By not having a pasty lid it gives centre stage to the mincemeat which, until I made this dish, I hadn’t realised how beautiful it looks. By having less pastry, it also makes the texture stickier and richer in your mouth. In other words – this is a good thing!


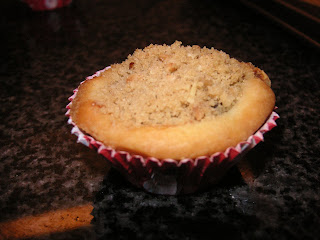
The second idea is at the other end of the size spectrum: mini mincemeat crumble tarts.

If it’s possible for baked items to be cute then these are the cutest little things around! I like cakes or tarts that do more than one thing – these are great because you have the pastry case which houses the mincemeat and then top it off with nutty crumble. Is it a cake or a dessert? Should you have it with a cup of tea or after dinner? Any answer is correct.

Here they are fresh from the oven, still in the baking tray:

They look so cute en masse:


And this is just to show off my mini-muffin tree stand. You’ll notice I made some mini jam tarts too, to satisfy the mincemeat haters!


Just a quick note on mincemeat. I’m sure you can buy some very nice quality mincemeat but homemade is always best. Mine is made by The CCM (Caked Crusader’s Ma) using Delia Smith’s recipe. It keeps beautifully and The CCM makes it every other year. This year I have used the mincemeat she made in 2006 and as long as it is kept airtight and cool it will mature wonderfully. If it looks a little dry stir in a tablespoon of brandy to return it to the required glossy state.

Whenever a dish requires sweet shortcrust pastry, unless there is something interesting about the recipe, I always ignore the pastry ingredients and make the sweet rich shortcrust pastry recipe from my Women’s Institute cookbook . This pastry is unbeatable – it never fails to be delicious and could not be easier to make or a nicer consistency to work with. Here’s the recipe:

Sweet Shortcrust Pastry

Ingredients:
For the pastry:
115g plain flour
80g unsalted butter
2 tablespoons icing sugar
1 egg yolk

How to make:

- Put the flour and butter into a bowl and rub together until it resembles fine breadcrumbs – either using your fingertips, a food processor or, as I discovered to my joy, the beater fitting on the Kitchenaid mixer.
- Add the icing sugar and stir in.
- Add the egg yolk and bring the dough together until it is smooth, glossy and soft.
- Wrap the dough in clingfilm and refrigerate for at least 30 minutes before you need to use it – this relaxes the dough and stops the cooked pastry from shrinking.
- Bask in glory at the wonderful thing you have made.
- Do not eat yet – it’s raw!

Mincemeat Tart

Ingredients:
Double amount of the shortcrust pastry i.e. 230g plain flour, 160g butter etc
Approx 900g good quality mincemeat
1 egg for glazing
Sprinkle of caster sugar

How to make:

- Preheat the oven to 200°C/fan oven 180°C/400°F/Gas mark 6
- Grease a 30cm loose bottomed flan tin. This is a big tart – if you want to, you can make a smaller one but obviously will have pastry left over from the proportion I have recommended.
- Take the pastry from the fridge and roll it out between two pieces of greaseproof paper. This gets rid of the need to flour the surface and risk drying the pastry out. Lay the pastry in the tin. Keep any spare pastry to one side.
- Cover the pastry with greaseproof paper and weigh down with baking beans, dried lentils – whatever you use.
- Bake the pastry case for 15 minutes. This is called “blind” baking i.e. cooking the pastry shell so it will be crisp when you bake it again with the filling.
- Remove from the oven and allow to cool slightly before removing the paper and beans.
- Spoon the mincemeat evenly into the pastry shell.
- Use the pastry leftovers to make decorations to sit on the mincemeat. As it’s Christmas I used a Christmas tree cutter but a star or holly leaves would be just as pretty.
- Once you have positioned the pastry decorations on the mincemeat, glaze them with beaten egg and a sprinkle of caster sugar.
- Bake in the oven for 20-25 minutes until the pastry is golden brown. Mine took 20 minutes.
- Serve with cream, whipped cream, brandy butter, ice cream – the list goes on!
- Bask in glory at the wonderful thing you have made.
- Eat.

Mini Mincemeat Crumble Tarts

Ingredients:
Single amount of the shortcrust pastry
Approx 200g good quality mincemeat

For the crumble topping:
90g Plain flour
40g chopped nuts (I used hazelnuts)
40g soft brown sugar
40g Unsalted butter

How to make:

- Preheat the oven to 180°C/fan oven 160°C/350°F/Gas mark 4
- Grease a mini muffin pan . The proportions above will give approx 14 mini tarts. If you don’t have a mini muffin pan, use an ordinary size muffin pan – obviously you will get less.
- Take the pastry from the fridge and roll it out between two pieces of greaseproof paper. This gets rid of the need to flour the surface and risk drying the pastry out. Using an appropriate size cutter, cut out discs of pastry and place in the mini muffin pan.
- Spoon in enough mincemeat so it is level with the pasty – this gives a nice flat surface for the crumble to sit on.
- To make the crumble rub the butter into the flour (this can be done in a processor or Kitchenaid mixer) and then stir in the sugar and nuts.
- Sprinkle the crumble into nice little domes on top of each tart. It will scatter a bit over the tray but don’t worry.
- Bake in the oven for 20 minutes until the pasty is golden brown.
- Allow to cool slightly in the tin before removing, otherwise you risk smashing the pastry to bits!
- To look pretty, when I took the tarts out of the tray, I sat them in mini muffin cases. This makes them easier to pick up and eat.
- Serve just as they are or with a blob of cream.
- Bask in glory at the wonderful thing you have made.
- Eat.