Showing posts with label cool equipment. Show all posts

Sunday, 30 January 2011

Starting out….a beginner’s guide

I received an email from a student named Sam, part of which was as follows:

I used to enjoy making cakes at home and would actually quite like to bake something... but I don't have the first clue what to buy.

I suppose this is a request for a sort of 'beginners start up guide' post for your blog. What inexpensive kit to buy but will do the job, what key ingredients do you think every cake maker needs in his/her cupboard, that sort of thing. Then maybe a recipe to go with those things....

This got me thinking. Although my baking obsession began only maybe about 5 years back it’s amazing how much kit I’ve acquired (I can be very focussed when I want to be!) so I’ve tried recall what I started out with and what I think you need to make nice cakes…and it’s surprisingly little.

The first thing I’d say is that if you’re on a tight budget forget kitchenware shops or department stores. Don’t get me wrong, they sell gorgeous stuff but they’re not known for being cheap. Ruling out options like charity shops or car boot sales (because you can’t guarantee what you’ll find on any given week) I think good quality but cheap kitchenware can be found in the following places:

  • Wilkinsons or any equivalent general household goods store – many high streets have such a shop, many are independent rather than chains.
  • Pound shops – used selectively. I’m not sure I’d buy my cake tins here but a set of plastic measuring spoons or a wooden spoon does the same job however much it costs.
  • Supermarkets – a superb source of kitchenware at great prices. Electronic handheld whisks can be picked up for £6 (often cheaper in the sales). I buy virtually all of my everyday cake tins from Tesco.
  • Robert Dyas – forget that it’s a DIY shop, it has a good selection of cookware often with special offers like 2-for-1 on cake tins
  • Ikea

So, that’s where I’d head, but what should be on your shopping list? I’ve tried to be concise and cover all aspects of baking such as cakes, cupcakes, biscuits and pastry – obviously, if you have no plan to make pastry, ignore the stuff relating to pastry…sorry if that sounds patronising but I don’t want to scare anyone by the length of the list! Some of these items might already be in your kitchen as they are multi-use.

If you hunt around and choose wisely I think you can easily get everything for under £40, and you won’t need all of it straightaway. The list is intended as a “starting from scratch” guide, but you’re more than likely to have some of it already.

  • 2 x 20cm round springform tins i.e. the kind that do up with a clip. This tin is the workhorse of the kitchen and you’ll use it for practically every cake you bake. Why two? They are the same diameter as sandwich tins (the sort you need to make layer cakes such as Victoria sponges) so, if you have two, you can save yourself having to buy extra tins for that purpose.
  • 1 x cupcake pan i.e. the pan with 12 little indents. Non stick is always best because, while you won’t need it for cupcakes as they sit in paper cases, you will if you decide to make mince pies or jam tarts in it.
  • 1 x baking sheet – a flat tray perfect for biscuits or scones.
  • 1 x large mixing bowl – metal, glass or ceramic it’s up to you; they’ll all do the job just as well. I’m always drawn to metal as a big stainless steel bowl is light to move around the kitchen and won’t smash if you drop it.
  • 1 x wooden spoon – try to get one with a nice long handle as it’s easier to use.
  • 1 x large metal spoon – you need this for folding. It has a sharper edge so cuts through the ingredients more crisply; again, a long handle will make it easier to use.
  • 1 x spatula – now if you’re going to use this in hot pans get a silicone one; however, I use mine only to scrape cake batter from the bowl. I’m cheap where spatulas are concerned – I hate the fancy ones with rigid wooden handles. I like a nice one piece plastic effort that is flexible; from memory, mine is by Kitchencraft and cost no more than £2.
  • 1 x metal sieve – handy for sifting flours and icing sugar but also useful for straining fruit to make coulis and egg mixes used to make custard.
  • 1 set of measuring spoons – don’t pay much for these; I have a great set that came from a Christmas cracker last year! You can use your ordinary household spoons in the cutler drawer but these are more precise for half spoon measures.
  • 1 x cake skewer for testing when the cake is done. However, if you already have metal or wooden kebab skewers you can use those instead.
  • 1 x electronic hand whisk – yes this sounds extravagant but I have seen them in my Tesco for £5. It will repay its cost so many times over the first time you try to whip egg whites or cream! Personally, I reckon all sponges taste lighter when you get air into the creaming process – why break a sweat when this piece of kit will do it for you?
  • 1 set of scales – I would go for electronic and, again, I’ve seen them in Tesco for around the £5 mark. Choose one with a nice big bowl that can handle wet and dry ingredients.
  • 1 x wire cooling rack. Still the best way to cool cakes and get air flow round them. I like the old fashioned rectangular kind as you can fit two tins on it at a time.
  • 1 x measuring jug – many cakes contain milk or oil and measuring this accurately can make or break a recipe. Plastic will be cheapest but if you’re going to use it for other cooking with hot ingredients (i.e. making up stock) then choose glass.
  • 1 x biscuit cutters – plastic are cheapest and I’ve bought whole sets in Pound stores.
  • 1 x rolling pin – if you wish to make pastry, biscuits or scones then you’ll need one of these; go simple and pick the plainest wooden one you can find – make sure it has a bit of weight to it.
  • Baking paper – sold where the foil and clingfilm is in the supermarket. Line your cake tins with this and nothing will stick or tear on removal.
  • Clingfilm – use this to roll out biscuit dough and pastry and you won’t need to use any extra flour.

You have the kit but what will you use it for? There are staple ingredients I think every baker should have in their kitchen. With these you’ll be able to bake a huge array of cakes and biscuits and, when a recipe catches your eye and needs something additional, you’ll only have to buy that one extra item:

  • Unsalted butter – always unsalted. You should be in charge of any salt in your baking
  • Caster sugar – the one ingredient you’ll use again, and again and again!
  • Icing sugar – for icings and buttercreams, and some pastry recipes
  • Plain flour – for pastry, biscuits and some cakes
  • Self raising flour – for cakes
  • Baking powder – the most common raising agent
  • Eggs –I always use large eggs
  • Milk – I only use semi skimmed, it’s a nice halfway house as it isn’t too fatty but still has flavour
  • Jam or nutella – nice for filling sponges
  • Cocoa powder – will turn any sponge batter into a chocolate sponge batter
  • Vanilla extract – gorgeous in sponges, biscuits and custard

The perfect recipe to put all this into action? Start with a classic and marvel at baking skills you didn’t know you had – it’s got to be a Victoria Sponge, and you can find the recipe here.

If you think I’ve missed out anything important please leave a comment!

Wednesday, 29 December 2010

Raspberry jelly and panna cotta


A little while back I remember posting a teaser photo of a dessert I was working on for Christmas – well this is it! It’s a raspberry jelly with vanilla panna cotta. In my family we either don’t like Christmas pud or at that age where it “sits on you” when you’re trying to sleep at night. So I picked this as a light and fruity (but still calorific – don’t fret!) alternative.


Using the gorgeous copper mould Mr CC bought me for Christmas last year I set about making the jelly. Here it is setting in the fridge:


The recipe needs to be started 2 days before serving as you must ensure you’ve left enough time for both layers to set. If you don’t have that much time you could make exactly the same thing in individual moulds and these will set quicker.


It’s by no means a cheap dessert – the raspberries are expensive and all that dairy for the panna cotta isn’t exactly pennies but, for a celebration, it’s worth it. If you consider the price of a good quality dessert from a top food retailer (such as M&S or Waitrose etc) it’s comparable and you know exactly what’s gone into yours – all good stuff! Plus, it’s very rich so serves lots of people.


Homemade jelly is divine; it’s soft and intensely fruity. It’s also a lot less sweet than packet jelly so the fruit really shines through. One thing I would like to point out and I’m sure a science boffin can explain the answer, the liquid jelly mix tastes much sweeter than when it’s set. First time I made this I panicked that it was going to be too sweet so don’t worry if you think the same...it will all be fine!


The fruit in the pan looks glorious; an explosion of colour:


Simmer until it breaks down:


The key to a nice jelly texture is straining out all the fruit seeds. I used a metal sieve – what’s gathering in the bowl is the basis of the jelly:


A piece of equipment I find particularly useful is a straining mushroom. It drives the juice through the sieve. It looks like a darning mushroom (does anyone still use those?) and, when I bought it, I didn’t think I’d ever use it – it’s so effective though, that I use it whenever I sieve fruit:


I love the crisp line where jelly meets panna cotta; it’s important to let the jelly set fully before pouring over the panna cotta otherwise you won’t get this crisp delineation.

Sorry if some of the photos are a bit murky – Christmas day was rather gloomy (weather-wise) and it was impossible to get good light.

Ingredients

Note – this is the basic quantity for the jelly – you can scale it up as required but allow extra setting time. For my giant mould I doubled up the quantities.
5 leaves gelatine
500g raspberries – fresh or frozen, plus an extra punnet to set in the jelly
150g caster sugar
400ml cold water

For the panna cotta recipe click here

Method

Start by soaking the gelatine leaves in cold water until they are soft.

Place the raspberries, sugar and water in a saucepan and heat gently until the sugar has dissolved.

Simmer further and mash the raspberries with a spoon or – and I found this really productive – the masher you’d use to make mash potato.

Pass through a sieve and return the liquid to a clean pan.

Heat gently and then remove the pan from the heat.

Squeeze all the water from the gelatine and whisk into the raspberry juice – it will dissolve very quickly.

Leave the jelly to cool a little.

Pass through a sieve into your chosen mould – sieving again will strain out any seeds that passed through first time.

Drop the extra raspberries into the jelly.

Chill until set – I left overnight.

Now make the panna cotta - for the panna cotta method click here

Pour the panna cotta over the set jelly and press a sheet of clingfilm onto the panna cotta – this stops a skin forming.

Refrigerate overnight to ensure it has set.

To turn out of the mould, dip for 5-10 seconds in warm water then press a plate against the mould and flip. You will hear a release squelch when the jelly has freed itself.

Bask in the glory of the wonderful thing you have made.

Eat.

Sunday, 12 December 2010

Blueberry and Clotted Cream cake


I’m back from hols and hoped to have posted a holiday cake update but time seems to have run away from me...but I promise I’ll do it soon!


It’s always flattering to be asked to try out new kitchen equipment so when Tanya from Cooking Fantastic sent me these curious looking sandwich tin inserts (Silverwood Victoria Surprises, to be more precise) I couldn’t wait to get cracking:


They look like flattened hats but are far more exciting than that – they sit in a standard sandwich tin and create a secret cavity in the sponge.
I’m probably making it all sound rather complicated…..!


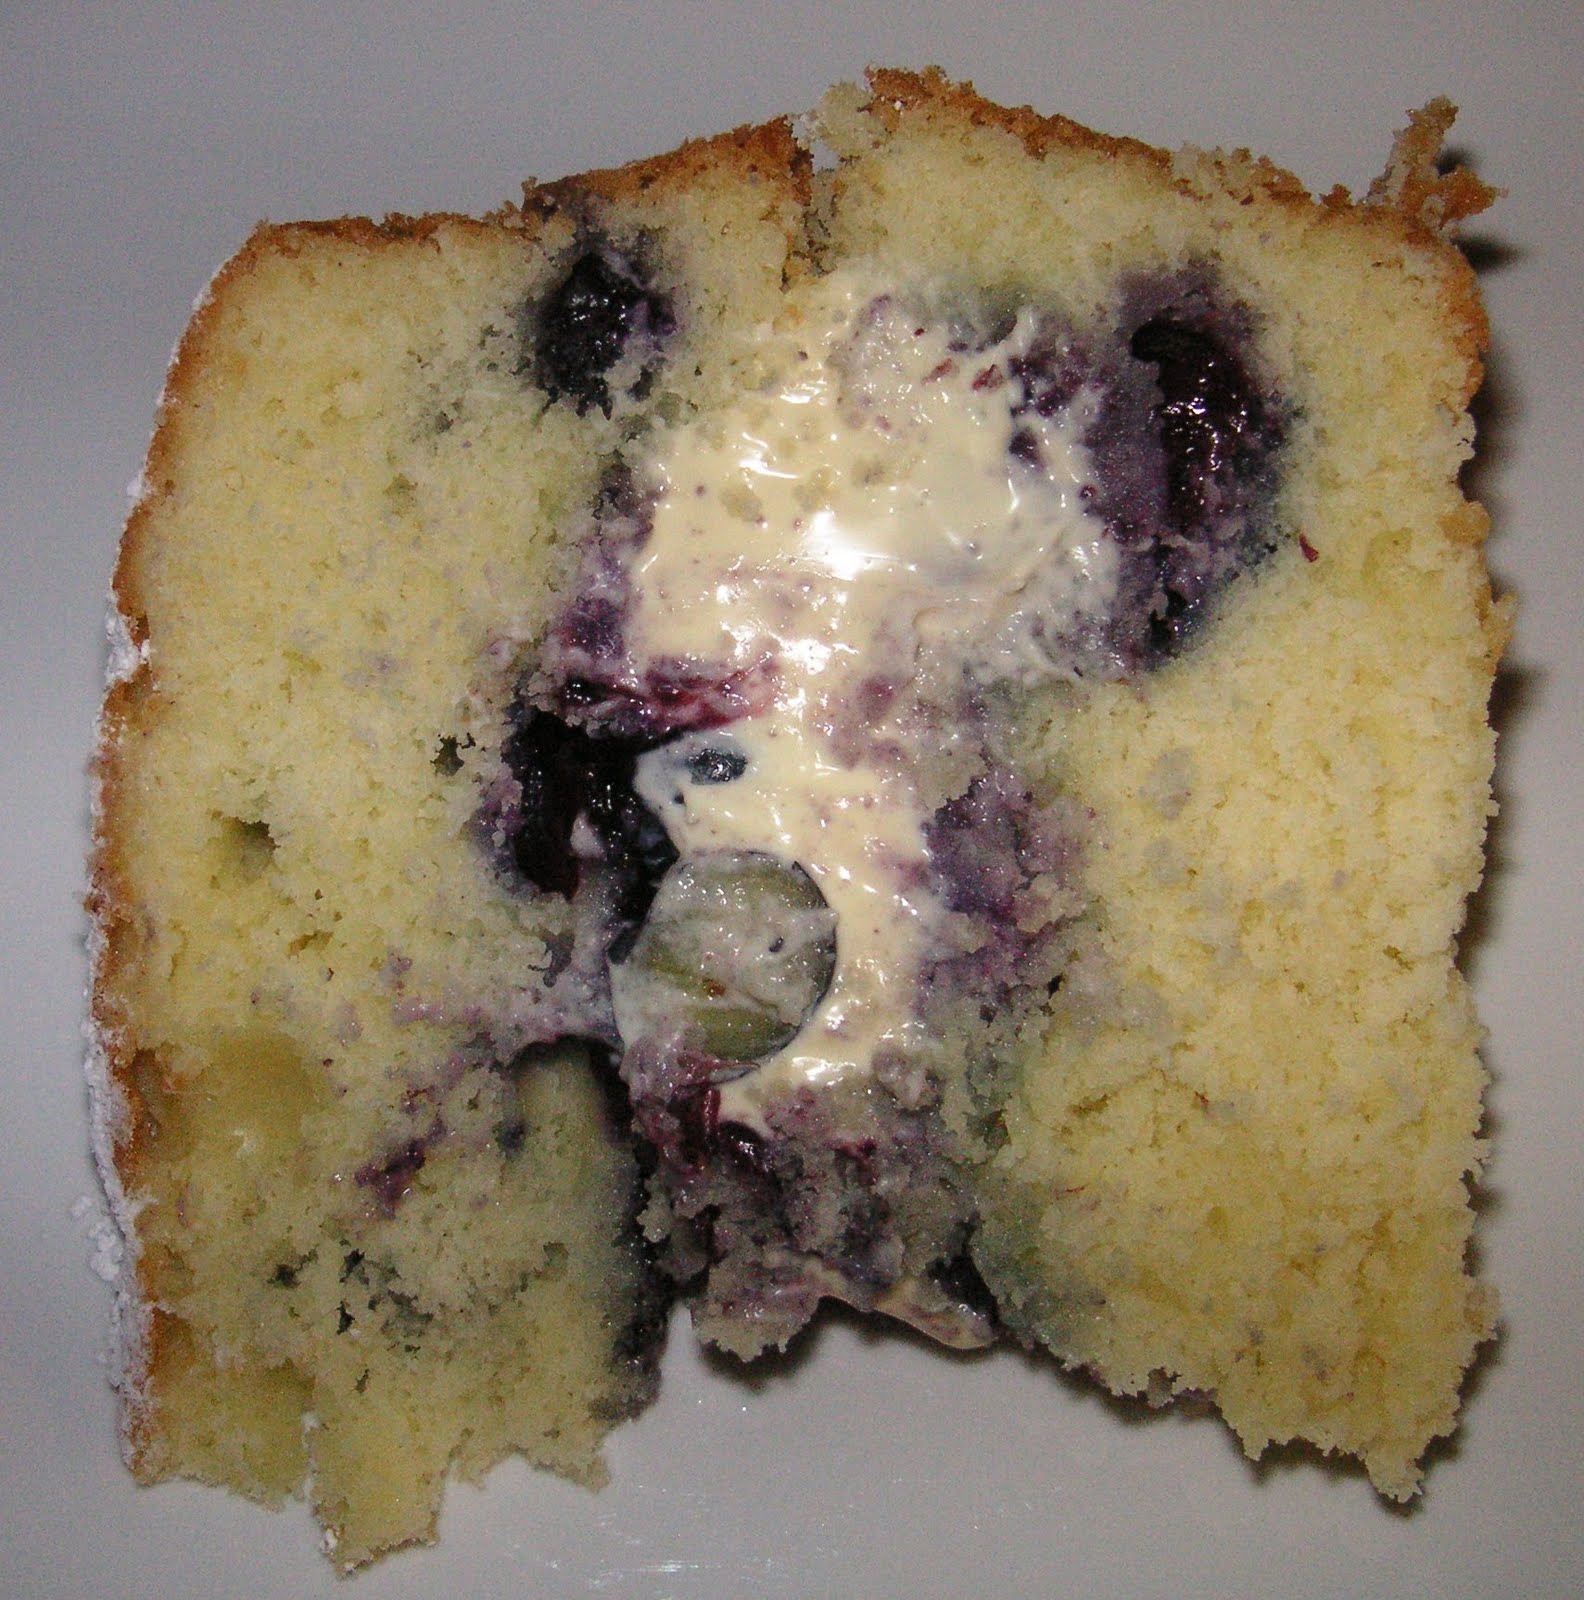
The sponges come out like shallow bowls to be filled with goodies:


I decided the best approach would be to dome one up with filling and then put the other sponge on like a lid; as is my way, I was rather greedy with the amount of filling I crammed in – it’s why the slices practically exploded on the plate:


Blueberries are a beautiful fruit and I’m starting to think that I prefer them baked than in their natural state; it’s the way they break down and ooze precious purple pulp (try saying that 5 times quickly!) into the sponge.


When built, the cake looks like a Madeira type sponge and only reveals its secret filling when cut. Thanks for letting me try the tins, Tanya!


Ingredients

For the cake:
200g caster sugar
200g unsalted butter, at room temperature
4 eggs
200g self raising flour
1 teaspoon baking powder
2 tablespoons milk
150g blueberries

For the filling:
4 tablespoons blueberry jam
227g pot of clotted cream
100g blueberries

Method

Preheat the oven to 190˚C/fan oven 170˚C/375˚F/Gas mark 5.

Line two 20cm loose bottomed sandwich tins with baking paper ensuring that the paper comes up above the height of the tin. Place Silverwood Victoria Secret inserts into tin, if using.

Place all the cake ingredients except for the blueberries into a bowl and beat until smooth and soft.

Fold in the blueberries, taking care not to squash too many.

Spoon the mixture into the tins and level the surface.

Bake for approximately 20 minutes or until a skewer inserted into the batter comes out cleanly. Mine took 27 minutes.

Leave to cool in the tins until cool enough to de-tin; then leave to cool completely on a wire rack. The sponges can be made up to 2 days ahead of serving.

On the day of serving build the sponge: place one of the sponges on a plate and spread with the blueberry jam.

Spread ¾s of the clotted cream on top of the jam and sprinkle the blueberries on top, covering with the remaining clotted cream.

Place remaining sponge on top.

Dust with icing sugar, if desired.

Refrigerate until serving – try to remember to take the cake from the fridge 20 minutes or so in advance of serving so the flavours can come through.

Bask in the glory of the wonderful thing you have made.

Eat.

Sunday, 10 May 2009

Cool stuff

Most people reading this site will have a passing interest in baked goods and baking. You will therefore know the joy of seeing lovely baking stuff for sale. I’m sure you will agree, that it is all the more wonderful when you come across original, interesting baking products in the most unexpected of environments.

Take yesterday for example; there I was, wandering around the British Museum generally exuding an air of studiousness and intelligence (hmmmm) when I spotted these:


Egyptian themed biscuit cutters! Instantly I knew these cutters satisfied a need that, until that moment, I didn’t know I had. How have I lived so long without being able to make mummy or Ankh or Egyptian cat-shaped biscuits?

A further highlight was found at a really cool shop called Artbox. Along with a couple of Hello Kitty cake themed items, I had to purchase this cushion especially as I am a fan of Japanese English – note the ingredients in the top right listed as “butter or margaries”:

Special mention and thanks must go to the CCBF (Caked Crusader’s Boyfriend) who didn’t object to entering the packed shop where he was the only male present and then manfully carried a rather dinky shopping basket that I rapidly filled with pink, girly merchandise!

Sunday, 23 November 2008

Glazed chocolate cream cake

Happy birthday to me, happy birthday to me, happy birthday Caked Crusader, happy birthday to me. And so on. OK, so my birthday was yesterday but the cake was today – and I’m sure you’ll appreciate which was the more important!

Yes, I am one year older (I hesitate to add “and wiser”) and what better way to celebrate than eating a sinfully rich, chocolatey cream cake? This cake is a beauty – quite simply the best chocolate cake I have ever eaten. Every layer has a different texture and is just plain divine!

Unlike many chocolate cakes it gives a really strong hit of cocoa and although very rich, the cream filling lightens the eating experience...so you can eat lots of it!

The chocolate sponge is rich and delicious:


It’s a layer cake. Here is the bottom layer in the tin:


Add a layer of rich chocolate cream:


I played with the recipe a little. Originally the chocolate cream sandwiched the cake, but when I saw how thick the chocolate cream was, even I baulked at it being too solid and rich. So I decided to lighten some of the chocolate cream by adding it to whipped cream and making a lighter mousse! In other words, my solution to something being too rich and heavy was to add lots more cream to it. It made sense at the time....


The thick cream filling means that you serve the cake as it is – there is no need for any additional cream; it would almost be gilding the lily.

For such an impressive looking cake there is nothing tricky in the making. The sponge cake part is actually embarrassingly easy. The chocolate cream filling requires a little concentration but again, please don’t think it’s complicated to make.


I made the sponge and the cream the day before I wanted to serve the cake. On the morning of the day, I assembled the cake and made the chocolate glaze. Once assembled the cake must be refrigerated for at least an hour before serving.
We all agreed that you have to plunge the fork down and make sure you get a bit of each layer in every mouthful.


As the recipe also provided the quantities in cups, I include them in the ingredients list below.

The great thing about everyone knowing your obsessions is that you get themed gifts. Look at this lovely cake stand I got from my friend Soo:


Ingredients:
For the cake:
150g (1 cup) plain flour
50g (1/3 cup) cocoa powder
1 teaspoon baking powder
½ teaspoon bicarbonate of soda
200g (1 cup) caster sugar
250ml (1 cup) milk (whole or semi skimmed)
90g (1/3 cup) unsalted butter
1 egg
1 teaspoon vanilla extract

For the chocolate cream:
100g (1/2 cup) caster sugar
50g (1/3 cup) cocoa powder
2 tablespoons cornflour
375ml (1 ½ cups) double cream, plus a further 420ml (1 2/3 cups) i.e. 795ml in total
1 tablespoon unsalted butter
1 teaspoon vanilla extract

For the chocolate glaze:
1 tablespoon unsalted butter
2 tablespoons water
3 tablespoons cocoa powder
150g (1 cup) icing sugar
1 teaspoon vanilla extract
Additional: water or cream to reach the right consistency

How to make:

- Preheat the oven to 180°C/fan oven 160°C/350°F/Gas mark 4.
- Butter a 23cm springform round cake tin and then dust with some cocoa powder.
- Start by making the cake: place the flour, cocoa powder, baking powder, bicarbonate of soda and sugar in a bowl and mix together.
- Into the dry mix, beat in the milk, butter, egg and vanilla until well combined.
- Pour the batter into the prepared tin and bake for 40-50 minutes or until a skewer comes out cleanly. Mine took 45 minutes.
- Leave to cool for approximately 15 minutes in the tin, before turning out onto a wire rack and leaving to cool completely.
- Now make the chocolate cream filling: In a medium saucepan stir together the sugar, cocoa, and cornflour.
- Gradually stir in 375ml of the cream.
- Simmer over a medium heat stirring constantly until the mixture thickens and starts to boil.
- Boil for 1 minute, stirring all the time.
- Remove from the heat and stir in the butter and vanilla.
- Transfer to a bowl and cover with clingfilm, making sure that the clingfilm is pressed directly onto the surface of the cream.
- Leave to cool to room temperature before refrigerating until you build the cake.
- On the morning of the day that you wish to serve the cake slice the sponge into two layers and place the bottom layer on the plate you will serve the cake from. Put the side of the springform pan over the sponge (i.e. the tin without the base) as this will give a nice mould for the finished cake. Spoon 1/3 of the cold chocolate cream onto the base and spread evenly.
- Flip the top layer of sponge and spread 1/3 of the chocolate cream onto it. Put to one side.
- Whip up 420ml of double cream to soft peak stage. Add the remaining 1/3 of chocolate cream to it and continue to whisk until you have a firm mousse consistency. Spread over the bottom layer of sponge and then put on the top layer of sponge.
- Refrigerate for 30 minutes of so before removing the tin and making the glaze.
- To make the glaze: melt the butter and water in a saucepan and then remove from the heat.
- Stir in the cocoa powder.
- Using an electric whisk, beat in the icing sugar and vanilla until smooth. I found I needed to add a further 5 tablespoons of cream before I reached the thick but still spreadable stage.
- Leave to cool slightly before pouring over the cake. This will stop all the glaze just running off the sides!

- Chill in the refrigerator for a further hour before serving.
- Bask in glory at the wonderful thing you have made.
- Eat.

Sunday, 2 November 2008

Cool equipment

I already have way too many cake slices but there’s always room for one more. This dog shaped slice (you turn it upside down to use it) is made by Filou Pylones:


Now here’s a surreal(ish) photo. I see this as The Count’s audition for a job on a TV shopping channel - “One cake slice, nya ha ha”.


If you needed reminding of how great The Count is (and Cookie Monster) this should do the trick:


Sunday, 19 October 2008

Baked vanilla and cherry cheesecake


The quest for MPC (that’s My Perfect Cheesecake) has resumed. Regular readers will recall that I have had a couple of near misses but am yet to find The One. For cheesecake escapades to date, click here.


What made me hope that this could be MPC? A couple of things: I liked the idea of a shortbread biscuit base and I liked the mix of cream cheese and sour cream. The recipe as written scattered raspberries on top but I fancied cherries. I also put a line of cherries though the cheesecake in homage to those fascinatingly long, rectangular pork pies with boiled eggs in that you used to see on supermarket deli counters.


A change is as good as a rest so the clichĂ© goes, thus I decided to make the cheesecake in my new toy – a springform terrine/loaf tin, apart from just looking a bit different, it gives lovely even slices:


I had a dilemma in Tesco this morning (in truth, it wasn’t much of a dilemma – the outcome was easily guessable if you had only a passing knowledge of me). When browsing the shortbread biscuits I had two options: firstly, a packet weighing 200g i.e. EXACTLY the right amount for this recipe or secondly, a packet weighing 150g. So of course, I bought two packets of the 150g and ate the leftovers!

Look at how the cherry juice bleeds into the cheesecake – it’s a lovely colour combination:


If there was a cheesecake equivalent of the Man from Del Monte (I’d forgotten how naff these adverts were) what would he be saying, on tasting this attempt at MPC? He’d be saying yes!

Eureka - I have found it!


Ingredients:
For the base:
200g shortbread biscuits (you can use digestives if you prefer)
5og unsalted butter, melted

For the cheesecake:
600g cream cheese (I used Philadelphia)
2 tablespoons plain flour
175g caster sugar
2 teaspoons vanilla extract
2 eggs plus 1 egg yolk
142ml soured cream

For the topping:
425g tin of black cherries in syrup (this weight includes the syrup)

How to make:

- Preheat the oven to 180°C/fan oven 160°C/350°F/Gas mark 4.
- You will need either a 20cm round springform tin or a 30cm x 10cm springform terrine tin. I never grease a tin when making cheesecake, but you can if you wish.
- Start by making the base. Place the biscuits in a food processor and whizz until you have fine crumbs. If you don’t have a processor put the biscuits in a tightly sealed bag and hit with a rolling pin.
- Add the melted butter and mix until the base resembles smooth peanut butter.
- Spread into the base of your tin. If using shortbread biscuits, you do not have to bake the base in advance; if using digestives you should pop the tin into the oven for 5 minutes.
- Now make the cheesecake: put all the ingredients into a large bowl and beat until smooth, thick and well combined.
- Pour half onto the base and place some cherries on top. You don’t have to do this but it looks pretty when you cut slices. Pour the remainder of the cheesecake mix on top and smooth the surface.
- Bake in the oven for approximately 45 minutes or until the cheesecake is set but still has a wobble in the middle. I used the terrine tin and mine took 45 minutes – it puffed up on baking and levelled as it cooled.
- Leave to cool in the tin. You can either cool on a wire rack, or in the oven with the door ajar.
- Just before serving the cheesecake add the topping. I used the remainder of my cherries and boiled the syrup that came in the tin until it reduced to a thick, luscious sauce.
- Bask in glory at the wonderful thing you have made.
- Eat.

Sunday, 22 June 2008

Berry and custard cake

While I enjoy tackling complicated, involved recipes – indeed, it wouldn’t be much of a blog if each week my comments amounted to “open the packet, pour it out into a bowl” – there is something very rewarding about a simple recipe that looks so much more. This is definitely such a recipe. The finished cake looks sophisticated and like you spent several hours on it. In truth the whole cake is baked in one go and once it’s baked there’s little more to do than eat it!

This is a perfect cake to make right now when the summer berries are abundant and of beautiful quality. I used English raspberries and blackberries but you could use any mix of berries that take your fancy. Nothing says summer like a colander full of berries!


Once the cake batter is in the tin you sit the berries on top:


Then cover the berries with custard:


The custard is incredibly easy to make and as it is made with soured cream rather than the more usual double cream it has a very slight tart edge that compliments the berries perfectly. If you normally find custard too sweet then give this a go.

Whilst cooking the cake encases the custard and this is what it looks like once baked; I love the way you can see the berries just waiting to burst free from the squidgy sides of the cake:


I knew the cake would taste delicious but thought it needed something to make it look pretty. The recipe recommended serving it with whipped cream and more berries so I though why not put these on top of the cake?


The berries clearly thought this was a good decision as they are positively glowing with happiness!


This is the sort of cake where everybody wants a second slice. Can you blame them?


Cream, custard, berries and sponge. The perfect summer cake. Enjoy!


If some of the measurements in the recipe look strangely precise it is because I converted it from a US recipe in cups.

Finally I got to use my new cake tin this week – I like things that go beyond being merely useful and are also beautiful. I ordered mine from Amazon.


Ingredients:
For the cake:
125g (1 cup) plain flour
112g (1/2 cup) caster sugar
1 egg
100g (7 tablespoons) unsalted butter, melted
1 ½ teaspoons baking powder
3 teaspoons vanilla extract
300g (3 cups) mixed berries (I used raspberries and blackberries)

For the custard topping:
475ml (2 cups) soured cream
112g (1/2 cup) caster sugar
1 ½ tablespoons custard powder
2 egg yolks
3 teaspoons vanilla extract

Optional decoration: whipped cream and raspberries

How to make:

- Preheat the oven to 180°C/fan oven 160°C/350°F/Gas mark 4.
- Grease and line a 23cm springform cake tin.
- Mix together all the cake ingredients, except the berries, until you have well combined and smooth batter.
- Spoon into the cake tin and level.
- Place the berries evenly over the surface of the cake batter and put the tin to one side.
- Now make the custard topping. Place all the ingredients into a bowl and beat until you have a nice yellow runny custard.
- Pour the custard gently over the berries so as not to disturb them.
- Bake for 50-60 minutes until the custard is well set. Mine took 60 minutes. Don’t worry if the cake creeps up over the custard whilst baking – it gives a rather nice ‘enclosed’ look, as if the sponge base is a bowl for the custard.
- Leave to cool in the tin, on a wire rack. The cake will keep for a day or two in the refrigerator.
- Serve with whipped cream and berries, if desired; you can either pipe it on top of the cake and place the berries on top or serve separately in bowls.
- Bask in glory at the wonderful thing you have made.
- Eat.

Sunday, 8 June 2008

Cool stuff

If there’s one thing I don’t need it’s another mug, but then I saw this one and it was almost like it was made for me. From “The interesting thoughts of Edward Monkton” range I think you’ll see why it struck a chord.....