Showing posts with label cream cheese. Show all posts

Saturday, 19 September 2015

Apple cheesecake tart


I've just realised that I forgot my blog's 8th birthday a week or so back. This apple cheesecake tart more than makes up for it.  I have been trying to think of a three word combination better than that.  Bank holiday weekend? Winning lottery ticket? Tiny fluffy puppy? I’m sure there are others!


This tart is glorious mainly because of the combination of textures.  The flavours obviously work, but it’s the crispy pastry with the creamy cheesecake layer topped with the soft, juicy apples and spice.  The apple juices bake down into the cheesecake giving it a delicate fruity tang; the apple slices hold their shape but retain a little bite but still yield to gentle pressure from a spoon or fork.


This would work beautifully served warm as a dessert with vanilla ice cream.  I served it at room temperature with thick cream.  I think you could also make smaller, individual tarts which would look very pretty served for dessert with a ball of ice cream on top (or on the side).


Normally I photograph my bakes as I serve them for eating.  This one wasn’t going to be served until the evening so I decided to photograph it in the afternoon.  Tip: If you serve desserts in the kitchen and bring them through to the dining room no one notices if there’s a slice missing!  Just call me ‘Two Desserts’......(aka The Very Thoughtful Lady Who Wanted To Ensure Dessert Was OK Before Inflicting It On Anyone Else).


Ingredients

For the pastry:
175g plain flour
85g unsalted butter, cold
30g caster sugar
½ teaspoon ground cinnamon
1 egg yolk
1 tablespoon cold water

For the filling:
250g cream cheese – I used Philadelphia
2 eggs
60g caster sugar

For the apples:
4 Cox’s apples, peeled, cored and sliced
70g caster sugar
1 teaspoon ground cinnamon


Method

Start by making the pastry: place the flour and butter into a food processor and blitz until you have fine breadcrumbs (you can do this by hand using the rubbing in method if you prefer).

Add the sugar and cinnamon and blitz again.

Add the egg yolk and water and blitz until a ball of pastry just starts to form.

Tip the dough out onto a sheet of clingfilm and bring together, using your hands, to form a ball of pastry.  Handle as little as possible.

Flatten into a disc and roll out between two sheets of clingfilm so that you can line a 23cm round, loose bottomed flan tin.

Prick the base with a fork.

Cover with clingfilm and refrigerate for one hour.

Preheat the oven to 200C/fan oven 180C/400F/gas mark 6.

Remove the pastry from the fridge and line the pastry case with either baking paper or non stick foil.

Weight the paper/foil with baking beans.

Bake for 10 minutes, then remove the beans and paper/foil and bake uncovered for a further 5 minutes.

Leave to pastry case to cool.

Reduce the oven to 190C/fan oven 170C/375F/gas mark 5.

Now make the filling: place the cream cheese, eggs and caster sugar into a food processor and blitz until you have a smooth, well combined mixture.  You can do this in a stand mixer, or by hand if you prefer.

Pour into the part baked pastry case.

Now attend to the apples: toss the sliced apples in sugar and cinnamon.

Layer over the top of the cream cheese mixture.

Bake for 35 minutes or until golden and set.

Leave to cool in the tin.

Serve in generous slices with thick cream.

Bask in the glory of the wonderful thing you have created.


Eat.

Sunday, 19 October 2014

Matcha and chocolate cupcakes


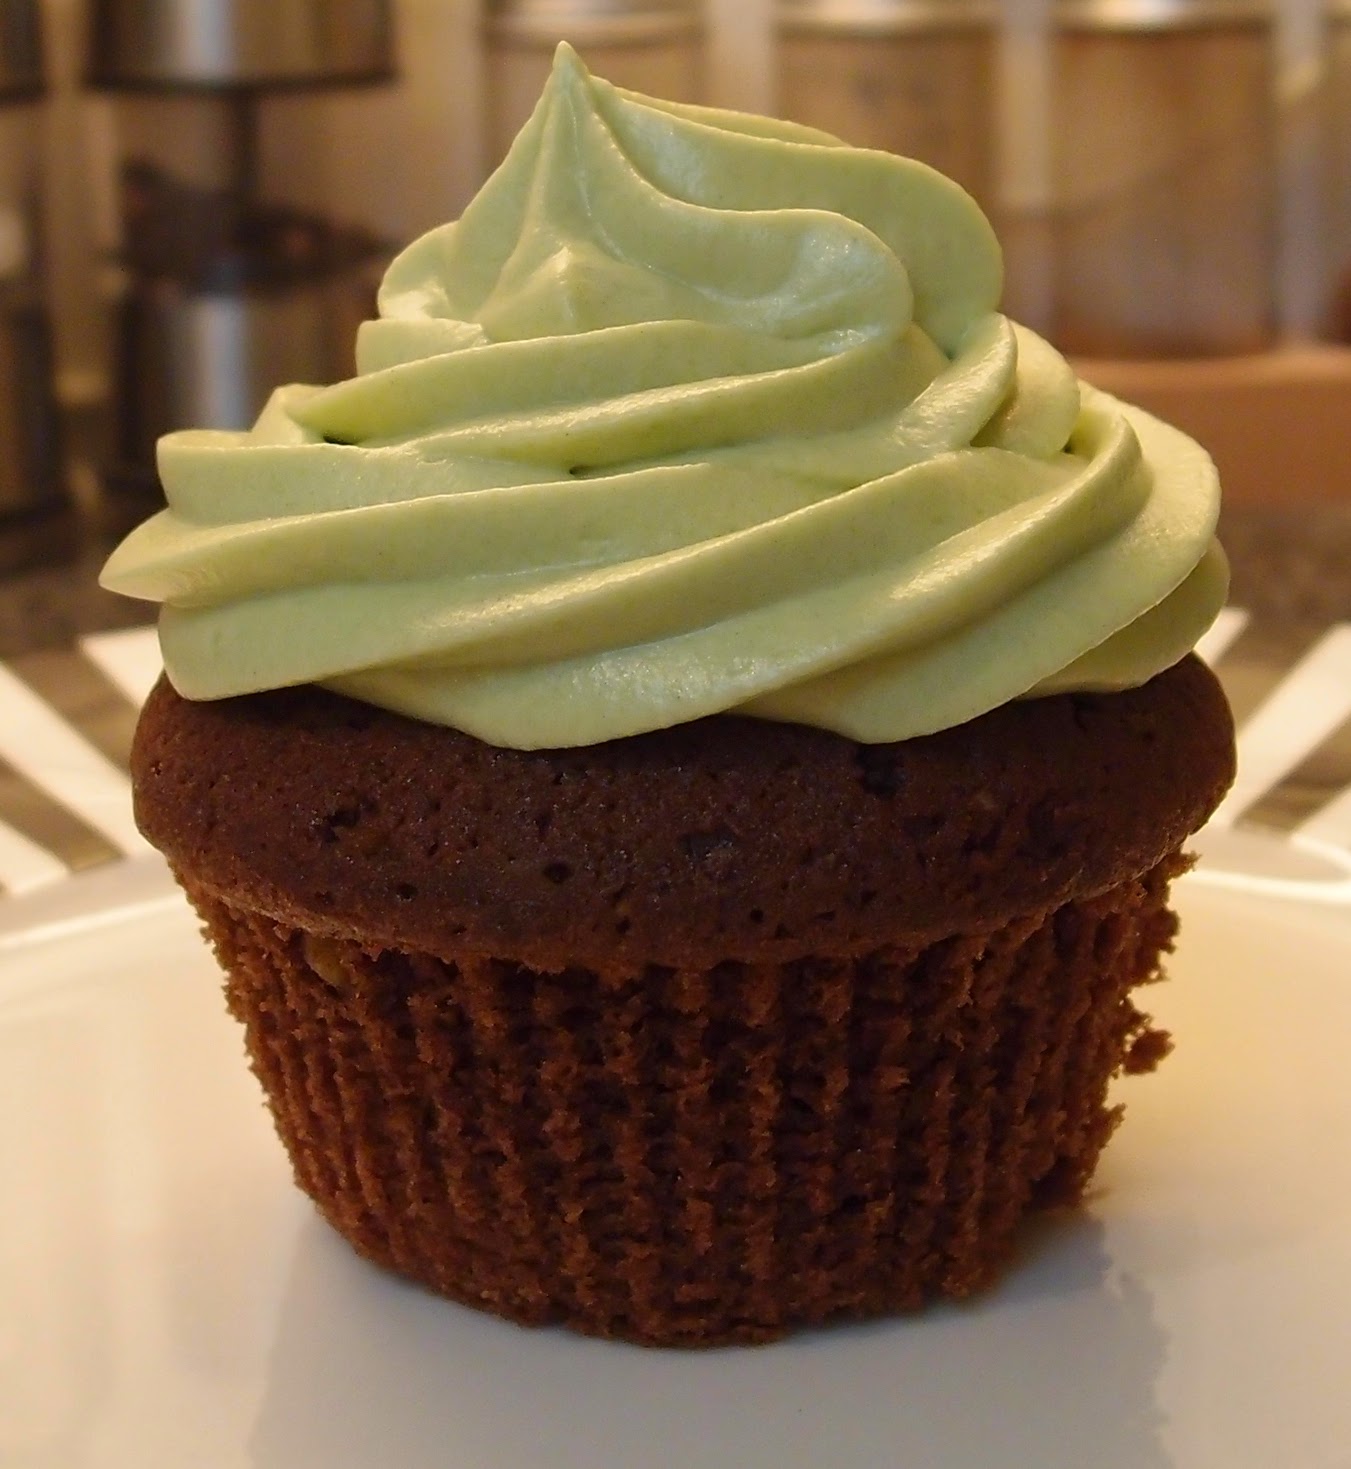
When Tombo Tea kindly offered me a sample of their matcha baking mix I was intrigued and also a little wary.  I don’t like green tea as a drink but, when I’ve tried it in bakes, have always enjoyed it. I pondered how best to bake with matcha: it has a fresh, clean, almost grassy taste so figured it would balance well with rich ingredients like chocolate and cream cheese.  These cupcakes were the result of my musings and I am extremely pleased with them!


One of my great joys in baking (I already know I’m overselling this) is when you take a teaspoon of something, tip it out and it holds its shape.  Look at this lovely ball of greenness:


I loved how green the frosting turned out; one of the features of Tombo Tea’s matcha baking mix is that it retains its green colour.  It would be perfect for any Halloween bakes but also all year as it’s a natural rather than garish colour.  I also enjoyed something being green but not minty – it’s always interesting to see everyone’s expectations challenged; we get conditioned that certain colours equal certain flavours so it’s nice to shake things up!


The matcha cut through the very rich frosting; the balance between freshness and richness was perfect and at that moment I became a convert to green tea!  The chocolate cupcakes didn’t benefit from the colour, but again the addition of the matcha elevated these to something lighter and fresher than the usual rich chocolate cake.


Definition of sod’s law: the cupcake you pick to cut in half will always be the one you tested during baking with the skewer.  Notice the little vertical line in the centre at the top?


Now some eagle eyed readers will notice that the recipe makes 12 cupcakes but there are only 11 in the tin.  I have a two word answer for you, my friends: cook’s perks.


Thanks to Tombo Tea for sending me the sample of matcha baking mix - I absolutely loved it.

Ingredients

For the sponges:
175g unsalted butter, at room temperature
175g golden caster sugar
1 teaspoon vanilla extract
3 eggs
145g self raising flour
30g cocoa powder
½ teaspoon baking powder
1 teaspoon matcha green tea powder
2 tablespoons milk, if needed

For the frosting:
200g unsalted butter, at room temperature
300g icing sugar
180g cream cheese – I used Philadelphia
1 ½ teaspoon matcha green tea powder


Method

Preheat the oven to 180°C/fan oven 160°C/350°F/gas mark 4.

Line a cupcake tin with 12 paper cases.

Start by making the sponges: beat together the butter and sugar until pale, light and fluffy.  Don’t skimp on this stage.

Beat in the vanilla.

Beat in the eggs, one at a time, adding some of the flour if it looks like it might curdle.  Use this as a learning opportunity – if it starts to curdle, you need to beat the butter and sugar for longer next time.

Fold in the flour, cocoa powder, baking powder, matcha powder.

If necessary, add the milk to loosen the mixture to a dropping consistency (I needed to use it).

Spoon into the cupcake cases and bake for approximately 25 minutes or until a skewer inserted into the sponges comes out clean.  Probably best to check the cupcakes after 20 minutes in case your oven is quicker than mine.

Leave to cool – out of the tin - on a wire rack.

Now make the frosting: beat the butter until it is pale and whippy looking.

Add the icing sugar and beat again until well incorporated.

Beat in the cream cheese and matcha.

Pipe or spread over the sponges.

Refrigerate until 20 minutes before serving.

Bask in the glory of the wonderful thing you have created.


Eat.

Sunday, 14 September 2014

Raspberry ripple cheesecake squares


This recipe was featured in the Sainsbury’s magazine – by far and away the best supermarket magazine in my opinion. The recipe, initially, looks like a very basic cheesecake with a bit of a fruity swirl on top.  Look closer and you will spot two less common twists to a cheesecake: firstly, the addition of ground pistachios to the biscuit base, and secondly, yoghurt in the cheesecake.  Both additions pack in extra flavour and I loved the tanginess the yoghurt added.  The pistachios in the base look so pretty:


I must confess I was dubious as to the quantities of the ingredients required for the topping – it looked so much! But the fact it is baked in a traybake tin rather than the more traditional round tin necessitates the larger quantity of cheesecake – and I don’t have a problem with making a bigger cheesecake! (Do take heed though, and use a deep tin!)


Restraint is the key to creating the ripple effect.  I have to force myself to stop about five swirls before I want to otherwise you lose the definition and it all looks an odd shade of pink rather than the lovely red/white contrast.  It’s the same with any marble cake too – I always have the urge to make just one more swirl (I am the Columbo of baking) and then regret it!


Now I must end on a rant.  Kraft – the makers of Philadelphia, my go to cream cheese provider – has relaunched their product.  Now aside from the fact I’m not sure it’s quite as tangy as it was before (it’s billed as ‘now even creamier’), to my horror, the pots now have less content.  What used to be a 300g pot is now 280g.  A 200g pot is now 180g.  This is not good news for recipes using cream cheese – such as this one – where 600g is needed.  Interestingly, the pot looks the same size...just with less filling.  No doubt it is so the price can be kept the same, but, if you are paying the same price for 6.7% less content then surely that is a price rise?  Do they think we’re stupid? Not to mention the extra annoyance that you now need to buy three pots where you previously would only need two.  I am not impressed Kraft, not impressed at all.


Ingredients

For the base:
100g pistachio nuts
200g ginger nut biscuits
75g unsalted butter, at room temperature

For the topping:
600g cream cheese – I used Philadelphia
450g Greek yoghurt – I used Total
250g caster sugar
3 eggs
2 teaspoons vanilla extract
1 ½ teaspoons cornflour

For the ripple:
150g raspberries
1 tablespoon icing sugar


Method

Preheat the oven to 160°C/fan oven 140°C/320°F/gas mark 3.

Line a tin approximately 30cm x 20cm with baking paper.  Make sure the tin has a bit of depth to it – about 4cm minimum.  I used a disposable foil traybake tin as I find them easy to cut open and get the finished item out.

Put the nuts and biscuits into a food processor and blitz to crumbs.

Add the butter and blitz again until you have the texture of clumpy, wet sand.  NB. There is no need to melt the butter.

Press the crumbs into the prepared tin and ensure you have an even distribution.

Beat together all the ingredients for the topping until well combined.

Spoon over the biscuit base and level the surface.

Now make the ripple: blitz the raspberries and icing sugar together in a food processor.

Sieve to remove the seeds.

Blob the puree on top of the cheesecake and, using a skewer, swirl it around so it mixes a little with the cheesecake – don’t over swirl or you will lose the contrast and just end up with it looking pink!  Less is more!

Bake for approximately 45 minutes or until there’s a slight wobble but the mix isn’t runny.

Cool, in the tin, before refrigerating until you wish to serve.

Cut into generous squares.

Bask in the glory of the wonderful thing you have created.


Eat.

Sunday, 30 March 2014

Almond, amaretto and raisin cupcakes


There are many ways to induce me to buy something but one of the quickest is to make the small bottle a replica of the large therefore making it look cute in comparison.  I realise on reading this some of you will be thinking ‘what on earth is she on about’ whereas others will be nodding, thinking, ‘yeah, I totally get that’.  To cut a long story short I bought a miniature of Disaronno on a whim in a supermarket. (The egg in the photo is to illustrate how tiny and cuuuuuuuute the little bottle is!)


Having purchased my cute miniature I had to come up with a way to use it.  For those that haven’t tried it, Disaronno is a brand of amaretto, an almond liqueur.  Instantly I started thinking about an almond based cupcake so adapted my orange and almond cupcake recipe by losing the orange and replacing it with liqueur soaked raisins. I do have a fondness for booze soaked raisins and see no reason why they should only feature in Christmas baking.


Mr CC always announces loudly, lest I forget his views on the matter, that the best frosting/buttercream is cream cheese based.  Seriously.  He says this whenever the subject comes up on cookery shows or in conversation.  I get it: he likes cream cheese frosting.  All the (not so) subliminal messages must have worked because what’s on this cupake?  Cream cheese frosting!  It works well here as it holds it own against the bold flavour of the cupcake whilst adding another flavour and texture.  A lighter buttercream could get lost.


The cupcakes took on a little more colour than I’d normally like due to being overbaked by 3 minutes (which didn’t thankfully affect their taste or texture).  How can I be so precise?  Because I was hoovering and didn’t hear the timer; when I did it had been beeping for 3 minutes!  That’ll teach me for trying to multitask.  Kids – don’t be like me.  Don’t hoover and bake; it isn’t worth it.  This is actually one of the things Mr CC mocks me for over any other: refusing to accept that some items are designed to be mobile.  Hence, our cordless phone sits in the base unit and is never anywhere near me when it rings and, why our kitchen timer – with a clip on the back so it can attach to anything – was in the kitchen beeping away while I was hoovering the bedroom.  I’d like to say I’d learned my lesson, but.......


While the Disaronno is a dominant ingredient of the cupcake it’s worth noting that the entire 18 cucpakes use only one a miniature bottle, so if you’re not keen on alcohol please don’t be discouraged from this recipe.  Also, there is only 1 tablespoon of alcohol that isn’t cooked.


The Disaronno plumped up the raisins and made them much juicier, almost like berries.  One of my eaters, who didn’t know the method for making the cupcake, commented on this; I always think if someone notices without prompting then it must be true! 


Ingredients

For the sponges:
150g raisins or sultanas
4 tablespoons amaretto liqueur – I used Disaronno, but you could use rum or brandy if you prefer
225g unsalted butter, at room temperature
225g golden caster sugar
3 eggs
190g plain flour
75g ground almonds
2 teaspoons baking powder

For the frosting:
200g unsalted butter, at room temperature
450g icing sugar
200g cream cheese – I used Philadelphia
1 tablespoon amaretto (Disaronno) liqueur


Method

Preheat the oven to 170°C/fan oven 150°C/340°F/gas mark 3.5

Line two cupcake pans with 18 paper cases.

About an hour before baking, or the night before if you remember, soak the raisins in the amaretto.

Now make the sponge: beat together the butter and sugar until light and pale.

Beat in the eggs, one at a time.

Beat in the flour, almonds, and baking powder.

Gently stir in the raisins, including any liquid that has not been absorbed.

Spoon into the paper cases.

Bake for approximately 22 minutes, or until a skewer inserted comes out clean.
Leave to cool.

Now make the frosting: beat the butter until soft.

Add the icing sugar and cream cheese and stir together manually before going back to the stand mixer – this stops the icing sugar clouding up!

Beat until well combined.

Beat in the amaretto.

Spoon into a piping bag and, if the frosting is very soft, don’t be afraid to chill it for ten minutes before piping.

Pipe over the cupcakes.

Refrigerate until 30 minutes before serving.

Bask in the glory of the wonderful thing you have created.


Eat.

Sunday, 9 February 2014

Guinness and chocolate cake


I’ve been making a lot of cakes with fruit of late but fancied something rich, dark and chocolaty this weekend.  This cake ticked the boxes and the cream cheese frosting was a bonus!


The frosting is supposed to represent the head on a pint of Guinness.  I cannot drink Guinness, it makes my mouth pucker in a way Mr CC finds endlessly amusing.  Indeed, one of his favourite past times is egging me on to try a drink of his whilst promising, ‘honestly, it’s not that bitter’, just so he can see that face.  Quite why anyone wants to drink something that tastes like iron filings is beyond me – but – in a cake, with lots of sugar to temper the bitterness, it works really well.


Several of my eaters didn’t fancy this cake from the description but were amazed at how much they liked it.  It is the richest, most intense chocolate cake and you wouldn’t know it had Guinness in, but you would wonder why the chocolate was so much more satisfying than a normal chocolate cake.


I suppose I should say that this cake is really rich and small slices will suffice....but really?  When was a cake ever so good that you only wanted a small piece of it?  Does. Not. Compute.


Ingredients

For the cake:
250ml Guinness
250g unsalted butter
75g cocoa powder
400g caster sugar
142ml sour cream
2 eggs
1 tablespoon vanilla extract
275g plain flour
2 ½ teaspoons bicarbonate of soda

For the frosting:
300g cream cheese – I used Philadelphia
150g icing sugar
125ml double cream

Method

Preheat the oven to 180°C/fan oven 160°C/350°F/gas mark 4.

Line a 20cm round springform tin with baking paper.

Place the Guinness and butter into a saucepan and gently melt together, stirring occasionally.

Remove from the heat and whisk in the cocoa and sugar.

In a separate bowl beat together the sour cream and eggs, then stir into the butter mix.

Stir in the vanilla, flour and bicarbonate of soda.

Pour into the cake tin and bake for approximately 45 minutes – 1 hour or until a skewer inserted into the cake comes out clean.

Leave to cool, in the tin, on a wire rack.  Don’t panic if it sinks a little on cooling – it’s a rich, squidgy cake!

Now make the topping: whisk the cream cheese until soft and smooth.

Add the icing sugar and beat it into the cream cheese.

Add the cream and beat again.

Spoon over the cake so that it looks like the head on a pint of Guinness.

Bask in the glory of the wonderful thing you have created.


Eat.

Sunday, 19 January 2014

Cream cheese biscuits


For reasons I won’t bore you with, it’s not been a great start to the year so I felt justified in ‘buying me a little happy’.  This manifested itself in an Oxo Good GripsCookie Press. Regular readers of the blog will know that I’ve never had much success in piping biscuit dough and usually end up spooning it onto the baking sheet instead, but with this lovely bit of kit my luck has changed!


The recipe is from the instruction book that comes with the cookie press and Mr CC declared them the best biscuits I have ever made.  I think he’s right.  They are lovely: crisp, buttery, flavoursome and small enough that there’s no shame in eating several!


Because they are small and thin they crisp up quickly from the oven.  We ate some warm and they had an almost nutty flavour, which was surprising given that they don’t contain any nuts.  When cool that nuttiness goes, but the cream cheese gives a boost to the flavour; you wouldn’t know they contained cream cheese but it does add something.


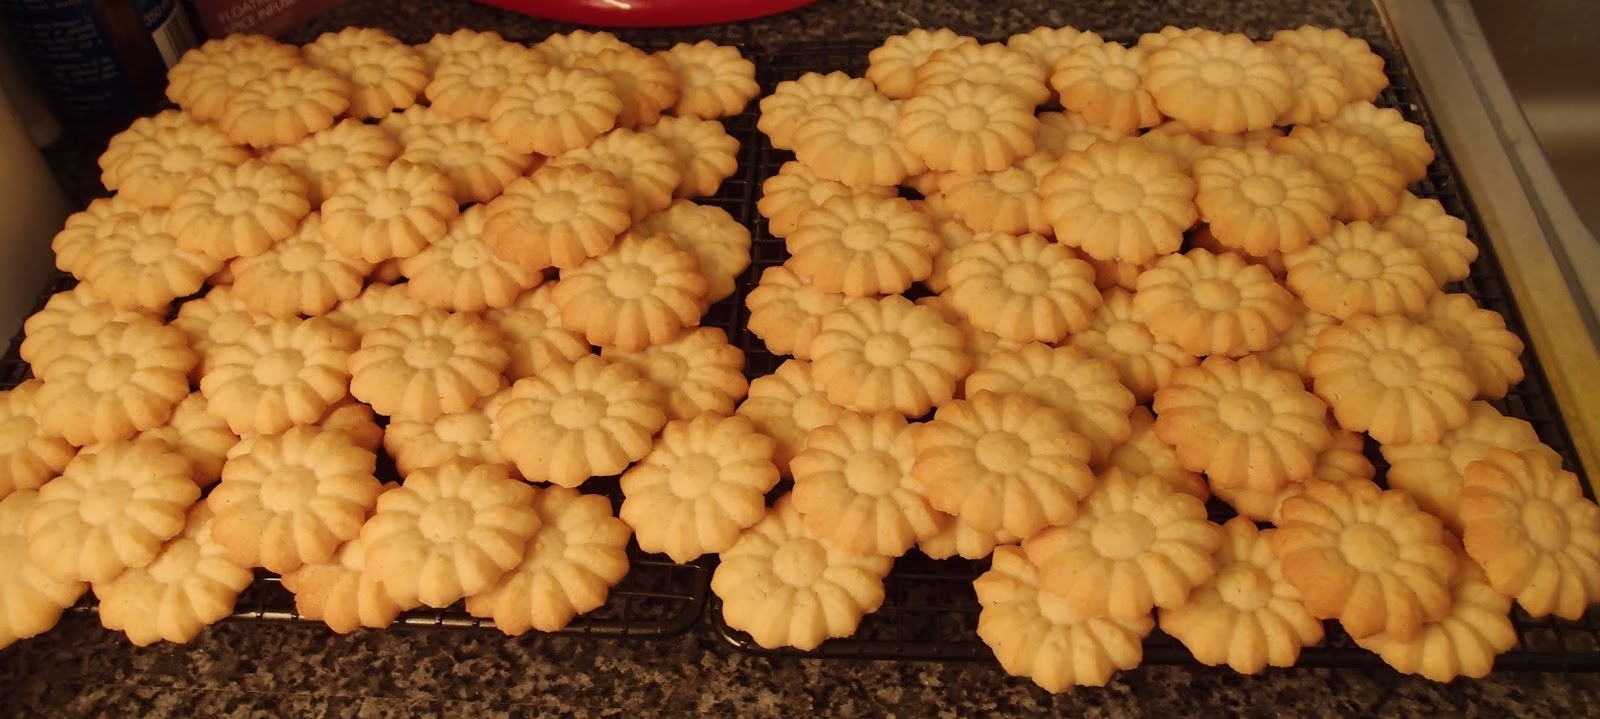
The recipe said the yield would be about eight dozen biscuits.  I never have a lot of luck in getting the suggested amount thus expected to get half that.  I got well over 100!  It is the recipe that just keeps on giving!  The shape looked so crisp unbaked that I thought I would lose all that definition on baking:


But guess what?  They kept their shape:


Ingredients

230g unsalted butter, at room temperature
85g cream cheese – I used Philadelphia
250g caster sugar
1 egg yolk
1 teaspoon vanilla extract
310g plain flour
½ teaspoon cinnamon


Method

Preheat the oven to 180°C/fan oven 160°C/350°F/gas mark 4.

Line baking sheets with baking paper or non stick foil – you will need about six, but I only had three so re-used them as the batches finished baking.

Beat together the butter and cream cheese until combined.

Add the sugar, egg yolk and vanilla and beat until combined.

Weigh out the flour and cinnamon.

Gradually beat into the butter mixture.

At this point you can spoon small teaspoons full of the dough onto the baking sheet, but I used my cookie press.  Fill the cookie press with dough (you will have to refill about four times) and press your cookies onto the prepared baking sheet.  They don’t spread a lot so place them as close together as the cookie press will allow.

Bake for 15 minutes, turning the trays halfway through the baking time.  The biscuits are ready when they are a light golden colour.

Leave to cool for five minutes on the tray before transferring to a wire rack and leaving to cool completely.

If using a cookie press this recipe will make about 100 biscuits.

Bask in the glory of the wonderful thing you have created.


Eat.

Thursday, 26 December 2013

Trifle cheesecake


Trifle or cheesecake?  Surely, one of the toughest decisions the dessert menu can pose.  Well, fret no more because nature has found a solution: trifle cheesecake.  All the flavour and texture of cheesecake with all the bells and whistles of trifle.


As soon as I saw this recipe in the BBC Good Food Christmas magazine I knew it was what we’d be eating after Christmas lunch.  If I was in a romcom, I could tell the BBC they had me at “trifle cheesecake”.


Christmas would be much more drab without sprinkles:


When you think about it, some cheesecakes already have a thick fruity layer on top but more of a set coulis than jelly.  The jelly works really well and lightens the whole dessert.  It was definitely a crowd pleaser.


I thought I had lined my tin pretty thoroughly, and also thought I had spread out the cheesecake layer to close off any holes.  Wrong.  That liquid jelly is a terror and I say this to prepare you for the likelihood of leakage.  Take precautions in advance – lots of kitchen paper under the tin will prevent it looking like a jelly massacre took place shortly before you opened the fridge door.  Also have a spare packet of jelly to make up for the jelly lost in leakage; it looks a bit weird if your raspberries are left poking out the top! (Not a sentence I ever thought I’d type)


Apologies for the poor quality photos; the light wasn’t great and, by this point in events, I had roast potato-fuelled inertia.  In other words....a typical Christmas!  Hope you all had a good one!


Ingredients

For the base:
250g digestive biscuits
100g unsalted butter

For the cheesecake layer:
3 gelatine leaves
3 tablespoons Bird’s custard powder
200ml milk
100ml double cream
900g cream cheese – I used Philadelphia
200g golden caster sugar
1 teaspoon vanilla extract

For the jelly:
1 x 135g pack raspberry jelly cubes (You might want a spare pack on standby, should you lose jelly to leakages – I did!)
175g raspberries

For the cream:
300ml double cream
Cadbury’s Flake
Sprinkles of your choice


Method

Line a 23cm round springform tin with foil or clingfilm.  It needs to be completely lined.  Also wrap the outside of the tin with foil – because the chances are the jelly will leak!  If you’re a pessimist (I am) then place some kitchen paper under the tin inside the foil as it soaks up any leaks.

In a food processor blitz together the digestive biscuits and butter (no need to melt) until it resembles wet sand.

Press the biscuits crumbs into the base of the prepared tin and refrigerate.

Now make the custard for the cheesecake layer: place the gelatine leaves into a bowl of cold water.  Put to one side.

Spoon the custard powder into a bowl.

Pour the milk and cream into a saucepan and then take three or four tablespoons of this to stir into the custard powder and make a thick paste.

Heat the milk and cream in the saucepan until almost at boiling point.

Pour over the custard paste and stir to ensure no lumps.

Return to the saucepan and heat, stirring all the time, until the custard thickens.

Remove from the heat.

Squeeze all the water from the gelatine leaves and whisk into the warm custard.

Pour into a bowl and press clingfilm onto the surface to stop a skin forming.

Leave to cool.

When it is cool, you can make the cheesecake layer: beat together the cream cheese, sugar and vanilla until smooth and well combined.

Stir the custard to loosen it a bit, and then beat into the cheesecake mix.

Spoon over the biscuit base and return to the refrigerator for 4 hours.

Now make the jelly layer: Make half the packet of jelly and leave, in the jug to cool for 30 minutes or so.

Pour over the cheesecake and place the raspberries in the jelly.  At this point, they won’t be covered.  There might be some jelly leakage at this point but if you have prepared your tin adequately it shouldn’t cause any fridge-carnage!

Refrigerate for an hour.

Make up the remaining half pack of jelly and pour over the raspberries.

Refrigerate for an hour or until the jelly is totally set.

Whip up the cream and pipe over the jelly on top of the trifle.

Sprinkle over crushed Flake or almonds, or any sugar decoration you have.

Remove from the refrigerator about 10 minutes before you wish to serve.

Bask in the glory of the wonderful thing you have created.


Eat.