Showing posts with label yoghurt. Show all posts

Sunday, 17 January 2016

Fruit yoghurt sponge


Sorry I’ve been absent for a while – it was a triple whammy of New Year low, new job and new home computer.  It’s a fairly regular pattern I think: after all the richness of Christmas excesses my palate always starts craving something simple and wholesome around this time of year.  And what could be better than a simple sponge cake?


This cake is enriched by using yoghurt; I’ve experimented by using a flavoured yoghurt and matching it with some fresh fruit.  I went for blueberry because that was all my local supermarket had other than strawberry, and I am not made about strawberries baked into things.


I was hoping for the cake to take on the purple tinge of the yoghurt but, as you can plainly see, it didn’t.  What I didn’t expect – and what turns out to be the true joy of this cake – is that the sponge tastes of blueberry….


…let me clarify: the sponge itself tastes of blueberry.  Normally in such a cake, the sponge tastes of sponge and you get the burst of blueberry in your mouth when you bite into a blueberry.  However, with this cake, the flavoured yoghurt has infused the sponge resulting in the most wonderfully fruity tasting cake.  I loved it.


Ingredients


175g unsalted butter, at room temperature
275g caster sugar
1 teaspoon vanilla extract
3 eggs
175g Greek style yoghurt – I used blueberry flavour
275g self raising flour
1 teaspoon bicarbonate of soda
130g fresh blueberries
2 tablespoons light brown sugar to sprinkle on top of the cake


Method

Preheat oven to 180C/ fan oven 160C/ 350F/ gas mark 4.

Line a 20cm round springform tin with baking paper.

Beat together the butter and sugar until light and whippy.  Don’t skimp on this stage.

Beat in the vanilla and the eggs, one at a time.

Stir in half of the yoghurt, followed by half of the flour.

Take a spoonful of the remaining flour and toss the blueberries in it to stop them sticking or sinking in the batter.

Stir in the second half of the yoghurt, the flour and all of the bicarbonate of soda.

Fold in the blueberries.

Spoon into the prepared tin and level the surface.

Sprinkle the light brown sugar over the top of the cake.

Bake for approximately 1 hour or until a skewer inserted into the sponge comes out cleanly.   Don’t panic if your cake takes longer – mine took about 1 hour 15 minutes.

Leave to cool in the tin for about 15 minutes before de-tinning and leaving to cool completely on a wire rack.

Bask in the glory of the wonderful thing you have created.


Eat.

Sunday, 26 July 2015

Chocolate yoghurt cake


Sometimes, you don’t ‘want’ or ‘fancy’ cake…you NEED it.  I really needed chocolate cake this weekend; nothing fancy, just a handsome piece of sponge with a bit of icing.  This cake hit the mark – packed with chocolate flavour, it has a lovely light crumb and a simple topping that adds a rich mousse-like texture.


The inclusion of yoghurt created a light sponge; yoghurt’s impact on a cake fascinates me because it makes the cake light and airy but also adds moisture and the two seem like they should be mutually exclusive.  I’m no scientist; I just know it works!


The sponge is flavoursome enough that it could standalone.  It would also be perfect made into a loaf cake, cupcakes or individual sponges for a pudding.  It’s one of those recipes that can be adapted easily and should be filed away in your armoury of ‘awesome bakes’. 


Many years ago, I saw Ina Garten demonstrate a simple tip when you’re icing the cake on its final serving plate/stand.  Place four squares of foil on the plate, then the cake on top.  The foil will catch any drips of icing and you can them whip them away leaving a clean plate.  I use it all the time and always marvel that it’s the simplest tips that are always the most useful!


Served warm for dessert with custard or ice cream, or as a good slab of sponge with a cup of tea, this one is a crowd pleaser.  It’s not too sweet but, at the same time, it’s really cocoa-y without having the grown up bitterness that can sometimes go with that.  Even a bit of whipped cream and a few berries would make it look a rather smart dessert. 


Ingredients

For the cake:
175g unsalted butter, at room temperature
275g caster sugar
1 teaspoon vanilla extract
3 eggs
175g Greek style yoghurt
225g self raising flour
50g cocoa powder
1 teaspoon bicarbonate of soda

For the icing:
25g unsalted butter
25g cocoa powder
3 tablespoons milk, plus extra if needed
175g icing sugar


Method

Preheat the oven to 180C/fan oven 160C/350F/gas mark 4.

Line a 20cm round springform tin with baking paper.

Start by making the cake: beat together the butter and sugar until smooth and well combined.  It won’t become really light and fluffy because of the ratios involved.

Beat in the vanilla.

Beat in the eggs one at a time.

Beat in the yoghurt.

Fold in the flour, cocoa and bicarbonate of soda and mix until just combined – don’t overwork it.

Spoon into the prepared tin and level the surface.

Bake for approximately 35-45 minutes or until a skewer inserted into the cake comes out clean.  It’s best to start checking at around the 40 minute mark but don’t worry if it takes longer.  Mine took just over 50 minutes.

Leave to cool in the tin for approximately 20 minutes before de-tinning and leaving to cool completely on a wire rack.

Now make the icing: place the butter and cocoa powder in a saucepan and melt together over a gentle heat, stirring all the time.  It will look a bit icky at this point!

Remove from the heat and beat in the milk and icing sugar; add more milk as required to reach a thick, mousse-like texture.

Put to one side while you prepare the cake for icing.

Place four squares of foil on the serving plate and sit the cake on these so that they will catch the icing drips and keep the plate clean.

Spoon or pour the icing slowly over the cake letting it run down the sides.

When the icing has set a little, gently pull out the foil from under the cake – and voila! A clean plate.  If the icing is very runny pop the cake in the fridge for 10 minutes to make it set.
Serve in generous slices.

Bask in the glory of the wonderful thing you have created.


Eat.

Sunday, 19 July 2015

Banana and golden syrup cake


I had some bananas sitting around in the kitchen feeling generally unloved.  Mr CC won’t touch a banana once it’s past that green, starchy stage that makes your teeth squeak, so they were headed for the compostables bin until I found this recipe.  It’s from the BBC Goodfood site but I’ve made a tweak and substituted golden syrup for the maple syrup listed in the original recipe.  We’ve tried to love maple syrup but just cannot – it’s that background smoky taste that we struggle with; probably because like any good child of the 1970s/80s we were raised on steamed golden syrup sponges and that has fixed our expectation as to what syrup should taste like!


This is an upside down cake and the bananas bake at the bottom of the tin in golden syrup.  When you turn the cake out you add some more syrup and can then either serve it warm with custard for dessert, or as a tea time treat at room temperature.  It definitely has a stronger banana taste when warm, so that’s the way to go if you ‘need’ a good strong hit of banana!


This recipe makes a handsome size cake – perfect when you have many guests to feed.  My one tip with upside cakes is that it’s always best to turn them out the tin when they’re hot/warm – not only because it’s easier to peel the paper off the fruit at the bottom, but also because if your cake has domed while cooking it settles down nicely when still warm to give a stable, flat base.  If you turn it out when cold the shape is fixed and it will look like a spinning top (or a Beyblade, if you can picture one...maybe that’s too obscure a reference!)


The cake keeps fine but just be aware that over time the bananas lose their colour and look a bit grey.  No impact on the taste but not quite so appealing to the eye!


Ingredients

8 tablespoons golden syrup
3 ripe bananas, and 1 very ripe banana
100g unsalted butter, at room temperature
200g light muscovado sugar
4 eggs
2 teaspoon vanilla extract
200g self raising flour
100g ground almonds
1 teaspoon bicarbonate of soda
200g natural/Greek yoghurt


Method

Preheat the oven to 160C/fan oven 140C/325F/gas mark 3.

Line a 20cm square cake tin with baking paper.

Drizzle four tablespoons of golden syrup over the bottom of the tin.

Slice the three ripe bananas (either in rings, or in length) and place evenly in the tin.

Mash the very ripe banana and beat it together with the butter, sugar, eggs and vanilla until well combined.

Fold in the flour, ground almonds and bicarbonate of soda.

Fold in the yoghurt.

Spoon into the tin – take care not to move the sliced bananas around in the bottom of the tin.

Bake for 45 mins – 1 hour or until a skewer inserted into the cake comes out clean.

Let the cake settle for 10 minutes before turning it out onto a wire rack and inverting it (i.e. the bananas are now on the top).

Using a skewer, poke some holes into the cake between the bananas.

Drizzle over the remaining four tablespoons of golden syrup.

Serve either warm for dessert with custard, or on its own at room temperature with a cup of tea.

Bask in the glory of the wonderful thing you have created.

Eat.


Sunday, 14 September 2014

Raspberry ripple cheesecake squares


This recipe was featured in the Sainsbury’s magazine – by far and away the best supermarket magazine in my opinion. The recipe, initially, looks like a very basic cheesecake with a bit of a fruity swirl on top.  Look closer and you will spot two less common twists to a cheesecake: firstly, the addition of ground pistachios to the biscuit base, and secondly, yoghurt in the cheesecake.  Both additions pack in extra flavour and I loved the tanginess the yoghurt added.  The pistachios in the base look so pretty:


I must confess I was dubious as to the quantities of the ingredients required for the topping – it looked so much! But the fact it is baked in a traybake tin rather than the more traditional round tin necessitates the larger quantity of cheesecake – and I don’t have a problem with making a bigger cheesecake! (Do take heed though, and use a deep tin!)


Restraint is the key to creating the ripple effect.  I have to force myself to stop about five swirls before I want to otherwise you lose the definition and it all looks an odd shade of pink rather than the lovely red/white contrast.  It’s the same with any marble cake too – I always have the urge to make just one more swirl (I am the Columbo of baking) and then regret it!


Now I must end on a rant.  Kraft – the makers of Philadelphia, my go to cream cheese provider – has relaunched their product.  Now aside from the fact I’m not sure it’s quite as tangy as it was before (it’s billed as ‘now even creamier’), to my horror, the pots now have less content.  What used to be a 300g pot is now 280g.  A 200g pot is now 180g.  This is not good news for recipes using cream cheese – such as this one – where 600g is needed.  Interestingly, the pot looks the same size...just with less filling.  No doubt it is so the price can be kept the same, but, if you are paying the same price for 6.7% less content then surely that is a price rise?  Do they think we’re stupid? Not to mention the extra annoyance that you now need to buy three pots where you previously would only need two.  I am not impressed Kraft, not impressed at all.


Ingredients

For the base:
100g pistachio nuts
200g ginger nut biscuits
75g unsalted butter, at room temperature

For the topping:
600g cream cheese – I used Philadelphia
450g Greek yoghurt – I used Total
250g caster sugar
3 eggs
2 teaspoons vanilla extract
1 ½ teaspoons cornflour

For the ripple:
150g raspberries
1 tablespoon icing sugar


Method

Preheat the oven to 160°C/fan oven 140°C/320°F/gas mark 3.

Line a tin approximately 30cm x 20cm with baking paper.  Make sure the tin has a bit of depth to it – about 4cm minimum.  I used a disposable foil traybake tin as I find them easy to cut open and get the finished item out.

Put the nuts and biscuits into a food processor and blitz to crumbs.

Add the butter and blitz again until you have the texture of clumpy, wet sand.  NB. There is no need to melt the butter.

Press the crumbs into the prepared tin and ensure you have an even distribution.

Beat together all the ingredients for the topping until well combined.

Spoon over the biscuit base and level the surface.

Now make the ripple: blitz the raspberries and icing sugar together in a food processor.

Sieve to remove the seeds.

Blob the puree on top of the cheesecake and, using a skewer, swirl it around so it mixes a little with the cheesecake – don’t over swirl or you will lose the contrast and just end up with it looking pink!  Less is more!

Bake for approximately 45 minutes or until there’s a slight wobble but the mix isn’t runny.

Cool, in the tin, before refrigerating until you wish to serve.

Cut into generous squares.

Bask in the glory of the wonderful thing you have created.


Eat.

Sunday, 13 July 2014

White chocolate sponge cake


Now don’t get me wrong, I have love for all baked goods (even those I don’t personally like) but given the choice of fancy patisserie or a nice simple sponge I will ALWAYS choose the sponge.  What can I say?  I’m clearly low-rent.  Just saying the word ‘sponge’ pleases me.  Low-rent and easily pleased?  Who can say….


I needed sponge cake this week; it’s the cake equivalent of a security blanket.  Have a slice of sponge and all is right with the world.  This sponge recipe is soft and fluffy with a lovely crumb and little pockets of white chocolate baked into it.  The thick, sticky frosting is smooth and perfect for picking up any crumbs that try and escape!  The cream cheese/white chocolate combination worked well as the tang balanced out the sweetness – it was a big hit!


You can decorate it how you please; it truly is a blank canvas.  You could jazz it up with fruit dipped in white chocolate or opt for colourful with smarties.  I chose Aero balls simply because they were big and I liked the two-tone look of them.  I cut the cake into 15 pieces...of varying sizes.  I cannot cut straight to save my life.  Here's the proof:


Recently I have made a discovery.  I always found melting chocolate on the hob a bit stressful because, even though I made all efforts to melt it slowly,  it did occasionally seize on me (go grainy) and it would always be at a high pressure moment when I didn’t have any spare chocolate (in truth, does anyone ever have spare chocolate?  But maybe this is just semantics).  So I switched to the microwave but that can be hit and miss too if it overheats.  My discovery is this: a heat diffuser.  Unfortunately it only works on gas hobs. You place it on the gas ring and put your pan of chocolate directly on top of it.  I have never had any issues since I’ve started using this.  And it only costs around £6!


Ingredients

For the sponge:
250g unsalted butter, at room temperature
250g golden caster sugar
2 teaspoons vanilla extract
4 eggs
300g self raising flour
½ teaspoon baking powder
150ml natural yoghurt
3 tablespoons milk
100g white chocolate, finely chopped – or you could use white chocolate chips if you prefer

For the frosting:
100g white chocolate
300g cream cheese – I used Philadelphia
100g icing sugar

Optional: sweets of your choice to decorate, or chopped white chocolate


Method

Preheat the oven to 180°C/ fan oven 160°C/ 350°F/ gas mark 4.

Line a 20cm x 30cm tin with baking paper.  You can, if you prefer, use a 20cm square tin or a 23cm round tin but this will alter the depth of the cake and therefore also the cooking time.

Beat the butter until it is soft and creamy.

Add the sugar and beat until the mixture is light and whippy – do not skimp on this!

Beat in the vanilla.

Beat in the eggs, one at a time, adding some of the flour if it looks like it might curdle.  (Use this as a learning opportunity – if it curdles you didn’t spend long enough beating together the butter and sugar – increase the time next time)

Stir in the flour, baking powder, yoghurt and milk – ensure they are well incorporated into the batter.

Finally, stir in the chopped chocolate.

Spoon the mixture into the prepared tin and bake for approximately 25-30 minutes or until a skewer inserted into the cake comes out cleanly.

Leave to cool in the tin.

Now make the frosting: melt the white chocolate either in the microwave (in short 30 second bursts) or in a bowl over a pan of simmering water (ensuring the bowl does not touch the water).

Put the chocolate to one side to cool a little.

Beat together the cream cheese and icing sugar.

Stir in the melted chocolate.

Chill in the fridge until it reaches a spreadable consistency.

Spread over the cake and decorate with the sweets of your choice.

Cut into chunky squares.

Bask in the glory of the wonderful thing you have created.


Eat.

Sunday, 29 June 2014

Strawberry and almond cheesecake sponge

  
It’s Wimbledon time so my thoughts have turned towards strawberries - I am a predictable creature!  This cake was the cover star of Good Food magazine a month or so back and I stored it away for when the strawberry season was at its best.


You will often hear people complaining that strawberries don’t taste like they used to…and that is true for many strawberries but I think that, if you’re choosy about the variety of strawberry you buy, there are some crackers still available.  If you cannot grow your own, and don’t have a pick-your-own nearby, here are my tips for buying strawberries:
  1. Avoid any imported strawberries – I don’t want to eat a strawberry that’s seen more of the world than I have!
  2. Buy strawberries grown as locally to where you live as possible – it surely means they’ve not been sitting around for long?
  3. Take note of the variety of strawberry you like – I would rather go without than buy the tasteless Sonata variety, but a Jubilee strawberry is pretty much a guarantee of flavour.
  4. Smell them.  A strawberry with no smell is a strawberry with no taste.


This recipe pretty much ticks all my boxes for what I like in a cake: it’s made with yoghurt, it contains almonds, it uses cheesecake, and it has big chunks of fruit.  It would work with many different fruits.  The CCD’s damson tree is looking like it’s going to have a bumper harvest so I might make the cake again using damson plums.


The soft almond sponge provides a lovely texture for holding the pockets of cheesecake and strawberries.  This really was one of the best cakes I’ve tasted in a long time...and I’ve tasted a lot of cakes!


Ingredients

For the cheesecake:
200g cream cheese – I used Philadelphia
25g caster sugar
1 egg

For the cake:
175g unsalted butter, at room temperature
250g caster sugar
2 teaspoons vanilla extract
4 eggs
200g self raising flour
50g ground almonds
75g natural yoghurt
250g strawberries – washed, hulled and chopped
Handful of flaked almonds


Method

Start by making the cheesecake: beat together the cream cheese, caster sugar and egg until combined.  Don’t overbeat or it will turn runny – I would actually recommend doing this stage with a bowl and a spoon to control the texture of the mix better.  (Mine did turn runny so I popped it into the freezer for an hour before making the cake – this turned it back to a more spoonable consistency).


If – unlike me – you haven’t turned the cheesecake mix runny, spoon into a bowl and refrigerate until needed.


Preheat the oven to 180°C/fan oven 160°C/ 350°F/ Gas mark 4.


Line a 20cm round springform tin with baking paper.


Beat together the butter and sugar until pale and whippy.  Don’t skimp on this stage – it should look almost like whipped cream.


Beat in the vanilla.


Beat in the eggs one at a time, adding some of the flour if it looks like the mixture will curdle.


Stir in the flour, almonds and yoghurt.


Spoon half of the cake batter into the prepared tin and level the surface.

Spoon blobs of the chilled cheesecake mixture onto the cake.  Use about half at this stage.

Scatter over half the strawberries.


Spoon the remaining cake batter over the top and level the surface.  Be gentle so the strawberries stay in place.


Use your finger or the end of a wooden spoon handle to make divots in the sponge.  Blob the remaining cheesecake into these spaces.

Scatter over the remaining strawberries.

Scatter over the flaked almonds.


Bake for approximately 50 minutes or until a skewer inserted into the cake comes out clean.  It is best to check after 45 minutes to see if the cake is browning too quickly; if it is cover loosely with foil and continue baking.  Don’t worry if your cake takes longer – mine took almost 1 hour 30 minutes, and I did need to cover it with foil.


Leave to cool in the tin for at least 20 minutes before de-tinning and leaving to cool completely on a wire rack.


Refrigerate the cake until 20-30 minutes before serving.


Bask in the glory of the wonderful thing you have created.


Eat.

Saturday, 7 July 2012

Blackberry cupcakes


Blackberries work so well in baking, as do most berries.  They have a strong flavour and I love it when they break down during cooking and ooze their colourful juice into the sponge batter.


I was drawn to this recipe for two reasons: firstly, the unusual (to me) sponge recipe and secondly, for the buttercream using more cream than butter.  It sounded light and whippy and delicious...and oh how it was!


These are big cupcakes so don’t expect a dainty bite; personally, that doesn’t present a problem! The yoghurt added a tang to the sponge which I really liked; it worked so well with the blackberries.


The buttercream, if I can call it that when it contains so little butter, is a revelation – so light and soft.  It melts in your mouth like ice cream leaving behind an aromatic hint of vanilla creaminess.  When I made it and tasted it I was disappointed as it was very sweet, however when eaten with the cake it is perfect.


The other odd thing about this buttercream is that it’s a man pleaser...every single man who tried it said (without knowing the other men had said it) how much they preferred it to the more usual buttercream.  I guess men really are a different species!


Ingredients

For the cupcakes:
225g self raising flour
175g caster sugar
3 eggs
100ml plain yoghurt
175g unsalted butter – melted
150g blackberries

For the buttercream:
50g unsalted butter, at room temperature
100ml double cream, plus extra if needed
½ teaspoon vanilla extract
350g icing sugar
12 blackberries

Method

Preheat the oven to 180°C/fan oven 160°C/350°F/gas mark 4.

Line a 12 hole cupcake pan with paper cases.

Mix together the flour and caster sugar in a large bowl.

In a separate bowl, beat together the eggs and yoghurt (I used the bowl on my scales to cut down on washing up!)

Pour the eggs and yoghurt, along with the melted butter, into the dry mix and stir together.  Don’t over work it.

Stir in the blackberries – it’s best if some break up and ooze their juice.

Spoon into the paper cases.  Don’t panic that the cases look full.

Bake for 20-25 minutes (they will need this long – they are big cakes), or until a skewer inserted into the cake comes out clean.  Mine took almost 30 minutes.

Remove from the oven and leave to cool for a few minutes in the tin.

When cool enough to safely handle, de-tin and leave to cool completely on a wire rack.

Now make the buttercream: beat the butter until soft and whippy.

Beat in the cream and vanilla.

Sift in the icing sugar and beat until smooth.

If the icing is too thick, add more cream – a tablespoon at a time.

Spoon into a piping bag (if it’s a bit soft refrigerate for 5 minutes or so) and pipe generous swirls on top of each cake.

Place a blackberry on the top of each cake.

Bask in the glory of the wonderful thing you have created.

Eat.

Sunday, 10 June 2012

Toffee topped banana and brazil nut cake


This cake is massive!  When I spooned the batter into the tin it filled it to the brim and I had a horrible feeling that one of my tasks that afternoon would be scraping cake from the bottom of the oven!  But it didn’t overspill – I think that’s due to the long, slow cooking time.


It’s the only large cake I’ve made that has a muffin top to it!  The cake came up well above the height of the tin.


I don’t make a lot of banana cakes as a large percentage of my family won’t eat them; however, when I saw this beauty selfishness took over and I knew we had to become better acquainted.  I’m not sure if it was the toffee covered nut topping or the fact that it just sounded so great from the ingredient list.  Whatever the reason, we’ve had a very successful first date and are now going steady!


I cut the nuts finer for the cake than I did on the top.  I don’t mind chunky nuts on top of a cake where they can be seen, but when hidden in sponge a large nut can be a nasty surprise for delicate teeth.
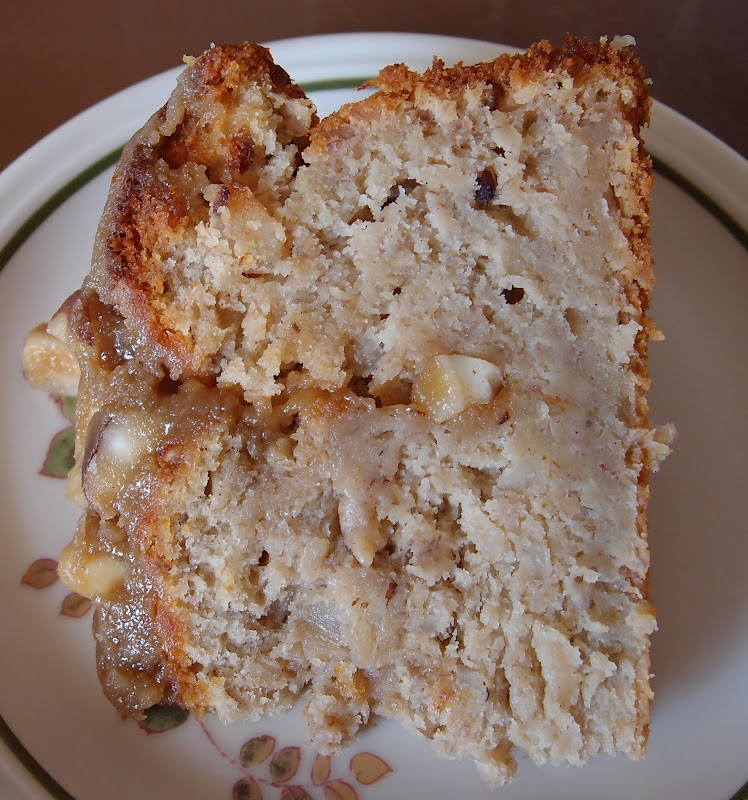


This cake keeps for days getting better and better – so no need to panic about how huge it is – and is lovely for breakfast, an accompaniment for your mid-morning or mid-afternoon tea, and, if you cut a large enough slice, will do very nicely as a meal in itself!  This next photo show why it’s worth piercing the cake with a skewer before pouring on the toffee topping – look at how it’s oozed into the cake:


Ingredients

For the cake:

175g unsalted butter, at room temperature
175g light brown sugar
4 eggs
125g brazil nuts – chopped quite small
3 large bananas – peeled and mashed
½ teaspoon mixed spice
350g self raising flour
1 teaspoon baking powder
300ml plain Greek yoghurt
1 tablespoon runny honey

For the topping:

75g unsalted butter
175g light brown sugar
2 tablespoon double cream
75g brazil nuts – roughly chopped

To serve: thick cream


Method

Preheat the oven to 180°C/ fan oven 160°C/ 350°F/gas mark 4.

Line a 20cm round springform tin with baking paper.

Beat together the butter and sugar until light and fluffy.

Beat in the eggs, gradually.  The mix might start to curdle a little on the fourth egg but that’s fine.

Stir in the brazil nuts and spice.

Mash the bananas and stir into the mix.  I find the most efficient mashing technique is to use my potato ricer.

Stir in the flour and baking powder.

Stir in the yoghurt and honey.

Spoon into the prepared tin and don’t panic – the tin will be full to the brim!

Bake for approximately 1 hour 20 minutes (mine took exactly this time) or until a skewer inserted into the cake comes out clean.

Leave to cool in the tin until you can safely remove the tin.  Then leave to cool completely on a wire rack.

Pierce the cake with a skewer.

Now make the topping: Place the butter, sugar and cream in a pan and gently melt together.
Bring to simmering point and stir well.

Remove from the heat and stir in the chopped nuts.

Pour the mixture over the cake letting it drizzle a little down the sides.

You can if you wish put the whole cake under the grill for 1- minutes to toast the nut topping but I didn’t bother as my grill is erratic and I didn’t want to risk burning the cake.

Serve the cake with thick cream.

Bask in the glory of the wonderful thing you have created.

Eat.

