Showing posts with label shortbread. Show all posts

Sunday, 15 November 2015

Florentine biscuit bars


This recipe is adapted from the one in the BBC Good Food 25th birthday edition.  As soon as I saw the combination of florentines and shortbread I was sold!  I always associate florentines with Christmas as that’s the only time of year we ever used to have them; I don’t know whether they have any particular association with Christmas but, growing up, I remember they always used to form part of M&S’s confection/biscuit range.  M&S used to make a mixed box i.e. milk, dark and white chocolate.  Tactically I would always eat the milk first as I was the only one in my family to like white chocolate so I didn’t have to rush with those!


This is a good recipe to use up all the odds and ends of nuts a baker always seems to have in their cupboard; I buy a bag of nuts for a particular recipe and then don’t use them all.  I seem to have endless bags with about 20-30g of nuts left in them – this is where they get to step into the spotlight!


The cherries and pistachios look so pretty in amongst the nuts and chocolate.  You could make it look extremely festive by using red and green cherries…although I try not to think too hard about what they do to turn those poor cherries such a vivid green.  Some questions are best left unanswered.


Ingredients
For the base:
200g unsalted butter, at room temperature
100g golden caster sugar
200g plain flour
100g ground rice flour


For the topping:
25g unsalted butter
75g golden caster sugar
1 tablespoon plain flour
75ml double cream
50g flaked almonds
25g whole blanched almonds
75g chopped nuts of your choice – I used a mix of pistachios and chopped hazelnuts
75g glace cherries, halved
100g chocolate chips


Method
Line a 20cm square tin with baking papermaking sure the paper comes up high enough that you can use it to lift the finished bake up out of the tin.

Use a food processor to blitz together the butter and sugar.

Add the flour and rice flour and pulse until it starts to come together – don’t overwork it or your biscuit will be tough rather than crumbly.

Press into the base of the tin taking care to distribute the mix evenly.

Prick all over with a fork, cover with clingfilm and refrigerate for at least 30 minutes (or up to 2 days).

Preheat the oven to 180°C/fan oven 160°C/350°F/gas mark 4.

Bake the biscuit base for 25 minutes.

While the base is cooking start work on the topping: place the butter, sugar and flour in a pan large enough to take all the other topping ingredients and gently melt together stirring all the time.

When all the sugar crystals have dissolved add the cream and stir until smooth.

Stir in all the nuts and cherries.

Stir in the chocolate chips.   If you prefer, you can omit the chocolate chips and instead melt the chocolate and drizzle over the baked bars.

Spoon the hot nut mixture over the just-baked base and ensure it is well spread out.  Be gentle – a spatula or the back of a spoon works well.

Return to the oven and bake until the top is firm but retains a little squidge; this will take anywhere between 10-20 minutes but it can catch quickly so check every 5 minutes.

Leave to cool, in the tin, on a wire rack.

Cut into fingers.

If you didn’t add chocolate chips, decorate by melting 100g chocolate by your preferred method i.e. microwave or hob, and drizzle over the cold bake. (I like to do this after I’ve cut the fingers as then the chocolate isn’t disturbed with cutting)

Bask in the glory of the wonderful thing you have created.


Eat.

Sunday, 2 November 2014

Cherry shortbread


I used to work in an office where we got particularly nice biscuits in meetings.  I’m not saying the biscuits made us book more meetings but……well, nope, I think that’s exactly what I’m saying!  The prize on the plate was always the cherry shortbread ring – it could make any meeting palatable (it’s no coincidence it was shaped like a life saver).  I’m sure this golden snitch of a biscuit ensured punctual starts to meetings more than any other reason; you could get to the meeting room 10 minutes early and would rarely be the first one there!


Happy memories of the cherry shortbread ring drifted into my head this week, probably because I was sitting in a meeting room sans biscuits (I know – the horror!).  I decided to pay homage to this glorious biscuit and also tackle what I call a ‘pressed’ shortbread, something that’s been on my to-bake list for a while.  This method is where you tip the dough crumbs into the tin and then  press it into shape, which is where the real binding together of the ingredients takes place.


This is an incredibly flavoursome biscuit given the small number of ingredients.  And who knew it would taste even better when eaten sitting on the sofa, rather than around a meeting table?  You learn something new every day!


Ingredients

280g plain flour
60g ground rice flour
230g unsalted butter, from the fridge
115g golden caster sugar, plus 2-3 tablespoons extra for dusting
85g glace cherries, chopped small – you could use chocolate chips or chopped stem ginger instead, if you so wished


Method

Preheat the oven to 170°C/ fan oven 150°C/325°F/gas mark 3.

Line the base of two 20cm round springform tin with baking paper (loose bottomed sandwich tins would also be good).

Place the plain and rice flour into a bowl.

Rub the butter into the flour until the mix resembles fine breadcrumbs (this can be done with your hands, or in a food mixer).

Stir in the sugar and chopped cherries.

Press the mixture into the prepared baking tin and use your hand to ensure the mix is evenly distributed.

Prick with a fork and cut into segments – this will help to cut into pieces post baking.

Bake for approximately 35-40 minutes or until a very light golden colour.

Leave to firm in the tin for 30 minutes.

Use a sharp knife to rescore along the lines you cut pre-baking.

Dust (generously!) with caster sugar.

Leave to cool in the tin until it is firm enough to de-tin without breaking.

Snap along the score lines.

Bask in the glory of the wonderful thing you have created.

Eat.


Sunday, 18 November 2012

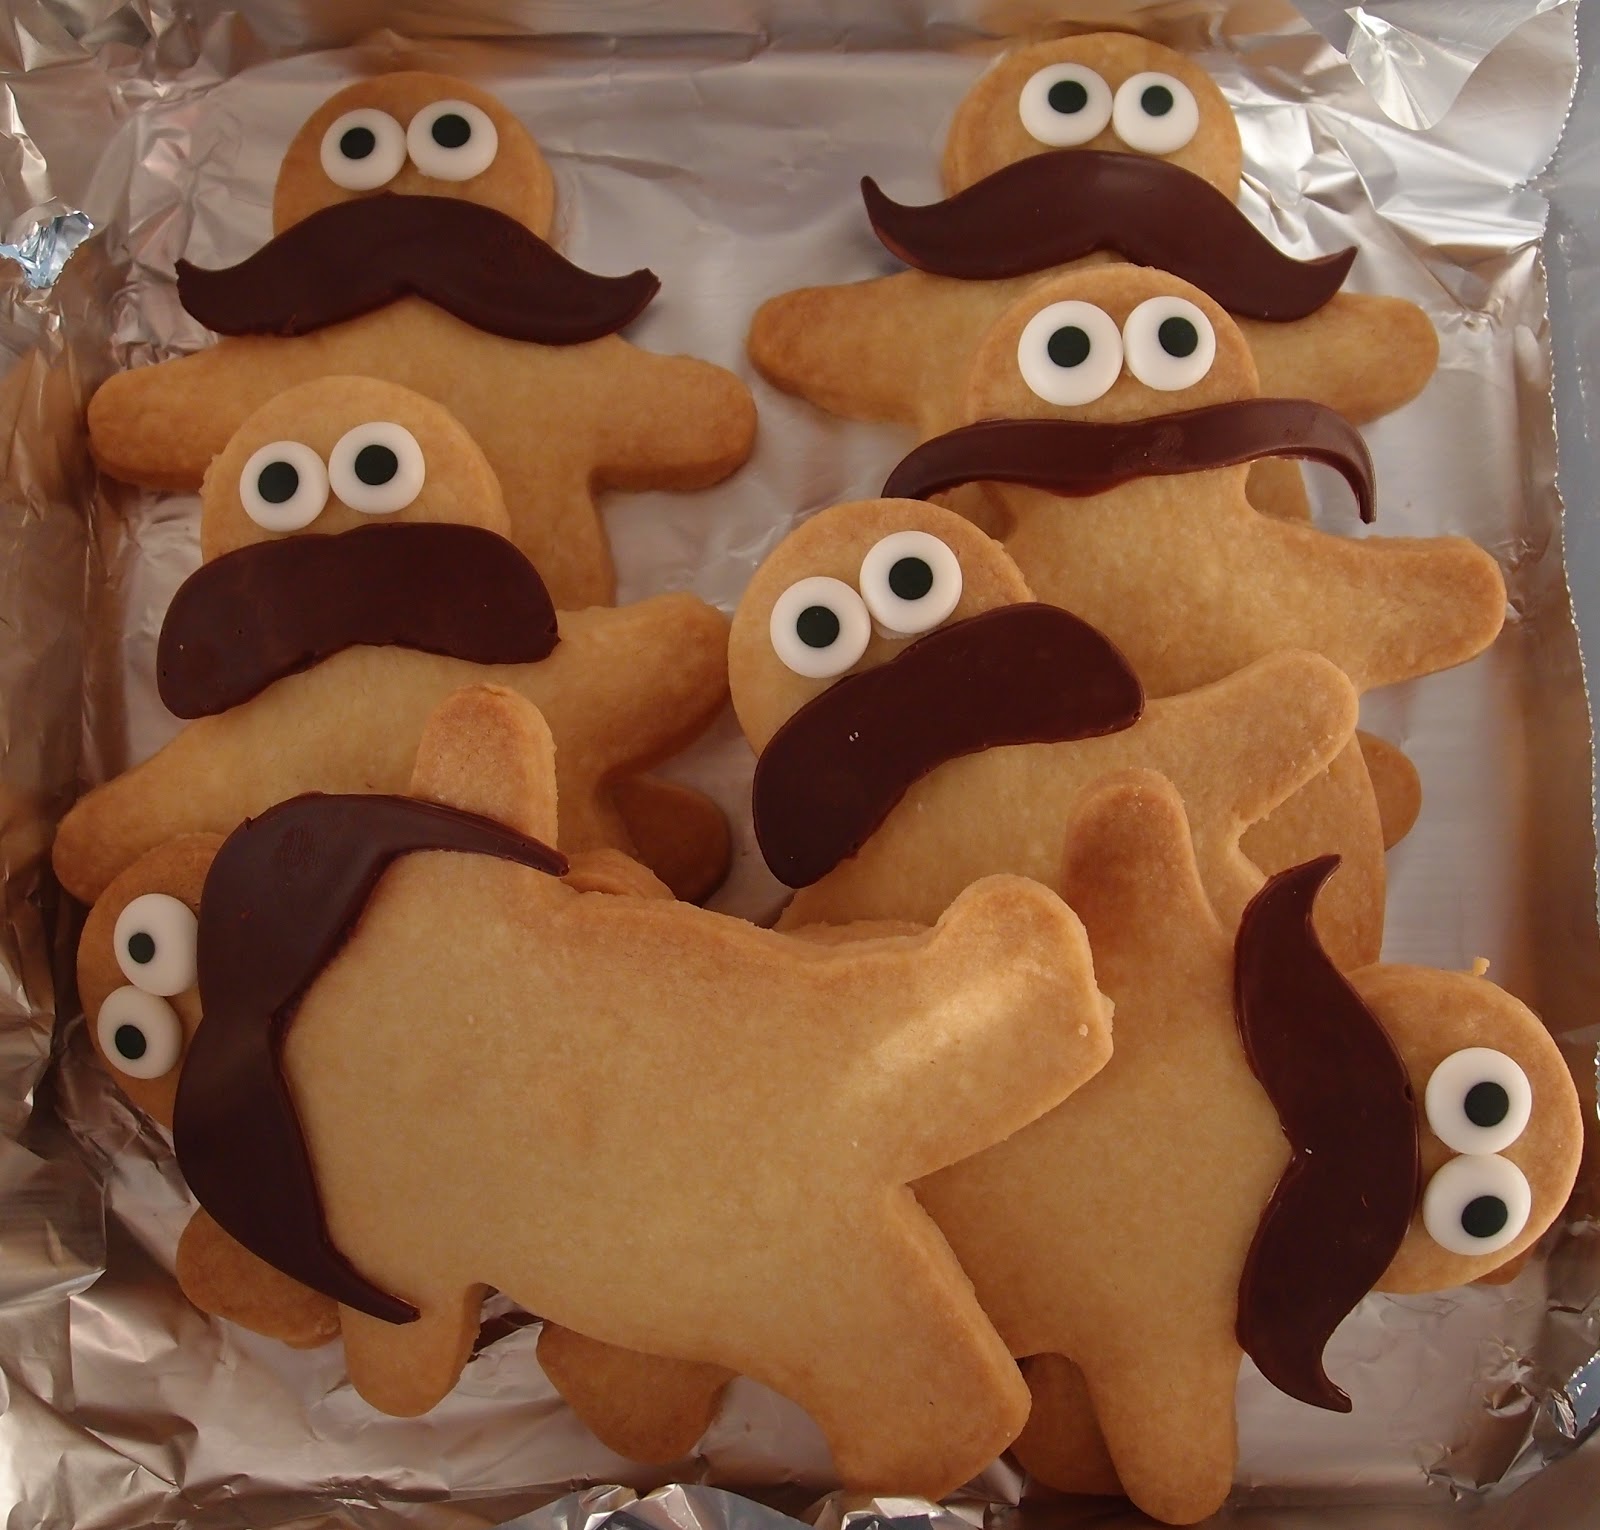
Movember moustache shortbread and prize giveaway


The biscuits are cute, but this is a slightly more serious post than usual.  If you normally skim read (aw c’mon, there’s no shame admitting it....we all do it...don’t we???) please could you slow down at the bit headed up “charity prize draw”?  Thanks awfully!


November is the month you are most likely to see dapper gentlemen sporting beautifully groomed moustaches.  Why?  Movember, of course!  If you haven’t heard of Movember here is the explanation taken directly from the official site:

During November each year, Movember is responsible for the sprouting of moustaches on thousands of men’s faces in the UK and around the world. The aim of which is to raise vital funds and awareness for men’s health, specifically prostate cancer and testicular cancer.

Once registered at movember.com each Mo Bro must begin the 1st of Movember with a clean shaven face. For the entire month each Mo Bro must grow and groom a moustache. There is to be no joining of the mo to the sideburns (that’s considered a beard), there’s to be no joining of the handlebars to the chin (that’s considered a goatee) and each Mo Bro must conduct himself like a true gentleman.

A Mo Sista is essentially a woman who loves a Mo. An individual that is dedicated to supporting the Mo Bros in her life through their moustache growing journey; whether it be a friend, colleague, family member or partner. These inspirational women are committed to raising awareness of men's health issues and much needed funds for men's health along the way.

Mo Bros effectively become walking, talking billboards for the 30 days of November and through their actions and words raise awareness by prompting private and public conversation around the often ignored issue of men’s health.


Mr CC is currently sporting a fine Mexican-style moustache.  We monitor its progress with wonder each day as he has never sported facial hair beyond the few days ‘can’t be bothered to shave’ stubble.  I’m viewing it as an experience similar to an advent calendar, but with less chocolate.  We are both impressed by its luxuriant fullness and that it is (mostly) uniform in colour.  Such a ‘tache deserves sponsorship!


Now, as a Mo Sista married to a Mo Bro (Mr CC!) I must do my bit to raise awareness and – perhaps more importantly – funds.  This is where I throw myself at your mercy...and hopefully your charity.  This is a brilliant cause and every pound raised helps the fight against cancer.


Charity prize draw

Please, please, please, might you consider sponsoring Mr CC’s ‘tache growing exploits?  His Mo page can be found here and you can donate by clicking the ‘donate to me’ box displayed under his profile picture.  You can donate using credit cards or paypal and - I think - you can donate from anywhere in the world.  The money goes directly to the charity and – if you are in the UK and a taxpayer – you can also click the gift aid box thus increasing your donation at no extra cost to you!


To further sweeten the pill, I have put together a little prize bundle worth over £40.  The prize includes moustache themed goodies of biscuit cutters and stamps, sandwich cutters (can also be used for pastry or biscuits), picks for canapĂ©s or cupcake decorations, candies and – because the other big C-word is approaching (that’s Christmas) - a Christmas themed cupcake case set and book!


On 1st December I shall enter the names of all donors into the prize draw and pick one at random.  That person will win the prize bundle of goodies.  Please leave your name in the donation details (blog name is fine if you don’t wish to leave your real name – just split it into a first and surname) and also, in the message box, state that you have come to the Mo page via The Caked Crusader.  This is so I know to include you in the draw.  Also, I know many blog competitions/draws often limit entries to a particular country but I’m not doing that here – the cause is too important to fret about postage costs.  If you donate and win I will post the prize bundle to you WHEREVER you are in the world...if your country has a postal system, I’ll get it to you!


The shortbread men are made from my quick and easy shortbread recipe. In honour of Mr CC’s fine ‘tache growing exploits, each little man was given a chocolate moustache (ebay is brilliant for finding quirky and cheap chocolate moulds).


The chocolate shortbread ‘taches were made from an adapted version of the recipe I used for the men, and that adapted version is set out below.  The moustache biscuits give an idea of what you can win by donating as they were made using the moustache cutter and stamp set included in the prize bundle – obviously, not the set I’m giving away...I bought my own set!


Thank you for whatever donation you can make – it’s such a good cause.  Hope you’re lucky in the prize draw!


Ingredients for chocolate shortbread
125g unsalted butter, at room temperature
55g caster sugar, plus extra for sprinking
150g plain flour
30g cocoa powder
Optional: 100g chocolate chips
Method
Preheat oven to 190°C/fan oven 170°C/375°F/gas mark5
Line two baking sheets with greaseproof paper.
Beat together the butter and sugar until you have a smooth paste.
Stir in the flour, cocoa and chocolate chips (if using), and bring together to a dough.
Roll out the dough between two sheets of clingfilm. You’re aiming for a thickness of approximately 1cm.
Cut into shapes using the cutter of your choice and place on the baking tray; allow a little room for expansion but no need to leave more than about 1cm. NB. The dough re-rolls easily so don’t waste any of it!
Sprinkle with additional caster sugar.
Bake for approximately 15 minutes or until the biscuits are firm-ish to the touch. Mine took nearer 18 minutes.
Leave to cool on a wire rack.
Store in an airtight container – they will keep for days and days!
Bask in the glory of the wonderful thing you have created.
Eat.

Sunday, 3 June 2012

Jubilee treats...part one of two


If you live in the UK, the chances are you’ve realised that this weekend is a four day Golden Jubilee celebration marking Our Maj’s 60 years on the throne (stop sniggering!).  Let’s just say it’s garnered a mention or two in the media....


Being an old curmudgeon, I shall be avoiding street parties like the plague (the last street party I went to was for the Silver Jubilee in 1977; I had green balloons attached to me and wore a label identifying me as a Birds-Eye pea pod.  This stuff scars you for life – believe me) but instead decided on a nice meal with my family.


This post covers the dessert and afternoon tea cake.  As I was roasting a huge rib of beef on the day, I wanted to pick recipes that could be prepared in advance, would have a broad appeal, would suit the occasion and look good without much faff.  I think the strawberry mousse, and the raspberry and blueberry cake achieved this!


Let’s start with the strawberry mousse: it’s a gelatine set mousse containing both cream and natural yoghurt; this stopped it being too sweet.  I like leaving little flecks of cream in my mousse as they feel delicious in your mouth; the trick is to fold the mousse just enough but not so much that it becomes a single colour and texture.


The darker topping is just strawberry puree, sweetened to taste with some icing sugar.  I served the mousse with shortbread biscuits (the recipe for which can be found here)


The raspberry and blueberry sponge is my attempt to get patriotic by picking out the colours of the Union flag (yes, I am a pedant – it’s only the Union Jack when it’s at sea.  Pedantry over.)  This is a big cake and it serves a lot of people – I used my 23cm round tin which is a tin that doesn’t get a lot of airings in my kitchen!


Raspberries and blueberries are probably my favourite fresh fruits to bake with as they add such a pop of colour and a fabulous texture to any cake as they collapse and squidge into the batter during baking.  All this cake needed was a simple vanilla buttercream to set it off.


I hope everyone enjoys the extended weekend...and please come back and visit early next week to see my other Jubilee bake involving golden syrup and cream cheese (and no – it’s not a cheesecake!)


Ingredients for the strawberry mousse

625g strawberries, washed and hulled
Icing sugar – to taste
3 tablespoons runny honey
4 leaves gelatine
250ml double cream
250g natural yoghurt

To serve: shortbread biscuits – recipe can be found here

Method for the strawberry mousse

Take 225g of the strawberries and blitz in a food processor or blender.

Pass through a sieve and taste – add icing sugar if needed.  I added 1 ½ tablespoons to my strawberries.

Pour into a jug and refrigerate until serving.

Now make the mousse: blitz the remaining strawberries and sieve.

Stir in the honey.

Fill a small bowl with cold water and place the gelatine leaves in it to soften.

Pour about 1/3 of the larger puree into a small saucepan and heat until just bubbling.

Remove from the heat.

Squeeze all the water out of the now soft gelatine leaves and whisk into the hot puree.

Put to one side until cool, then whisk into the other 2/3 of puree.

Whip the cream until it forms soft peaks.

Add the yoghurt and whip until combined.

Fold in the strawberry puree.  If you like creamy little bits left in your mousse take care not to fold it too much.

Ladle into four 250ml glasses and cover with clingfilm.

Refrigerate until you wish to serve.

When serving, pour some of the puree on top, and serve with tiny shortbread biscuits.

Bask in the glory of the wonderful thing you have created.

Eat.


Ingredients for the raspberry and blueberry cake

For the cake:

200g unsalted butter, at room temperature
200g caster sugar
2 teaspoons vanilla extract
3 eggs
325g plain flour
3 teaspoons baking powder
150ml milk
125g fresh raspberries
125g fresh blueberries

For the buttercream:

150g unsalted butter, at room temperature
200g icing sugar
2 teaspoons vanilla extract
2 tablespoons milk

Method for the raspberry and blueberry cake

Preheat the oven to 180°C/fan oven 160°C/350°F/Gas mark 4.

Line a 23cm round springform tin with baking paper (a 20cm square tin would also work).

Beat together the butter and sugar until smooth, light and whippy.  Don’t skimp on this stage – this is where you get all the air into your batter.

Beat in the vanilla.

Beat in the eggs, one at a time.

Measure out the flour and then take two tablespoons of it and sprinkle over the fruit – this ensures that the fruit is dry and won’t sink in the cake.

Fold the flour and baking powder into the batter, followed by the milk.

Tip the floury fruit into the batter and gently fold trying not to break the fruit – some will break, don’t worry!

Spoon into the tin and level the surface.

Bake for 50 minutes – 1 hour or until a skewer inserted into the cake comes out clean.  Mine took an hour.

Leave to cool, in the tin, until it is cool enough to handle and safely de-tin.  Leave to cool completely on a wire rack.

Now make the buttercream: beat the butter until it is soft.

Add the icing sugar and beat together – start with the mixer on a low number to avoid dusting your kitchen with icing sugar!

Add the vanilla  and milk and beat until smooth.

Spread over the top of the cake and decorate as desired.

Bask in the glory of the wonderful thing you have created.

Eat.

Sunday, 27 May 2012

Rhubarb and mascarpone tart


The rainy April and early May has been excellent for garden rhubarb but, now the hot weather has arrived it will rapidly dry out and become straw-like.  Before that happens, I’ve just managed to sneak in one more rhubarb recipe!


This tart has a shortbread base which is very buttery, very short and very crumbly.  It tastes just like the lightest shortbread biscuit you’ve ever eaten but is soft and tricky to work with, although it does patch well.  The original recipe I adapted said you should bake it blind, as you would pastry i.e. baking paper and beans.  I did this and, after baking, when I lifted the paper out, most of the shortbread went with it!  After laughing at how amusing this was (yeah, right) I found myself scraping soft shortbread off the paper and spreading it back into the tin – just about saving it.  What I’m trying to say is – don’t line the baking paper with beans.  Unless you want heartbreak!


The creamy mascarpone filling is light and creamy.  I will definitely use it for other fruits, such as peach, plum, raspberry or apricot.  It has a hint of cheesecake tang but is lighter and firmer in texture.


For all my rantings about the shortbread tart case it is sooooo worth it!  The buttery crumbly texture is divine and it has that almost granular shortbread texture that gives it more bite and substance than pastry.


Occasionally, I muse on how fun or difficult certain words are to type.   If you’ve missed this fear not, for here’s a summary:

Nice words to type: Demerara (flows like music across the keyboard)
Nasty words to type: Desiccated (is it two S’s or C’s?)

I would like to add “mascarpone” to the nasty words list – after the initial “ma” I always hesitate thinking, “does the ‘r’ come now or after the second ‘a’”.  Just me then.....


Ingredients

For the rhubarb:
500g rhubarb, cut into 2cm chunks
60g caster sugar

For the shortbread base:
135g unsalted butter, at room temperature
65g caster sugar
160g plain flour
15g cornflour
25g brown rice flour

For the filling:
115g caster sugar
30g unsalted butter, at room temperature
225g mascarpone
30g plain flour
2 eggs – separated
100ml double cream

Method

Preheat the oven to 190°C/fan oven 170°C/375°F/gas mark 5.

Place the rhubarb on an oven tray and sprinkle over the sugar.

Roast for approximately 15 minutes or until the rhubarb is soft, but still holding its shape.
Tip into a sieve and leave to cool.

Now make the shortbread base: Place all the ingredients in the food processor and pulse until you have squidgy crumbs that look like they will squeeze together to make a dough.  If you don’t have a processor, make by the rubbing in method.

Tip the dough out onto a sheet of clingfilm and, with as little handling as possible, bring into a ball.

If your dough is very soft refrigerate it briefly.  I didn’t as I feared it would make the shortbread tricky to roll out.  It rolls well soft and patches easily.

Roll out between two sheets of clingfilm until it will line a 25cm loose bottomed flan tin.  No need to grease the tin.

Don’t panic – the pastry will be very thin.

Gently place a sheet of baking paper down onto the pastry but don’t use baking beans – I found the pastry too soft for them.

Bake for approximately 15-20 minutes or until the pastry is just turning golden and biscuity.
Leave to cool, then wrap a foil collar around the outside of the tin – this is to protect the filling from spilling out when it soufflĂ©s during baking.  Not sure it’s really necessary so make your own judgement – all I’ll say it, next time, I won’t bother.

Now make the filling: place the butter, sugar and mascarpone in a large bowl and beat together.

Beat in the egg yolks and cream.

In a separate bowl whisk the egg whites until you have soft peaks.

Fold into the mascarpone mixture and ensure all ingredients are well combined.

Spoon into the cooled pastry case and level the surface.

Place the cooled rhubarb chunks on top.

Bake for approximately 45 minutes or until golden brown.  Another clue it’s ready is that the filling should be firm but with a bit of a wobble when you shake the tin.

Leave to cool – don’t panic that the filling will sink a little.

Serve, at room temperature on its own or – if you must – with cream!

Bask in the glory of the wonderful thing you have created.

Eat.

Wednesday, 30 November 2011

Quick and easy shortbread


The CCMIL (Caked Crusader’s Mother in Law) has a birthday only two days after mine. As she has to be careful about her sugar intake I decided against a cake and, knowing her fondness for a ‘plain’ biscuit, decided on birthday biscuits.


This is such a simple recipe yet the results are amazing. I know some people think shortbread can only be called shortbread if it contains rice flour or similar to “rough” the texture up, but I think this recipe produces a wonderful, buttery, crisp yet crumbly biccie. And surely that’s what we all want?


It was a first outing for my Wilton biscuit cutter and stamp. The ‘happy birthday’ message just about survived baking! I think it would work better on a less buttery biscuit that would hold its definition more on baking – I did try chilling the biscuits before baking to hold the shape more, but it made no difference at all.


This is the type of recipe that works as a standalone biscuit to enjoy with a cup of tea, but would also be a fab accompaniment to a mousse or pannacotta for dessert. You could flavour the biscuit with any extract or alcohol and you could also add dried fruit or chocolate chips. Just think how yummy it would be with dried cranberries for Christmas. It only takes a few minutes to make the dough so is a good recipe to have in your armoury!


Ingredients

125g unsalted butter, at room temperature
55g caster sugar, plus extra for sprinking
180g plain flour

Method

Preheat oven to 190°C/fan oven 170°C/375°F/gas mark5

Line two baking sheets with greaseproof paper.

Beat together the butter and sugar until you have a smooth paste.

Stir in the flour and bring together to a dough.

Roll out the dough between two sheets of clingfilm. You’re aiming for a thickness of approximately 1cm.

Cut into rounds and place on the baking tray; allow a little room for expansion but no need to leave more than about 1cm. NB. The dough re-rolls easily so don’t waste any of it!

Sprinkle with additional caster sugar.

Bake for approximately 15 minutes or until the biscuits are golden brown. Mine took nearer 18 minutes.

Leave to cool on a wire rack.

Store in an airtight container – they will keep for days and days!

Bask in the glory of the wonderful thing you have created.

Eat.