Showing posts with label tart. Show all posts

Sunday, 1 May 2016

Chocolate pecan tart


I suspect this may be the same as a Mississippi mud pie but haven’t called it that in case, like key lime pie, there’s a specific ingredient/aspect that defines it and I’m not aware of it!  These things can be a minefield so I thought I’d avoid causing any offence – in all honesty it was the inclusion of pecan nuts that made me just think, ‘hmm, best not go there!’


It’s a bank holiday weekend so that means the glorious euphoria that only an extra day off work can bring!  I wanted to make something that would last all weekend and provide dessert.  This met the brief and was also a tart that I knew we wouldn’t get bored of – seriously, how you could you ever tire of chocolate tart?


The tart souffled up whilst cooking and sank when cooling.  Don’t panic when this happens; although my outer ring of pecan nuts stood up like sentries and meant the edge couldn’t sink back down giving an ‘interesting’ final look!  Here it is souffled….


….and sunken:


I do admire the design of pecan nuts – they look like shrivelled brains.  Walnuts and pecans have it sewn up regarding ‘interesting looking nuts’.  Most nuts are a bit dull looking – smooth and pale, but these two have raised the bar and always make me pause to look whenever I bake with them.  The complexity in shape that nature can produce is fascinating.  I’ve re-read what I’ve just written and concede that some people may find it weird.  I can assure you that it’s when I say I’ve started talking to the nuts that you should worry (or when I claim that they answer back!)


Ingredients

For the tart base:
225g biscuits – I used hobnobs, but digestives or ginger biscuits would also work
100g unsalted butter, at room temperature

For the filling:
170g plain chocolate
170g unsalted butter
4 eggs
170g dark muscovado sugar
150ml whipping cream
100g pecan nuts

To serve: whipped cream


Method

Start by making the base: blitz the biscuits to crumbs in a food processor, then add the butter and blitz again until you have clumpy wet sand.  NB. If you use the food processor there is no need to melt the butter, unlike it you use the old ‘bash the biscuits with a rolling pin’ method!

Press the crumbs into a 20cm loose bottomed flan tin taking care to come right up the sides.

Place in the refrigerator while you make the filling.

Preheat the oven to 190C/fan oven 170C/375F/gas mark 5.

Melt the chocolate and butter together over a gentle heat.

Leave to cool for about 10 minutes – if the mix is too hot the eggs will scramble when you add them causing a lumpy final texture.

Whisk in the eggs and sugar until smooth and well combined.

Whisk in the cream.

Pour into the chilled biscuit base and place the pecan nuts on top, arranged however you wish.

Bake for 30-40 minutes or until the chocolate filling looks set.

Leave to cool before de-tinning.  Don’t worry that your tart will settle as it cools – this is normal.

Serve in generous slices with cream.

Bask in the glory of the wonderful thing you have created.


Eat

Sunday, 31 January 2016

Yorkshire curd tart


Whenever Mr CC and I are in York there are two things I have to eat:  Firstly, a Fat Rascal from Bettys, and secondly, a Yorkshire Curd tart from Bennett’s – a lovely little cafĂ© right next to York Minster.  Admittedly, the curd tart has a slight lemon tang but I’m warming towards lemon – I’m not saying we’re ever going to best friends but the animosity and hurt is over.


I’ve long wanted to make a curd tart but it’s nigh on impossible to find curd cheese unless you are blessed with a great deli, a fancy supermarket or farm shop.  Some recipes say you can substitute ricotta but – whisper it for fear of causing offence – I’ve come to the conclusion that I don’t like ricotta.  Neither the texture nor the blandness do anything for me in baked goods (it’s ok in savoury recipes).


This recipe, adapted from the BBC GoodFood website, starts with instructions how to make curd cheese and it’s a lot simpler than you might think.  Start with a very high fat, rich milk:


The formation of the curds in the milk is like witchcraft; I felt like I was at a cauldron making magic happen:


The most fascinating thing is that the curds suck the fat out of the milk so, as they form, the remaining liquid turns more and more watery.  Really one of the most oddly enjoyable things I’ve done for a long time!  I had no use for the whey, but apparently you can keep it and use it wherever you would use buttermilk….thinking about it, it probably is buttermilk?


The only real thing to be aware of is that you need to start it the day before to allow draining time.  A lot of draining time….I started it off in a tea towel lined colander sitting in the sink….


… and then, after several hours, stood the colander (still tea towel lined) in a bowl….


….before refrigerating it overnight.  The next morning I had this:


This tart is perfect for anyone who doesn’t like overly sweet bakes; it has a sharp zing to it from a combination of the lemon and curd cheese.  One slice will not be enough!


Ingredients

For the curds:
1.8 litres full fat Jersey milk – this has 5g fat per 100ml (compared to semi skimmed which has 1.8g per 100ml)
Juice of 1 ½ lemons
(NB. This made 445g curd cheese – so if you have curd cheese to hand and don’t want to make it, use this weight)

For the pastry:
210g plain flour
130g unsalted butter – cold
2 teaspoons caster sugar
1-2 tablespoons cold water

For the filling:
75g unsalted butter – at room temperature
75g caster sugar
2 eggs
100g currants
Grated nutmeg – allspice is more traditional, if you prefer


Method

Start making the curds the day before you want to serve the tart: place the milk in a saucepan and bring to a simmer.

Add the lemon juice and turn the heat to low.
Gently stir while the curds form; if you are too firm you will break the curds.  The curds form very quickly – mine were smaller than I expected (but I had nothing to compare it to, so that probably doesn’t mean much).

Once the mixture looks watery with creamy lumps remove from the heat and leave to cool.

Drain the curds overnight in the fridge.  I lined a colander with a clean tea towel and suspended this across a bowl. I started the draining process in the sink because there was a lot of liquid and I didn’t need it for anything.

On the day of making the tart start with the pastry: place the flour, butter and sugar in a food processor and blitz until you have breadcrumb sized pieces.

Add the water gradually and only what is needed to form a dough.

Tip the dough out onto a sheet of clingfilm and handle just enough to bring together.

Flatten into a disc and wrap in clingfilm.

Refrigerate for 20 minutes, although the dough will happily sit in the fridge for a couple of days.

Preheat the oven to 180C/fan oven 160C/350F/gas mark 4.

Roll out the pastry and use to line a 23cm loose bottomed tart tin.  Leave the excess pastry overhanging the tin.

To make the filling beat together the butter and sugar until soft and well combined.

Beat in the eggs, one at a time.

Stir in the curds, making sure you break up any large lumps.

Stir in the currants.

Spoon into the pastry case (note – no need to blind bake the pastry) and level the surface.

Grate some nutmeg over the top, or sprinkle over some ground allspice.

Bake for approximately 40 minutes or until the tart feels set and the pastry is golden.

Leave to cool in the tin.

Serve in generous slices.

Bask in the glory of the wonderful thing you have created.


Eat.

Saturday, 19 September 2015

Apple cheesecake tart


I've just realised that I forgot my blog's 8th birthday a week or so back. This apple cheesecake tart more than makes up for it.  I have been trying to think of a three word combination better than that.  Bank holiday weekend? Winning lottery ticket? Tiny fluffy puppy? I’m sure there are others!


This tart is glorious mainly because of the combination of textures.  The flavours obviously work, but it’s the crispy pastry with the creamy cheesecake layer topped with the soft, juicy apples and spice.  The apple juices bake down into the cheesecake giving it a delicate fruity tang; the apple slices hold their shape but retain a little bite but still yield to gentle pressure from a spoon or fork.


This would work beautifully served warm as a dessert with vanilla ice cream.  I served it at room temperature with thick cream.  I think you could also make smaller, individual tarts which would look very pretty served for dessert with a ball of ice cream on top (or on the side).


Normally I photograph my bakes as I serve them for eating.  This one wasn’t going to be served until the evening so I decided to photograph it in the afternoon.  Tip: If you serve desserts in the kitchen and bring them through to the dining room no one notices if there’s a slice missing!  Just call me ‘Two Desserts’......(aka The Very Thoughtful Lady Who Wanted To Ensure Dessert Was OK Before Inflicting It On Anyone Else).


Ingredients

For the pastry:
175g plain flour
85g unsalted butter, cold
30g caster sugar
½ teaspoon ground cinnamon
1 egg yolk
1 tablespoon cold water

For the filling:
250g cream cheese – I used Philadelphia
2 eggs
60g caster sugar

For the apples:
4 Cox’s apples, peeled, cored and sliced
70g caster sugar
1 teaspoon ground cinnamon


Method

Start by making the pastry: place the flour and butter into a food processor and blitz until you have fine breadcrumbs (you can do this by hand using the rubbing in method if you prefer).

Add the sugar and cinnamon and blitz again.

Add the egg yolk and water and blitz until a ball of pastry just starts to form.

Tip the dough out onto a sheet of clingfilm and bring together, using your hands, to form a ball of pastry.  Handle as little as possible.

Flatten into a disc and roll out between two sheets of clingfilm so that you can line a 23cm round, loose bottomed flan tin.

Prick the base with a fork.

Cover with clingfilm and refrigerate for one hour.

Preheat the oven to 200C/fan oven 180C/400F/gas mark 6.

Remove the pastry from the fridge and line the pastry case with either baking paper or non stick foil.

Weight the paper/foil with baking beans.

Bake for 10 minutes, then remove the beans and paper/foil and bake uncovered for a further 5 minutes.

Leave to pastry case to cool.

Reduce the oven to 190C/fan oven 170C/375F/gas mark 5.

Now make the filling: place the cream cheese, eggs and caster sugar into a food processor and blitz until you have a smooth, well combined mixture.  You can do this in a stand mixer, or by hand if you prefer.

Pour into the part baked pastry case.

Now attend to the apples: toss the sliced apples in sugar and cinnamon.

Layer over the top of the cream cheese mixture.

Bake for 35 minutes or until golden and set.

Leave to cool in the tin.

Serve in generous slices with thick cream.

Bask in the glory of the wonderful thing you have created.


Eat.

Sunday, 2 August 2015

Coconut Cream tart


When Mr CC and I have a quiet Sunday at home it will usually begin with the Channel 4 show ‘Sunday Brunch’.  Most of this time is spent asking each other if we have heard of the ‘celebrity’ guests and complaining about the awful music they choose to showcase either side of the ad breaks.  I think we’re getting old! It is, primarily, a cooking show, yet I rarely want to replicate the dishes that are made….until last weekend’s show when this recipe for coconut cream tart cropped up.  They followed the US convention of calling it coconut cream pie but, to me, if there’s no pastry lid in sight….it ain’t a pie!


I have long wanted to make a coconut cream tart but, when I looked up US recipes, they often seem to include ingredients such as ‘pudding mix’ and I don’t know what that is.  This recipe uses custard powder, so I wonder if that’s what pudding mix effectively is – just a cornflower based thickening agent?


This is not a dessert for the diet conscious.  It is rich, creamy, and huge…all things that make it pretty ace!  The creamy mascarpone topping is so much nicer that plain whipped cream as it has a custard-like flavour; indeed, I have used it in the past as both a shortcut for crème patisserie, and custard in a trifle.  It is hard not to eat it all straight from the bowl.  I added a little sugar to the topping (as well as increasing the quantity of topping) as the whole tart is not overly sweet.  When a US guest on Sunday Brunch tried it she commented that it was not as sweet as American versions.  If you want a sweeter tart maybe add more sugar to the custard layer.


There is coconut in the biscuit base and the custard is bulked out with a lot of desiccated coconut.  It means the custard layer is not smooth but the benefit is that it really boosts the coconut flavour.  If, like me, you can never have anything too coconutty then this is heaven!


I suppose you could serve it with some berries in an attempt to make it look a bit healthier but I didn’t bother.  I decided to embrace its creamy, custardy goodness in all its white/yellow/beige splendour!


Ingredients

For the base:
225g digestive biscuits
90g unsalted butter, at room temperature
15g desiccated coconut

For the filling:
3 egg yolks
80g caster sugar
1 teaspoon vanilla extract
475ml milk
225g coconut cream
60g custard powder
30g unsalted butter, at room temperature
225g desiccated coconut
For the topping:
150g mascarpone
300ml double cream
1 tablespoon icing sugar
Handful of toasted coconut flakes – I couldn’t find toasted flakes anywhere so toasted some coconut in a dry frying pan; keep it moving and don’t let it burn!

Method

Start by making the base: place the biscuits in a food processor and blitz until you have fine crumbs. 

Add the butter and coconut and blitz again.

NB. If you don’t have a food processor and are crushing the biscuits using the ‘bashing them with a rolling pin’ method, you will need to melt the butter.

Press the damp crumbs into a 23cm loose bottomed tart tin.

Refrigerate for an hour.

Now make the filling: beat together the egg yolks and sugar until smooth and fluffy.  They will puff up in volume.

Beat in the vanilla.

Place the milk, coconut cream and custard powder in a pan and bring gently to the boil.  Stir enough to ensure the custard powder has dissolved and is not clumping in lumps at the bottom of the pan.

Remove from the heat and gradually pour over the egg mix, whisking well the whole time.

Sieve the mixture back into the saucepan (don’t skip this stage – there will be little eggy lumps that you don’t want in your creamy filling!) and simmer, stirring the whole time, until the mix is thick and creamy.  If it coats the back of a spoon it’s the thickness you want.

Remove the pan from the heat and quickly stir in the butter and desiccated coconut.

Spoon into the biscuit base and level the surface.

Press clingfilm over the surface (to stop any skin forming) and refrigerate for 4 hours.

Now make the topping: beat the mascarpone just enough to slacken it a little.

Pour in the cream and beat until the mix is thick enough to hold its shape.

Beat in the icing sugar.

Spoon on top of the tart.

Scatter over the toasted coconut flakes.

Serve in generous slices.

Bask in the glory of the wonderful thing you have created.


Eat.

Sunday, 21 June 2015

Chocolate custard tarts


Did you miss me?  When I signed off in February I wasn’t planning on being away for so long but you know how things are sometimes...weeks become months and so it goes on.  Sorry.  If it’s any consolation I missed you all!    I can’t promise that I’ll go back to my regular-like-clockwork weekly updates but I shall try my very best.


This is the first time I have attempted chocolate pastry.  I’ve read before that it’s ‘tricky’ and can be difficult to roll etc, therefore I decided to take the approach I would to turn a sponge into a chocolate sponge: use a trusted recipe and replace some of the flour with cocoa.  It worked well and I didn’t have any issues with texture or rolling.


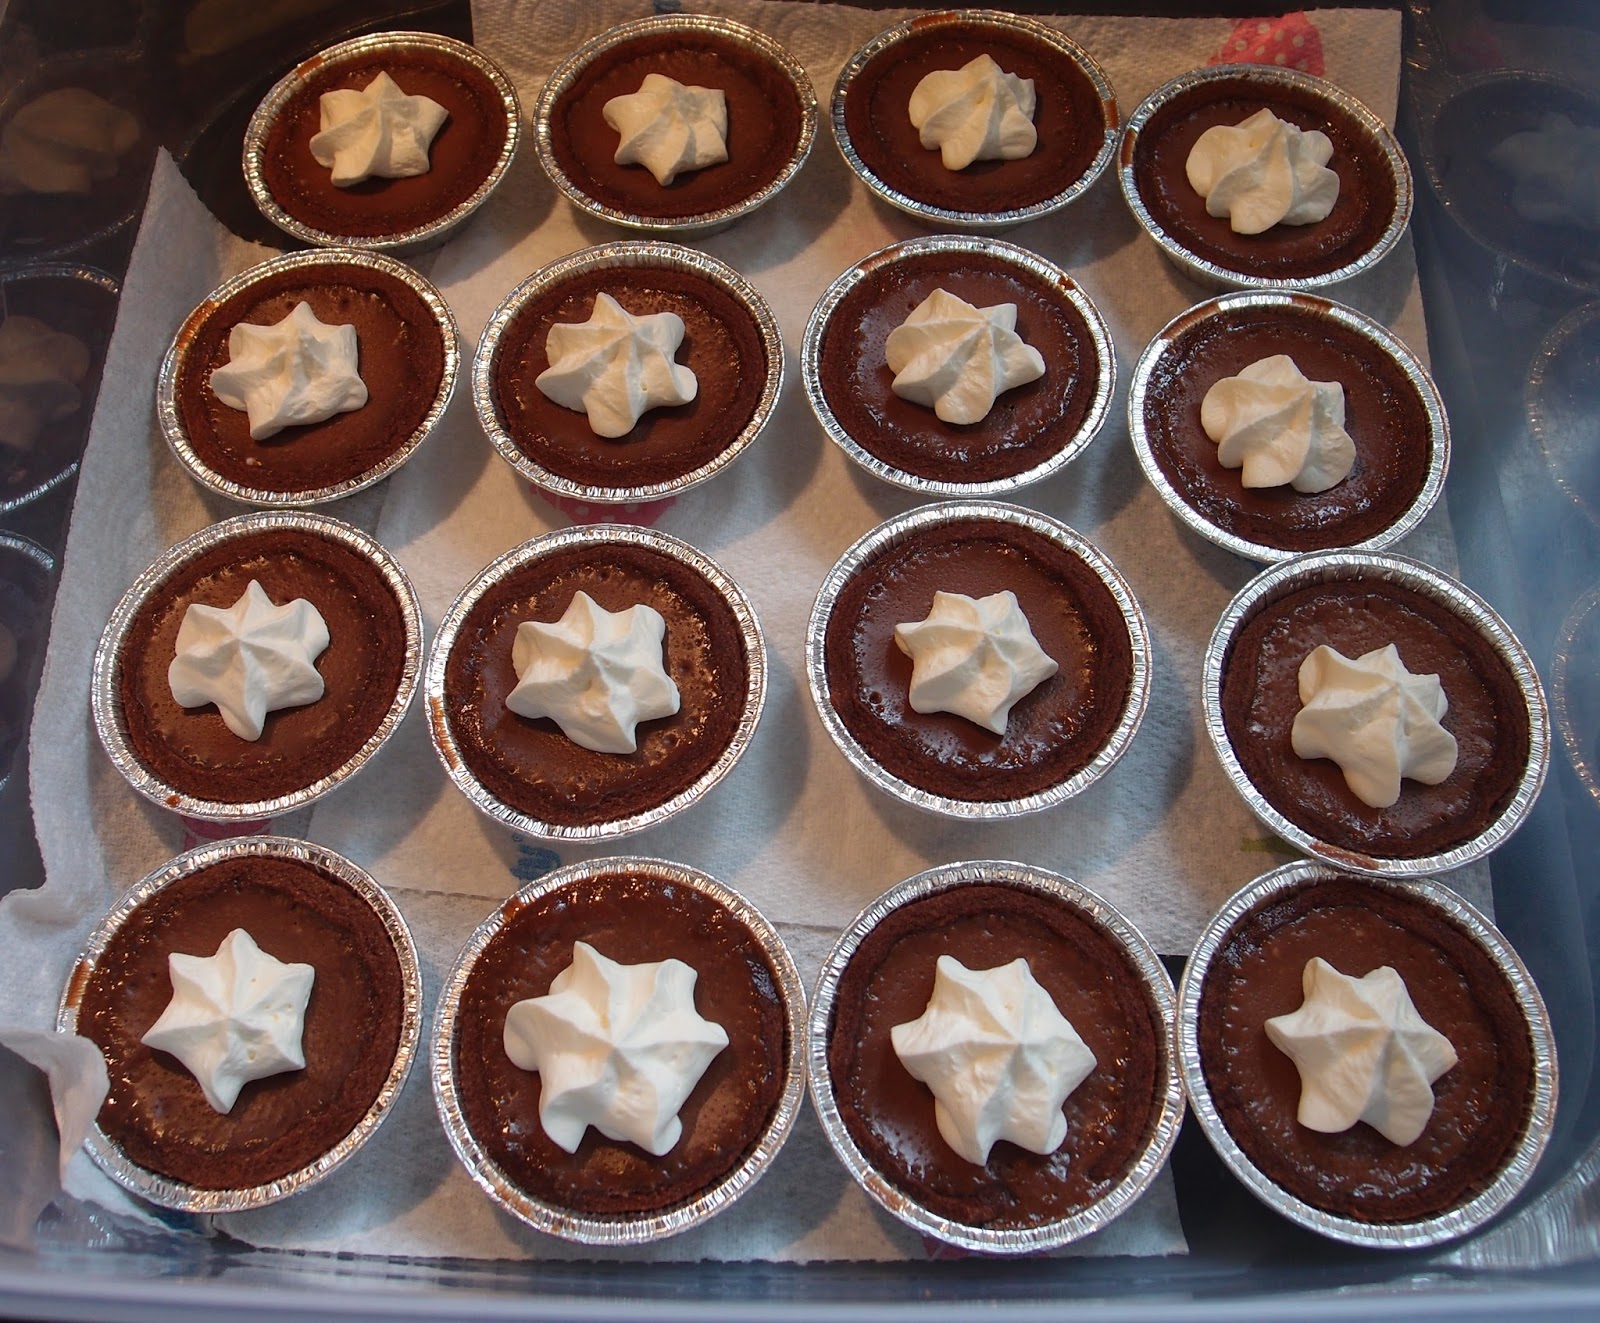
I didn’t have to pack chocolate flavour into the pastry as the tart filling was pure chocolate indulgence!  It combines the intense richness of ganache with the velvety texture of custard – be careful not to overbake it or you will lose the lightness of texture.  The use of milk chocolate makes it a tart to suit most palates (except those odd souls who like their chocolate so bitter it’s more of a punishment than a pleasure).


I only ever make individual pies and tarts in disposable foil cases now – they are so easy to use and the pastry never sticks.  There is no sadder sight in baking than a beautiful tart or pie ruined because it wouldn’t come out of the pan.  We’ve all been there – I remember mine was a batch of mince pies that ended up so scarred and battered by the knife I attacked them with to dislodge them, that I suspect they formed some sort of support group to get over the trauma.


Now of course these don’t need any adornment at all but I never know when to stop, so piped a simple rosette of whipped cream on the top of each tart.  I like the contrast it gave against the dark tarts.  I showed a modicum of restraint in not sprinkling crushed flake over the top….but you can bet your life I thought about it (and wanted to!).


Ingredients

For the pastry:
150g plain flour
25g cocoa powder
85g unsalted butter – cold
30g caster sugar
1 egg yolk
1 tablespoon cold water

For the filling:
225ml single cream
75ml whole milk
300g milk chocolate
2 eggs

To decorate:
200ml whipping cream


Method

Start by making the pastry: place the flour, cocoa and butter in a food processor and blitz until you have crumbs that look a bit like wet sand.

Add the sugar and blitz again.

Add the egg yolk and water and blitz just until the pastry starts to form.

Tip out onto a sheet of clingfilm and bring together into a ball of dough – don’t over handle or it may become tough.

Roll the pastry out between two sheets of clingfilm and, using a cutter of the appropriate size, cut out rounds to line either a cupcake pan or individual foil tart tins (I use the latter as they are a nice way to transport and protect the tarts).  I got 18 tartlets.

Prick the base of each tart with a fork, then cover with clingfilm and chill for about 30 minutes to 1 hour.  It won’t do any harm to chill overnight, if you want to get a head start!

Preheat the oven to 180C/fan oven 160C/350F/gas mark 4.

Line each pastry case with baking paper or non stick foil, then weigh down with baking beans or rice.

Bake for 10 minutes.

Remove the baking beans/rice and paper/foil and return to the oven – uncovered – for a further 5 minutes or until the pastry base no longer looks wet or shiny.  This is the best test for chocolate pastry as the colour will not help you!

Put to one side to cool.

Reduce the oven to 140C/fan oven 120C/275F/gas mark 1

Now make the filling: place the cream and milk in a saucepan and bring just to boiling point.
Remove from the heat and add the chocolate.

Stir until all the ingredients are combined.

Leave to cool for 10 minutes before beating in the eggs.

Spoon into the pastry cases – I found a ladle worked best.

Bake for 10-15 minutes or until the filling looks set but wobbles when you shake the tray – they will continue to set as they cool.

[If you have leftover filling spoon into ramekins and place them in a roasting tin.  Fill the tray with hot water until it comes halfway up the sides of the ramekins and bake for about 15-20 minutes or until set with a wobble – bonus dessert!]

Leave to cool on wire rack.

Decorate with whipped cream if required.

Refrigerate until about an hour before you wish to serve.

Bask in the glory of the wonderful thing you have created.

Eat.


Sunday, 23 November 2014

Chocolate and chestnut tart – happy birthday to me!


It was some time ago that I ate the “best cake ever” (in my opinion).  It was a ‘maronischnitte’ from CafĂ© Sacher in Salzburg; a creamy chestnut delight.  My thoughts turned to it recently and I decided to take elements of it for my birthday cake…or birthday tart as it became.


Last weekend Mr CC and I had a spiritual experience: we visited Whole Foods on Kensington High Street.  Never before have we so wanted to dislike a shop yet fallen in love with it so quickly.  I was convinced it would be overpriced hydroponic mung beans being sold to yummy mummies but it wasn’t; it was glorious.  I could’ve spent a grotesque amount of money but limited myself to what I could hold in my hands, which turned out to be a pot of couverture chocolate, a pot of red onion and horseradish stuffing, and three bars of chocolate.  Not to be used in the same dish, I’m sure you’ll appreciate.


I used my couverture in the making of the ganache.  Apart from the pebble shaped pieces looking professional in the pan I didn’t honestly notice much difference in the way it handled. It may have melted a bit quicker, and for milk chocolate had a very strong rich cocoa taste but nothing really stood out as different.


For the chestnut element I used a tin of Clement Faugier chestnut spread as it was sweet and had vanilla added to it.  Ok, and I love the tin it comes in.  The tin has a lot of ribbing to it and a really busy, vintage-y design; I particularly love the fuzzy looking chestnuts.


A biscuit base (I wasn’t in the mood for pastry), chocolate ganache, sweet chestnuts and lashings of whipped cream.  Happy birthday to me!


Ingredients

For the biscuit base:
200g biscuits – hobnobs, digestives or shortbreads will all work
100g unsalted butter
1 tablespoon golden syrup or honey
For the ganache:
200ml whipping cream
1 teaspoon vanilla extract
200g milk chocolate – or dark if you prefer

For the topping:
250g sweetened chestnut puree
300ml whipping cream

To decorate: chocolate flake


Method

Place the biscuits, butter and golden syrup in a food processor and blitz until you have moist crumbs.  If you don’t have a food processor, place the biscuits in a bag and beat to crumbs with a rolling pin.  Then put in a bowl and add the butter (melted) and golden syrup.
Press the crumbs into a 23cm round loose bottomed tart tin (I used a disposable foil tin as we’re in the process of packing up the house for moving – it did make it harder to get out, so use a loose bottomed tin if you can).  Alternatively, you could use a 36cm x 12cm rectangular loose bottomed tart tin.
Refrigerate for at least an hour.
Now make the filling: Place the cream in a saucepan and add the vanilla.
Bring the cream to up to boiling point, without actually letting it boil, and then remove from the heat.
Break up the chocolate and add to the cream.
Let it stand for a couple of minutes before going in with your whisk and ensuring that the cream and chocolate are fully combined.
Leave to cool for 15-20 minutes.  Whisk occasionally to thicken up the ganache.
Remove the tart base from the fridge and pour the ganache into it.
Return to the fridge and leave to firm up – once it is firm, wrap it in clingfilm (if you try and do this straightaway you will get a mess and the clingfilm won’t pull away easily).
Spread the chestnut puree over the ganache.
Whip the cream and pipe over the chestnut layer.
Finish with some flaked chocolate.
Remove from the fridge 30 minutes before you wish to serve.
Serve in slices.
Bask in the glory of the wonderful thing you have created.

Eat.


Sunday, 10 August 2014

Pine nut and honey tart


A lot of my baking recently has been selected based on the limited time I had available and how low faff the recipe was.  Rather gloriously, this weekend I was able to accommodate a bit of faff, which was fortuitous as I had a hankering for pastry.  I’ve adapted this recipe from the BBC Good Foodwebsite and used dates and sultanas instead of glace fruit.  I still find glace fruit hard to love and had a box of dates a friend had bought me back from Oman (thanks, Jasmin!) so the stars seemed in alignment to make this happy substitution.


Normally, when a recipe gives the option of soaking fruit in either rum or orange juice I will ALWAYS pick rum.  But I fancied a change this time so surprised myself by opting for orange juice.  It did a nice job of plumping up the fruit and added a fruitiness to proceedings.


The filling is reasonably runny pre-baking so, although you mix the fruit into it do not be disheartened when you cut into the tart and see the fruit has settled at the bottom.  This is what’s meant to happen.


Fruit aside, the tart filling is virtually identical to a bakewell tart.  If you’re fed up with jam or berries in your bakewell this recipe provides a nice variation.  The pine nut and honey topping also makes a tasty change.  I don’t use pine nuts very often in my baking but they work very well and take on a lovely toasted flavour.


The flavours in this tart are gentle and harmonious.  There are many different influences in this recipe and I struggled to think how to describe it.  If you like bakewell tarts, baklava, Eccles cakes, marzipan and sticky toffee pudding you will love it!


Ingredients

For the pastry:
175g plain flour
85g unsalted butter – cold
30g caster sugar
1 egg yolk
1 tablespoon water

For the filling:
100g raisins
40g sultanas
100g dates – chopped so they are a similar size to the raisins and sultanas
3 tablespoons or either rum or orange juice
175g unsalted butter, at room temperature
175g golden caster sugar
50g plain flour
175g ground almonds
5 eggs
85g pine nuts
2 tablespoons clear honey
 To serve: thick cream


Method

Start by making the pastry: place the flour and butter in the food processor and blitz until you have fine crumbs. 

Add the sugar and blitz briefly.

While the machine is still running tip in the egg yolk and the water.

Stop the processor when clumps are starting to form.

Tip the clumps out onto a sheet of clingfilm and, using your hands, bring them together to form a ball of pastry.  Handle only enough to achieve this – you don’t want to overhandle the pastry and make it tough.

If you wish to make the pastry by hand rub the butter into the flour until you have breadcrumbs.  Stir in the sugar, egg and water and, using your hands, bring together to a ball of dough.

Roll the pastry out between two sheets of clingfilm so it is large enough to line a 23cm round loose bottomed tart tin.  Don’t expect lots of spare pastry overhanging the tin – this recipe makes just enough!

Prick the base of the pastry with a fork.

Cover with clingfilm and refrigerate for 1 hour.

While the pastry is chilling, start the filling: place the raisins, sultanas and dates in a bowl and add the orange juice or rum. 

Stir so all the fruit is covered with liquid and leave to soak, stirring occasionally if you happen to pass by.

Preheat the oven to 200°C/fan oven 180°C/400°F/gas mark 6.

Cover the chilled pastry with baking paper or non-stick foil and weigh down with baking beans.

Bake for 10 minutes, before removing the paper and beans and baking for a further 5 minutes or until the pastry is just starting to turn golden.

Remove from the oven and put to one side while you make the filling.

Reduce the oven temperature to 180°C/fan oven 160°C/350°F/gas mark 4.

Now make the tart filling: beat together the butter, sugar, flour, almonds and eggs.

Stir in the soaked fruit, including any liquid left in the bowl.

Spoon into the pastry case and level the surface.  It will look full but don't worry - it doesn't rise much on baking.

Scatter the pine nuts over the top.

Drizzle over the honey.

Bake for approximately 40-50 minutes or until a skewer inserted into the filling comes out clean.

If your tart browns too quickly (I’d check after 40 minutes) cover it loosely with foil and continue baking.

Leave to cool, in the tin, on a wire rack and de-tin for serving.

Serve at room temperature with thick cream.

Bask in the glory of the wonderful thing you have created.


Eat.