Sunday, 13 November 2011

Rocky road cupcakes


Unusually for me I was extremely dithery in what to bake this week; normally I know what I want to bake as soon as I’ve posted the previous week’s bake on my blog! I was eventually drawn to this recipe as it contains just about everything – I might as well call them “kitchen sink cupcakes”!


I’ve never had rocky road before although I’ve been aware of it. Reading about it online it seems that you can pick or choose what you want to include – biscuits, dried fruit, coconut, brownies...I even saw popcorn mentioned, but the vital components are marshmallow, chocolate and nuts. So I’ve obeyed the rules but added chopped honeycomb pieces (like you’d get in a Crunchie, not actual honeycomb!) simply because I’ve tidied my baking cupboard and been reunited with them!


These turned out to be substantial cupcakes in size, look and the amount of stomach space they occupy. Or in other words: win, win, win!


The cake is squidgy – almost a halfway between sponge and brownie; the frosting is thick and fudgy. They are a perfect combination. You can see how squidgy the sponge is in this photo, taken when the cakes were fresh from the oven:


Ingredients

For the cupcake sponge:
140g unsalted butter, at room temperature
140g caster sugar
1 teaspoon vanilla extract
3 eggs
150g self raising flour
55g cocoa powder
50g milk chocolate chips
30g mini marshmallows – or diced larger marshmallows

For the topping (this topping is very rich and therefore I recommend piping on a little less than you would a normal cupcake. If you want the normal amount of buttercream, double the quantities as this is quite a mean recipe!):
50g plain chocolate, broken into squares (I actually used ½ dark, ½ milk chocolate)
2 tablespoons water
25g unsalted butter
175g icing sugar

To decorate:
85g mini marshmallows
40g nuts, roughly chopped – I used almonds
50g honeycomb pieces
Optional: 55g milk chocolate ,melted

Method

Preheat the oven to 180°C/fan oven 160°C/350°F/Gas mark 4.

Line a cupcake pan with paper cases.

Beat together the butter and sugar until light and fluffy. Don’t skimp on this stage as this is what makes the sponge light and airy.

Beat in the vanilla extract

Beat in the eggs, using a little of the flour if it looks like it might curdle.

Gently fold in the flour and cocoa powder.

When the mixture is smooth and well combined, stir in the chocolate chips and mini marshmallows

Spoon the batter into the paper cases.

Bake for 15-20 minutes or until a skewer inserted into the cupcakes comes out clean. Mine took 18 minutes.

Remove from the tin as soon as possible and leave to cool on a wire rack – removing from the tin is important as the heat of the tin will mean that the cupcakes continue to cook.

Now make the topping: place the chocolate, water and butter in a heatproof bowl and place over a saucepan of simmering water.

Stir until melted and smooth.

With the bowl still over the water stir in the icing sugar and beat until smooth and thick. At this point you can remove from the heat and whip further off the heat.

It takes a lot of beating – firstly, until it is cool and secondly, until it’s thick enough to pipe. I mixed it until cool, then popped it in the fridge for 30 minutes before giving it a final whip up.

Pipe the frosting over the cupcakes then decorate with whichever components of a rocky road you have chosen to use.

Optional: Melt the chocolate and drizzle over the top.

Bask in the glory of the wonderful thing you have created.

Eat.

Sunday, 6 November 2011

Yorkshire parkin


As my love affair with all Yorkshire related baking grows, I chose to make parkin
this week. Parkin is traditionally eaten in Yorkshire on 5th November, Bonfire Night, and as I was heading to a firework display with Mr CC and the CCMIL (Caked Crusader’s Mother in Law) it seemed an appropriate treat to have waiting for us on our return.


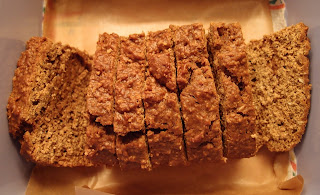
Parkin is a true test of willpower as it needs to be allowed to age – you can’t leap on it and gobble it up the minute it comes out of the oven! It needs to be stored, in an airtight container, for at least 4 days so the spice and treacle can mellow and mature; the texture also changes and becomes darker and stickier.


I have to admit that when my parkin came out of the oven I was a little disappointed, because it didn’t look particularly dark or sticky. Here it is, freshly baked:


Now, I understand the need for aging. Just look at the difference after two days in an airtight container. It’s sunk, it’s darker and it’s sticky to the touch. If ever there was a reward for patience, this is it:


After four days it had improved even further:


What makes parkin different to gingerbread is the inclusion of oatmeal. This was a stumbling block as I couldn’t find oatmeal anywhere; so I bought rolled oats and blitzed them to a fine, gritty flour in my food processor. The look and taste of my finished parkin matched those I’d eaten in Whitby, so I’m assuming this is an acceptable substitution:


When a slice of parkin is put in front of you, you have a big decision to make – to butter or not to butter? In the interests of science I tried both and liked both. I think buttering the parkin makes it a more substantial bite to eat, and I liked the salty contrast of the butter with the sticky spiced cake. Remember the rule re:buttering - it must be so thick that you can leave teeth marks in it! My dentist could probably identify me from this photo:


Ingredients

300ml milk
225g golden syrup
225g black treacle
115g unsalted butter
50g dark brown sugar
450g plain flour
½ teaspoon bicarbonate of soda
2 teaspoons ground ginger – next time I would use more, probably 4 teaspoons
350g medium oatmeal – I couldn’t find this so blitzed rolled oats (i.e. porridge oats) in the food processor until it resembled coarse flour
1 egg

Optional extra: pinch cayenne pepper

To serve: butter


Method

Preheat the oven to 180°C/fan oven 160°C/350°F/Gas mark 4.

Line a 20cm square cake tin with baking paper that comes up above the height of the tin – this makes it easier to lift the baked parkin out.

Place the milk, golden syrup, black treacle, butter, and dark brown sugar into a saucepan. I placed the saucepan on the scales and weighed the syrup and treacle directly into the pan – it stops the scale’s tray getting icky.

Place the pan over a gentle heat and stir continuously until the ingredients have melted and combined. Do not let the mixture boil.

Remove from the heat and leave to cool for 5 minutes.

Place the flour, bicarbonate of soda, ground ginger, oatmeal and – if using – the cayenne into a large bowl and mix.

Stir in the egg, then make a well for the wet ingredients.

Stirring all the time, pour in the wet ingredients (from the saucepan) and stir until well combined. It will look a bit gritty because of the oatmeal, so don’t panic.

Pour into the prepared tin and level the surface.

Bake for approximately 40 minutes or, until the surface of the parkin is firm to the touch. The skewer test isn’t great here because you want to retain some squidginess.

Leave the parkin to cool in the tin, until the tin is cool enough to handle.

Remove the parkin from the tin and leave to cool completely on a wire rack.

Store in an airtight tin for at least 4 days before eating. You can eat it plain, or buttered.

Bask in the glory of the wonderful thing you have created.

Eat.

Wednesday, 2 November 2011

Peanut butter cookies with ganache filling


Continuing my love for all baked things using peanut butter, I present to you a work of art – a peanut butter cookie filled with an oozy ganache filling. Oh boy, does this work!


Somewhat perversely, having amassed a collection of biscuit cutters that can only be contained in 12 drawers of storage (small drawers – it’s not like I’m obsessed or anything), I find myself currently favouring biscuit recipes where cutters aren’t required. They are often quicker and easier to make.


Having said that, I found these a bit of a faff – however, they are TOTALLY worth it...if they weren’t I wouldn’t feature them on my site! The problem is moulding the biscuit around the ganache. I tried the approach the recipe said, which was to make a patty then put a spoonful of ganache in the centre, then drawing the sides up:


This was tricky as the dough was prone to crumbling. So I then tried making a patty and pinching the edges to make a volcano – this did work, but the finished bake looked....well, let’s just call it
rustic:


What worked best for me, was making a ball and using the end of a wooden spoon to make a well, spooning some ganache into it then closing it up. The finished biscuit (shown here uncooked) looked decent enough...


...especially when compared to one of my earlier efforts. Let’s be honest, this one ain’t gonna win no beauty contest ("why, Ambassador, with this biscuit you're really spoil- ugh!"):


The salty peanut butter in the biscuit works so well with the thick ganache – a flavour sensation!

I decided to double the mixture based on this email exchange with the CCB (Caked Crusader’s Brother):

CCB: Do they come in large batches, nothing more disappointing than an epic biscuit that only comes in 24’s ?

Me: The mix apparently makes 18, so I’ll double it up

CCB: Will there be enough to go round? [Author’s note – there were 5 of us for tea, and I was also making a cake]


Ingredients

For the ganache – I found this too much and only needed half. If you’re more confident in your biscuit making (particularly with getting ganache into a biscuit dough!) go for it, but – be warned - you might have some left over:

125g dark chocolate – I used half dark, half milk
150ml double cream

For the biscuit:

125g unsalted butter, at room temperature
125g caster sugar
125g crunchy or smooth peanut butter – whichever you prefer, I used crunchy
4 tablespoons golden syrup
1 tablespoon milk
225g plain flour
½ teaspoon bicarbonate of soda

Method

Preheat the oven to 180°C/fan oven 160°C/350°F/Gas mark 4.

Start by making the ganache, as you want this to have time to cool naturally before adding to the biscuits. Best not to refrigerate it as it can set hard, I found placing it by an open window helped. If you’re pushed for time give it a short burst in the fridge. I think my ganache was possibly still too runny so give it time to firm up.

Place the chocolate, broken into chunks, in a heatproof bowl.

Heat the cream to boiling point, then immediately pour over the chocolate.

Leave to stand for a couple of minutes then stir until it is smooth and well combined.

Now make the biscuits: Line two baking sheets with baking paper.

In a large bowl, beat together the butter and sugar until it is light, whipped and fluffy.

Beat in the peanut butter, followed by the golden syrup and milk.

Add the flour and bicarbonate of soda and knead until you have a smooth dough.

Take a generous tablespoon of dough and flatten it into a patty.

Place a teaspoon of the now firm ganache into the centre of the patty and then pull up the sides so you can seal them i.e. leaving you with a ball of biscuit filled with ganache. If the ganache isn’t completely sealed in it can leak during baking. I found this didn’t always work and it was easier to make an indent (with the end of a wooden spoon) into a ball of dough and then spoon the ganache in before pinching it closed – but you will get less ganache in using this method.

Place the ball on the baking sheet and flatten slightly. Repeat with the remaining mixture.

Bake for 10-12 minutes or until the biscuits are golden brown.

Leave to cool completely, still on the baking sheet, on a wire rack.

Store in an airtight container for several days and eat as and when required.

Bask in the glory of the wonderful thing you have created.

Eat.
Sunday, 30 October 2011

Coble cake


Mr CC and I have just returned from a splendid jaunt to Whitby
; a beautiful town on the rugged North York coast. It is also the inspiration and setting for Bram Stoker’s Dracula.


My cake this week is therefore Yorkshire-themed. Cobles are open fishing boats, with flat bottoms, commonly sighted on the North York coast. This cake is named after them but doesn’t seem well documented – there are some mentions but I couldn’t find a recipe anywhere on the internet. The cake is a spiced sponge, filled with apple puree and served with cream. This was all the detail I needed to produce my own version!


I was tempted to whip the cream and fill the sponge with it, along with the apple puree but I think this wouldn’t have produced such an elegant finish. I also considered stirring the apple puree through the cream but again, I wanted to keep the flavours distinct.


The one thing that the internet seems in agreement about re: Coble cake is that it needs to be served with cream. I was happy to oblige:


There were some lovely tea rooms in Whitby; one thing we noticed very quickly was that the region hasn’t got much time for fancy patisserie, favouring good hearty cakes in – and remember this is me saying this – hearty portions! We enjoyed, amongst other things, a toasted teacake so huge it took both hands to lift it to my mouth! I took the biggest bite I could out of one half (f
or photographic purposes only, obviously) – it barely made an indent:


I think our serving of chocolate cake and flapjacks highlights the generosity of Yorkshire portions. There aren’t many places where TWO flapjacks are considered the standard serving! Also notice how the chocolate cake is only just contained within the boundaries of the plate:


Another highlight was this toffee apple betty cake – the flavours were a delight and I loved how the apple was layered in the middle section:


This scone was lovely – unusually for me I chose to have it with butter and jam rather than cream and jam:


Mr CC was pleased with his carrot cake...and who wouldn’t be, having a triple-decker slice like this put in front of them?


Ingredients

For the cake:
250g unsalted butter, at room temperature
220g golden caster sugar
4 eggs
80ml milk
300g self raising flour
1 teaspoon ground ginger
1 teaspoon ground cinnamon
½ teaspoon freshly grated nutmeg
1 ½ teaspoon mixed spice

For the apple puree (puree is never an exact science so make whatever quantity you wish – it freezes brilliantly); however for this cake I used:
1-2 Bramley apples
10 tablespoons caster sugar – or to taste
Water

To serve: thick or whipped cream

Method

Preheat the oven to 180°C/fan oven 160°C/350°F/Gas mark 4.

Line two 20cm round loose bottomed sandwich tins with baking paper.

Start by making the sponge: Beat together the butter and sugar until light and fluffy. Don’t skimp on this stage as this is when you get lots of lovely air into your sponge.

Beat in the eggs gradually, adding some of the flour if it looks like it might curdle.

Beat in the milk.

Fold in the flour and all the spices until the mixture is smooth and well combined.

Spoon into the prepared tins and level the surface.

Bake for approximately 30 minutes or until a skewer inserted into the centre of the sponge comes out clean. Another good sign is if the sponge is just pulling away from the edge of the tin.

Leave to cool in the tin for about 20 minutes before turning out and leaving to cool completely on a wire rack.

Meanwhile, make the apple puree. Take a saucepan of appropriate size – roughly so that the apples will half fill the pan.

Cover the bottom of the pan with water – ideally about 2cm deep.

Peel, core and thinly slice the cooking apples.

Slowly simmer until the apples break down and you have a puree; if the pan looks dry add some more water. You can speed this up placing the pan lid 3/4s over the pan.

Personally, I like my puree with some apple chunks still in it; if you don’t cook until smooth.

Add the sugar right at the end – this is totally to taste so add gradually until you have the right sweetness for you.

When you are ready to assemble the cake place one sponge layer, flat side up, on the serving plate.

Spread the apple puree over the sponge and then sandwich with the second sponge, flat side down.

If you wish, dust the top sponge with icing sugar.

Serve in generous slices with whipped cream.

Bask in the glory of the wonderful thing you have made.

Eat.
