Sunday, 6 June 2010

Pecan tart


It’s easy to get stuck in a baking rut and keep making similar things using your favourite ingredients.
Every once in a while it’s nice to ask someone else for inspiration – this week I asked Mr CC to pick ingredients for me to use and he chose pecans and maple syrup. So obviously, it had to be pecan tart (nope, I won’t call it pie – sorry!)


I know most people would call this ‘pecan pie’ but I really struggle calling something ‘pie’ when it doesn’t have a pastry lid.
It breaches all that is right in this world to misname baked goods in such a way. The Oxford English Dictionary defines pie as “a baked dish of savoury or sweet ingredients encased in or topped with pastry” – note the “encased in” bit – the pastry must seal in the filling. I’m disappointed that the OED allows anything topped with pastry to be called a pie but I’ll leave that battle for another day. So to sum up – this is a TART and not a PIE. Now that that can of worms has been successfully opened I feel a lot better....I’m no psychic but I sense this may lead to some comments....


The pastry interested me in this recipe as it didn’t use egg; normally my short crust pastry always uses egg yolk.
It produced a drier, more biscuity pastry which contrasted well with the incredibly rich and sticky filling. The filling sets firm but, while the top sets hard, the inside remains soft and moist.


I served it at room temperature with thick cream but it would also be lovely warm with ice cream.

You’ll notice in my ingredients list I used half golden syrup and half maple syrup – you can easily use all of one if you wish.

Homage to the dawn of computer games...here is a pecan tart pretending to be a pacman:


Ingredients

For the pastry:

200g plain flour
115g unsalted butter, cold
2 tablespoons caster sugar
cold water

For the filling:
70g unsalted butter, at room temperature
100g light muscovado sugar
70g golden syrup
70g maple syrup
2 eggs, beaten
1 teaspoon vanilla extract
130g pecan nuts, roughly chopped

Method

Start by making the pastry: place the flour and butter in a food processor and blitz until you have breadcrumbs. Alternatively, rub the butter into the flour by hand.

Stir in the sugar and enough water to bring the crumbs to a stiff dough. I pulsed the mix in my food processor and found that 3 ½ tablespoons of cold water was enough.

Form the pastry into a fat disc and wrap in clingfilm, refrigerating for 20 minutes.

Roll the pastry out between two sheets of clingfilm (no extra flour needed) until it is large enough to line a 23cm round loose bottomed tart tin.

Prick the base of the pastry with a fork.

Chill for a further 20 minutes.

Preheat the oven to 200°C/fan oven 180°C/400°F/Gas mark 6.

Cover the pastry with baking paper and weigh down with baking beans.

Cook for 10 minutes then remove the paper and beans and cook for a further 5 minutes.

Put to one side while you make the filling.

Reduce the oven temperature to 180°C/fan oven 160°C/350°F/Gas mark 4.

To make the filling place the butter, sugar, golden syrup and maple syrup into a saucepan and gently heat, stirring all the time, until the ingredients have melted and combined.

Remove from the heat and beat in the eggs and vanilla.

Stir in the chopped pecans.

Pour the mixture into the pastry case and make sure the nuts are evenly distributed.

Bake for 30-40 minutes or until the filling is set. Mine took 35 minutes.

Leave to cool in the tin, on a wire rack.

Serve either at room temperature with thick cream or warm with ice cream.

Bask in the glory of the wonderful thing you have made.

Eat.

Wednesday, 2 June 2010

Iron Cupcake London Challenge XI – Celebration


Our 11
th challenge is also our first birthday, therefore I had to make sure we had an extra super prize...and here it is!


Not only does this stand have cute little silver cupcake case cups to hold your cupcakes in place but the whole thing revolves!
Yes – revolves! No more having to go to all the effort of reaching for that far away cupcake you desire, simply revolve the stand and it comes to you!

The winner of both the amateur and professional competition will win one of these stands, along with other goodies.

As it’s our first birthday there is also a special prize on the night for the best decorated cupcakes – as voted for by the bakers!

Still plenty of time to bake for Monday’s challenge. All details can be found here.

Sunday, 30 May 2010

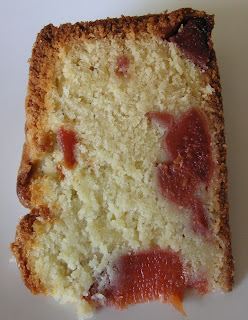
Quince cake


Before making this cake I had two experiences of quince: firstly, as something the Owl and the Pussycat ate by the light of the moon (with runcible spoons, what else?) and, secondly, as that sticky paste/thick jam you get served on a cheeseboard.


I hadn’t planned to bake with quince but when browsing the stalls in
Borough Market I spotted the lovely big round yellow fruits – looking very much like pregnant apples – and bought them on the spur of the moment, worrying about finding a recipe afterwards.


My next step was to look online for quince cake recipes.
There weren’t that many in truth. Lots of recipes for paste, few for cake. As with everything in life, Amazon showed me the way – would you believe it sells a cookbook devoted to quince? Silly as it sounds (and trust me, I know it sounds silly) I felt like I had to do right by my beautiful quince so ordered the book. This method of cooking the quince comes from it...I’ve teamed it with a buttery, sweet pound cake-esque recipe.


If I had to sum up quince I’d say:

Pros

gorgeous aroma, like tropical apples

beautiful colour when cooked

lovely delicate flavour and texture

good score in a game of Scrabble

Cons

difficult to peel and cut keeping all fingers intact. It is a brute to cut – hard and dense in texture

needs a bit of love and care – in this recipe you have to poach the quince for 2.5 hours before you can even start making the cake


Here are the quince just about to start their 2 ½ poaching marathon:


Here they are at the end of the poaching time; their colour and aroma was just divine!


The texture was akin to pear, but the taste was tropical apple.
We were all big fans. Quince and me may only just have met but I see this as the start of a beautiful friendship....if friendship is the right word where one of the ‘friends’ is always eaten by the other!


Ingredients

For the quince:

500ml water
150g caster sugar
2 teaspoons fresh lemon juice
1 cinnamon stick – about 6cm long
3 medium quince – peeled, cored and cut into wedges (about 12 wedges per quince)

For the cake:
250g unsalted butter, at room temperature
350g caster sugar (this isn’t a typo!!!)
4 eggs
280g plain flour
1 teaspoon baking powder
¼ teaspoon ground cinnamon
1 teaspoon vanilla extract
150ml double cream
2 tablespoons of the poaching syrup you cooked the quince in.

Method

Start by preparing the quince – this can be done up to 3 days ahead of making the cake.

Place all the ingredients into a large pan and bring to a simmer over a low heat.

Cover the pan and simmer for 2-2 ½ hours or until the quince turns a deep red colour.
Remove from the heat and discard the cinnamon stick.

Cool to room temperature and then chill until cold.
Cover and chill until needed – the quince will keep for up to 3 days.

Now make the cake: Preheat the oven to 190°C/fan oven 170°C/375°F/Gas mark 5.

Line a 20cm round springform tin with baking paper.

Beat together the butter and sugar until light and fluffy. Don’t skimp on this stage as this is when you get lots of lovely air into your sponge.
While the butter and sugar is creaming, drain the chilled fruit through a sieve (retain the poaching syrup) and pat dry with paper towels.
Beat in the eggs one at a time (to the butter and sugar) and beat to ensure they are well incorporated.
Add half of the flour along with the baking powder, cinnamon and vanilla.
Add half of the cream and beat until combined.

Beat in the remaining flour, followed by the remaining cream and the 2 tablespoons of poaching syrup.

Fold the quince into the batter and spoon into the prepared cake tin – I retained some of the prettier slices to place on top of the batter; I also cut some of the bigger chunks through as I didn’t want them to sink in the cake.

Bake for approximately 1 hour 10 minutes or until a skewer inserted into the cake comes out clean. Mine took nearer 1 ½ hours. If the top starts to brown too much, cover loosely with foil.
Leave to cool on a wire rack until the tin is cool enough to handle, then turn the cake out and leave to cool completely.

Serve with a cup of tea – nothing else is needed!

Bask in the glory of the wonderful thing you have made.

Eat.

No-Bake vanilla and strawberry cheesecake


English strawberries are just too lovely at the moment to resist and they make a perfect topping for this simple cheesecake.


This cheesecake could not be easier to make – it doesn’t require any cooking, only contains 7 ingredients and barely takes 20 minutes from start to refrigerator!


Of course, you can use any fruit for the topping. I loved the way that half the strawberries are kept whole and the other half turned into a lovely thick coulis.


The CCB (Caked Crusader’s Brother) declared that this was the cheesecake he’d been waiting for me to make.
After all my attempts, I’ve finally found the cheesecake he’s been wanting for years! He has now said that he needs to find something else to nag about......


Ingredients

For the cheesecake:

250g digestive biscuits (personally, I prefer hobnobs for a cheesecake base but I bowed to family pressure)
100g unsalted butter
1 vanilla pod
600g cream cheese – I used Philadelphia
100g icing sugar
284ml double cream

For the topping:

400g strawberries, washed, hulled and halved
25g icing sugar
1 teaspoon water

Method

Place the ring from a 20cm round springform tin on the plate you’ll server the cheesecake from. Wrap the ring in either clingfilm or greaseproof paper to ensure that you can free the cheesecake easily.

Break the biscuits into crumbs – either in a food processor or with the bag and rolling pin method (i.e. place biscuits in a bag. Secure end. Bash with rolling pin)

If using the food processor method add the butter to the crumbs and pulse it until the butter is distributed. If using the bag method, melt the butter and stir in.

Use the crumbs to line the base of the cheesecake. Press them down onto the plate but not so hard that you create biscuity concrete!

Refrigerate while making the cheesecake.

Slice the vanilla pod in half and remove the seeds.

Place seeds in a bowl along with the cream cheese and icing sugar and beat until smooth and well combined.

Pour in the cream and beat until the mixture is completely combined.

Spoon over the biscuit base and level.

Leave to set overnight in the refrigerator.

To make the topping puree half the strawberries along with the icing sugar and water.

Sieve this mixture to remove the seeds.

Add the remaining halved strawberries to the top of the cheesecake and, when ready to serve, pour over the coulis/puree.

Remove the cheesecake from the fridge about 30 minutes (depending on your weather conditions!) before you wish to serve and remove the ring from the edge.

Bask in the glory of the wonderful thing you have created.

Eat.