Sunday, 9 February 2014

Guinness and chocolate cake


I’ve been making a lot of cakes with fruit of late but fancied something rich, dark and chocolaty this weekend.  This cake ticked the boxes and the cream cheese frosting was a bonus!


The frosting is supposed to represent the head on a pint of Guinness.  I cannot drink Guinness, it makes my mouth pucker in a way Mr CC finds endlessly amusing.  Indeed, one of his favourite past times is egging me on to try a drink of his whilst promising, ‘honestly, it’s not that bitter’, just so he can see that face.  Quite why anyone wants to drink something that tastes like iron filings is beyond me – but – in a cake, with lots of sugar to temper the bitterness, it works really well.


Several of my eaters didn’t fancy this cake from the description but were amazed at how much they liked it.  It is the richest, most intense chocolate cake and you wouldn’t know it had Guinness in, but you would wonder why the chocolate was so much more satisfying than a normal chocolate cake.


I suppose I should say that this cake is really rich and small slices will suffice....but really?  When was a cake ever so good that you only wanted a small piece of it?  Does. Not. Compute.


Ingredients

For the cake:
250ml Guinness
250g unsalted butter
75g cocoa powder
400g caster sugar
142ml sour cream
2 eggs
1 tablespoon vanilla extract
275g plain flour
2 ½ teaspoons bicarbonate of soda

For the frosting:
300g cream cheese – I used Philadelphia
150g icing sugar
125ml double cream

Method

Preheat the oven to 180°C/fan oven 160°C/350°F/gas mark 4.

Line a 20cm round springform tin with baking paper.

Place the Guinness and butter into a saucepan and gently melt together, stirring occasionally.

Remove from the heat and whisk in the cocoa and sugar.

In a separate bowl beat together the sour cream and eggs, then stir into the butter mix.

Stir in the vanilla, flour and bicarbonate of soda.

Pour into the cake tin and bake for approximately 45 minutes – 1 hour or until a skewer inserted into the cake comes out clean.

Leave to cool, in the tin, on a wire rack.  Don’t panic if it sinks a little on cooling – it’s a rich, squidgy cake!

Now make the topping: whisk the cream cheese until soft and smooth.

Add the icing sugar and beat it into the cream cheese.

Add the cream and beat again.

Spoon over the cake so that it looks like the head on a pint of Guinness.

Bask in the glory of the wonderful thing you have created.


Eat.

Sunday, 2 February 2014

Banana fruit loaf


I love bananas but most of my family don’t.  That’s why I don’t bake many banana recipes.  I chose this one thinking no one would know there were bananas lurking but be warned – this tastes very much of banana.


Sometimes banana bread can be a bit dense and stodgy for my taste, and what drew me to this recipe was that the finished article looks more like a tea loaf.  I think the lure of sultanas sold it to me too; any cake or biscuit with sultanas in is instantly healthy and suitable for breakfast.  No dietician in the land can convince me otherwise!


Remember the golden rule when serving this – it must be buttered thickly enough so the eater can provide a set of dental records with every bite!


Because I had 4 over ripe bananas I doubled the recipe and made two loaves.  It did result in a lot of banana loaf to eat but it’s versatile stuff – I’m going to toast it for breakfast when it ages and firms up some more, and I’m also tempted to use it for bread and butter pudding.


Ingredients

75g unsalted butter, at room temperature
100g light brown soft sugar
3 tablespoons runny honey
2 eggs
2 ripe bananas - peeled, destringed and mashed
225g self raising flour
1 teaspoon mixed spice
¼ teaspoon bicarbonate of soda
¼ teaspoon salt
225g sultanas or raisins – I used a mix of the two

To serve: butter


Method

Preheat the oven to 180°C/fan oven 160°C/350°F/gas mark 4.

Line a 900g (2lb) loaf tin with a paper liner.

Beat together the butter and sugar until lighter and smooth – it won’t go fluffy because of the brown sugar and the ratio of ingredients.

Beat in the honey, eggs and bananas.  At this point it will look pretty unsavoury so don’t panic!

Add the flour, spice, bicarbonate of soda, salt and dried fruit and stir until well combined.

Spoon into the prepared tin and level the surface.

Bake for approximately 1 hour or until a skewer inserted into the middle comes out clean.

Leave to cool in the tin for about 30 minutes before de-tinning and leaving to cool completely on a wire rack.

Serve in thick slices, generously buttered.  When (if?) it reaches a few days old it can be toasted as a lovely breakfast treat!

Bask in the glory of the wonderful thing you have created.


Eat.

Sunday, 26 January 2014

Self saucing chocolate pudding


This pudding borders on witchcraft and I bet everyone who makes it for the first time puts it in the oven thinking, ‘this will never work’.  But guess what?  It does!  The idea of pouring hot water over a batter and the oven sorting it all out is hard to believe but by the time you take the finished pud out of the oven there will be a lovely sponge risen on the top, and a thick, rich chocolate sauce at the bottom of the dish.  


It really doesn’t look promising going into the oven (apologies for all the mess and smears around the bowl – I was having one of those uncoordinated days where everything goes where it shouldn’t!):


I particularly liked where the sauce bubbled up on top of the sponge and set into a crusty topping.  The sponge and sauce contrasted with vanilla ice cream was the perfect dish – hot, cold, multiple textures and bold flavours.


This is a real ‘stick to the ribs’ pudding reminiscent of that chocolate sponge you sometimes got for school dinners.  The chocolate sauce is more chocolatey than school dinners chocolate custard (not that I didn’t love school dins chocolate custard!)


The other good thing about this dessert is that it takes barely 10 minutes to get it ready for the oven.  I do recommend standing your baking dish on a tray to catch any spills.  Some of my chocolate sauce did decide to erupt out of the pud like a rather limp Versuvius.  Mmmm, chocolate lava!


Ingredients

For the batter:
150g self raising flour
165g caster sugar
2 tablespoons cocoa powder
125ml milk
1 teaspoon vanilla extract
30g unsalted butter, melted

For the topping:
150g dark brown sugar
4 tablespoons cocoa powder
425ml hot water


Method

Preheat the oven to 190°C/fan oven 170°C/375°F/gas mark 5.

Grease a 1.5-2 litre oven proof dish with butter.

Place the flour, sugar and cocoa in a large bowl and mix together.

Beat in the milk, vanilla and butter until you have a smooth batter.

Spoon into the prepared dish and level the surface.

Now make the topping: Stir together the brown sugar and cocoa powder making sure there are no lumps.

Scatter over the top of the batter.

Pour the hot water over the top at a gentle speed so as not to disturb everything – using the back of a spoon to break the flow helps.

Place on a baking sheet in the oven (this will catch any sauce that bubbles up) and bake for 50 minutes, during which time the sponge will rise to the top and the liquid will be at the bottom of the dish transformed into a thick chocolate sauce.

Serve from the oven with vanilla ice cream.

Bask in the glory of the wonderful thing you have created.


Eat.

Sunday, 19 January 2014

Cream cheese biscuits


For reasons I won’t bore you with, it’s not been a great start to the year so I felt justified in ‘buying me a little happy’.  This manifested itself in an Oxo Good GripsCookie Press. Regular readers of the blog will know that I’ve never had much success in piping biscuit dough and usually end up spooning it onto the baking sheet instead, but with this lovely bit of kit my luck has changed!


The recipe is from the instruction book that comes with the cookie press and Mr CC declared them the best biscuits I have ever made.  I think he’s right.  They are lovely: crisp, buttery, flavoursome and small enough that there’s no shame in eating several!


Because they are small and thin they crisp up quickly from the oven.  We ate some warm and they had an almost nutty flavour, which was surprising given that they don’t contain any nuts.  When cool that nuttiness goes, but the cream cheese gives a boost to the flavour; you wouldn’t know they contained cream cheese but it does add something.


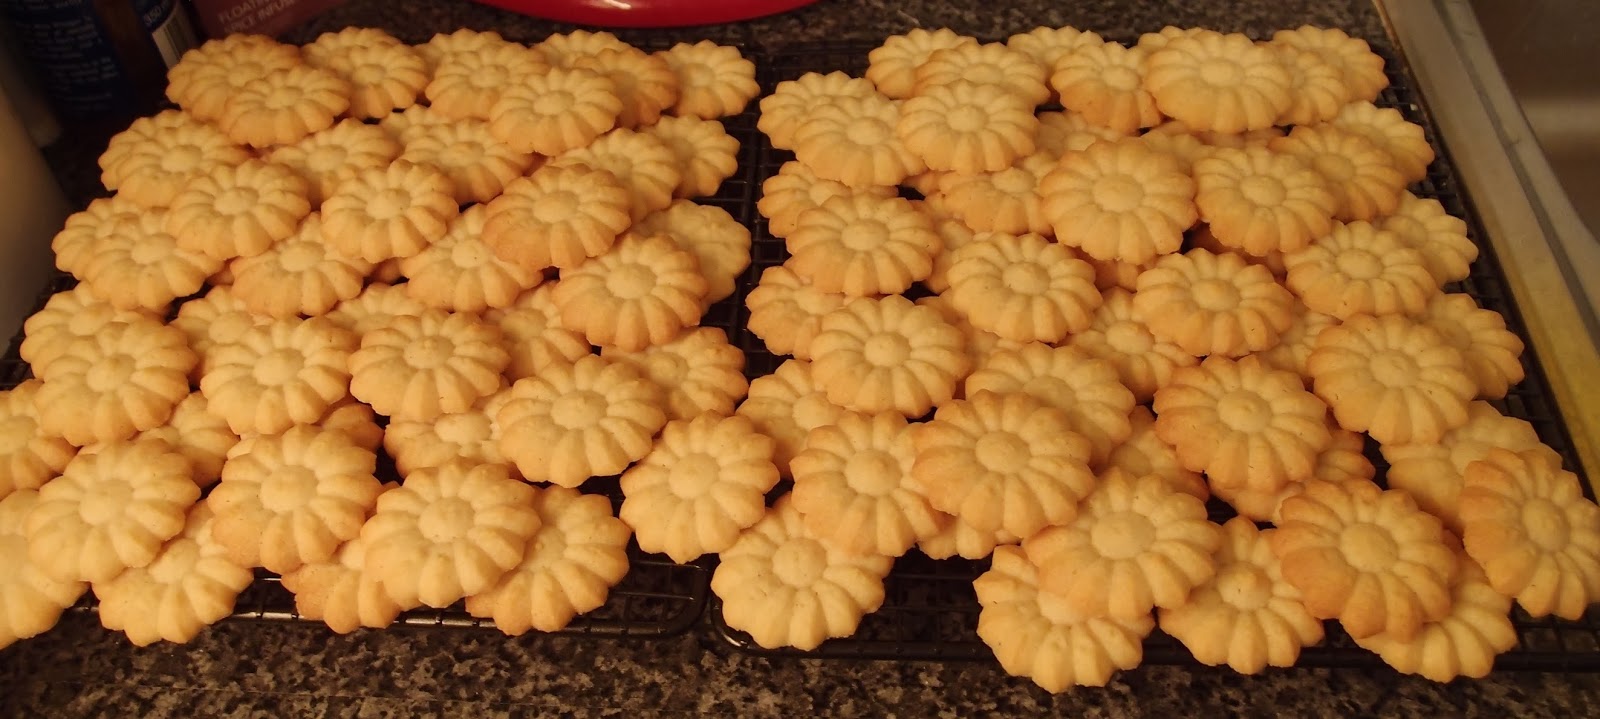
The recipe said the yield would be about eight dozen biscuits.  I never have a lot of luck in getting the suggested amount thus expected to get half that.  I got well over 100!  It is the recipe that just keeps on giving!  The shape looked so crisp unbaked that I thought I would lose all that definition on baking:


But guess what?  They kept their shape:


Ingredients

230g unsalted butter, at room temperature
85g cream cheese – I used Philadelphia
250g caster sugar
1 egg yolk
1 teaspoon vanilla extract
310g plain flour
½ teaspoon cinnamon


Method

Preheat the oven to 180°C/fan oven 160°C/350°F/gas mark 4.

Line baking sheets with baking paper or non stick foil – you will need about six, but I only had three so re-used them as the batches finished baking.

Beat together the butter and cream cheese until combined.

Add the sugar, egg yolk and vanilla and beat until combined.

Weigh out the flour and cinnamon.

Gradually beat into the butter mixture.

At this point you can spoon small teaspoons full of the dough onto the baking sheet, but I used my cookie press.  Fill the cookie press with dough (you will have to refill about four times) and press your cookies onto the prepared baking sheet.  They don’t spread a lot so place them as close together as the cookie press will allow.

Bake for 15 minutes, turning the trays halfway through the baking time.  The biscuits are ready when they are a light golden colour.

Leave to cool for five minutes on the tray before transferring to a wire rack and leaving to cool completely.

If using a cookie press this recipe will make about 100 biscuits.

Bask in the glory of the wonderful thing you have created.


Eat.