Sunday, 12 August 2012

Coconut biscuits


I’m writing this as the biscuits are baking in the oven – the smell of toasting coconut is driving me mad!  Why won’t they bake faster????  Coconut is one of my all time favourite baking ingredients. 


When I looked at the method for these biscuits I expected them to be like the oaty melting moments biscuits I remember making at school.  While the method is similar i.e. roll dough into ball, roll in coconut, the result is quite different.  These are not shortbread-like in texture – they are a cross between a biscuit and a macaroon (note the ‘oo’ there – I’m talking about those big flat coconut macaroons you used to find in bakeries).  Slightly chewy and satisfyingly filling.


I’m limited in my opportunity to bake with coconut as the CCB and Boy Wonder (Caked Crusader’s Brother and my nephew) hate it; so I can only use it on weekends I won’t be seeing them.  In truth, the Boy Wonder doesn’t hate coconut at all and likes anything with it in...until you tell him its coconut!  Men, huh?


The quantity below yielded 25 biscuits for me.  According to the recipe it should’ve been 32.  I have never yet got the recommended number of biscuits out of ANY recipe I’ve made.  I don’t know why – I used the teaspoon measurement, like they said but my heaped teaspoons always seem a little more heaped than anyone else’s.  Maybe you’re not meant to see it as a challenge as to how much dough you can pile up onto the small spoon?


You can decorate the biscuits by placing half a glace cherry in the centre of each biscuit before baking but, seeing as the first thing I do is pick it off, I didn’t bother!


News just in – I’ve had a decadent idea...how about spreading the flat side of the biscuit with a little raspberry or strawberry jam – a sort of biscuit version of a Madeleine?  
Ever eager and dedicated to my research (ahem), I have scuttled to the kitchen and tested my theory:


Oh yes, it tastes even better than it looks!  This is the BEST way to enjoy these biccies!


Ingredients

120g unsalted butter, at room temperature
250g caster sugar
2 eggs
150g desiccated coconut – you may need a tablespoon or so extra
300g plain flour
Optional: Jam to spread on the biscuit (strongly recommended!)


Method

Preheat the oven to 180°C/fan oven 160°C/350°F/gas mark 4.

Line three baking sheets with baking paper.

Place the butter, sugar and eggs into a bowl and beat together until you have a custardy looking cream.

Measure out the coconut then take four rounded tablespoons of it and place on a plate for later. 

Add the rest of the coconut to the butter mix and stir in.

Stir in the flour – you should have a firmish and sticky dough.

Take a rounded teaspoon of the dough and roll into a ball – it won’t be as sticky as you expect and will handle easily.

Roll the ball in the reserved coconut. (I found I needed an extra tablespoon of coconut to ensure all the balls got a nice even covering)

Place on a baking sheet and flatten so that you have a thick disc of approx 4cm across.

Continue to do this with the remaining dough.

Place the biscuits a little apart as they do spread on baking.  I was too cautious and put 8-9 per baking sheet; they could’ve gone closer!

Bake for approximately 18 minutes or until golden.  I turned the trays around halfway through to ensure even colour.

Leave to cool on the baking sheet before storing in an airtight container.

Bask in the glory of the wonderful thing you have created.

Eat

Wednesday, 8 August 2012

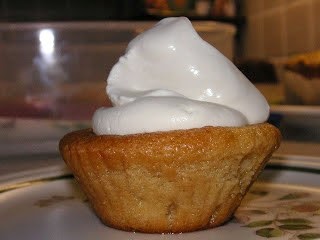
Marshmallow fluff cupcakes


Certain words just get me every time; if something has one of these words in the title I am opening my purse before my brain has even questioned whether I need the item.  'Vintage' is one.  'Plush' is another.  I can now add 'fluff' to the list.  I’m still not really sure what turns marshmallow into marshmallow fluff, but before I could find out I owned a couple of jars of the stuff and wondered what to use it for!


What I can say is that it is the stickiest, sweetest substance I have encountered.  It stuck to the spoon so I used a knife to scrape it off.  It then stuck to the knife so I used a spatula to scrape that off...can you see where this is going?  It even made the baked sponge sticky.  Until I got it under control I had visions of Mr CC getting home and finding me stuck in the middle of a marshmallow fluff web in the kitchen.


Now, all of this might make you think that I didn’t bond with it (actually, I bonded rather too well – sticking two of my fingers together!) but it does have one thing in its favour – it is delicious!  I can forgive it all its ‘handling issues’!


These cupcakes are very sweet and simple looking.  I think what makes them, is the texture – that mallowy sticky sweetness.  They are sweet, I cut down on the icing sugar in the buttercream from the original recipe and they are still very sweet.  If you know anyone on the cusp of diabetes maybe steer them away from this recipe!


NB.  I bought my marshmallow fluff from Amazon
, but I have noticed that some ‘old fashioned’ sweet shops also stock it.


Ingredients:

For the sponges:
175g unsalted butter, at room temperature
175g caster sugar
1 teaspoon vanilla extract
3 eggs
2 tablespoons marshmallow fluff
175g self raising flour
2 tablespoons milk

For the buttercream:
150g unsalted butter, at room temperature
150g icing sugar
2 tablespoons milk
1 teaspoon vanilla extract
150g marshmallow fluff

To decorate: sprinkles of your choice

How to make:

Preheat the oven to 180°C/fan oven 160°C/350°F/Gas mark 4.

Line a cupcake pan with 12 paper cases.

Place the butter and sugar in a bowl and beat until pale, fluffy and whippy – almost like whipped cream.  It will take a good 5-10 minutes so don’t skimp.

Beat in the vanilla extract.

Beat in the eggs, one at a time, adding some of the flour if the mixture looks like it’s curdling.

Beat in the marshmallow fluff.

Fold in the flour and the milk.

Spoon the mixture into the paper cases and bake for approximately 20 minutes or until a skewer inserted into the cakes comes out clean.

Leave to cool for 5 minutes in the tray.

As soon as you can safely handle, remove from the tin and leave to cool completely on a wire rack.

Now make the buttercream: Beat together the butter, icing sugar, milk and vanilla until smooth.

Beat in the marshmallow fluff gradually, large spoonfuls at a time, until incorporated.

Pipe over the cupcakes and decorate with sprinkles.

Bask in the glory of the wonderful thing you have created.

Eat.

Sunday, 5 August 2012

Blueberry bakewell tart


Mr CC is a curious chap in that he prefers pastry to cake.  I love both, but cake will always be my main love (after Mr CC, of course).  I’ve been dabbling more in pastry recently and find blueberries and pastry to be a lovely combination, probably textural – the juicy blueberries offsetting the crumbly pastry.  Yum.


The bakewell/frangipane filling is extra rich as it contains no flour at all; usually the recipe contains both ground almonds and flour, but this one uses only the almonds.  The taste is noticeably richer than a normal bakewell and has a good, firm texture.


I often find that anything with almonds is always better to eat the day after baking.  The almonds need time to settle and release their nutty oils and scent.  It is horrible having to ignore such a tempting treat but – if you can wait – it’s worth it!  It’s why I often store my baking in metal tins rather than transparent plastic...out of sight, out of mind!


The pastry for this tart is crumbly, light and buttery.  It is best to roll it out straight from the fridge while it is at its firmest.  If you let it get too soft it will fall apart, but it does patch well so it’s not all lost.


Mr CC has asked that I highlight the crumbly pastry and the pleasing contrast of the tart berries (they weren’t tart – he’s just trying to be like a Masterchef judge!) with the rich almond.  He has departed the room with the words, ‘and you can quote me on that’.  So I have.


Ingredients

For the pastry:
225g unsalted butter – straight from the fridge
1 tablespoon golden caster sugar
275g plain flour
2 egg yolks

For the filling:
200g unsalted butter – at room temperature
200g caster sugar
4 eggs
200g ground almonds
1 teaspoon almond extract
250g blueberries
two handfuls of flaked almonds
To serve: thick cream, dusting of icing sugar

Method

Start by making the pastry: place the butter, sugar and flour into a food processor and blitz until you have buttery crumbs.  It won’t be as crumbly as some pastries at this stage. (You can use the rubbing in method if you don’t have a food processor, but as it’s so buttery you might find it tricky).

Add the egg yolks and pulse until the ball of dough is starting to come together.

Tip out onto a piece of clingfilm and work (touching as little as possible) into a fat disc of pastry.

Wrap in clingfilm and refrigerate for at least 30 minutes or an hour if you can.

Preheat the oven to 190°C/170°C/375°F/gas mark 5.

Roll out the pastry between two sheets of clingfilm until it can line a 25cm loose bottomed flan tin.

Leave the overhanging pastry in place.

Line the pastry case with a sheet of baking paper or foil and weigh down with baking beans.

Bake for 15 minutes, then remove the foil and beans and bake – uncovered – for a further 6 minutes.

Remove from the oven and leave to cool. 

Cut off any excess pastry; most will have fallen off during baking.

Lower the oven temperature to 180°C/160°C/350°F/gas mark 4.

Now make the filling: beat together the butter and sugar until light and fluffy.

Beat in the eggs one at a time.  Don’t worry if the mixture starts to curdle.

Beat in the ground almonds and almond extract.

Spread the filling over the pastry case and level the surface.

Sprinkle the blueberries over the top and press down lightly.

Scatter over the flaked almonds.

Bake for approximately 35-45 minutes or until a skewer inserted into the filling comes out clean.  Don’t worry if it takes longer.

Leave to cool, in the tin, on a wire rack.

Serve either warm, or at room temperature, with thick cream.  Dust with a little icing sugar before serving.

Bask in the glory of the wonderful thing you have created.

Eat.

Sunday, 29 July 2012

Famous Faces’ Favourite Fancies – Olympian chocolate cake


You may have noticed that the Olympics have started...if you live anywhere near London (as I do) your local news has featured at least one Olympic themed story every day for seven years and there has been much unrest over how London will work (and get to work) during the Olympics.  Personally, I love the Olympics, but enduring the protracted build up has rather threatened to take the shine off it all.  I’m hoping that, now it’s actually started, my love will return... I’m sure that an hour or two spent enjoying the mens’ rowing will be just what the doctor ordered!


One of our great medal hopes (and certainly one of the most popular) is the diver Tom Daley. It is hard to believe he is only 18 years old as he seems to have been around forever!  What I admire about Tom, apart from his immense talent and dedication to his sport, is the aplomb with which he conducts himself – he always comes across so well in interviews, and seems to enjoy himself.  I think so many modern sports people often look like they forget they’re meant to enjoy it.


I heartily approve of Tom’s choice of chocolate cake and I went all out to make this as chocolatey as possible; the recipe is basically a Victoria sponge but chocolated up at every opportunity! (NB.  I suspect that “chocolatey” and “chocolated up” are not proper words, and if they are, they aren’t very pretty.   But they just seem right somehow!)


The addition of melted chocolate into the buttercream made it a firmer, more moussey texture than normal and it had a deep chocolate flavour.  It kept well too.  Whenever I comment that a cake keeps well I hope it conveys to you the magnitude of the cake.  I think mountaineers could scale the north face of this one!


Best of luck Tom – the country is behind you!  Win us the gold!


Ingredients

For the cake:
225g unsalted butter, at room temperature
200g golden caster sugar
4 eggs
200g self raising flour
50g cocoa powder
2 teaspoons baking powder
100ml milk

For the filling:
100g milk chocolate, melted
125g unsalted butter, at room temperature
25g cocoa powder
75g icing sugar


Method

Preheat the oven to 190°C/fan oven 170°C/375°F/Gas mark 5.

Line two 20cm round loose bottomed sandwich tins with baking paper.

In a large bowl beat together the butter and sugar until light and fluffy – don’t skimp on this stage as this is where the air is added.  Your mixture should look like over-whipped cream before you stop.

Beat in the eggs one at a time.  If the mixture looks like it might curdle add some of the flour.
Fold in the flour, cocoa and baking powder.

Fold in the milk.

Spoon into the two prepared tins, as evenly as possible (I do it by eye but you can weigh it if you wish to be more precise) and level the surfaces.

Bake for 25-35 minutes or until a skewer inserted into the cakes comes out clean.

Leave to cool in the tins until you can safely de-tin; then leave to cool completely on a wire rack.

You can keep the sponges in an airtight container for a day or two before building the finished cake.

Now make the filling: Let the melted chocolate cool a little, but not so much it sets again.  I like to melt small quantities of chocolate like this in a microwave, giving short 20 second bursts – but a bowl over a saucepan of simmering water works just as well.

Whisk the butter, on its own, until it is white and fluffy – looking like whipped cream almost.

Add the cocoa, icing sugar and melted chocolate and whisk until well combined and the mixture resembles a thick mousse.

Place one of the sponges, flat side up, on the serving plate and spread half the filling over it.

Place the other sponge, flat side down, on top and press gently to make a good seal.

Spread the remaining filling on top and spread over.

Decorate as required.

Bask in the glory of the wonderful thing you have created.

Eat.