Sunday, 2 August 2009

Vanilla and coconut cake with sweet tobacco


Not sure how many of you will know the joys of sweet tobacco so the first thing I should explain is that it is not tobacco. A cake topped with tobacco would be quite revolting! Sweet tobacco is shredded coconut, lightly toasted then tossed in cocoa powder. Here it is:

Most Brits over 30 years old will have spent a large chunk of their pocket money in sweet shops where you bought “quarters” i.e. 4 ounces of your favourites – Tom Thumb pips, kola kubes, gummi bears, and – if you were flush – Cadbury’s chocolate éclairs...ah....happy times. I wonder what today’s children buy in our metric world? 100g doesn’t quite conjure up the same romance!

On our recent day trip to Canterbury, the CCBF (Caked Crusader’s Boyfriend) and I found, purely by chance, an old fashioned sweetshop called Sugarboy and it sold sweet tobacco. Thus the idea for this cake was born. I also realised that, if there is ever a competition for eating sweet tobacco, I will be entering the CCBF pronto and placing hefty bets on him winning!


The sponge part of this cake is a Delia Smith recipe. She calls it an “all in one” cake advocating putting all the ingredients in the bowl at the same time and whisking until the batter is light and well combined. I know this would probably work but I just couldn't bring myself to carry out such an act of barbarism so my method below sets out a slower approach with each ingredient added separately.


The coconut Swiss meringue buttercream (SMBC) is simply my standard SMBC recipe but with coconut extract added instead of the more usual vanilla. It is a lovely combination of flavour and texture.

Ingredients:

For the cake:
175g unsalted butter, at room temperature
175g golden caster sugar
2 teaspoons vanilla extract
3 eggs
175g self raising flour
1 teaspoon baking powder

For the Swiss meringue buttercream:

4 egg whites
250g caster sugar
250g unsalted butter
1 teaspoon coconut extract (less is more, it’s quite pungent)

To decorate: Sweet tobacco, or any shredded or toasted coconut

How to make:

- Preheat the oven to 170°C/fan oven 150°C/325°F/Gas mark 3.

- Line the bottoms of two 20cm loose bottomed sandwich tins with baking paper.

- Cream together the butter and sugar until light and fluffy. Do not skimp on this stage as it’s the key to a lovely sponge.

- Gradually beat in the eggs, adding a little of the flour if it starts to curdle.

- Beat in the vanilla extract.

- Beat in the flour and baking powder.

- If the batter is too stiff i.e. not dropping consistency, add a dash of milk – I didn’t need to.

- Divide the batter evenly between the two prepared tins. Level the surfaces.

- Bake for approx 30 minutes until a skewer inserted into the cakes comes out clean. Mine took 35 minutes.

- Leave to cool for 10 minutes in the tins before removing from the tins and leaving to cool completely on a wire rack.

- The sponges can be made the day before and stored in airtight containers.

- Now make the swiss meringue buttercream. Place the egg whites and sugar in a bowl over a pan of simmering water. Stir pretty much constantly to prevent the egg from cooking.

- After 5-10 minutes, when the sugar has dissolved (when you cannot see any crystals on the back of the spoon), remove the bowl from the pan of simmering water and whisk until the meringue has puffed up and the mix is cool.

- Add the butter and coconut extract to the meringue and whisk until the butter has been completely incorporated into the meringue. At first it will look a disaster – it will collapse and look curdled but don’t worry! Stop when the mixture is smooth, light and fluffy.

- Place one sponge on the serving plate and top with a third of the buttercream.

- Place the second sponge on top and press down gently to ensure the buttercream has levelled out.

- Use the remaining buttercream to cover the top and sides.

- Decorate as required – I used sweet tobacco

- Bask in glory at the wonderful thing you have made.

- Eat.

Gooseberry fool


I was extremely lucky recently to be sent a gift box from Abel and Cole to try some of the items from their “kitchen cupboard – baking” section. I’ve showcased these items elsewhere, but included in my box were some of the most gorgeous gooseberries I’ve ever tasted. Now, I know what you’re going to say, “ but this fool can’t be made with gooseberries – gooseberries are green!”.

Well, these are dessert gooseberries and are the same colour as a black grape. They are also much sweeter than the green gooseberry and taste like fruit punch, yet all from one fruit!

Whilst making this, I pondered whether any dessert had a less fortunate name! Gooseberry is always used disparagingly – it’s the unwanted person in a trio. Fool is obviously not a compliment. So I searched the net to find out why such a tasty dessert would be labelled a fool. As with much of life, there are no straightforward answers.

‘Foole’ is first mentioned as a dessert in 1598. Some people say that the word ‘fool’ comes from the French “fouler” meaning to crush, but the Oxford English Dictionary dismisses this as without evidence. Maybe we’ll never know....it’s something to ponder whilst tucking into a bowlful of nature’s delights!


Ingredients:

350g gooseberries ( I used dessert gooseberries)
1 tablespoon water
75g (or to taste) caster sugar
300ml double cream
200g cold, fresh custard

How to make:

- Place the washed gooseberries in a saucepan with the water and bring to a simmer over a medium heat. There’s no need to top and tail the fruit as the pulp will be sieved later.

- Cook for 5-10 minutes, stirring to ensure the fruit breaks down.

- Puree in a food processor, then sieve the ensure that all the pips are removed.

- Stir in the sugar, then leave to cool completely.

- Whip the cream until it reaches the soft peak stage.

- Fold in the custard.

- Fold in the gooseberry puree. Don’t over stir as it’s nice to have a marbled texture.

- Spoon into dessert glasses.

- Chill until required.

- Bask in glory at the wonderful thing you have made.

- Eat.

Tuesday, 28 July 2009

Iron Cupcake London: Challenge III prizes


NEWSFLASH – ok, more of a reminder – ICL Challenge III is next Monday!!!


All the details of the next challenge are set out below but, before we get to that, have a look at what you could win!

This is the bumper haul of goodies the lucky winner will be taking home:


The runner up will get these prizes:


So what are you waiting for? Start thinking about how you can win this challenge....


ICL Challenge III: Dessert
Think of your favourite dessert and turn it into a cupcake. Make one batch (i.e. 12) of cupcakes interpreting the theme of “dessert” in any way you wish…

On the night everyone will have a say in declaring the winner, who walks away with the ICL Winner’s rosette plus a cupcake themed goody bag (presented in the much-coveted ICL bag!).

Event details:

Monday 3 August 2009

6.00pm – 8.30pm

Barrowboy & Banker pub, 6-8 Borough High Street, SE1 9QQ

Entry fee: £5 – even if you don’t wish to enter the competition why not come along to taste the cupcakes? (Entry fee includes tea or coffee)


Please email me or leave a comment here, to let me know if you plan to enter or just come along to eat. Everyone welcome - particularly hungry people!

Why not visit the
Iron Cupcake London
site for more details and to view previous challenges?

Sunday, 26 July 2009

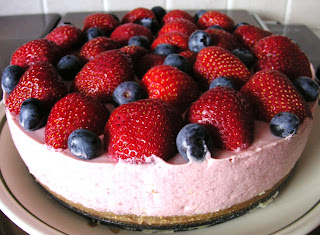
Strawberry yoghurt mousse cake


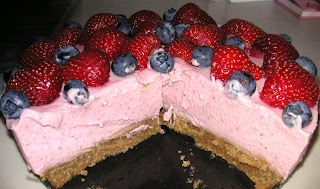
This is a recipe that sits between mousse and cheesecake. It’s firmer than mousse (because of the gelatine that sets it) but isn’t as densely textured or rich as a cheesecake. In other words...the perfect summer pud!

The addition of yoghurt stops the cake being too sweet and gives a silky texture. Whenever I puree strawberries for such a recipe I always then sieve the puree to remove as many seeds as possible – it is an extra stage but so worth it.

The other thing I’d point out was that I used Hobnobs for the biscuit base rather than digestives. It might be me getting old but I find digestives taste incredibly salty these days and, where possible, I avoid them. The hobnobs provide a flavoursome base with the lovely addition of oats. For those of you who don’t know what a hobnob is it’s an oaty, sweet biscuit.

This recipe has a few processes to it but none are difficult. It is easier to make if you have a food processor but you could make it without - I do however think that it might be a little tiresome to make it manually.

When I removed the sides of the cake tin I did have a small panic that the whole thing was going to collapse...thankfully it didn’t. The texture of this mousse is soft and I recommend serving it reasonably quickly on removal from the fridge. The softness is also what makes it such a joy to eat.

I decorated the cake simply with strawberries and blueberries. Those lovely people at Abel and Cole gave me some wonderful English blueberries which were juicy and sweet and very possibly the most flavoursome blueberries I’ve tasted.

Ingredients:
300g hob nob biscuits (or any biscuit you use for making bases)
175g unsalted butter
500g strawberries, hulled and washed
75g caster sugar
4 leaves gelatine
250ml Greek yoghurt
300ml double cream

For decoration: strawberries and blueberries

How to make:

- Start by making the base: place the biscuits into the food processor and blitz until you have crumbs.

- Meanwhile, melt the butter.

- Stir the biscuit crumbs into the butter then pour in the base of a 20cm springform tin. Press down. Leave to cool.

- Puree the strawberries in the food processor until you have liquid pulp.

- Pass the puree through a sieve to remove as many seeds as possible – this will provide a silkier texture.

- Place the gelatine leaves in a bowl of cold water and leave to soften.

- Pour the strawberry puree into a saucepan and stir in the sugar.

- Heat until the sugar has dissolved and the puree is warm but not boiling.

- Squeeze all the water out of the gelatine leaves and whisk into the puree. I find using a whisk, rather than a spoon, gets the gelatine to absorb quickly without any lumps.

- Put to one side to cool.

- When the puree is at room temperature whisk in the yoghurt.

- Whisk the cream until you have stiff peaks then fold into the strawberry mixture.

- Pour over the biscuit base and chill in the fridge for at least 6 hours.

- Decorate as desired – I used strawberries and blueberries.

- Bask in glory at the wonderful thing you have made.

- Eat.