Monday, 29 August 2016

Goodbye…for now definitely, possibly forever (ooh, that came out more dramatic than intended!)


I thought I should post to say goodbye to you all.  I haven’t posted anything now since June and suppose I’ve just fallen out of love with blogging.  The coming weekend would be my blog’s 9th birthday and it’s made me realise that I’ve been doing this for so long now that it’s started to feel like another job. 

I still love baking, and still bake most weekends, but it feels liberating not to have to scrabble around each week and find something different to bake, write it up, take photos, post it online etc.  It was starting to take up a big chunk of my limited free time, which is fine when you enjoy it, but not so much when you don’t.  And sometimes I just want to make the same cake three weekends in a row without worrying about not having anything to post!

It’s been a blast and I’ve loved all your comments and emails – thank you to everyone who’s stopped by whether leaving a comment or not.  The blog will stay up and available (I use it as my personal recipe book and would be lost without it!), and I’ll do my best to continue responding to any questions left in the comments section.

I don’t want to say that I’ll never be back – in a few months’ time I might desperately miss the blogosphere and return to it, but it doesn’t feel likely at the moment.


To paraphrase Douglas Adams’s dolphins when they leave Earth: so long, and thanks for all the cake!

Sunday, 19 June 2016

Coconut brownies


I had virtually no time to bake this weekend but, nonetheless, wanted some home baking.  This is the perfect recipe to have up your sleeve – the work of minutes to get in the oven, very few ingredients, and utterly delicious. 


If I had to pick my favourite things to pair with chocolate coconut would be right at the top of the list, perhaps having to slug it out with pear for who actually had the top spot.  There is just something about coconut that brings out the best in chocolate and vice versa.  I love the damp grainy texture of baked desiccated coconut and that you can find bits of it in your teeth for a while after eating – it’s the ingredient that keeps on giving!


One thing I think it’s important to point out – this recipe didn’t behave like a normal brownie recipe; usually, when you’ve done the melting of the chocolate and butter you end up with quite a liquid mixture right until you add the flour, and even then it’s a runny mix.  This was thicker and only started to loosen when I added the eggs – here’s what it looked like after the initial melting stage (just so you don’t panic that it’s gone wrong if yours looks similar!):


Possibly the only difficult thing about baking brownies is judging when to remove them from the oven.  I work on the assumption that things firm up/set/dry out a little on cooling so try and take them out before they look ‘done’.  This goes against my prudent nature and I feel a bit of a risk-taking daredevil in removing something from the oven before it looks ready, but I force myself, and the momentary stress is worth it!  In my opinion a brownie is better a little underdone, than a little over.


Ingredients

100g cocoa powder
250g unsalted butter
500g golden caster sugar
4 eggs
100g self raising flour
100g desiccated coconut, plus 2 tablespoons extra to sprinkle on top


Method

Preheat the oven to 180C/fan oven 160C/350F/gas mark 4.

Line a 20cm square tin with baking paper or non stick foil.

Place the cocoa powder, butter and sugar into a large pan (large enough to accommodate all the additional ingredients) and melt over a gentle heat, stirring all the time so nothing catches on the bottom of the pan.

When everything has combined remove from the heat and leave to cool for about 10 minutes.

Beat in the eggs, one at a time.

Fold in the flour and coconut.

Pour into the prepared tin and sprinkle the extra coconut over the top.

Bake for approximately 45 minutes or until the brownie is set but not firm.  Best to start checking after about 30 minutes as ovens vary.  If the top is getting too dark and crusty, cover loosely with foil and continue to bake.

Leave to cool in the tin and, when cool, cut into chunky sized squares.

Serve with a cup of tea, or warm and serve with ice cream for dessert.

Bask in the glory of the wonderful thing you have created.


Eat.

Sunday, 12 June 2016

Ginger and rum cake


I think I must be a contrarian baker.  Now that summer actually seems to have arrived, I know I should be thinking about strawberries, cream and other such light frippery….but what I really wanted this week was ginger cake.  And rum.  And dates.  And all things that make you think of colder weather (not that I even like colder weather).  As I said – contrarian.


This cake is always better the day after baking, and the day after that; it’s always the way with sticky spicy cakes – they need time to mellow and let their flavours mature.  I do have a penchant for rum and have a selection at home that would rival most cocktail bars; for this cake I chose a spiced rum as I thought the extra punch of flavour would work well.  Spiced rum always seems to have a vanilla note to it too and I never miss the opportunity to get a bit of vanilla into something.


You can taste each of the main flavours in the cake: ginger, dates and rum.  Putting the rum in the icing gives a raw hit – if you like your booze softer, and more baked, consider putting more in the cake and leaving it out of the icing.


Without checking through almost nine years of blogging, I don’t remember putting dates into a ginger cake before.  It was a good move – it turned a standard ginger cake into something more akin to a sticky toffee pudding.  You could leave the icing off this cake and serve it warm, as dessert, with custard or ice cream.  Personally, I am always partial to a white icing and a bit of the itchy teeth feel it can sometimes create.  Many older people I know have lost their taste for overly sweet things…I do sometimes wonder if it will ever happen to me.  I just can’t imagine being that person who winces when they eat something and say, ‘ooh, that’s a bit sweet for me’.  Does. Not.  Compute.


Ingredients

75g unsalted butter
100g dark muscovado sugar
125g black treacle
125g golden syrup
2 eggs
3 tablespoons rum – I used spiced rum
225g self raising flour
2 teaspoons ground ginger
50g stem ginger, finely chopped
75g medjool dates – pitted and finely chopped
For the icing:
100g icing sugar
1-2 tablespoons spiced rum
1 tablespoon stem ginger syrup (from the jar of stem ginger)

Method

Preheat the oven to 180C/fan 160C/350F/gas mark 4.

Line a 900g loaf tin with baking paper.

Place the butter, sugar, treacle and golden syrup into a saucepan and melt together over a gentle heat.

Leave to cool for at least 5 minutes before beating in the eggs and rum – if the mix is too hot the eggs will scramble and leave lumps in the cake.  Not nice.

Stir in the flour and ground ginger.

Stir in the chopped ginger and dates.

Pour into the prepared baking tin.

Bake for 50 minutes – 1 hour, or until a skewer inserted into the cake comes out clean.

Leave to cool for 10-15 minutes in the tin, before de-tinning and leaving to cool completely on a wire rack.

Now make the icing: mix the icing sugar with 1 tablepsoon each of rum and ginger syrup – add the extra spoonful of rum only if needed.  You’re aiming for a thick, glossy icing that has movement to it but isn’t so loose it will just run off the cake.

Spoon the icing over the cake and leave to set.

This cake gets better with age – it becomes stickier and more flavoursome.

Serve in generous slices with a cup of tea.

Bask in the glory of the wonderful thing you have created.

Eat.


Sunday, 5 June 2016

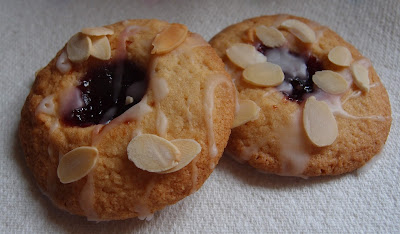
Bakewell thumbprint biscuits


If there’s one thing I’ve learned since I’ve been blogging it’s that good recipes can turn up anywhere; a particularly good source being supermarket free magazines.  This one is from the Co-Op’s magazine and combines two of my favourite things – biscuits and bakewells.  Sadly, I no longer live near a Co-Op but my mother in law does, and diligently picks up the new magazine for me whenever it’s available – thanks Dot!


We all probably made thumbprint biscuits as children; they must be up there with fairy cakes and rock buns as the ideal ‘starter’ bake for children.  But what I liked about this recipe was that it reinvented the familiar biscuit and introduced almonds and white icing to create a bakewell hybrid.  It really is a winning combination.


The recipe makes a lot of biscuits.  A lot.  The recipe said it would make 40, and I got 26 (this isn’t bad for me – normally when a recipe says 40 I get about 12!). This is very handy as it is a strong individual who will stop at one!


The lemon zest in the biscuit and the lemon juice in the white icing is quite strong; if you want the almond and jam to be more dominant I would recommend maybe using the zest in the biscuit and making the icing up with water.


Ingredients

For the biscuits:
175g unsalted butter, at room temperature
175g caster sugar
1 lemon’s zest
1 teaspoon vanilla extract
1 egg
150g ground almonds
150g self raising flour
approx ½ a jar of raspberry jam

For the icing:
80g icing sugar
1 lemon’s juice
Handful of toasted flaked almonds


Method

Preheat the oven to 180C/fan oven 160C/350F/Gas mark 4.

Line two (or four if you have them, otherwise you can just rotate the baking trays and use them twice) baking sheets with baking paper or non stick foil.

Beat together the butter, sugar, zest and vanilla until light and whippy; you will notice the mix turning pale.

Add the egg and beat well.

Add the ground almonds and self raising flour and stir until just mixed.

Take a heaped teaspoon of the mix and roll into a ball.

Place on the baking sheet.

Repeat until the tray is full – they do spread while baking so aim for a maximum of 8 per baking sheet (depending on the size of your sheet.)

Push your thumb into each ball to form a well.

Spoon ½ teaspoon of jam into each well.

Bake for approximately 10-12 minutes until golden and nicely spread. I found mine needed longer – about 16-18 minutes, but it’s good to check after 10 minutes if only to rotate the trays for an even bake.

Repeat the process until all your biscuit dough is used up.

Leave to cool.

Now make the icing: mix together the icing sugar with just enough lemon juice (you won’t need it all) until you have a thick but runny icing.

Drizzle across the top of the cooled biscuits.

Scatter over the flaked almonds.

Bask in the glory of the wonderful thing you have created.


Eat.