Sunday 30 December 2007

Revisiting old favourites with a Christmas twist!

There are so many recipes that look worth baking that I often find myself looking for the next new thing forgetting what has been enjoyed in the past. Sometimes however, it’s worth taking time out to revisit old favourites.

There is very little in the cake world more comforting than a slice of sponge with buttercream. Here’s the proof:


Plus, it’s a good thing to make over an extended holiday period as it keeps very well.

I made a Genoese sponge with buttercream in the shape of a Christmas tree.


This is exactly the same recipe as I used for my nephew’s birthday cake back in September. Follow this link for the recipes.

How can you celebrate without biscuits and dipping sauce? Well, the obvious answer is that you can’t. So I made those too. The Christmas twist here is that I used star shape cutters of decreasing size to build a biscuit tree. Try not to look at the tins of Weightwatchers soup in the background - the sad and bleak necessity of worshipping at the altar of cake!


Here’s my arty aerial shot in homage to the Esther Williams films of the 1940s and 50s (No, I’m not that old but Channel 4 used to show them in the afternoon before Countdown back in my student days so I often saw the last ten minutes or so.)


The biscuits can be decorated however you please, I used piped icing and M&Ms for the baubles. Follow this link for the recipes

I was quite ambitious this time and managed to get my tree to 30cm in height (that’s 12 inches or a foot for those of you still working in old money!). We live in a sceptical age so here is photographic evidence - I removed the soup tins in this one!:


This is a sight that will cheer me in the coming months: the Christmas tea table. The santa bowl contains sweetened cream (double cream lightly whipped and sweetened with icing sugar plus a dash of vanilla) and the dish with the little cupcakes dangling from it contains the magical dipping sauce!

One of your ‘five a day’

It is a truth universally acknowledged that we all should eat more fruit and vegetables – no less than five individual portions each day. And how better to get one of your ‘five a day’ than to smother the item in thick chocolate? This is a handy little trick to have up your sleeve and the ratio of applause to effort is most pleasing i.e it’s dead easy to make and is greeted with delight.

There are only two ingredients: nice plump strawberries and good quality chocolate. I used milk chocolate as my nephew doesn’t like plain; I think plain would actually give a better contrast of bitter against the sweet strawberries but no one complained!

I also wanted to show off my mini cupcake stand. These are easily obtained from US sellers, I find KitchenKrafts particularly good but actually purchased mine through a UK seller on Ebay.


What the Caked Crusader chose to bake to this week (30 Dec 2007)

I can’t seem to stop playing Peter Cincotti’s latest CD at the moment – East of Angel Town.
I feel a bit smug about Peter Cincotti, who is sure to become a major star, as I got in pretty much at the start. He released his first album in 2003 when he was barely 20 years old. I remember seeing him live in 2004 at one of the venues at the Royal Festival Hall and being staggered by what an accomplished, relaxed, witty performer he already was.

The latest album is the first one of original material; the prior two contain cover versions from the Great American Songbook. Like Michael Buble, Cincotti is developing into a fine songwriter and, while some of the Amazon reviews seem to criticise him for daring to record original material, only a couple of listens to East of Angel Town show that to be a good decision.

Thursday 27 December 2007

Gingerbread House

I have never made a gingerbread house before but, aware of the increasing social problem of homeless gingerbread men at this time of year, thought it my duty to help out.

I knew that gingerbread homes must be decorated but I was also aware that my eatership on this one would be at the more ‘aged’ end of the spectrum so it couldn’t be too over-the-top as to turn them off it fearing indigestion, or worse.

It’s difficult to be specific really about making a gingerbread house as you can make it any size or shape you want and decorate it pretty much how you wish. What I will provide is the basic gingerbread recipe and the icing recipe that will hold the house together.

More experienced gingerbread builders draw their own templates for house panels. I used a tin that had been pre-marked.

I thought the dough was particularly attractive and glossy (yes, I know, I need to get out more....)

I approached it like an IKEA flat pack project – here are the panels:


Anything that required detailed piping work, I thought best to do while I could still lay the panels flat. I am particularly proud of my piped tree!

Assembling the panels is the tricky bit. Don’t be afraid to use mugs or pots to rest the panels against whilst the icing is drying:

I’m not sure you’d get a clean survey on this house – the chimney looks a bit wonky!


And here’s the finished house from the other side:


Of course, this is a house for eating and it’s a tricky task to break into it. Luckily, my nephew’s friend, Merf Gustav Mulpeno (for years we thought he was a raccoon, only to discover recently he's actually a ring-tailed lemur) was on hand to do the necessary:

Unfortunately, he then claimed squatters’ rights!


Ingredients:
For the gingerbread (this quantity made my whole house):
250g unsalted butter
200g dark muscovado sugar
7 tablespoons golden syrup
600g plain flour
2 teaspoons bicarbonate of soda
4 teaspoons ground ginger (I confess to putting a lot more in)

For the icing to hold the house together:
454g icing sugar
3 tablespoons meringue powder
6-8 tablespoons warm water

How to make:

- Preheat the oven to 200°C/fan oven 180°C/Gas mark 6
- Melt the butter, sugar and golden syrup in a saucepan.
- In a large bowl mix together the flour, bicarbonate of soda and ginger and then stir in the butter mixture to make a stiff dough. If it won’t come together add a tiny amount of water.
- Roll out a portion of the dough, between two sheets of baking paper, to about the thickness of two £1 coins and using your template, tin or cutters cut out the house panels. I recommend rolling only part of the dough at a time as it doesn’t re-roll that well. If the dough starts drying out and getting stiff it can be revived by a dash of water.
- Whatever method you use for cutting out the panels you need: two side walls, two roof panels and a front and back wall.
- Bake for approximately 12 minutes or until firm and a little dark at the edges.
- Leave to cool and harden up. It is best to make the gingerbread a day or so before assembling the house as you want the gingerbread to firm up and settle so it doesn’t crumble in your hands when building.
- To make the icing which will hold the house together put all the ingredients in a mixer and mix until it holds a stiff peak.
- Assemble the house by using the icing as cement. Pipe around the edges of each panel and stick onto a large board.
- When the construction is complete you can decorate however you wish.
- Bask in glory at the wonderful thing you have made.
- Eat.

Things to do with Mincemeat.....

It’s Christmas so it must be time to entomb some mincemeat in pastry i.e. make mince pies. Bored with the idea of doing this for what felt like the millionth time I sought different options; well, I am a Crusader after all even if it is just the ‘Caked’ variety. Here are two ideas for mincemeat that aren’t radically different but just different enough to whet one’s jaded taste buds.

The first is a large mincemeat tart.


We’re going to have it for dessert on Christmas day with some lightly whipped sweetened vanilla cream. By not having a pasty lid it gives centre stage to the mincemeat which, until I made this dish, I hadn’t realised how beautiful it looks. By having less pastry, it also makes the texture stickier and richer in your mouth. In other words – this is a good thing!


The second idea is at the other end of the size spectrum: mini mincemeat crumble tarts.

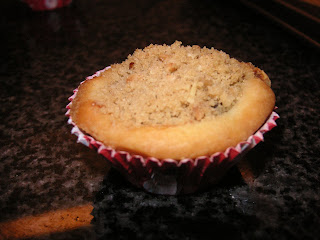
If it’s possible for baked items to be cute then these are the cutest little things around! I like cakes or tarts that do more than one thing – these are great because you have the pastry case which houses the mincemeat and then top it off with nutty crumble. Is it a cake or a dessert? Should you have it with a cup of tea or after dinner? Any answer is correct.

Here they are fresh from the oven, still in the baking tray:

They look so cute en masse:


And this is just to show off my mini-muffin tree stand. You’ll notice I made some mini jam tarts too, to satisfy the mincemeat haters!


Just a quick note on mincemeat. I’m sure you can buy some very nice quality mincemeat but homemade is always best. Mine is made by The CCM (Caked Crusader’s Ma) using Delia Smith’s recipe. It keeps beautifully and The CCM makes it every other year. This year I have used the mincemeat she made in 2006 and as long as it is kept airtight and cool it will mature wonderfully. If it looks a little dry stir in a tablespoon of brandy to return it to the required glossy state.

Whenever a dish requires sweet shortcrust pastry, unless there is something interesting about the recipe, I always ignore the pastry ingredients and make the sweet rich shortcrust pastry recipe from my Women’s Institute cookbook . This pastry is unbeatable – it never fails to be delicious and could not be easier to make or a nicer consistency to work with. Here’s the recipe:

Sweet Shortcrust Pastry

Ingredients:
For the pastry:
115g plain flour
80g unsalted butter
2 tablespoons icing sugar
1 egg yolk

How to make:

- Put the flour and butter into a bowl and rub together until it resembles fine breadcrumbs – either using your fingertips, a food processor or, as I discovered to my joy, the beater fitting on the Kitchenaid mixer.
- Add the icing sugar and stir in.
- Add the egg yolk and bring the dough together until it is smooth, glossy and soft.
- Wrap the dough in clingfilm and refrigerate for at least 30 minutes before you need to use it – this relaxes the dough and stops the cooked pastry from shrinking.
- Bask in glory at the wonderful thing you have made.
- Do not eat yet – it’s raw!

Mincemeat Tart

Ingredients:
Double amount of the shortcrust pastry i.e. 230g plain flour, 160g butter etc
Approx 900g good quality mincemeat
1 egg for glazing
Sprinkle of caster sugar

How to make:

- Preheat the oven to 200°C/fan oven 180°C/400°F/Gas mark 6
- Grease a 30cm loose bottomed flan tin. This is a big tart – if you want to, you can make a smaller one but obviously will have pastry left over from the proportion I have recommended.
- Take the pastry from the fridge and roll it out between two pieces of greaseproof paper. This gets rid of the need to flour the surface and risk drying the pastry out. Lay the pastry in the tin. Keep any spare pastry to one side.
- Cover the pastry with greaseproof paper and weigh down with baking beans, dried lentils – whatever you use.
- Bake the pastry case for 15 minutes. This is called “blind” baking i.e. cooking the pastry shell so it will be crisp when you bake it again with the filling.
- Remove from the oven and allow to cool slightly before removing the paper and beans.
- Spoon the mincemeat evenly into the pastry shell.
- Use the pastry leftovers to make decorations to sit on the mincemeat. As it’s Christmas I used a Christmas tree cutter but a star or holly leaves would be just as pretty.
- Once you have positioned the pastry decorations on the mincemeat, glaze them with beaten egg and a sprinkle of caster sugar.
- Bake in the oven for 20-25 minutes until the pastry is golden brown. Mine took 20 minutes.
- Serve with cream, whipped cream, brandy butter, ice cream – the list goes on!
- Bask in glory at the wonderful thing you have made.
- Eat.

Mini Mincemeat Crumble Tarts

Ingredients:
Single amount of the shortcrust pastry
Approx 200g good quality mincemeat

For the crumble topping:
90g Plain flour
40g chopped nuts (I used hazelnuts)
40g soft brown sugar
40g Unsalted butter

How to make:

- Preheat the oven to 180°C/fan oven 160°C/350°F/Gas mark 4
- Grease a mini muffin pan . The proportions above will give approx 14 mini tarts. If you don’t have a mini muffin pan, use an ordinary size muffin pan – obviously you will get less.
- Take the pastry from the fridge and roll it out between two pieces of greaseproof paper. This gets rid of the need to flour the surface and risk drying the pastry out. Using an appropriate size cutter, cut out discs of pastry and place in the mini muffin pan.
- Spoon in enough mincemeat so it is level with the pasty – this gives a nice flat surface for the crumble to sit on.
- To make the crumble rub the butter into the flour (this can be done in a processor or Kitchenaid mixer) and then stir in the sugar and nuts.
- Sprinkle the crumble into nice little domes on top of each tart. It will scatter a bit over the tray but don’t worry.
- Bake in the oven for 20 minutes until the pasty is golden brown.
- Allow to cool slightly in the tin before removing, otherwise you risk smashing the pastry to bits!
- To look pretty, when I took the tarts out of the tray, I sat them in mini muffin cases. This makes them easier to pick up and eat.
- Serve just as they are or with a blob of cream.
- Bask in glory at the wonderful thing you have made.
- Eat.


What the Caked Crusader chose to bake to this week (22 Dec 2007)

I only own one Christmas music CD so it seemed appropriate to listen to it this week. It’s Bobby Darin’s “On the 25th Day”. Even the grouchiest heart (i.e. mine) will be warmed by some of the less conventional Christmas recordings such as the gospel tinged “Go tell it on the mountain” and “Mary where is your baby”.

If you’ve had your fill of the more standard Christmas songs - or to put it another way -anything that has been playing in every shop since about September, then try this album and be refreshed!

Saturday 22 December 2007

The December 2007 Daring Baker Challenge: Yule Log

This was always going to be a special challenge and the result was rather delicious! We had to make a Yule log using a Genoise sponge and covered in buttercream; the details of which are set out below. I chose to make my buttercream chocolate flavoured and it turned out to be a good decision!

Here’s the sponge all golden and springy from the oven:


As the buttercream is very light – almost a meringue/buttercream hybrid I decided to contrast this and fill my log with sweetened vanilla cream and chocolate sprinkles. I used a 300ml pot of double cream which I sweetened with approximately 4 tablespoons of icing sugar and a splash of vanilla extract. This was the point when I paused to ponder whether I had enough chocolate sprinkles. I think the fact that you can only just see the cream underneath meant that the answer was yes!

The trickiest bit was rolling the log. I found myself putting this off as I was fearful of the whole thing falling apart. It didn’t roll quite as tight as I hoped for but cracking was minimal so I count it as a success!


Here’s the log wrapped up tightly in greaseproof paper ready for the fridge overnight. I made the buttercream on the morning of the day it would be served:


The challenge rules demanded that we make mushrooms. I decided on making marzipan mushrooms and think I have given away that far too much of my youth was spent playing Mario games on my Nintendo console (I think it was a SNES which makes me sound really ancient). In my world this is what mushrooms look like (my brother ate one hoping it would give him a ‘power up’. Alas, it didn’t)


The buttercream is out-of-this-world delicious. Light and soft and smooth – everything you could want from a cake coating! Here is the finished log:


Of course, the proof of the log is in the eating and I can personally vouch for the deliciousness of this slice:


Sources: Perfect Cakes by Nick Malgieri and The Williams-Sonoma Collection: Dessert Serves 12. Cake should be stored in a cool, dry place. Leftovers should be refrigerated.


Plain Genoise:

3 large eggs
3 large egg yolks
pinch of salt
¾ cup (173g) of sugar
½ cup (115g) cake flour - spoon flour into dry-measure cup and level off (can also use plain flour minus 1 tablespoon)
¼ cup (58g) cornstarch
one 10 x 15 inch jelly-roll pan (swiss roll tin) that has been buttered and lined with parchment paper and then buttered again

How to make:

1.Set a rack in the middle of the oven and preheat to 400 degrees F/200°C/ fan oven 180°C/ GM 6.
2.Half-fill a medium saucepan with water and bring it to a boil over high heat. Lower the heat so the water is simmering.
3.Whisk the eggs, egg yolks, salt and sugar together in the bowl of a heavy-duty mixer. Place over the pan of simmering water and whisk gently until the mixture is just lukewarm, about 100 degrees if you have a thermometer (or test with your finger - it should be warm to the touch).
4.Attach the bowl to the mixer and, with the whisk attachment, whip on medium-high speed until the egg mixture is cooled (touch the outside of the bowl to tell) and tripled in volume. The egg foam will be thick and will form a slowly dissolving ribbon falling back onto the bowl of whipped eggs when the whisk is lifted.
5.While the eggs are whipping, stir together the flour and cornstarch.
6.Sift one-third of the flour mixture over the beaten eggs. Use a rubber spatula to fold in the flour mixture, making sure to scrape all the way to the bottom of the bowl on every pass through the batter to prevent the flour mixture from accumulating there and making lumps. Repeat with another third of the flour mixture and finally with the remainder.
7.Scrape the batter into the prepared pan and smooth the top.
8.Bake the genoise for about 10 to 12 minutes. Make sure the cake doesn’t overbake and become too dry or it will not roll properly.
9.While the cake is baking, begin making the buttercream.
10.Once the cake is done (a tester will come out clean and if you press the cake lightly it will spring back), remove it from the oven and let it cool on a rack.

Coffee Buttercream:

4 large egg whites
1 cup (230g) sugar
24 tablespoons (3 sticks or 1-1/2 cups i.e. 345g) unsalted butter, softened
2 tablespoons instant espresso powder
2 tablespoons rum or brandy
NB. I made a chocolate buttercream instead. This meant I omitted the coffee and rum and replaced by 200g melted chocolate – I used Green & Blacks milk chocolate and it was delicious!

How to make:

1.Whisk the egg whites and sugar together in the bowl of an electric mixer. Set the bowl over simmering water and whisk gently until the sugar is dissolved and the egg whites are hot. 2.Attach the bowl to the mixer and whip with the whisk on medium speed until cooled. Switch to the paddle and beat in the softened butter and continue beating until the buttercream is smooth. Dissolve the instant coffee in the liquor and beat into the buttercream.

Filling and frosting the log:

1.Run a sharp knife around the edges of the genoise to loosen it from the pan.
2.Turn the genoise layer over (unmolding it from the sheet pan onto a flat surface) and peel away the paper.
3.Carefully invert your genoise onto a fresh piece of parchment paper.
4.Spread with half the coffee buttercream (or whatever filling you’re using).
5.Use the parchment paper to help you roll the cake into a tight cylinder.
6.Transfer back to the baking sheet and refrigerate for several hours.
7.Unwrap the cake. Trim the ends on the diagonal, starting the cuts about 2 inches away from each end.
8.Position the larger cut piece on each log about 2/3 across the top.
9.Cover the log with the reserved buttercream, making sure to curve around the protruding stump.
10.Streak the buttercream with a fork or decorating comb to resemble bark.
11.Transfer the log to a platter and decorate with your mushrooms and whatever other decorations you’ve chosen.

Meringue Mushrooms:

3 large egg whites, at room temperature
¼ teaspoon cream of tartar
½ cup (115 g) granulated sugar
1/3 cup (75 g) icing sugar
Unsweetened cocoa powder for dusting

How to make:

1.Preheat the oven to 225 degrees F. Line 2 baking sheets with parchment. Have ready a pastry bag fitted with a small (no. 6) plain tip. In a bowl, using a mixer on medium-low speed, beat together the egg whites and cream of tartar until very foamy. Slowly add the granulated sugar while beating. Increase the speed to high and beat until soft peaks form when the beaters are lifted. Continue until the whites hold stiff, shiny peaks. Sift the icing sugar over the whites and, using a rubber spatula, fold in until well blended.
2.Scoop the mixture into the bag. On one baking sheet, pipe 48 stems, each ½ inch (12 mm.) wide at the base and tapering off to a point at the top, ¾ inch (2 cm.) tall, and spaced about ½ inch (12 mm.) apart. On the other sheet, pipe 48 mounds for the tops, each about 1-1/4 inches (3 cm.) wide and ¾ inch (2 cm.) high, also spaced ½ inch (12 mm.) apart. With a damp fingertip, gently smooth any pointy tips. Dust with cocoa. Reserve the remaining meringue.
3.Bake until dry and firm enough to lift off the paper, 50-55 minutes. Set the pans on the counter and turn the mounds flat side up. With the tip of a knife, carefully make a small hole in the flat side of each mound. Pipe small dabs of the remaining meringue into the holes and insert the stems tip first. Return to the oven until completely dry, about 15 minutes longer. Let cool completely on the sheets.
4.Garnish your Yule Log with the mushrooms.

Marzipan Mushrooms:

8 ounces (225g) almond paste
2 cups (460g) icing sugar
3 to 5 tablespoons light corn syrup/golden syrup
Cocoa powder

How to make:

1.To make the marzipan combine the almond paste and 1 cup of the icing sugar in the bowl of an electric mixer and beat with the paddle attachment on low speed until sugar is almost absorbed. 2.Add the remaining 1 cup of sugar and mix until the mixture resembles fine crumbs.
3.Add half the corn syrup, then continue mixing until a bit of the marzipan holds together when squeezed, adding additional corn syrup a little at a time, as necessary: the marzipan in the bowl will still appear crumbly.
4.Transfer the marzipan to a work surface and knead until smooth.
5.Roll one-third of the marzipan into a 6 inches long cylinder and cut into 1-inch lengths.
6.Roll half the lengths into balls. Press the remaining cylindrical lengths (stems) into the balls (caps) to make mushrooms.
7.Smudge with cocoa powder.

Sunday 16 December 2007

Multi-Purpose Fruit Cake

This is a recipe from my ‘Christmas Cakes and Puddings book’ from Australian Women’s Weekly . Their recipes are exceptionally reliable. I have spent a while pondering what other purposes the cake may have to justify the ‘multi-purpose’ in the title and think it must mean that this fruit cake would work in any situation where fruit cake is needed i.e. the whole gamut of hatches, matches and despatches as well as seasonal events. I don’t think you could use it stop leaky taps or wedge under a wobbly table, for example.

My fruit cake will remain nude this year. No one in my family really likes the marzipan and hard icing so why bother with it? Sure, it looks pretty but why slave over something that everyone is going to discretely pick off and discard on their plate? A paper ruffle and a plastic Santa will suffice!

The great thing about this sort of fruit cake is that you can tailor it to your tastes. For instance, if you loathe glacĂ© cherries, omit them – as long as you maintain the overall weight of fruit in this cake it doesn’t matter what you choose to put in or leave out. I left out the glacĂ© apricots simply because I didn’t have any and increased the amount of raisins, sultanas and currants accordingly. What pleased me with this recipe was the inclusion of dates and prunes – often overlooked in Christmas cakes; as I have a weakness for both they were a most welcome addition!


Here is the mix waiting to go into the tin:


Dense fruit cake is fascinating when you think about it. Study a slice of cut fruit cake and you will notice how little ‘cake’ there actually is. The batter is merely a way of holding the fruit together. OK, perhaps it isn’t that fascinating.....(note to self – new year resolution: to get out more)

Here is the finished cake - it was a really gloomy day when I took this photo so I needed electric lighting; it seems to have caused some light reflection on the surface for which I apologise.


As this is for Christmas I cannot show you a cut slice yet - I will add a photo of a slice after Christmas. However, by photographing the side and base of the cake, you will get an idea of what it will look like:


Whenever a recipe requires dried fruits to be soaked in alcohol I recommend soaking for as long as possible; my preferred time is 24 hours in advance. I leave the spoon next to the dish and whenever passing stop and give the mix a stir. This seems to work well. Here is all the fruit freshly soaked in brandy glistening like jewels:

Post Christmas update:

The cake has now been cut and eaten so here are some update photos. This is how I served it - very simple indeed!

Here is a cut slice and the cut cake:


Ingredients:
250g sultanas
250g raisins
140g chopped seeded prunes
110g currants
125g chopped glacé apricots
110g chopped seeded dates
60g chopped glacé cherries
125ml brandy
250g unsalted butter
2 teaspoons finely grated lemon rind
200g brown sugar
2 tablespoons honey
4 eggs
225g plain flour
75g self raising flour
1 teaspoon mixed spice
60ml brandy for brushing on the hot cake

How to make:

- The day before you make the cake, place all the fruit (i.e. the first 7 items on the ingredients list) into a large bowl and pour on the brandy. Cover the bowl and, whenever you think of it, give the fruit a stir so it evenly absorbs the brandy.
- Preheat oven to 150°C/fan oven 130°C/300°F/ Gas mark 2 and line either a 19cm square tin or 23cm round tin with greaseproof paper. As the baking time is so long, use two or three layers of paper and make sure that the paper comes up approximately 5cm above the edge of the tin. This protects the cake from burning.
- Beat the butter, lemon rind and sugar in a bowl until well combined.
- Add the honey and beat until combined.
- Add the eggs one at a time and beat after each addition. By the time you reach the final egg the mix may start to curdle a little but don’t worry – nothing bad will happen!
- Stir in the fruit and then stir in the flours and spice.
- Spoon into the cake tin and even the surface.
- Bake for approximately 3 hours or until a skewer comes out cleanly. I’d recommend checking the cake after 2 ½ hours. If the top is colouring too much, put a sheet of baking paper over it. Mine took exactly 3 hours.
- This is where the recipe differs to other fruit cakes you may have made. As soon as you remove the cake from the oven, brush on the extra brandy.
- Wrap the cake, still in the tin, tightly in foil. What this does is make the cake extra moist. Leave to cool completely over night.
- The next day, remove the cake from the tin and wrap in fresh greaseproof paper and foil. Keep in an airtight container until you are ready to use.
- Bask in glory at the wonderful thing you have made.
- Eat.

Apple Custard Teacake

Sometimes there are too many difficult decisions to make in life, for example should you have cream, custard or maybe even ice cream with your cake? I like baked goods that provide answers, and this is such a cake. There is no decision to be made as you don’t serve it with anything – because the custard is already in it. Genius!


I confess to having a bit of a love affair with apple cakes; sponge and apple is such a heavenly combination. This cake is a substantial country cake and everyone who tries it loves it. Little airy-fairy cakes are all well and good but sometimes you want to have a slice of cake and really know you’ve eaten something.

The slightly unusual ingredient in the sponge part of the cake is custard powder and it adds a robustness to the mix – this isn’t an airy batter, this is a solid dense cake mix. It has to be to support the weight of the custard and the apples.


There is another thing I love about making this cake: when you put the clingfilm over the custard to stop a skin forming as it cools you get an incredible touch sensation – it’s the most amazingly silky surface that’s impossible to resist stroking! Hard to put into words but when you get to that point in the recipe you will realise exactly what I mean!


Ingredients:
For the custard:
2 tablespoons custard powder
55g caster sugar
250ml milk (whole or semi skimmed)
20g unsalted butter
2 teaspoons of vanilla extract

For the cake:
200g unsalted butter, softened
110g caster sugar
2 eggs
185g self raising flour
40g custard powder
2-3 apples, depending on size (I used three small Gala), peeled, cored and thinly sliced

For the cake topping:
1 tablespoon unsalted butter
2 teaspoons caster sugar
1 teaspoon ground cinnamon

Additional caster sugar to sprinkle on the baked cake. I recommend this as it adds to the look

How to make:

- Start by making the custard: combine the custard powder and sugar in a saucepan then, over a medium heat, add the milk.
- Stir all the time until the custard thickens slightly. Do not leave the pan or stop stirring because if the custard thickens and you’re not there you’ll end up with something like glue!
- As soon as the custard thickens take the pan off the heat and stir in the butter and vanilla.
- Press clingfilm on to the top of the custard to stop a skin forming and try to resist wasting about 10 mins stroking the surface of the newly-covered custard! Leave to cool.
- Preheat oven to 190°C/fan oven 170°C/375°F/ Gas mark 5 and line a 22cm round springform tin with greaseproof paper.
- Cream together the butter and sugar until pale and fluffy. Don’t skimp on this stage as I think it is the foundation of success. Take a tiny piece of the mix and place on your tongue. Press it to the roof of your mouth – if it’s gritty the mix needs more beating. When it’s smooth you can move to the next stage.
- Beat in the eggs one at a time. The mix shouldn’t curdle but don’t worry if it does as it will correct itself when you add the flour.
- Stir in the flour and custard powder.
- Building the cake in the tin requires care – this isn’t a cake where you simply dump the mix in the tin and put in the over. You’ll need a knife and spatula and a light touch!
- Spoon half the cake mix into the cake tin and level it. It is a thick batter and you will worry that you don’t have enough mix. You do. You just have to be patient and spread it carefully.
- Remove the clingfilm and spoon the custard onto the cake mix in the tin. Be careful not to spread the custard to the edge as you want the top and bottom layers of cake mix to meet and enclose the custard.
- Now the bit that requires patience and care. Spread the remaining cake mix on top of the custard ensuring that as you spread it you don’t disturb the custard. Try to skim the surface with your knife so that you only move the mix. It isn’t easy but if you’re careful you’ll manage. My hint is to spoon the mix around the edge and draw it towards the centre – that way you guarantee the custard will be cased in the cake.
- Peel, core and slice the apples. I cut the apple into quarters, and then each quarter into four i.e. an apple yields 16 slices.
- Arrange the apple slices on top of the cake.
- Brush the apples with the melted butter and then sprinkle on the sugar and cinnamon.
- Bake in the oven for approx 1 hour until a skewer comes out clean. Mine took exactly one hour.
- While the cake cools in the tin, sprinkle additional caster sugar on top.
- Bask in glory at the wonderful thing you have made.
- Eat.

What the Caked Crusader chose to bake to this week (15 Dec 2007)

I fancied a bit of a singing session with my baking this week. I’m sure my neighbours were delighted! However much they may have been appalled by my vocal talent (or lack of) they couldn’t have criticised my choice of album. I love all of Kirsty MacColl’s recordings but my favourite is Tropical Brainstorm, sadly her final album before her tragic, untimely death. Flavoured with Latin American rhythms and packed full of Kirsty’s bitingly funny lyrics delivered in her warm voice it is a masterpiece. There isn’t a duff track or moment on the whole CD. Researching it online I was stunned to see that it was released in 2000. It’s as fresh and vibrant as if it was recorded yesterday.

Every track on it is wonderful but the standout for me is “In These Shoes”. Forget that comedienne Catherine Tate swiped it and used it as the theme music for her hilarious TV show (yes – the italics are there to indicate sarcasm). It’s a terrific song.

Monday 10 December 2007

BBC Olive magazine

If you happen to come across the latest copy (Jan 08) of Olive magazine you will see a mention of The Caked Crusader. Fame at last!!!

Sunday 9 December 2007

Tres Leches Cake (Three Milk)

I promise to always tell the truth about my baking and the truth here is that you should only make this cake if you have a lot of time to lavish on it. And I mean a lot. It is worth the effort though - in fact, it's a bit of a stunner and unlike anything you'll have had before.


This is not a ‘quick make’ as the cake requires time to soak up a mixture of milks and cream (hence the name of the cake). When I started basting the cake with the milk/cream solution I was very concerned that it wouldn’t absorb all the liquid. After about two hours less than half the liquid had found its way into the cake. Then, as a last resort, I flipped the cake. Voila! A one way ticket to speedy absorption. Therefore, my top tip is when you put the cake into a large tin to pour the milk/cream solution into it, ensure that you turn the cake upside down to how it was baked i.e. so the flattest surface, which was the bottom when baking, is now the top. This limits how much liquid rolls off the top and gives a much better surface for soaking.

When you take it out the oven, the cake will sink a little and shrivel. It was quite odd to see a plump sponge turn into the cake equivalent of a shar pei dog. But once you start soaking it, it plumps up again so fear not!

Here it is looking shar pei like before I flipped it:


And see how it looks flipped with all the liquid absorbed:


The thinking behind the cake is interesting: make a fat free sponge and then soak it in condensed milk, evaporated milk and cream. This gives a rich and moist finish that is out of this world and worth every minute lavished on it. It takes the idea of a rum baba and makes it more dairy focused (which can’t be a bad thing – remember we all need calcium for healthy bones!)

It’s very hard to describe the taste and texture – it’s dense in texture because of the liquid but not heavy. The best I can do is to say it tastes like vanilla ice cream in cake form. If making the meringue with boiling sugar syrup frightens you, this cake would also work with whipped cream.


Boiling the sugar syrup – the temperature’s not quite at the required level yet:


Ingredients:
For the cake:
6 eggs, separated
230g caster sugar
125ml milk (whole or semi skimmed)
3 teaspoons vanilla extract
290g plain flour
2 teaspoons baking powder
½ teaspoon cream of tartar
395g tin condensed milk
375g tin evaporated milk
300ml single cream
3 tablespoons rum

For the meringue topping:
290g caster sugar
4 egg whites
½ teaspoon cream of tartar

How to make:

- Preheat oven to 170°C/fan oven 150°C/325°F/ Gas mark 3 and line a 22cm square tin with greaseproof paper.
- Beat the six egg yolks with all but 2 tablespoons of the sugar (put aside for the egg whites) until pale, thick and creamy. Don’t skimp on this stage or try to rush.
- Fold in the milk and one teaspoon of the vanilla extract.
- Fold in the flour and baking powder. Put the bowl to one side.
- In a separate bowl whisk the egg whites until they appear frothy, then add the cream of tartar.
- Resume whisking until the whites start to peak, then add the sugar.
- Continue whisking until you have stiff glossy peaks.
- Stir a spoon of whites into the cake mix to slacken the mix.
- Carefully fold in the rest of the whites until the mix is just combined.
- Pour into the cake tin and bake for 45-50 minutes or until a skewer comes out clean. Mine took 45 minutes.
- Cool in the tin for 30 minutes before removing from the tin and letting cool completely on a wire rack. This is when it will go a bit wrinkly looking!
- When completely cool, stand the cake upside down, so what was the bottom is now the flat top, in a larger tin (I used a plastic tray) and using your cake skewer make lots of deep holes in the cake.
- Mix together the condensed milk, evaporated milk, cream, remaining 2 teaspoons of vanilla and rum.
- Ladle a small amount of the milk mix over the cake and leave to absorb. Continue doing this periodically until all is absorbed. This may take several hours.
- Put the now soggy cake into the fridge overnight to let the liquid settle in the cake and mellow.
- The day you want to serve the cake, make the meringue topping.
- Put the sugar with 80ml water into a small saucepan over a high heat and stir until the sugar has dissolved.
- Let the sugar syrup boil until it reaches ‘softball stage’. What this means is a temperature of 240°F or 120°C. If you don’t have a sugar thermometer, boil for about 8 minutes and then take a tiny amount of the syrup and drop into a bowl of cool water. The sugar should form a small soft lump.
- While that’s happening, whisk the egg whites and cream of tartar until soft peaks form.
- Slowly add the sugar syrup to the egg whites and continue whisking while doing so.
- Continue to whisk until the mixture is thick and cool to the touch. This took me at least ten minutes. The hot sugar has cooked the egg white resulting in soft meringue.
- Spread the meringue over the top and sides of the cake with a spatula dipped in hot water. This will increase the ease of spreading.
- Refrigerate the cake uncovered until needed.
- Bask in glory at the wonderful thing you have made.
- Eat.