Showing posts with label nutella. Show all posts

Sunday, 17 November 2013

Nutella pecan brownies


Nutella pecan brownies...there’s not a word to dislike in that!  I loved these!  The nutella adds a richness and roundness of flavour to the brownie that compliments the chopped pecans.  I think they are up there as the most flavoursome brownie I’ve tasted....and I liked how the nutella added to the squidginess too.


I used dark chocolate for the brownies, where usually I’d be tempted to use milk or half milk/half dark.  The nutella is milky and sweet and I didn’t want to overdo the sweetness as I like a brownie with a strong hit of cocoa goodness!


Brownies are one of the few things that Mr CC and I disagree on (also on that list are Michael Buble, how interesting science is, coffee and capers).
  He can’t get past the texture, which for me is the whole point of a brownie!


Footnote: this could actually be the footnote for any brownies I have ever made....Mr CC took the leftover ones into work for his colleagues...he tried one...and he liked it.  But he doesn’t like brownies.  Except for all those brownies in the recent past he has tried and liked.  Men are funny!


Ingredients

150g unsalted butter
100g nutella
100g dark or milk chocolate, broken into squares (I used dark)
3 eggs
150g caster sugar
80 self raising flour
50g pecan nuts, chopped finely plus a further 12 pecan halves for the top


Method

Preheat the oven to 200°C/fan oven 180°C/400°F/gas mark 6.

Line an 18cm (20cm will work too) square pan with baking paper.

Place the butter and nutella into a small saucepan and place over a gentle heat.  Stir occasionally.

When the mixture is melted and smooth turn the heat to the lowest setting and add the chopped chocolate.

As soon as the chocolate starts to melt, turn the heat off and leave the chocolate to melt into the butter mix.  Stir occasionally until the chocolate has completely melted.

In a large mixing bowl whisk together the eggs and sugar until it is light and whippy.

Pour in the chocolate mix and beat together.

Fold in the flour and chopped nuts.

Pour into the prepared tin and gently sit the pecan halves on top – space them out evenly as this will help you to cut the brownies later.

Bake for 30 minutes or until the brownies are almost baked.  There’s no right or wrong here – it depends how squidgy you like your brownies.  Make sure you take them out just before they are how you like them as they will continue to cook and firm up as they cool.

Leave the brownies to cool for 20 minutes in the tin before lifting out and cutting into 12 brownies.

Bask in the glory of the wonderful thing you have created.


Eat.

Saturday, 22 June 2013

Nutella friands/financiers


I was very pleased to be offered a copy of Nutella: The 30 best recipes (published by Jacqui Small) to feature on my site, and even more pleased to be able to offer all readers the chance to buy the book at a special price which is cheaper than amazon (see below).  The book is shaped like a jar of Nutella - as if it needed making any more appealing, given the subject matter!


The recipe which caught my eye was the financier recipes.  As I didn’t have a financier tin (I know!  I was as surprised as you!) I decided to deploy my seldom used friand tins.  These must be much deeper than a financier as the recipe said it would make 18, whereas I only got 6 friands!


Soft light-but-close-textured almond sponge with a generous pocket of Nutella is never going to be a tough sell; the Nutella sank but it did in the photo in the book too so I didn’t feel bad about it.  The smell of them baking alone was enough to draw Mr CC to the kitchen like a Bisto kid!


Given the almond content, friands are always better the day after baking.  It takes time for the almond oils to seep out.  But it is pretty tough leaving them to find this out!


Cute-but-at-the-same-time-aggravating thing I learned during writing this post?  Word autocorrects friands to friends.  Nutella friends...now there’s a concept!


Special offer (cheaper than Amazon!) available to all readers of my blog:

To order Nutella: The 30 Best Recipes (published by Jacqui Small) at the discounted price of £7.00 including p&p*, telephone 01903 828503 and quote offer code JS232. Or send a cheque made payable to: Littlehampton Book Services Mail Order Department, Littlehampton Book Services, PO Box 4264, Worthing, West Sussex BN13 3TG. Please quote the offer code JS232 and include your name and address details. 
*UK ONLY - Please add £2.50 if ordering from overseas.


Ingredients

70g unsalted butter
50g plain flour
130g icing sugar
70g ground almonds
4 egg whites
50g (approx) nutella


Method

Preheat the oven to 200°C/fan oven 180°C/400°F/gas mark 6.

Grease financier pans, friand pans, or muffin pans.  The recipe stated it will make 18 (fairly shallow) financiers but I made full depth friands and only got 6!

Melt the butter over a gentle heat and put to one side to cool.

In a large bowl mix together the flour, icing sugar and almonds.

Beat the egg whites, one at a time, into the dry mix.

Gradually beat in the melted butter.  The mix will be very runny.

Pour the mix into the prepared moulds.  Half fill each hole.

Add approximately ½ heaped teaspoon of Nutella to each cake.

Bake for approximately 12 minutes (for shallow financiers) or longer for deeper cakes; my friands took 22 minutes.  They’re ready when a skewer inserted into the cake comes out clean.

Leave to cool in the tin for 15 minutes as they are very soft and fragile straight from the oven.  They will sink a little as they cool so don’t panic.

Turn out onto a wire rack and leave to cool completely.

Bask in the glory of the wonderful thing you have created.


Eat.

Sunday, 2 January 2011

Fun with puff pastry and a Christmas round up


This Christmas I showed my ability to learn from past mistakes and grow as a person – by which I mean that I didn’t buy my usual six limes and will thus be spared the sad task of having to throw them away towards the end of January. However, I did have a minor aberration in the Tesco aisle where they stocked the fresh ready-rolled all-butter puff pastry ....and ended up with quite a lot of puff pastry. You may not know what it’s like to look in your fridge and wonder “why on earth did I think I would need that much puff pastry?” so let me tell you it’s a mixture of shame tinged with pride at owning so much puff pastry. Having frozen what I could, I was left with several packs so decided to make palmiers.

No recipe needed here as it couldn’t be simpler. Just spread your filling over the pastry; here is the mincemeat version:


Then roll them up from the sides so they meet in the middle and chill them for 30 minutes before slicing. At this point, they don’t look very palmier-like but don’t panic:


When baked they look like fat villainous Victorian moustaches (to bake them, simply follow the instructions on the pastry packet – mine needed about 15 minutes at 180C):


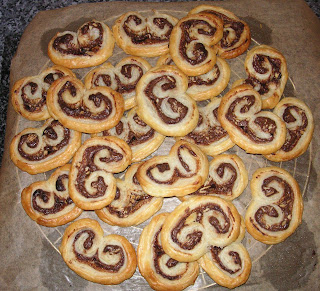
These were such a hit that I repeated the process with nutella, chopped almonds and cinnamon (these were Mr CC’s favourites):


And then – because there was still some pastry to use up, I tried a plainer sugared version. I simply sprinkled caster sugar over the pastry and then egg washed the slices, sprinkling with more sugar (sorry for the rather migraine-inducing photo but I made them in the evening and it was dark, so I needed my kitchen lights on!):


When I get round to tackling my frozen puff pastry mountain there will no doubt be more puff pastry recipes on my site!


Of course, it wouldn’t be Christmas without mince pies. I made my usual pies with decorative pastry toppers and if you’d like to see the recipe it can be found here


I also made a Christmas cake with my usual recipe only this year I used a much darker rum which gave it a richer colour (it was overproof rum and gave the flavour a bit of a kick!).


My cake toppers were from Salzburg and are Krampus and St Nicholas. Their bodies are Mozart Balls– the famous chocolate only available in Salzburg. I liked that they were cute and Krampus doesn’t look too evil!


Happy New Year to you all and here’s hoping your 2011 will be filled with exquisite baked goods!


Sunday, 14 February 2010

Valentine’s biscuits


I must confess that everything about Valentine’s Day makes me recoil from it with great speed – it’s so cynically marketed and, if you love someone, why do you need to be told to demonstrate it on a particular day? Why not every day?

Anyway, rant over (it’s fairly hypocritical anyway as I bought a card, gifts etc for Mr CC), this is my attempt at some Valentine’s baking. You can of course make these biccies at any time of year and ‘seasonalise’ (I’ve invented a word) them by using a different shaped cutter. And well worth making they are too as they are short and buttery and crispy but also crumbly. Just about my perfect biscuit.

When you bite into these you might well think they are shortbread – they aren’t, but they have a similar texture. If you cut a little shape out of the middle of some of the biscuits you can sandwich them with a whole one and create a pretty little window effect.

I sandwiched some with nutella, some with raspberry jam and left some plain. Don’t add the filling until the day of eating otherwise you might lose some of the crispness of the biscuit.

You can reroll any cut outs but I baked them – you are rewarded with delicious little crisp mouthfuls of biscuity heaven!


Ingredients:

For the biscuits:
225g unsalted butter, diced and at room temperature
100g caster sugar
200g plain flour, plus extra for rolling
100g ground almonds

To sandwich (optional): nutella or raspberry jam. I suspect any jam or curd would work well.

How to make:

- Place all the ingredients in a food processor and blitz until a dough just starts to form.

- Knead the dough into a ball and then wrap in clingfilm and refrigerate for 2 hours minimum (it’s a very soft dough so needs this long).

- Preheat the oven to 140°C/fan oven 120°C/275°F/Gas mark 1.

- Line two large baking sheets with baking or greaseproof paper.

- Remove the dough from the fridge and knead until it has softened. If it is still sticky add some more flour and knead this in. I added about a further 2-3 tablespoons.

- Cut the dough in half and roll one half out between two sheets of generously floured baking paper. Normally I wouldn’t flour baking paper but this dough needed it – use your judgement.

- Roll it out to 1/2cm thick and then cut out using your chosen cutter. If you’re planning to sandwich the biscuits take a smaller cutter and cut the centre out of half the biscuits.

- Place the biscuits and the cut out middles onto a baking sheet leaving about 1-2cm gap between them as they expand on baking.

- Repeat with the second ball of dough.

- Bake in the oven for approximately 40 minutes or until the biscuits are a pale golden brown. I was sceptical at a long bake at a low temperature but loved the effect – the biscuit had a much more delicate texture to it. Mine actually took a little over 40 minutes but it’s worth it. Check after 20 minutes in case the trays need turning to ensure an even bake.

- Place the trays on a cooling rack and let the biscuits cool. Don’t even think about moving them until they are cold as they are too fragile and will break.

- Store in an airtight container until you wish to serve, then sandwich with nutella or jam. Of course, you can leave them plain and enjoy the buttery almond taste on its own!

- Bask in glory at the wonderful thing you have made.

- Eat.

Sunday, 15 March 2009

Hazelnut cream sponge cake


I am always fascinated by recipes with methods that are new to me. This cake starts off as a meringue before you beat the egg yolks and other ingredients into it. The result is a light as air sandwich cake. You can see from the batter how airy and fluffy it is:


It was definitely time to revisit nutella, which I have previously used in cupcakes and swirl biscuits. This elegant sponge seemed the perfect addition to my growing collection of nutella recipes. If you happen to read the link I’ve provided to the Wikipedia page you will notice the sage advice that “Nutella is generally not recommended for people with an allergy to nuts” – who’d have thought?


This cake is light and creamy all the way. The sponge is super soft and the melt in the mouth whipped, almost moussey, topping is a perfect match for it.


Ingredients:
For the cake:
4 large eggs, separated
115g caster sugar
60g self raising flour
75g ground hazelnuts (I couldn’t find these to buy so bought chopped hazelnuts and blitzed them in the food processor)
20g unsalted butter
2 tablespoons boiling water

For the topping/filling:
170g nutella
130g unsalted butter, at room temperature
60g icing sugar
3 teaspoons boiling water

How to make:

- Preheat the oven to 180°C/fan oven 160°C/350°F/Gas mark 4.
- Line one 20cm loose bottomed square tins with baking paper.
- Whisk the egg whites until at the soft peak stage.
- Gradually whisk in the sugar until you have a thick, glossy meringue.
- Whisk in the egg yolks one at a time.
- Sift the flour over the mixture and fold in.
- Fold in the ground hazelnuts.
- Melt the butter in the two tablespoons of boiling water, then fold into the batter.
- Pour the batter into the prepared tin and bake for approximately 25 minutes or until a skewer inserted into the middle comes out clean. Mine took exactly 25 minutes.
- Leave the cake to cool in the tin for 10 minutes or so, before removing from the tin and leaving to cool completely on a wire rack.
- Now make the filling: beat the nutella and butter together until soft and creamy.
- Beat in the icing sugar and then gradually beat in the boiling water.
- Cut the sponge cake in half horizontally. I have to confess that my sponge was so soft and sticky that I didn’t dare do this and merely piped the icing on top of the whole sponge.
- If you have cut the sponge through, spread the filling over the bottom half and then replace the top layer of sponge.
- Refrigerate until the filling is firm.
- Bask in glory at the wonderful thing you have made.
- Eat.

Sunday, 17 August 2008

Nutella cupcakes


I’ve wanted to make nutella cupcakes for a while now but each recipe I found didn’t quite do it for me – can’t put my finger on why. So I decided to tinker with my trusted cupcake recipes and create my own version.

Here are the cupcakes fresh from the oven:


Nutella has it all; it’s thick, smooth and has such a depth of rich flavour that I have to limit myself to one suck of the spoon when I’ve finished making my cakes!

Beating the nutella into the Swiss meringue buttercream was particularly fun; watching the snowy buttercream slowly turn brown was pleasing and strangely relaxing. I knew this would work as my earlier strawberry and vanilla cupcakes beat jam into the buttercream.

Twelve happy little cupcakes ready to be eaten!


The buttercream was softer than usual, which must have been down to the nutella. It was – and I know I’m blowing my own trumpet here – the best buttercream ever, a cream/mousse hybrid. Divine!


A little extra nutella in the cupcake doesn't hurt!


Ingredients:

For the cupcakes:
125g unsalted butter, at room temperature
125g caster sugar
2 eggs
125g self raising flour
2 tablespoons milk (whole or semi skimmed, not skimmed)
5-6 teaspoons nutella

For the Swiss meringue buttercream:
4 egg whites
250g caster sugar
250g unsalted butter
2 teaspoons vanilla extract
3-4 tablespoons nutella (I used 3)

How to make:

- Preheat the oven to 190°C/fan oven 170°C/375°F/Gas mark 5.
- Line a muffin pan with 12 paper cases.
- Start by making the cupcakes. Beat together the butter and sugar until pale and fluffy.
- Add the eggs, flour and milk and beat until well combined and smooth.
- Spoon half the mixture evenly into the 12 paper cases.
- Spoon a scant half teaspoon of nutella onto each cake and then cover with the remaining batter.
- Bake for approximately 15 minutes or until a skewer comes out clean. Mine took 17 minutes.
- Remove from the oven and leave to cool on a wire rack.
- Now make the swiss meringue buttercream. Place the egg whites and sugar in a bowl over a pan of simmering water. Stir pretty much constantly to prevent the egg from cooking.
- After 5-10 minutes, when the sugar has dissolved, remove the bowl from the pan of simmering water and whisk until the meringue has puffed up and the mix is cool.
- Add the butter and vanilla to the meringue and whisk until the butter has been completely incorporated into the meringue. At first it will look a disaster – it will collapse and look curdled but don’t worry! Stop when the mixture is smooth, light and fluffy.
- Beat the nutella into the buttercream – add a spoon at a time so you can judge how much nutella the buttercream needs.
- Spoon the buttercream into a piping bag and swirl onto each cupcake.
- Bask in glory at the wonderful thing you have made.
- Eat.

Sunday, 1 June 2008

Raspberry (or Nutella) swirl biscuits

The CCB (Caked Crusader’s Brother) and I had the following conversation this week:

CCB: I’ve been pondering your site and have come to the conclusion that there aren’t enough biscuits on it.
Me: Well, I am the Caked Crusader, not the Crumbed Crusader. Plus, making biscuits never really thrills me in the same way making cake does.
CCB: I think you should have more biscuits on the site; biscuits are very popular and you need to ensure your mix of recipes appeals to a wide audience. I like eating biscuits – they’re easier to eat than cake.
Me: So what you’re actually saying is that you want me to make biscuits because you want them, not because you’re concerned about the ‘balance’ of recipes on my site?
CCB: Yes. Furthermore, any of my future observations re your site will be made on this basis.

So I’m making biscuits this week. Here they are all dressed up and ready to go:


Well, I call them biscuits but they’re more like a halfway house between a crumbly Viennese biscuit and a cupcake. I liked the way they were made into little rounds rather than the more usual finger shaped Viennese. The delicious crumbly melt-in-the-mouth quality means you really could eat loads of these and then wonder why you feel a bit full!

The dough is soft enough to pipe:


When the biscuits are ready to bake, chilling them for 30 minutes will help them keep their shape in the oven.
The recipe filled them with raspberry jam but any flavour of jam would work, as would something a bit naughtier like Nutella. I made 6 with jam, 6 with Nutella. It’s a tough decision (Notice my cool Spongebob Squarepants cupcake cases!):


The Nutella looked good...


...but then the jam looked mighty fine too...

OK, I’ve decided, it’s got to be Nutella!


Ingredients:
For the biscuit cupcakes:
175g unsalted butter
60g caster sugar
150g plain flour
30g cornflour
2 teaspoons vanilla extract

For the topping:
4-5 teaspoons raspberry jam or Nutella
Icing sugar, for dusting

How to make:

- Preheat the oven to 180°C/fan oven 160°C/350°F/Gas mark 4.
- Line a muffin tray with 12 paper cases.
- Cream the butter and sugar together until pale and fluffy.
- Beat in the flour, cornflour and vanilla.
- Fill a piping bag with the mixture and pipe circles into the paper cases. I used a large star icing nozzle.
- Chill for 20 minutes or so – this ensures that the piped biscuits will retain their shape during baking.
- Bake for 15-20 minutes until a light golden colour. Mine took 25 minutes.
- Leave to cool on a wire rack.
- To finish the biscuits, fill the centre holes with jam.
- Dust with icing sugar. I often say this is optional but for these, I really think it finishes them off and makes them look so pretty.
- Bask in glory at the wonderful thing you have made.
- Eat.