Sunday 28 September 2008

Extreme Lemon tart (Warning: for lemon addicts only!)

Now regular readers will know that I hate lemon. Oddly though, I rather enjoy using it in baking. I never claimed to make sense!


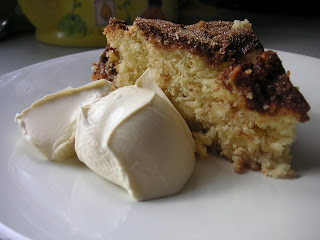
Recently I’ve made quite a few things with almond and the CCM (Caked Crusader’s Ma) has to eat these sparingly because as much as she loves almonds, they don’t reciprocate the love. So this one’s for her!


I found this lemon oil and it’s made solely from pressing lemons. That may sound an obvious comment but often you’ll find additional ingredients to make the expensive ingredient go further – no such tactics here. I bought this lemon oil from Lakeland Limited who state that it takes 330 lemons to make one bottle...that’s a lot of lemons! I added a few drops to the pastry for a subtle lemon tang and some more to the lemon juice just to perk up the zing-factor. You could use lemon zest to achieve the same objective but I wanted the lemon filling to be smooth.


Here’s the beautiful pastry straight from the fridge and about to be baked blind:


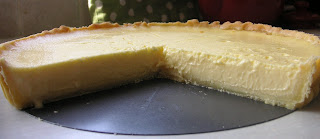
As the tart cooled I found that the surface cracked. Admittedly it isn’t desirable but it didn’t effect the flavour or texture, and with judicious cutting (i.e. cutting along the cracks) you can eliminate most of them.


The CCM’s verdict? She was pleased! She claimed that this is a lemon tart for people who never find things lemony enough. It also announced itself with that lemon tickle at the back of the throat – again, I’m reliant on the CCM here but this is apparently a good thing. The CCM also thought this would be a good dessert for people who usually find dessert too sweet.


Always sieve a custard-type filling before baking. Why? This photo is probably the best answer!


Ingredients:
For the pastry:
173g plain flour
120g unsalted butter
3 tablespoons icing sugar
2 egg yolks
Dash of lemon oil or, if preferred, the finely grated zest of 1 lemon

For the filling:
5 eggs, beaten
150g caster sugar
Juice of 5 lemons (if required, add the grated zest to the mix as well)
300ml double cream

How to make:

- Put all the ingredients for the pastry in a food processor and whizz together until a soft ball of dough is formed.
- Roll the pastry out between two sheets of baking paper and use to line a 23cm loose bottomed flan tin. No need to grease this, as the pastry is rich and buttery enough. Leave any excess pastry hanging over the edge of the flan tin (it’s always best to leave trimming the pastry until after you have blind baked it).
- Leave to chill in the refrigerator for 1 hour.
- Preheat the oven to 190°C/fan oven 170°C/375°F/Gas mark 5.
- Line the pastry case with baking paper and baking beans, and bake for 15 minutes.
- Remove the paper and beans and return to the oven for a further 5 minutes. Once you have removed the pastry from the oven reduce the temperature to 150°C/fan oven 130°C/300°F/Gas mark 2.
- Meanwhile, start making the filling: mix the eggs and sugar until combined.
- Beat in the lemon juice (and zest or oil, if using) followed by the double cream.
- Sieve the filling before pouring into the pastry case.
- Bake for 30 minutes or until the filling has only a slight tremor if you gently shake the tin. Mine took 35 minutes to reach this stage, but once you’re past the 30 minute mark watch it closely as mine was very liquid still at this point and then set quickly.
- Turn the oven off but leave the tart where it is. Let the tart cool in the oven – leave the oven door ajar. Without cooking the tart further, this helps the filling to firm up.
- When cool, transfer the tart to the fridge and chill thoroughly before serving, ideally 24 hours.
- Serve with cream or crème fraiche.
- Bask in glory at the wonderful thing you have made.
- Eat.

Lumberjack cake

Two things to address straight off regarding this cake:
1. No one seems to know why it’s named after lumberjacks
2. It is impossible to make this cake without Monty Python’s [http://en.wikipedia.org/wiki/Monty_Python] Lumberjack song playing in your mind on an endless loop. If you haven’t seen it here it is, if you have – watch it again – it’s still funny:


For a plain looking cake there’s really quite a lot going on here; this cake is all about flavour. The apple gives acidity and moisture, the dates provide wonderful texture and a toffee sweetness, and the buttery, caramelised coconut topping adds crunch and depth of flavour. It’s an embarrassment of riches!

Just how juicy does this look:


The cake has many elements of sticky toffee pudding i.e. the dates and the caramel sauce used in the topping, but then ups the ante and provides a tropical element with the coconut. The best description I can conjure to help you imagine the taste and texture of this, is to say it’s like a tropical bread pudding.

There is something about dates simmering in a pan that is always a joy – I think it’s partly the warm toffee aroma that’s produced:


One tip re: serving this cake; the texture is dense and the flavours are intense so I heartily recommend that you serve some cream with the cake to lighten it. Trust me – it takes it to a whole other level of pleasure!


As the cake is so moist it does start to sink a little on cutting; don’t worry – just think of all that delicious flavour the cake must contain!


Ingredients:
For the cake:
200g dates, pitted and chopped (200g is the weight you want after taking the stones out)
1 teaspoon bicarbonate of soda
125g unsalted butter, at room temperature
230g caster sugar
1 egg
1-2 teaspoons vanilla extract
2 granny smith apples (any tart eating apple will work), peeled, cored and grated
125g plain flour
60g self raising flour
Optional: Icing sugar to dust, before serving

For the topping:
75g unsalted butter
60g light brown soft sugar
35g dark brown soft sugar
80ml milk (whole or semi-skimmed)
60g shredded coconut (I couldn’t find this, so used flaked coconut that I chopped up a bit finer)

How to make:

- Preheat the oven to 180°C/fan oven 160°C/350°F/Gas mark 4.
- Line a 20cm round springform cake tin.
- Put the chopped dates in a saucepan along with 250ml of water and bring to the boil. Stir in the bicarbonate of soda (the mixture will froth up like mad) and put to one side to cool.
- Cream together the butter and sugar until pale and fluffy.
- Beat in the egg and vanilla.
- Stir in the dates (with all the liquid) and grated apple. Don’t worry if you have an extremely ugly batter at this point – mine would definitely not have won any beauty contests!
- Fold in the flours until combined.
- Spoon the batter into the prepared tin and level the surface. Bake for 40 minutes.
- Meanwhile, make the topping: put all the topping ingredients into a saucepan and stir over a low heat until the butter has melted and the mixture is well combined.
- When the cake has baked for 40 minutes, remove from the oven and gently spoon the topping onto it. Make sure that the topping evenly coats the cake and then return it to the oven for a further 20-30 minutes or until a skewer comes out clean. NB. The cake is wobbly even when cooked so rely on your skewer to tell you when it’s done. Mine required 67 minutes in total.
- Remove from the oven and leave to cool on a wire rack. It is best to let the cake cool completely before removing it from the tin. Even then, I still found that mine sunk a little when I transferred it from the tin.
- If required, dust with icing sugar just before serving. I served it with thick cream.
- The cake will keep for several days in an airtight container – no need to refrigerate.
- Bask in glory at the wonderful thing you have made.
- Eat.

Saturday 20 September 2008

Moist chocolate cake

Early post this week as I’m heading off for a few days’ hols.


I wasn’t planning on making this cake but then, something clicked inside and I NEEDED chocolate. Needed, I tell you – not wanted or fancied; I’m talking actual, physical need.

This recipe interested me as it uses drinking chocolate instead of cocoa powder or actual chocolate. I bought a posh drinking chocolate and didn’t realise that nowadays, instead of powdery granules you get flakes of chocolate (note the two tone colour as it's half milk, half dark):


This meant the chocolate rippled through the sponge batter rather than turning the whole mix brown. As I wanted the buttercream to be an even chocolatey brown colour I used my mini-chopper to grind the flakes down – same lovely taste but more workable for a buttercream. You can see that it still retained some flecks of chocolate, which I rather like as it makes it look all the more decadent!


Here’s a sandwich tin ready for the batter:


One of my top tips is to have bulldog clips near to hand in the kitchen as they are perfect for holding paper in place. If you leave the baking paper to its own devices, as soon as you start spooning the batter into the tin it flops over and is difficult to hold in place. By using the bulldog clip you avoid all of this – just remember to remove it before putting the tins in the oven.

The glace icing sets very quickly and provides a beautifully smooth finish with very little effort required!


Ingredients:
For the cake:
170g unsalted butter, at room temperature
170g caster sugar
3 eggs
110g self raising flour
85g drinking chocolate
1 tablespoon hot water

For the buttercream:
110g icing sugar
50g unsalted butter, at room temperature
50g drinking chocolate
Water or milk, if required

For the glace icing:
170g icing sugar
50g drinking chocolate
Approximately 2 tablespoons hot water, to mix

Optional: Chocolate sprinkles to decorate

How to make:

- Preheat the oven to 180°C/fan oven 160°C/350°F/Gas mark 4.
- Grease and line two 20cm sandwich tins.
- Start with the cake - cream the butter and sugar together until light and fluffy.
- Beat in the eggs, one at a time and add some of the flour if required to prevent curdling.
- Fold in the flour and drinking chocolate then stir in the hot water.
- Spoon into tins and level the surface. Bake for approximately 25 minutes or until a skewer comes out cleanly. Mine took exactly 25 minutes.
- Leave to cool in the tins before removing the tin and leaving the cakes to cool completely on a wire rack.
- Now make the buttercream filling: beat all the ingredients together until smooth and light. Use to sandwich the sponges.
- Now make the glace icing: beat the ingredients together until a thick paste is formed – you may need more water but add it with caution as you don’t want the icing too runny!
- Using a knife dipped in hot water, spread the icing over the top of the cake. Work fast as the icing sets alarmingly quick!
- Bask in glory at the wonderful thing you have made.
- Eat.

Apple cake

I found this exact recipe in two different cook books, only one called it “Irish Apple Cake” and the other called it “Yorkshire Apple Cake”. I have no idea which is correct so have simply called it Apple cake.


Apple works so well in cake – the acidity and texture adds a depth of flavour and interest to the sweet batter. This recipe uses cooking (rather than eating) apples and provides a beautifully balanced sweet/tart contrast.

I served this cake at tea time with some Chantilly cream but it would be delicious for dessert served warm with custard or ice cream.


This is one of those satisfying yet simple rustic cakes; the sort of cake you’d expect to see cooling in a farmhouse kitchen. I love all cake but this type is my favourite particularly the cinnamon sugar crunchy topping! This photo shows the topping off at its best:


Ingredients:
For the cake:
225g cooking apples (I used Bramleys), peeled, cored and chopped to 1cm cubes
225g plain flour
1.5 teaspoons baking powder
115g unsalted butter, diced
115g golden caster sugar
1 egg
2-3 tablespoons of milk

For the crunchy topping:
50g golden caster sugar
1 teaspoon cinnamon

How to make:

- Preheat the oven to 180°C/fan oven 160°C/350°F/Gas mark 4.
- Line a 20cm round springform cake tin.
- Rub the butter into the flour and baking powder until it resembles breadcrumbs.
- Stir in the sugar.
- Chop the apples (don’t do this too far in advance or they will turn brown, if you want to do it in advance then cover with some lemon juice to stop discolouration) and add to the bowl along with the egg.
- Mix thoroughly and add milk, as required, to achieve a dropping consistency.
- Spoon the mix into the cake tin. It will be lumpy because of the apple. Level in the pan.
- Now make the topping: Mix together the sugar and cinnamon and sprinkle evenly over the top of the cake.
- Bake for 45-50 minutes or until a skewer comes out cleanly. Mine took 50 minutes.
- Leave to cool in the tin for 20 minutes before turning out onto a wire rack and leaving to cool completely.
- Serve either at room temperature with some whipped cream, or warm with custard or ice cream.
- Bask in glory at the wonderful thing you have made.
- Eat.

Sunday 14 September 2008

Buttery almond and coconut cake (gluten free)

This falls into the category of cakes that couldn’t be easier to make or tastier to eat. Hopefully you can see that this is a GOOD category!


The cake itself isn’t hugely impressive to look at; as it doesn’t have any flour it remains reasonably flat but oh what a texture! Inside the cake is sticky, buttery and packed with flavour. The crust manages somehow to be chewy and crumbly at the same time.

Look how juicy and moist the cake is:


I served the cake with a cup of tea, but it would also be lovely as a dessert with some whipped cream or maybe even some fruit.

If you look up the phrase “buttery almondy coconuty goodness” in the dictionary it shows this photo:


Ingredients:
200g unsalted butter, melted and left to cool
180g ground almonds
60g desiccated coconut
250g caster sugar
4 eggs
2 teaspoons vanilla extract
1 teaspoon almond extract
2 handfuls flaked almonds

How to make:
- Preheat oven to 180°C/fan oven 160°C/350°F/Gas mark 4.
- Line a 20cm springform tin with baking paper.
- Melt the butter in a small saucepan then put to one side to cool. You don’t want the butter to colour so melt on a low light and remove from the heat as soon as possible.
- Put the ground almonds, coconut, and caster sugar into a bowl and whisk a little to combine and get some air into the dry mixture.
- In a separate bowl, beat together the eggs, vanilla and almond extract until well combined. Gradually beat in the cooled butter.
- Tip the dry mix into the butter mix and stir until totally combined. The batter is loose and slightly lumpy looking so don’t panic!
- Pour the batter into the tin and scatter the flaked almonds over the top.
- Bake for approximately 40 minutes or until a skewer comes out reasonably clean – as the cake is so moist and sticky it will never come out clean but as long as the batter on the skewer doesn’t look raw the cake is done. Mine took 45 minutes.
- Cool in the tin on a wire rack. The cake sinks a smidgen on cooling but this is the squidginess forming so is a good thing!
- Once completely cool, remove from the tin. The cake will keep for a few days but needs to be kept in the fridge.
- Bask in glory at the wonderful thing you have made.
- Eat.

Damson and cobnut tart with streusel topping

The damson tree in my parent’s garden has pulled out all the stops this year and given us a bumper crop. Unfortunately, all the damsons seem to be ripening at the same time, hence my jam making frenzy!


I’ve adapted this recipe from a plum and almond tart, then added a streusel topping. Hey, I’m greedy – I can’t help it, if you can add more to something, why not? You can easily make this tart with plums (Victoria would be particularly good) and almonds – just substitute like for like.

My plan was to use almonds but then, shopping at Borough Market – London’s oldest food market – I came across some Kent Cobnuts and decided to use them instead.

Cobnuts are a type of hazelnut and are fascinating looking things:


You have to pull the nut out from the leaves and then shell it, using nutcrackers.


The nut has the best flavour when toasted – this only takes 10-15 minutes at 180°C/fan oven 160°C/350°F/Gas mark 4. If you want to find out more about cobnuts this is a very useful site.

The tart case is not a pastry thus no rolling is required. It is almost a cinnamon shortbread and you press it into the tin. Cinnamon and plum/damson is a wonderful combination and as the tart cooks your kitchen smells of Autumn.

The crushed cobnuts were scattered into the base of the tart:


I was going to scatter the damsons in the tart base but then realised that if I was neat, I could pack more in! I ended up with something that looked like an exotic flower...made of damsons:


Here it is ready to serve:


The downside of packing the tart so full of fruit was that it was very juicy and hard to cut clean slices. In truth, that’s not much of a downside....


The biscuit crust was really delicious and I will definitely use it for other desserts. The cinnamon turns it a rich brown (rest of the slice not visible due to be buried under a gallon of custard!):


Ingredients:
For the cinnamon shortbread:
175g plain flour
130g unsalted butter, at room temperature
60g caster sugar
1 teaspoon ground cinnamon

For the filling:
1 kilo of plums or damsons (I used a bit more)
100g caster sugar
1 tablespoon cornflour
1 teaspoon ground cinnamon
Dash of almond extract
30g of chopped, toasted nuts – I used cobnuts but almond would be lovely too

For the streusel topping:
60g unsalted butter
75g plain flour
60g caster sugar
1 teaspoon ground cinnamon

How to make:

- Preheat the oven to 190°C/fan oven 170°C/375°F/Gas mark 5.
- Start by making the cinnamon shortbread. In a food processor whizz together all the ingredients until you have a juicy crumb that, when pressed, holds together.
- Press the shortbread into a 23cm loose bottomed tart tin, making sure there are no gaps and the shortbread comes right up the sides. There is no need to grease the tin as the shortbread has a lot of butter in it.
- Now prepare the damson filling. Stone and quarter each damson and place in a bowl. Add the sugar, cornflour, cinnamon and almond extract and toss the damsons to ensure that each piece is coated.
- Scatter the nuts in the base of the shortbread shell, then arrange the damson slices on top. I did this neatly in concentric circles simply because you can pack more fruit in that way.
- Tempting though it is, resist the urge to pour the sugary syrup that is left in the bowl over the damsons. The damsons will release more juice as they cook and you do not want the shortbread to become soggy.
- Bake in the oven for 30 minutes.
- While the tart is baking, make the streusel topping. Place all the ingredients in a food processor and whizz together until a dark crumb forms.
- When the tart has baked for 30 minutes, remove from the oven and scatter the streusel topping over the damsons. I like to leave a gap of about an inch around the edge with no streusel topping so you can see the damsons.
- Bake for a further 15 minutes then place on a wire rack to cool.
- The tart can be served at room temperature with some whipped cream or warmed and served with custard.
- Bask in glory at the wonderful thing you have made.
- Eat.

Damson jam

I don’t know whether it’s because of or in spite of, the wet summer we had but my parent’s damson tree has gone into overdrive this year producing kilo after kilo of wonderful fruit. There’s something criminal about letting fruit go to waste so I rolled up my sleeves and got stuck into one of my least favourite kitchen tasks – jam making.

Let me clarify: I love jam. I just don’t like making it – I always get nervous as to whether it will set. The scene is usually as follows: once I put the jam in the jars I have to keep coming back to it, picking up a jar and inspecting it much like a wine taster looks at a glass of vino, and then tip it gently side to side to see if the elusive “set” has happened yet. Play that scene out about 100 times and that’s me making jam.
Autumn in a pan:

Here’s the jam cauldron bubbling away:

Damson jam is particularly beautiful in both taste and colour and keeps me coming back to try my jam making one more time!

The recipe can be found here in one of my earlier posts.

I did actually get a set (honest!) but was so cheesed off by my preserving insecurities that I forgot to photograph it. The jam looks pretty much the same as it did last year and the CCM and CCD (Caked Crusader’s Ma and Da) have taken all nine jars of it!

Wednesday 10 September 2008

CAFTA

This week’s winner of a CAFTA (Cake’s Achievement in Film and Television Arts) award was nominated by my friend and work colleague Soo. I see this as payback for making her Monday mornings less traumatic by providing her with a ‘back to work’ cake boost!

The award is for “Cake that heralds the start of something big” and goes to the cake that Hagrid bakes Harry Potter for his 11th birthday, in the film “Harry Potter and the Sorceror’s Stone”.

Harry is, at this point in the story, completely unaware of his destiny and is living with the horrible Dursley’s who comprise of his Aunt Petunia, Uncle Vernon and their spoilt son Dudley.

The Dursley’s are trying to keep Harry from receiving the mysterious letters which have been arriving thick and fast at home (informing him of his impending education at Hogwarts). They are hiding on a remote island on a dark and stormy night. Hagrid arrives and among other things presents Harry with his first ever birthday cake.

Hagrid proudly announces that he baked and wrote the cake himself, and confesses he might have sat on it. I like the way that he’s not quite sure...either way, it’s a cake to interest the people at CakeWrecks (I love this site!):

While Hagrid is explaining Hogwarts to Harry, Dudley tucks into the cake.


Hagrid catches him and gives him a pig tail.


The moral of this story, as I see it: if you’re going to eat a cake that isn’t meant for you, make sure the baker hasn’t got any magical powers BEFORE you start tucking in.

Please email me (with photos) your CAFTA nominations.

Sunday 7 September 2008

Birthday cake for The Boy Wonder

It’s The Boy Wonder’s (AKA my nephew) 11th birthday so what could be better than a lovely sponge cake with buttercream? Answer – nothing!


This cake turned out a little surreal even by my standards and that’s its charm. Where else will you see pirate seals with a ship’s figurehead of a seal Amy Winehouse? (“In a psychiatric institute” is not an acceptable answer).


I feel I should explain the thought process behind the cake...even though it may frighten you to have an insight into the workings of my mind. Like most 11 year old boys, my nephew is fascinated by pirates. One of his favourite toys is Gottron, a rather lovely seal, who has ambitions to be a singer (he does have a beautiful singing voice so it isn’t a hopeless dream). Here is Gottron:


Keeping up so far? Good. Now, some while back I ordered marzipan seals and they’ve been unused and sitting in my cupboard ever since. Then I found a superb pirate ship cake tin...can you see where this is going?

Complicated tins cry out for cake release rather than just butter as you keep more of the fine detail; you can even see the little staircases between decks:


Of course, no pirate ship would set sail without a carved figurehead and I’m therefore hoping you’ll see the logic in a boatful of singing seals picking Amy Winehouse as theirs. All makes sense now doesn’t it? Please tell me it makes sense!

They tried to make her go to rehab, but she said “No, no, no”:


The cake is made from my trusty Genoese sponge recipe. My nephew is a sponge hoover and I know that if I made anything else he’d be disappointed. The recipe can be found here and I used 1.5x the quantity as the tin was so big. For your convenience I have set out the increased amounts below, but the basic mix will be enough for most average tins.

It is a myth that pirates made people walk the plank. If the Nassau Pirate Museum (ooh – get me!) taught me anything, it was that there is only one recorded incident of a person walking the plank. As for seals however, they had no stats...


All pirate ships have names and this one is no exception:


The crew had to serve a purpose in order to earn their keep. These two are on cannon duty. If you think the cannons look like Twix bars it’s because you have no imagination:


I freely admit I am no cake decorator but I am rather proud of this. What it lacks in skill it makes up for in oddness:


Gottron, meet Amy:


Genoese sponge never disappoints; it’s soft and crumbly and tasty and delicious:


Abandon ship! Abandon ship! She’s lost half her hull and is sinking!


As it was a birthday tea, I also made my Nutella cupcakes. The recipe for these can be found here and I urge you to try it as they are the best cupcakes I’ve ever tasted! Modest as always!


Ingredients (for the genoese birthday cake):
For the sponge:
338g Unsalted butter
338g Caster sugar
338g Self raising flour
6 large eggs, beaten
Vanilla

For the buttercream:
250g Unsalted butter, at room temperature
2 teaspoons vanilla extract
400g icing sugar
Blue food colouring – to be used in half the buttercream

How to make:
- Preheat oven to 160°C/fan oven 140°C/325°F/Gas mark 3
- Grease (or brush with cake release) your chosen tin.
- Cream the butter and sugar together until light and fluffy. Don’t skimp on this stage as it’s the key to creating an airy sponge. I like to beat the butter on its own and then add the sugar as it seems to give a paler, lighter result.
- Add the flour and eggs a little at a time. Because you’re adding them alternately in small amounts the mix will not curdle.
- Add the vanilla and beat the mix until it’s fluffy, pale and glossy. Taste a tiny bit to ensure it tastes smooth – if you can taste any grittiness it isn’t properly mixed.
- Spoon into your tin.
- Bake. The larger your cake the more cooking time it will need. Larger cakes can take anything from 40 minutes to over an hour. The key, as always, is the look and whether a skewer comes out clean. Ensure that you skewer the cake in different places as I often find the edges may be cooked but the centre still very raw. Be patient – it’s worth the wait!
- Let cool in tin before turning out.
- Now make the buttercream. Beat the butter and vanilla together until smooth and pale then stir in the icing sugar before beating to a smooth buttercream. At this point, I split the buttercream into two bowls as I wanted to leave half of it naturally coloured, and then colour the other half blue for the sea.
- Assemble your cake as required.
- Bask in glory at the wonderful things you have made.
- Eat.