Showing posts with label ricotta. Show all posts

Sunday, 3 August 2014

Chocolate ricotta cake


I’ve been baking a lot with fruit and ‘lighter’ summer flavours of late.  This week I just wanted something sinfully chocolatey with that lovely rich ‘stick to the ribs’ quality.  Chocolate, ricotta and almonds – perfect!


This is almost gluten free…I know that’s not very helpful and also not possible: something is either gluten free or it isn’t.  I point this out simply because, if you needed it to be gluten free, I wonder whether you could substitute more ground almonds for the flour; it’s only two tablespoons after all?  If any gluten free bakers know whether this would work please let me know via your comments. 


Realising I knew very little about ricotta I did some research.  The first thing I learned was that ‘ricotta’ literally means re-cooked.  I think this is because of the second fact that I learned: ricotta is produced from the by-product from the production of other cheeses such as mozzarella.  It’s made from the whey that’s left behind when the curds are strained – a bonus cheese no less!


The cake is meant to be served warm; I liked it at room temperature too but the texture becomes a little heavier.  This isn’t a bad thing as, like all (almost) flourless cakes the sticky, squidgy texture is a joy.  Serving it with cream was probably an unnecessary indulgence but… I apologise for nothing! (smugly award yourself bonus marks if you know which – admittedly obscure – cartoon character I’m quoting!)


Ingredients

150g unsalted butter, at room temperature
100g caster sugar
150g chocolate, melted and left to cool – I used half dark, half milk
3 eggs, separated
250g ricotta cheese
100g ground almonds
2 tablespoon plain flour

To serve: thick cream


Method

Preheat the oven to 170°C/ fan oven 150°C/325°F/gas mark 4.

Line a 20cm round springform tin with baking paper.

Beat together the butter and sugar until light and fluffy – do not skimp on this stage as this is your chance to get lots of air into the mix.

Add the chocolate, egg yolks and ricotta and stir until just combined.

Stir in the ground almonds and flour.

In a separate bowl whisk the egg whites until they reach soft peaks.

Fold the egg whites into the chocolate mixture.  This is best achieved by stirring a spoonful of whites into the chocolate to slacken the mix, which will make the rest of the egg whites easier to fold in.

Pour into the prepared tin – it will be quite runny.

Bake for approximately 30 minutes or until the cake is set around the edges but retains some wobble in the centre.  A skewer will not help you here!

Leave to cool in the tin for 10 minutes before attempting to de-tin.  It will settle a little as it cools so don’t panic!

Serve the cake warm (although I liked it just as much at room temperature!) with thick cream.

Bask in the glory of the wonderful thing you have created.


Eat.

Sunday, 1 September 2013

Peach and spiced ricotta tart


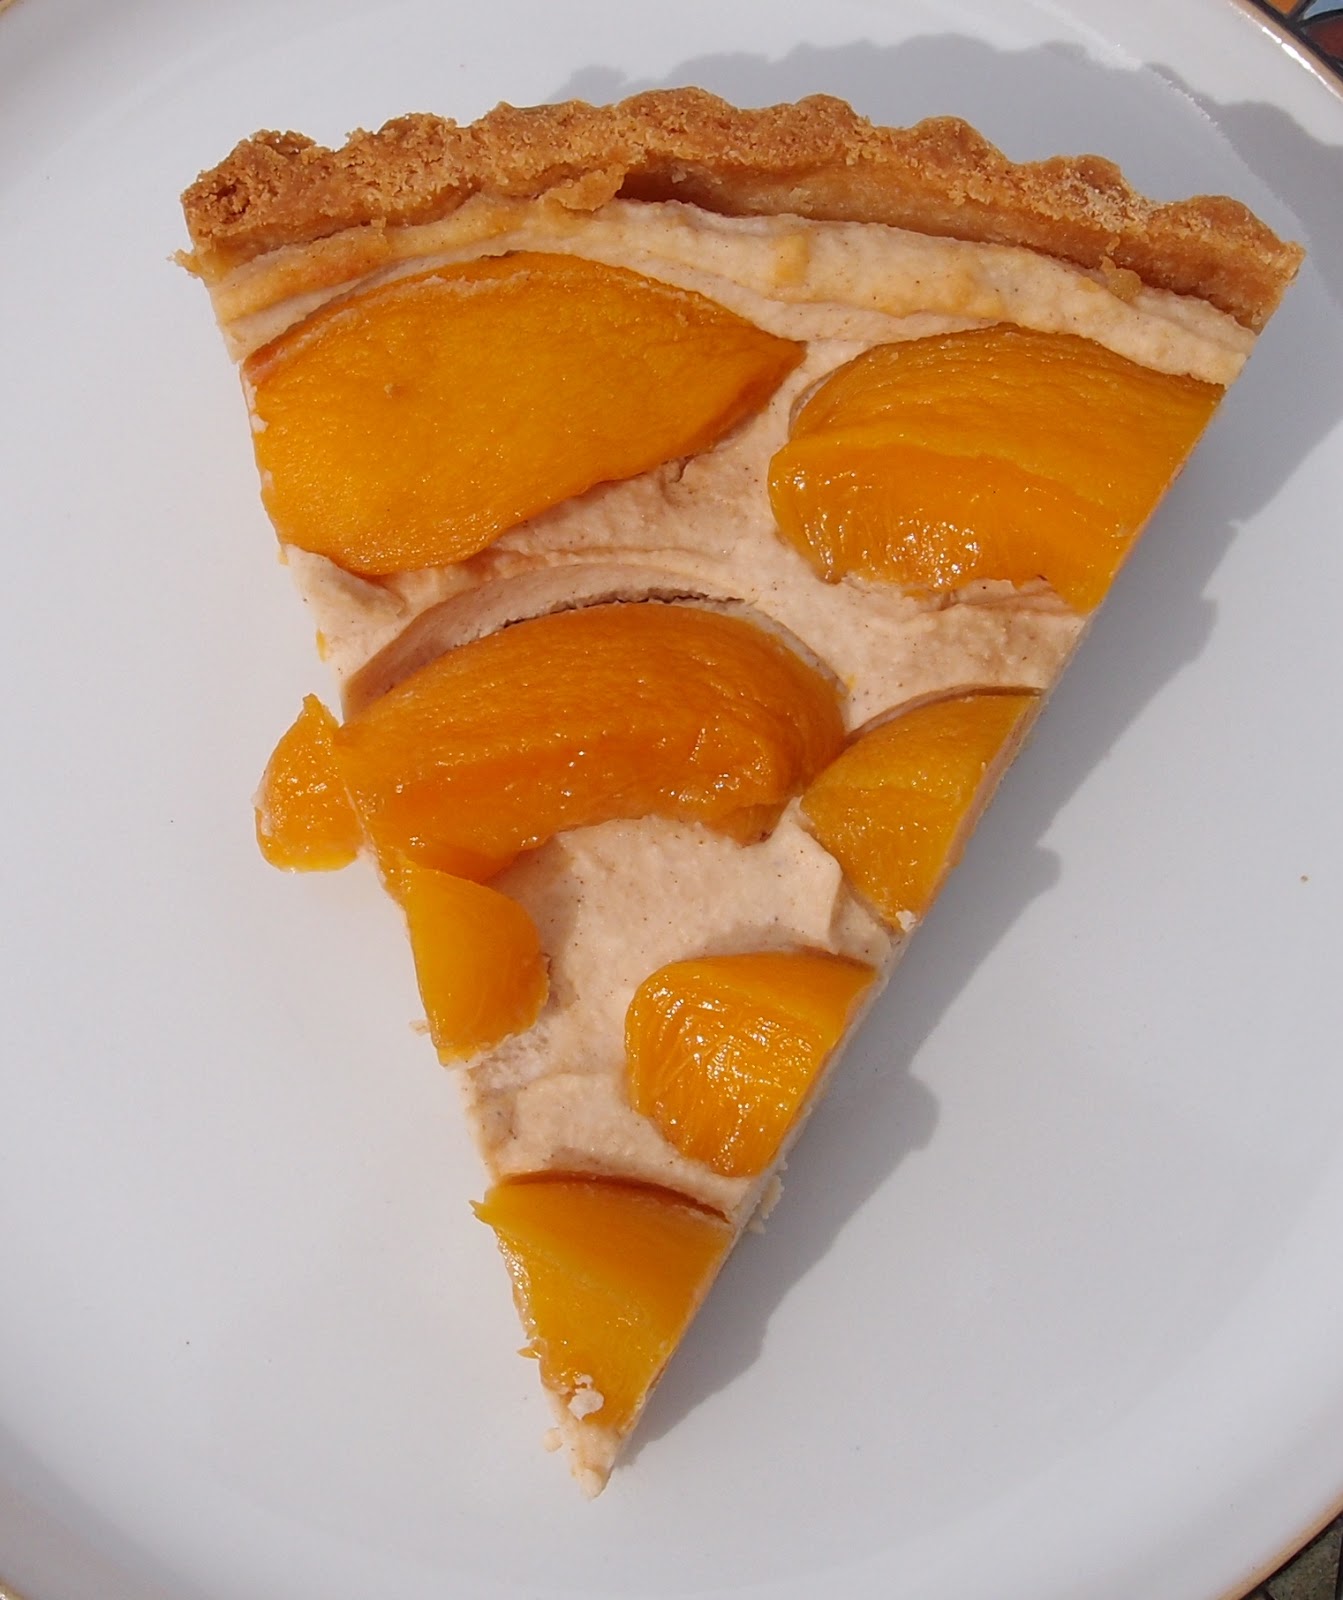
I think this tart looks a lot more complicated, and a lot more work than it actually is.  The roasted, lightly caramelised peaches sitting on a pillow of gently spiced ricotta work so well with the sweet, buttery vanilla pastry.  But honestly – if you can line a pastry case, the rest is plain sailing.


You’re probably meant to use fresh peaches or nectarines for this recipe but if you’ve followed my blog for any length of time you will know just how much I love tinned peaches.  How tinning a peach makes it better (both flavour and texture) I do not know...but it does.  So I used tinned peaches.  Using tinned peaches at the height of soft fruit season...I must be a contrarian baker!


When I trimmed the pastry I, of course, tasted the off cuts and was surprised how sweet it was.  It made sense when I tasted the ricotta filling which is not that sweet at all.  It’s all about balance.


I’m not sure roasting the tinned peaches was strictly necessary but I did it anyway and they did look and feel softer afterwards but they didn’t caramelise as much as I’d hoped.


This is the sort of tart you’d see in a lovely deli shop window; it’s not fine or delicate patisserie but it looks inviting and wholesome.  I was particularly proud of this one.  And I really need to reiterate – it’s easy to make!


Ingredients

For the pastry:
115g unsalted butter, at room temperature
75g caster sugar
1 egg yolk
1 teaspoon vanilla extract
Pinch of salt
185g plain flour

For the peaches:
3-4 peaches or nectarines, peeled and cut into half – stone removed.  I used tinned peaches...because I love them!  My peaches were small so I used 4
1 tablespoon brown sugar
20ml water

For the ricotta filling:
450g ricotta
40g caster sugar
½ teaspoon ground cinnamon
½ teaspoon ground ginger
1 egg
1 tablespoon brown sugar, for sprinkling on top


Method

Make the pastry – this is an unusual method but results in a rich, buttery pastry easier to work with than you might imagine: beat together the butter and sugar until pale and fluffy.

Add the egg yolk, vanilla and salt and beat until combined.

Add the flour and mix until the pastry just starts to clump.

Tip out onto a sheet of clingfilm and bring together into a ball.

Flatten into a fat disc and wrap in clingfilm.

Refrigerate for one hour.

Roll the pastry out between two sheets of clingfilm until it is 3-5mm thick.

Line a 23cm loose bottomed flan tin with the pastry.

Refrigerate for a further 30 minutes.

Preheat the oven to 180°C/fan oven 160°C/350°F/gas mark 4.

Cover the pastry with a sheet of baking paper or non stick foil and hold in place with baking beans.

Bake for 15 minutes, before removing the paper and beans and baking for a further 5 minutes until golden.

Leave to cool before trimming any overhanging pastry away.

Now roast the peaches: place the halves in a roasting tin.

Sprinkle the sugar over the peaches and pour the water into the bottom of the tin.

Roast for approximately 12 minutes or until they are soft and golden.

Leave to cool before cutting into wedges.

Now make the ricotta filling: beat together all the ingredients until well combined.

Spoon into the pastry case and arrange the peaches on top.

Sprinkle over the brown sugar.

Bake for 20-25 minutes or until the ricotta is golden and firm to the touch.  Mine took longer – nearer 40 minutes.

Remove from the oven and leave to cool for five minutes before removing from the tin.

Serve either warm, from the oven, or leave to cool completely.

Bask in the glory of the wonderful thing you have created.


Eat.

Sunday, 19 August 2012

White chocolate ricotta cheesecake


Anyone in the South East of England will know that we are in the midst of a mini heatwave and, with temperatures exceeding 32° this weekend, it is not a time to be standing in the kitchen with the oven firing on all cylinders.  Hence, my gelatine set cheesecake!


This cheesecake has a lot of good things in it...in large quantities.  It is as rich and delicious as the ingredients suggest and probably best to make when you have company as even I could only manage a thin slice.  OK, when I say ‘thin slice’ it’s probably what most people would call a large slice...but it’s all relative. 


I must confess I prefer the chilled or gelatine set cheesecakes to their baked cousins.  I know in many parts of the world a statement like that amounts to heresy but I can’t help it; I just find them lighter and texturally more pleasing. 


A time saving tip I have discovered with making biscuit bases is that if you make them using the food processor, there is no need to melt the butter.  If anything, it’s better not to as you don’t get that greasy/oily seepage as the base sets.  I always put this in the method but, am so pleased at cutting out a stage of the process, that I thought I’d mention it here too!


The cheesecake can be decorated however you wish – chocolate curls or sprinkles, a fruit garnish, or maybe left plain and served with a fruit coulis.  I had some gorgeous English cherries in the fridge, so dipped them in white chocolate – voila, a beautiful and healthy decoration (what do you mean the chocolate cancels out the fruit???  Who makes these rules?)


Ingredients

For the base:
200g digestive biscuits
50g unsalted butter

For the topping:
5 leaves gelatine
200g white chocolate – I used Green & Blacks with a hint of vanilla
6 tablespoons milk
500g ricotta
300ml double cream
50g icing sugar
2 eggs, separated

To decorate – anything you choose!  White chocolate curls, fruit, fruit dipped in chocolate...or nothing at all!  If you make chocolate dipped cherries like me, you’ll need 100g additional white chocolate.

Method

Preheat the oven to 200°C/fan oven 180°C/390°F/gas mark 6.

Line the sides of a 20cm round springform tin with baking paper.  I used a different shape tin – a rounded rectangle measuring 30cm x 11cm but a standard round tin will work just as well and hold the same amount.

Blitz the biscuits in a food processor until you have crumbs.

Add the butter and blitz again until you have the consistency of wet sand.  If making the base this way, there is no need to melt the butter.

If you make the base by bashing the biscuits into crumbs with a rolling pin, you will need to melt the butter to incorporate it.

Press the crumbs into the prepared tin and bake for 5 minutes.

Put to one side to cool.

Place the gelatine leaves in a bowl of cold water – the volume of water is irrelevant as it’s not used in the recipe; just make sure that you can submerge the leaves.

Place the chocolate and milk into a dish and cover.  Microwave in 20 second bursts and stir after each go, until you have melted chocolate.  You can place a bowl over a simmering pan of water if you prefer, but I find the microwave perfect for tasks like this (and less washing up!)

Squeeze all the water out of the now soft gelatine and whisk into the hot, melted chocolate.

Put to one side.

Beat together the ricotta, double cream, icing sugar and egg yolks until smooth and creamy.

Pour in the melted chocolate and stir in until fully incorporated.

In a separate bowl whisk the egg whites to stiff peaks.

Fold the egg whites into the chocolate mix.

Pour (it will be runny) over the cooled biscuit base.

Cover the tin with clingfilm and refrigerate until set – ideally overnight.

Serve in slices with more chocolate, fruit, coulis etc – the choice is yours!

Bask in the glory of the wonderful thing you have created.

Eat.

Sunday, 20 April 2008

Fallen ginger ricotta cake


I know the saying is that ‘all roads lead to Rome’ but for me, at the moment ‘all recipes lead to ginger’. I’m obsessed with the stuff! My favourite form is definitely stem ginger – I love everything about using it, from trying to ease the sticky ball from the jar where it’s wedged in and reluctant to come out, to the gloopy syrup that makes everything it touches as tacky as glue.
I did tweak this recipe slightly in that I chose to use gingernut biscuits for the base; the recipe as written used digestives but I really fancied a hit of gingery heat – the weather is grotesquely cold and windy at the moment so you have to get some warmth from somewhere! Even with that amendment I could still have taken this hotter – I think next time I’d maybe use two balls of stem ginger. Here’s the tin lined with the biscuit base:


This cake works as a dessert or a slice of something tasty to have with tea. It’s very similar in some ways to a cheesecake but has a little twist that involves egg whites that makes it lighter in texture. I love the way that you can see the flecks of ginger in the cut slice:


The ‘fallen’ in the title refers to the fact that, on removal from the oven, the cake will sink. Don’t be upset and don’t think you’ve done anything wrong- every millimetre it sinks increases the dense, lovely texture!

The rewards of a job well done:

Footnote: I am delighted to report that Nicky, a work colleague of mine, was so impressed with this cake that she made it too! Look at how magnificent it is! You will also see that it has been given my ultimate award - a ten out of ten:


Ingredients:
For the base:
225g gingernut biscuits (or digestives if you want it less gingery)
75g unsalted butter, melted

For the filling:
1 ball stem ginger in syrup, plus 1 tablespoon of the syrup
200g full-fat cream cheese (I used Philadelphia)
225g ricotta cheese (I pass this through a sieve to make sure that any lumps are removed – it gives a smoother texture)
4 tablespoons double cream
3 eggs, separated
1 tablespoon cornflour
125g icing sugar

How to make:

- Preheat the oven to 200°C/fan oven 180°C/400°F/Gas mark 6.
- Grease a 20cm springform tin with butter (this will help the crumbs to stick).
- Crush the biscuits to powder and then stir in the melted butter. Use just over half the mix to line the base and sides of the cake tin. Put the rest to one side.
- Chop the stem ginger finely and then beat it into the cream cheese, ricotta cheese, egg yolk, cornflour, double cream and ginger syrup. The mixture will be thick and creamy and the ginger should be evenly spread out in it. Put to one side.
- Whisk the egg whites until they are at the “soft peak” stage. Gradually add the icing sugar and whisk until the meringue is glossy and stiff.
- Fold the egg whites into the cheese mix and spoon into the biscuit crumb lined tin.
- Sprinkle the remaining biscuit crumbs on top.
- Bake for 30 minutes, then reduce the oven temperature to 180°C/fan oven 160°C/350°F/Gas mark 4 and loosely cover the tin with foil and bake for a further 45 minutes, or until the cake is just set in the middle.
- Remove and cool on a wire rack. Don’t panic – the cake will sink!
- Bask in glory at the wonderful thing you have made.
- Eat.

Sunday, 17 February 2008

Plum, almond and ricotta cake

This could very well be the moment I attain ‘nirvana’ in cake. Imagine a cake that has the lightness of the most beautiful sponge yet the richness and depth of flavour of a cheesecake and the moistness of the most wonderful friand . Then imagine that it has a layer of sweet jam and is topped by juicy caramelised plums. Then imagine that you don’t have to imagine it because it’s real!


There are no words to describe the loveliness of this cake. It looks beautiful, tastes beautiful and is ridiculously easy to make. It takes longer to assemble in the tin than it does to actually make the batter.


Any soft fruit would work in this cake - apricots, nectarines, peaches, plums – and I think it’s important to match the jam to the fruit. I happen to love plums and had a jar of homemade damson jam that provided a lovely match.

Don’t put the jam right to the edge as you want the cake to bake around it and enclose it. You don’t need to be too fussy about spreading it – blob it on:


Then cover with the remaining batter:


Any cake that looks this beautiful going into the oven is going to be a winner:


As it cooks, the sugar sprinkled on the top caramelises the fruit and makes a glorious topping:


This is what I believe is called a “serving suggestion”:


Ingredients:
250g ricotta cheese
140g unsalted butter, melted
4 eggs, beaten
225g golden caster sugar, plus 1 tablespoon for the top
250g self raising flour
200g ground almonds
4 tablespoons of plum/damson jam
1 tin of plums (There were 11 in the tin of which I used 7), stoned and cut into quarters
Handful of flaked almonds

To serve: lightly whipped cream. I used Chantilly cream.

How to make:
- Preheat the oven to 190°C/fan oven 170°C/375°F/Gas mark 5.
- Line a 23cm round cake tin. I used a one piece liner as it saves having to grease the tin.
- Beat together the ricotta, melted butter, eggs and sugar until well combined.
- Fold in the flour and ground almonds. You will have a very thick, heavy batter.
- Spoon half the batter into the tin and even out.
- Blob the jam over the batter trying not to go right to the edge (it’s nice if the cake encloses the jam so it’s a lovely surprise when the cake is cut).
- Spoon the rest of the batter over the jam and, using a knife, even the surface.
- Arrange the plum quarters on top of the batter.
- Scatter over the flaked almonds.
- Sprinkle the tablespoon of sugar over the top and then bake for approximately 1 hour and 30 minutes or until a skewer comes out clean. Mine took 1 hour and 25 minutes. The cake will have risen and the sugar should have caramelised the fruit. The fruit will shrivel a little but this is where all the delicious flavour comes from!
- Let the cake cool for 20 minutes or so before removing from the tin and letting cool completely on a wire rack.
- If desired, dust with icing sugar before serving. Personally, I don’t think it needs it.
- Bask in glory at the wonderful thing you have made.
- Eat.

Sunday, 13 January 2008

Vanilla cheesecake with raspberry sauce.

Indiana Jones’s goal in life was to find the Covenant of the Ark (and then some other stuff that justified the sequels). Outcome: successful.
The Tin Man joined Dorothy in her quest because he wanted a heart (which frankly is just going to make me sound petty in comparison). Outcome: successful
My aim is to find the perfect cheesecake. Outcome: almost there.

My Perfect Cheesecake (MPC) would be beautiful, smooth, dense textured but still light. Over the years I have tried many cheesecake recipes and they’ve never quite matched up to MPC that dwells in my brain and torments me in its elusiveness.

So this is my latest attempt:


It was absolutely lovely – I wouldn’t say it was MPC but it was pretty darned close; certainly closer than I’ve ever been before. Using ricotta rather than cream cheese definitely gives both a better flavour and texture. The biscuit base was very pleasing too as it held together well but was delicious and crumbly in the eating.


Where I goofed on this one was the topping. The recipe had a topping I didn’t care for so I decided to use raspberries. However, as soon as I started to heat the raspberries in some sugared water they all collapsed scuppering my intention to cover the top with beautifully poached whole raspberries covered in thick sauce.

Here they are, innocent before they did the dirty on me and all collapsed into mush:


I also used too many raspberries and ended up with a topping that swamped the cheesecake underneath. What I would do if I made this again is use 500g of raspberries (the photo above shows 750g – what was I thinking??) Firstly I would use enough whole raspberries from this amount to sit on top of the cheesecake. I would then poach the remainder in water and sugar and pour this sauce firstly, through a strainer and then over the raspberries. If I’d done that this time, I may well have been writing about MPC.

One curious thought that hit me when I was dissolving the gelatine was that it looked like I was melting a breast implant. See for yourself:


Ingredients:
For the base:
5og unsalted butter
160g digestive biscuits

For the filling:
350g ricotta
11g sachet of gelatine powder
2 egg yolks
60g caster sugar
2 teaspoons Vanilla extract (I put in more as I’m a vanilla freak)
275ml double cream

For the topping:
500g raspberries
Sugar, to taste


How to make:

- Preheat the oven to 200°C/fan oven 180°C/400°F/Gas mark 6.
- Grease an 18cm round tin.
- For the base, melt the butter in a saucepan. While it is melting, crush the biscuits into crumbs. I like to do this by putting the biscuits in a freezer bag, securing the end and then bashing them with my rolling pin.
- Add the crumbs to the melted butter and ensure that you mix well.
- Press the crumbs into the cake tin and bake in the oven for 15 minutes or until the base is browned.
- Leave to cool.
- Put 4 tablespoons of cold water into a dish and sprinkle the gelatine powder on top. Leave for 5 minutes.
- In a saucepan heat some water until it is gently simmering. Sit the bowl of water and gelatine on top and leave until the gelatine water has turned clear i.e. all the gelatine has dissolved. This took about 5-10 minutes. Put to one side.
- Beat the ricotta, egg yolks and sugar until blended.
- Add the vanilla and gelatine and continue to beat until the mix is smooth and well combined.
- In a separate bowl, whip the cream until it is at the soft peak stage, then add to the ricotta mix and beat until combined.
- Tip the mix onto the base, cover with foil and chill for at least 3 hours.
- Sit whole raspberries on top of the cheesecake.
- Put two tablespoons of water into a pan and melt a tablespoon of caster sugar into it. When it has dissolved, add the remaining raspberries.
- When the raspberries have collapsed, sweeten the sauce to taste. When it is sweet enough let it come to the boil and bubble away until it reduces in volume by about half and is thick. Strain into a jug and allow to cool.
- You may find as it cools, a skin forms. Remove this and then pour the sauce over the raspberries.
- Cover with clingfilm and return to the fridge until ready to serve.
- Bask in glory at the wonderful thing you have made.
- Eat.

Sunday, 11 November 2007

3R Cake (Rum, Raisin and Ricotta)

If you have bad memories of the 3 R’s at school (that’s reading, writing and arithmetic for those not in the know) fear not, for there is a new gang of 3 R’s in town: Rum, Raisin and Ricotta – a love triangle made in heaven!

This cake is exquisite. I could stop there and would have conveyed my message completely, but I’ll carry on...the squidgy, juicy texture of this cake is almost indescribably lovely. It’s similar to baked cheesecake – understandable given the ricotta – but doesn’t have the cheesecake style base and is much moister. The soaked raisins burst gentle rum flavours on your tongue and the soft cake cushions them delightfully. As you can guess....I’m a fan!


I think that where any recipe requires soaking fruit in alcohol you should aim to soak for as long as possible, ideally 24 hours. This isn’t vital and your cake won’t be ruined if you can’t, but more is always more! The longer soak allows greater absorption too so the raisins will be really plump and moist. As I soaked the fruit for 24 hours I used a little more than the recipe stated e.g. 6 tablespoons instead of 3...hic!


One warning though – if, like me, you taste the raw mix before baking, be prepared that the temptation to sit and eat the whole bowlful will be great. The only thing that stopped me was the thought ‘if it tastes this great raw, how awesome will it be cooked?’ I now know the answer: VERY!

How I wish this piece were here for me to eat right now:


You can dust the cake with icing sugar before serving if you want to. My eatership (as I have decided to term the eaters of my baking) never seem to like clouds of icing sugar on the top of their cake so I didn’t bother.

This cake is best made the day before you want it as letting it sit overnight somehow makes it more succulent. As long as you keep it airtight or just wrap it in foil it will keep perfectly for a few days.

Ingredients:

100g raisins
3 tablespoons rum (but Marsala would work if you don’t like rum)
175g unsalted butter, softened
175g caster sugar
250g ricotta cheese
Vanilla extract to taste, I used about a tablespoon
3 eggs, separated
150g self raising flour
1 teaspoon baking powder

Icing sugar, for dusting before serving (optional)

How to make:

- Either the day before, or as early as you can, put the raisins and rum in a bowl. Ensure that all the raisins are sitting in the liquor and then cover and put aside. If preparing the day before, whenever you think of it, give the raisins a stir to make sure that they all get their share of rum.
- Preheat oven to 180°C/fan oven 160°C/350°F/ Gas mark 4 and line either an 18cm square tin, or a 20cm round tin with greaseproof paper.
- Cream together the butter and sugar until pale and fluffy. Don’t skimp on this stage as I think it is the foundation of success. Take a tiny piece of the mix and place on your tongue. Press it to the roof of your mouth – if it’s gritty the mix needs more beating. When it’s smooth you can move to the next stage.
- Beat in the ricotta, egg yolks and vanilla.
- Stir in (beating is too tough on the raisins) the rum and raisin mixture including any unabsorbed rum.
- In a separate bowl whisk the egg whites until they reach the soft peak stage.
- Add a couple of spoons of egg white to the ricotta mix and fold in using a metal spoon. This slackens the mix and makes the rest of the egg white easier to fold in.
- Fold in the remaining egg white using light lifting and cutting motions.
- Fold in the flour and baking powder until the mix is thoroughly combined, then spoon into the tin.
- Level the surface, but don’t press down too hard as you don’t want to lose all the air you’ve been carefully folding in, and bake for 40 minutes or until the surface is firm to the touch and the contents don’t wobble too much. It will firm up on cooling so it’s a judgement call. Mine took almost an hour until I was happy it was set enough.
- The cake does flatten a little on cooling so don’t worry that you’ve done anything wrong. Let the cake cool in the tin as it needs to firm up before you handle it.
- Serve dusted with icing sugar if you want to.
- Bask in glory at the wonderful thing you have made.
- Eat.