Showing posts with label pie. Show all posts

Sunday, 11 September 2011

Lattice topped peach pie


This pie is my one last nod to summer baking, before my thoughts turn to more autumnal flavours. There is something very homely, yet at the same time elegant, about a lattice topped pie.


Normally I will use tinned peaches, but I think here you really need the fresh as you need them to bake down and release juices into the honey; I’m not sure that tinned peaches would behave the same way.


Here are the peaches cooking in honey and cinnamon. It looks a lot but it does cook down quite a lot and you end up with a quantity just enough for a generous pie (the ONLY kind of pie worth having!):


I cannot recommend the “boiling water” tip enough for peeling ripe peaches. The reason I usually use tinned peaches is because they are smooth and perfect, whereas when I’ve tried to peel a peach it comes out looking somewhat butchered. Look how perfect these are:


Simply pouring boiling water over the peaches and leaving them for one minute has a magical effect – rinse the peaches off in cold water and the peel almost falls off between your fingers. One of those strangely enjoyable tasks!


The lattice top isn’t as scary as you’d think as long as you’re methodical and alternate which strips of pastry you lift. At this point I had planned on photographing the progress of my lattice on the pie....however, moments before I started to make the lattice I had dropped almost a pint of thick double cream into my fridge and it kindly decided to pool under the crisper drawers; an area you can only access by removing most of the shelves in the fridge. On the plus side, I did surprise (impress?) myself with just how many swear words I know. Consequently, because of my cream fuelled rage, I totally forgot to take photos. But there are lots of useful aides on youtube and I really liked this one.


I used this pastry wheel to get the nice edge to the lattice strips. One wheel is plain, the other crimped. I was in a “crimped” sort of mood so went for that!


This was a lovely pie/tart – the gentle spicing and the honey mixed with peach juice gave an almost fruity butterscotch element. If you don’t fancy a lattice top you could make a ‘solid’ pastry lid or cut shapes of pastry and just lay them on the top.


Ingredients

For the peach filling:
7-8 fresh ripe peaches, peeled, stoned and sliced into wedges
5 tablespoons runny honey
100g caster sugar
1 ½ teaspoons ground cinnamon
2 ½ tablespoons plain flour

For the pastry (this is comfortably more than you will need, simply either freeze any leftover pastry or make some bonus jam tarts):
500g plain flour
250g unsalted butter, diced
2 teaspoon milk or water (I used milk)
2 eggs

To sprinkle on top of the pie for baking: a handful of caster sugar

To serve: custard or thick cream

Method

Start by making the peach filling: if your peaches won’t peel easily, pour boiling water over them, leave them for a minute or so, then remove them from the hot water, run under the cold tap and voila – easy peeling! You could also microwave them for 15 seconds then leave to stand for 2 minutes before peeling – I haven’t tried this method though.

Place the peach wedges (aim to cut each peach into about 12 slices, more if you can) in a pan along with the honey and cook over a gentle heat until the peaches soften and the honey thickens. Stir occasionally; it will take about 10 minutes.

Stir in the sugar and cinnamon.

Add the flour gradually until the liquid starts to thicken – you might not need it all - and bring the mixture back to a simmer.

Simmer gently until the flour has thickened the liquid – this will take anywhere from 10 to 15 minutes.

Remove from the heat and leave to cool.

Spoon into a container and cover with clingfilm.

Refrigerate for a minimum of 4 hours or, ideally, overnight.

To make the pastry: pulse the flour and butter in a food processor until you have crumbs.

Add the egg and milk and pulse again until the pastry clumps but does not form a ball – be careful not to overwork it.

Tip the dough onto a sheet of clingfilm and kneed it just enough to form a ball.

Cut the ball in half (make one half a bit more generous than the other), then for each ‘half’ - flatten, wrap in clingfilm and refrigerate for 30 minutes.

Roll out the larger half of chilled dough between two sheets of clingfilm. I didn’t need to add any extra flour. Use one sheet of the clingfilm to lift the pastry to line a 25cm pie pan or a loose bottomed flan tin.

There is no need to grease the pan as the pastry is buttery and will not stick.

Press the pastry into the pan and trim off any excess pastry.

Preheat the oven to 200˚C/fan oven 180˚C/390˚F/Gas mark 6.

Spoon the chilled peach filling into the pie case.

Roll out the remaining ball of pastry and cut 14 strips approximately 2cm wide.

Lay the longest strip across the centre of the pie and work outwards ensuring you have a regular under/over pattern. If you need more help then there are many guides on youtube – this is a good one.

Brush some milk, or beaten egg over the lattice top and sprinkle with a handful of sugar.

Bake for approximately 30 minutes, or until the pastry is golden and cooked.

Leave to cool, in the tin, on a wire rack.

Serve either at room temperature with thick cream, or warm with custard.

Bask in the glory of the wonderful thing you have created.

Eat.

Sunday, 20 September 2009

Damson Plum Pie – and a guest blogger!


Hello, CCM (Caked Crusader’s Ma) here. The Caked Crusader has bestowed me the honour of being her first guest blogger. Fruit pies were the first thing that I ever baked. I was taught how to make them when I was 11 years old by my cookery teacher at school.

Pastry decorations freehand....

...or using cutters:


The only change I’ve made to the original version I was taught is being much more generous with the fruit filling. One of my hates is meanness of fruit. I find that a lot of the time you have to play the game of "Find or guess the fruit in this". Hope you are getting the message - 3lbs of plums is not too many.

As reported by the CC our damson plum tree has excelled itself this year. To date we have picked over 60lbs and I think there is more than that amount still on the tree. I have lost count of how many plum pies I have made to eat and freeze over the past few weeks. Hope you will enjoy this recipe as much as we all do.

Footnote from the Caked Crusader: The recipe is given in imperial measurements as the CCM doesn’t do metric.

Serving suggestion:

Ingredients:
3lbs (damson) plums
2ozs caster sugar
1 egg + a little drop of milk to bind together
8ozs self raising flour
4ozs Cookeen (or Trex)
Pinch of salt
3-4 tablespoons of water

To serve: ice cream or custard

Method for the plums:

-I like to poach the plums a few hours ahead of making the pastry so they are cold.

-Pour the water into base of a large saucepan.

-Cut each plum in half and remove stone (very quick and easy).

-Layer into saucepan with the sugar.

-Simmer on a small heat until just beginning to soften (they should still look like plums - not mushy).

-Turn into a dish to cool for a few hours.

Method for the pastry:

-Grease an 8" pie dish.

-Put all the flour + pinch of salt into a bowl.

-Rub in the Cookeen until it resembles fine breadcrumbs.

-Add egg and enough milk to bind mixture together into a soft dough.

-Cut dough into two equal pieces.

-Roll out one piece on a floured board to fit your dish.

-Drain all the juice from the plums (do not throw this juice away it's lovely to drink).

-Spoon plums into pastry base.

-Roll remaining dough to fit on top of plums and to overlap base.

-Trim pastry edge with knife.

-Seal the top and bottom edges on dish with a fork dipped into water.

-Cut a few slits in top of pastry.

-Roll out trimmings to make decorations for top of pie (these can be cut out freehand or with a small pastry cutter).

-Cover pie and dish with Clingfilm and refrigerate for an hour or two or overnight if you prefer.

-Remove dish from fridge and brush top of pie with beaten egg or milk.

-Bake in centre of oven at 180 C for 40 minutes giving pie a turnaround halfway through cooking.

-When a golden colour remove from oven and sprinkle top with caster sugar.

-Bask in the glory of the wonderful thing you have made.

-Eat

-(I might have borrowed the last two lines from someone else but originality is so tiring!)

Sunday, 23 August 2009

Banoffee pie (aka Banamel pie)


This has to be one of the simplest desserts to make yet is always greeted with delight. If you can open packets and chop things, you can make an awesome banoffee pie. You don’t even need an oven!

I suppose you could make this into more work – if you really wanted to – by making your own caramel. I know you can do this by boiling a tin of condensed milk for several hours but I’ve heard stories about the tin exploding if you don’t keep it covered with water. I really didn’t fancy steam cleaning my entire kitchen this weekend so I bought my caramel!

The CCM (Caked Crusader’s Ma) declared banoffee pie to be in her “top two desserts”. When I enquired as to the other she admitted that she hadn’t thought that far ahead but felt she should leave some leeway for other great desserts!

My love affair with the crushed hobnob biscuit base continues – it works very well here giving some oaty crunch to an otherwise soft dish.

Whilst making this I pondered the name: banoffee. It’s a contraction of ‘banana’ and ‘toffee’ but why? The dish contains no toffee – it’s caramel. Why isn’t it called Banamel pie? Or Caramana Pie?

My extensive research (ok, so I googled it – that still counts!) revealed that toffee and caramel are different (see here if you’re interested) mainly because toffee contains no milk or cream. Banoffee pie only ever contains caramel. So why does toffee get the name check and steal the glory? The campaign to rename the dish starts here….

Ingredients

300g oaty biscuits (I used Hobnobs )
120g butter , melted
397g tin NestlĂ© Carnation Caramel (or any other caramel – I used Dulce de Leche) – save a little to drizzle over the cream
3 -4 bananas, sliced
350ml double cream
1 tbsp icing sugar
Chocolate to sprinkle over the top – I used 2 crushed Flake bars

How to make

- Crush the biscuits in a food processor or by placing them in a bag and hitting with a rolling pin.

- Add the melted butter and pulse to combine.

- Press the mixture into a 24cm tart tin or pie dish. No need to grease it – the biscuit base is buttery enough not to stick.

- Chill in the fridge until the base is set.

- Retain two tablespoons of the caramel and spread the rest over the biscuit base and return to the fridge until the caramel firms up – about an hour.

- Slice the bananas and arrange over the caramel.

- Whip the cream and icing sugar until you reach the soft peak stage then spread over the bananas.

- Drizzle the retained caramel over the cream.

- Crush the flakes and scatter over the top.

- Chill until you wish to serve

- Bask in the glory of the wonderful thing you have made.

- Eat.


Sunday, 31 May 2009

Dutch apple torte


It’s week two of my love affair with Aaron Maree’s “Cakes, Tortes and Gateaux of the World” and all is progressing well. This torte is a lot of work but well worth it if you have the time to devote to it.


You know how whenever a stalker who’s obsessed with a singer gets arrested, the stalker usually claims, in their defence, that the singer was directing particular lyrics in a song to them; never mind the millions of other people who heard the same lyric, it was meant for them only. Well that’s how I feel about this recipe. Aaron Maree meant it for me – look at the evidence: my favourite things in the world of cake are sponge, apples, coconut, cinnamon, almonds and pastry. This tart contains all of them. Mr Maree – what are you trying to tell me?


What caught my eye with this recipe was the way that it gets rid of that thorny issue of ‘shall we have pie or cake?’ Of course, the answer is to have both, but this recipe allows you do that in one piece. A whole Genoese sponge sits in the pastry case! Genius. The CCM (Caked Crusader’s Ma) observed that it feels like you’re eating three cakes/pies in one and it is a little strange at first as you won’t have eaten anything like it before. Once you overcome that sensation it’s deliciousness all the way!

Here is the sponge sitting in the base:


This gorgeous mix of apple, cinnamon and coconut is then added:


It is a nightmare to try and slice prettily though. This is probably a good place to ask whether any other bakers out there hate cutting the cake they’ve made? I loathe it and always pass the task to the CCM, standing on the sidelines panicking at every incision she makes. If it’s just me being weird then, fair enough, I accept I’m weird! The CCM worked her wonders with the knife and got a nice clean slice for a photo:


I made some tweaks to the recipe – the original recipe said to use cooking apples but the idea of Bramley apples with only 100g of sugar made my mouth pucker so I used a tart eating apple instead (Granny Smith’s). I also made 1.5x the pastry quantity as I have often found that professional pastry chef’s recipes are a bit stingy on the pastry because they’re so skilled at rolling it out paper thin. I’m glad I did extra as there wasn’t a lot spare. The quantities set out in the recipe below are what I used.

I loved the way the tort glowed when the apricot glaze was added:


Final thing to point out, the pastry in this recipe is quite hard to handle. It’s like a halfway house between shortcrust and shortbread and is delicious as a result . It’s extremely short and after barely 5 minutes out of the fridge turns soft – more like a paste. It does however patch well and a heavily floured work surface also helps. If you’re not that confident with pastry I would suggest using your own trusted shortcrust pastry instead of this one. You would be losing something though.

Serving suggestion:


Ingredients:
For the cake:
112g unsalted butter, at room temperature
112g caster sugar
2 eggs
112g self raising flour
1-2 teaspoons vanilla extract

For the ‘shortbread’ pastry:
450g plain flour
225g icing sugar
300g unsalted butter
3 eggs
Water as required

For the filling:
4 tart eating apples (I used Granny Smith. I used 6 apples which was too much – hence my hugely domed pie!)
6 level teaspoons cinnamon
30ml calvados (I used apple juice instead)
100g caster sugar
50g ground almonds
100g desiccated coconut
3 tablespoons apricot jam

For finishing off:
100g apricot glaze (I used ready made from Marks and Spencer, but if you can’t find it simply melt some apricot jam and brush it on)
200g icing sugar
2-4 tablespoons water
100g flaked almonds

How to make:
- Preheat the oven to 180°C/fan oven 160°C/350°F/Gas mark 4.
- Line one 20cm loose bottomed sandwich tin with baking paper.
- Cream together the butter and sugar until light and fluffy. Do not skimp on this stage as it’s the key to a lovely sponge.
- Gradually add the eggs, flour and vanilla until fully combined and you have a smooth, thick batter.
- Spoon the batter into the prepared tin. Level the surface.
- Bake for approx 25 minutes until a skewer inserted into the cakes comes out clean. Mine took 30 minutes.
- Leave to cool for 10 minutes in the tin before removing from the tin and leaving to cool completely on a wire rack.
- The sponge can be made the day before and stored in an airtight container.
- Now make the shortbread pastry: place the flour, icing sugar and butter in a food processor and blitz until you have fine breadcrumbs.
- Add the eggs and blitz again.
- Add enough water to make a dough. Knead until a nice firm consistency then wrap in clingfilm and chill for at least 30 minutes.
- Preheat the oven to 200°C/fan oven 180°C/400°F/Gas mark 6
- Lightly butter a 23cm springform pan.
- Take 2/3s of the pastry and roll out between two sheets of floured clingfilm. I floured the clingfilm as my pastry was soft and sticky; if yours isn’t then hold off on the flour.
- When you have a pastry disc big enough to line the inside of the tin and come right the way up the sides, transfer the pastry to the tin. Mine fell to bits but I discovered that it patches well!
- Return the pasty in the tin to the fridge while you prepare the filling.
- Now make the filling: peel, core and slice the apples – I cut each apple into about 12 slices i.e. I quartered it and then cut each quarter into 3.
- Place the apple slices in a bowl and add the cinnamon, calvados/apple juice, sugar, ground almonds and desiccated coconut. Stir so that all the apple slices are covered in the dry ingredients.
- Remove the pastry case from the fridge and spread the apricot jam over the base.
- Sit the Genoese sponge in the bottom of the tin. It should fit easily as it was made in a 20cm tin.
- Pack the coated apples around the sponge and over the top. Take care, because the tighter you pack the apples, the more you’ll get in!
- Return to the fridge while you roll out the top of the pastry.
- As before, roll the remaining pastry out between two sheets of clingfilm until you have a sufficient disc to cover the top of your torte.
- Remove the torte from the fridge and lay the pastry lid on top. Crimp the edges to ensure that nothing will escape during cooking.
- Bake for 30-35 minutes until the shortbread pastry looks cooked. Remember, the sponge is already cooked so judge it solely on the pastry.
- Remove from the oven and leave to cool on a wire rack. When the tin is cool enough to handle, remove the springform rim.
- Brush the top of the torte with apricot glaze and leave to dry.
- Now make the glace icing: place the icing sugar in a bowl and add a tablespoon of water. Whisk until a thick but runny paste is produced, adding more water as necessary to achieve this.
- Pour the icing over the top of the torte and, before it sets, scatter the flaked almonds over the top
- Bask in glory at the wonderful thing you have made.
- Eat.

Sunday, 5 April 2009

Custard peach pie


This pie isn’t going to win any beauty contests but boy, does it taste good! It is also quicker to make than you might think because you don’t need to bake the pastry blind. The whole thing goes into the oven at the same time.

Fruit and custard is a perfect combination. Here, the custard contrasts beautifully with the biscuity pastry and soft peaches.


I don’t think peaches are used enough in baking; they have a lovely flavour and texture which makes them ideal for cakes and desserts. I loaded up the pie shell with peaches:


This is what I consider an American pie as British pies tend to have pastry lids. The addition of the streusel topping adds a nice extra texture to the custard.

One omission from the original recipe though, which cost me dear, was the failure to warn that the pastry might over-brown. I would recommend checking it after 15 minutes and covering with foil if it’s browning too quickly. This will spare you the heart-break of having something look like this:


Luckily, one quick haircut later and it was ok!


Ingredients:
For the shortcrust pastry:
175g plain flour
120g unsalted butter, cold
3 tablespoons icing sugar
2 egg yolks

For the filling:
5 peaches (approx 700g)
150ml soured cream
3 egg yolks
200g caster sugar
30g plain flour

For the streusel topping:
60g unsalted butter
75g plain flour
60g caster sugar
½ teaspoon ground cinnamon

How to make:

- Start by making the pastry: put the flour, butter and icing sugar into the food processor and blitz until you get fine breadcrumbs.
- Add the egg yolks and blitz until the pastry just starts to come together.
- Turn out onto a lightly floured surface and bring together into a ball of dough, handling no more than is absolutely necessary.
- Wrap in clingfilm and chill for approximately 30 minutes.
- Preheat the oven to 220°C/fan oven 200°C/425°F/Gas mark 7.
- Roll the pastry out between two pieces of clingfilm until it is bigger than a 20-23cm pie dish.
- Ease the pastry into the pie dish. NB, there is no need to grease the pie dish due to the high butter content of the pastry.
- Leave approximately 2.5cm of pastry overlapping all the way around – you can crimp this or simply leave it plain.
- Peel 4 of the 5 peaches and cut into slices. I used sliced tinned peaches.
- Arrange the slices in the pastry case. You get a good fit if you overlap them in concentric circles.
- Beat together the soured cream, egg yolks, sugar and flour until just combined.
- Pour slowly and gently over the peaches – you don’t want to dislodge them.
- Bake the pie for 30 minutes or until the custard is just beginning to set. I recommend checking the pie after 15 minutes and covering the pastry edges loosely with foil if it is browning too quickly.
- While the pie is baking, prepare the streusel topping: rub together the butter, sugar and flour until you have breadcrumbs. Normally I would do this in a food processor, but the amount here is so small it’s quicker by hand.
- Stir in the ground cinnamon.
- After the pie has baked for 30 minutes, evenly sprinkle the streusel over the custard.
- Bake for a further 15 minutes or until the streusel is golden and a skewer inserted into the pie comes out clean.
- Cool the pie on a wire rack. You can serve the pie warm or cold.
- Just before serving, peel and slice the remaining peach arranging on top of the pie.
- I served my pie at room temperature with some spooning cream.
- Bask in glory at the wonderful thing you have made.
- Eat.

Tuesday, 23 December 2008

Things to do with mincemeat.....2008

Firstly, in case you want even more ideas, things I did with mincemeat last year can be found here!

As ever, my glorious mincemeat was made by the CCM’s (Caked Crusader’s Ma) own fair hand using Delia Smith’s recipe. To quote Bruce Forsyth, “didn’t she do well?”


This year I have used mincemeat in three ways and although all three use shortcrust pastry and mincemeat, they all somehow taste different.

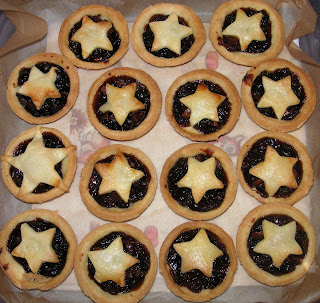
To start, here are star topped mince tarts. These are quite traditional but by having less pastry on top, they are lighter and allow the mincemeat to take a starring role.


Is it just me, or can anyone else see that the way the star drapes over the mincemeat looks just like Patrick Star (of Spongebob fame) lying on top of his rock? You have no idea how much time I spent surfing the net for a picture of Patrick on his rock to prove this but couldn’t find one.

The reason I started thinking about Patrick was because the first star cutter I used looked more like a starfish. You can see it in this photo – it’s the middle one in the far left column:


I find these pretty. I like the clean, unfussy lines of them:


The second way of using mincemeat came from one of my Swiss cookbooks and I’ve never seen the idea anywhere else – mincemeat rolls:


You roll shortcrust pastry out into a rectangle, completely cover it with mincemeat and then roll it up. After chilling (the mincement roll, not you!) it cuts beautifully into slices and you bake it.

Here they are raw ...ok, I realise they look like Vincent Van Gogh threw a wild party and everyone got carried away!

The third version is frangipane topped mince pies. This is a standard mince pie but instead of a pastry top, the tart is given an almond sponge layer.


These were very popular and the combination of mincemeat and frangipane worked brilliantly. I expected the mincemeat and frangipane to stay separate layers but you can see from this photo that they melded together to create a gloriously succulent filling:


The CCM's mincemeat is juicy stuff - just look at the plump fruit waiting to burst with sweet goodness when eaten:


Shortcrust pastry recipe

Ingredients:
For the shortcrust pastry (I found this amount makes approx 16 tarts but it depends on how thick you have the pastry and the size of your bun tin etc):
230g plain flour
160g unsalted butter
4 tablespoons icing sugar
2 egg yolk

How to make:
- Put the flour and butter into a bowl and rub together until it resembles fine breadcrumbs either using your fingertips, or a food processor.
- Add the icing sugar and stir in.
- Add the egg yolk and bring the dough together until it is smooth, glossy and soft.
- Wrap the dough in clingfilm and refrigerate for at least 30 minutes before you need to use it – this relaxes the dough and stops the cooked pastry from shrinking.
- Bask in glory at the wonderful thing you have made.
- Do not eat yet – it’s raw!


Star topped mince pies


Ingredients:
Shortcrust pastry – recipe set out above. 1 quantity will yield approx 16 tarts
8-10 tablespoons mincemeat (approx half a tablespoon for each tart)
Splash of milk, for glazing
2 tablespoons golden caster sugar

How to make:

- Use the appropriate amount of the shortcrust pastry (recipe above) for how many tarts you wish to make.
- Preheat the oven to 180°C/fan oven 160°C/350°F/Gas mark 4.
- If you trust the non-stick of your patty tin there is no need to grease it as the pastry contains so much butter. If in doubt I’d say you’re best off greasing it as it would be too heartbreaking to ruin your tarts getting them out of the tin.
- Roll the pastry out between two sheets of baking paper to a thickness of 0.5cm.
- Using a cutter cut out 16 pastry discs and line the patty tin. Re-roll the pastry as required – it’s quite good natured and will take many re-rolls.
- Spoon the mincemeat into the pastry discs. The mincemeat bubbles when it cooks so to keep the pastry edge nice and clean don’t put too much mincemeat in. I found half to three quarters of a tablespoon was ideal.
- Cut out stars and top each mince pie with one.
- Brush the stars with milk and then sprinkle over the golden caster sugar.
- Bake for 15-20 minutes until the pastry is golden and looks cooked.
- Leave to cool in the tin for 15 minutes before removing the mince pies. This is because the pastry is fragile on coming out of the oven.
- Remove from the tin and leave to cool completely.
- These will keep for a week in an airtight tin.
- Bask in glory at the wonderful thing you have made.
- Eat.


Mincemeat rolls


Ingredients:
Shortcrust pastry – recipe set out above. 1 quantity will yield 2 rolls from which you will get approx 20 slices)
1 jar of mincemeat (standard jam jar size)

How to make:

- Use the appropriate amount of the shortcrust pastry (recipe above) for how many rolls you wish to make.
- Cut the pastry in two as it is more manageable to roll out a smaller amount.
- Roll the pastry between two sheets of baking paper until it is about 0.5cm thick. Try to roll it so you end up with a neat rectangle.
- Spoon mincemeat all over the pastry leaving a gap on the long edge.
- Roll the pastry up using the paper to help you.
- Wrap tightly in clingfilm and refrigerate for at least an hour.
- Repeat with the other piece of pastry.
- Preheat the oven to 180°C/fan oven 160°C/350°F/Gas mark 4.
- Line two biscuit trays with baking paper.
- Remove the mincemeat roll from the fridge and cut into slices 1-1.5 cm thick. I found that a serrated bread knife gave the cleanest cut.
- Place the slices on the baking trays a little apart. They will expand on baking but not much.
- Bake for 15 minutes or until the pastry is golden and cooked.
- Cool for 10 minutes on their trays before using a spatula to transfer them to the wire rack to cool completely.
- These will keep for up to a week in an airtight container.
- Bask in glory at the wonderful thing you have made.
- Eat.

Frangipane mince pies


Follow the ingredients and method for the star topped mince pies set out above but, before baking make the frangipane topping.

Ingredients
For the frangipane topping:
100g unsalted butter
100g caster sugar
2 eggs
100g ground almonds
1 level tablespoon plain flour
1 teaspoon almond extract
For decoration: handful of flaked almonds

How to make:

- Preheat the oven to 200°C/fan oven 180°C/400°F/Gas mark 6.
- Follow the recipe for the star topped mince pies until you have the pastry cases filled with mincemeat in the patty tin.
- Now make the frangipane topping. Place the butter and sugar in the food processor and blend until soft and creamy.
- Add the eggs and blitz some more until well combined.
- Add the ground almonds, flour and almond extract and blitz again.
- Spoon the frangipane onto the mincemeat and then, if desired, scatter some flaked almonds on top.
- Bake for approximately 2o minutes or until the pastry and frangipane look golden and cooked.
- Leave to cool for 10 minutes in the tin before turning out to cool completely on a wire rack.
- Bask in glory at the wonderful thing you have made.
- Eat.

Sunday, 29 June 2008

Rhubarb meringue pie

I have always loved the concept of lemon meringue pie; it looks gorgeous - like a cloud has landed in a pie plate - and you get lots of different flavours and textures in a single slice. In fact, the only thing holding me back from forming a lifelong love affair with lemon meringue pie is the small matter of my lemon loathing. I may well have found the answer.


There’s no need to pipe the meringue but I’m obsessed with piping everything at the moment:


Rhubarb provides the same tart contrast as lemon does to the sweet sticky meringue and, as the CCD (Caked Crusader’s Da) had harvested the last of the summer’s rhubarb crop it seemed wrong to look a gift horse in the mouth.

Here’s the rhubarb waiting to be covered in a duvet of meringue:


Rhubarb, left to its own devices, is very tart – mouth puckeringly so. What interested me with this recipe was that you use a combination of sugar and orange juice to sweeten the rhubarb. The orange juice worked beautifully and seemed to bring out a delightful depth of flavour in the rhubarb. It was intriguing as the first ‘hit’ of flavour was the tart rhubarb then the sweet orange came through and left you with a fresh citrus taste.

The rhubarb filling sets very firm allowing lovely crisp slices to be cut:


I served it with thick cream, but in truth, it didn’t need it (believe me, this is not a comment I make lightly!).

Ingredients:
For the pastry:
173g plain flour
120g unsalted butter
3 tablespoons icing sugar
2 egg yolks - keep the whites for the meringue!
Plus, a further 2 egg yolks for sealing the pastry after baking blind – keep the whites for the meringue!

For the rhubarb filling:
675g rhubarb, chopped
75g caster sugar
Juice of 3 oranges (if you want to use bottle juice, this amounts to 250ml)
75g cornflour
1 egg yolk

For the meringue:
4 egg whites – saved from the stages above!
175g caster sugar

To serve: whipped cream

How to make:

- First make the pastry. Place the flour, icing sugar and butter in either a food processor or mixer and blend until the texture fine breadcrumbs.
- Add the egg yolks and mix until the dough comes together.
- Using your hands, make the dough into a smooth ball. Flatten slightly then wrap in clingfilm and refrigerate for at least 30 minutes.
- Preheat the oven to 200°C/fan oven 180°C/400°F/Gas mark 6.
- Grease a 23cm fluted flan tin and then roll the pastry out and use to line the tin. I roll my pastry out between two sheets of baking paper as this eliminates the need to dust the surface with flour.
- Once in the tin, cover the pastry with either baking paper or non stick foil and weigh down with baking beans.
- Bake for 15 minutes, then remove the baking beans and paper and brush the pastry with the two beaten egg yolks. This will seal the pastry and stop it becoming soggy from the juicy rhubarb.
- Return the pastry, uncovered, to the oven for a further 15 minutes, or until the pastry is crisp and golden.
- Leave to cool on a wire rack.
- While the pastry is cooking, make the rhubarb filling. Put the chopped rhubarb in a large pan with the sugar. Cover the pan and cook on a low heat for five minutes. Then remove the lid and keep cooking until the rhubarb softens. Rhubarb collapses when it cooks and that’s what you’re aiming for – you don’t want any hard lumps left. Stir every now and again to encourage the rhubarb to break down.
- Mix the cornflour with the orange juice. Remove the rhubarb from the heat and stir in the orange juice/cornflour mixture.
- Return the pan to the heat and bring to the boil stirring all the time. This will thicken the rhubarb.
- When the rhubarb is at boiling point, cook it for a further 2 minutes then remove from the heat.
- Allow to cool slightly before beating in the egg yolk. If you do this straightaway the egg might scramble so be patient!
- Pour the rhubarb into the pastry case. You can make the dish up to this point the day before serving. Let the rhubarb cool in the pastry case then cover and chill. If you make the meringue the day before it might weep.
- Finally, make the meringue topping. Whisk the three egg whites until the soft peak stage.
- Preheat the oven to 150°C/fan oven 130°C/300°F/Gas mark 2
- Continue to whisk and add the sugar gradually until it is fully incorporated.
- Whisk until the stiff peak stage before spreading or piping over the rhubarb.
- Bake for 35-40 minutes until the meringue is crisp on the outside and golden brown.
- Serve either warm or at room temperature but definitely with cream!
- Bask in glory at the wonderful thing you have made.
- Eat.