Showing posts with label pastry. Show all posts

Monday, 25 August 2014

Almond and cherry slices


Mr CC has been muttering of late that I don’t make his favourite sort of cakes.  The poor thing is practically malnourished due to my neglect! When I asked him what were his favourite sort of cakes he replied: anything that Mr Kipling makes.  Now don’t get me wrong; I am not (ok, I try not to be) a cake snob and will happily enjoy a Mr Kipling cake if there’s one on offer…but the thought of choosing one over a nice home baked treat is something I struggle with; if Mr CC heard my dramatic in-take of breath at his comment he didn’t let on. 


Mr CC mentioned, in particular, almond slices so I pondered how to take the essence of a Mr Kipling almond slice and pimp it up a bit.  I decided on adding a pastry base, chopped cherries and some thick white icing.  It then dawned on me that what I had actually created was the lovechild of a Mr Kipling almond slice and
bakewell tart…and it tasted as good as you’d expect!


If you’re pushed for time you can forget the pastry and simply bake the filling; the result will be a very pleasing almond sponge.  The cherries work so well with almond.  Whilst I still can’t manage half a glace cherry on top of a cake, chopped into small pieces I rather like the fruity –almost jammy - chewy little pop they bring to proceedings.  The cake will keep for days - anything with almonds seems to get better day after day as the nut oil is released.

This basic recipe has some alternative options available – omit the cherries and replace with fresh fruit such as raspberries or blueberries; you could also add a layer of jam between pastry and filling.


Ingredients
For the pastry:
175g plain flour
85g unsalted butter – straight from the fridge
30g caster sugar
1 egg yolk
1 tablespoon cold water

For the filling:
110g unsalted butter, at room temperature
150g golden caster sugar
2 eggs
150g plain flour
1/4 teaspoon baking powder
50g ground almonds
100g glace cherries, chopped quite small
1 tablespoon milk
A couple of handfuls of flaked almonds

For the icing:
100g icing sugar
Enough warm water to make a thick, glossy icing - add it a teaspoon at a time

Method
Start by making the pastry: place the flour and butter in the food processor and blitz until you have fine crumbs.

Add the sugar and blitz briefly.

While the machine is still running pour in the egg yolk and water.

Stop the processor when small clumps of pastry start to form.

Tip the clumps out onto a sheet of clingfilm and, using your hands, bring together into a ball of pastry.

If you wish to make the pastry by hand rub the butter into the flour until you have crumbs.  Stir in the sugar, egg and water and, bring together to a ball of dough.

Roll the pastry out between two sheets of clingfilm – this saves having to add any extra flour and changing the make up of the pastry.

Line a 30cm x 20cm traybake tin with the pastry.  I like to use a disposable foil traybake tin as I find it easier to get the cooked traybake out! 

Use any spare pastry to patch the tin – it’s good natured and will patch easily.

Prick the base of the pastry with a fork.

Cover with clingfilm and refrigerate for 1 hour. (Note that the pastry is rested after rolling – not before).

Preheat the oven to 200°C/fan oven 180°C/400°F/gas mark 6.

Cover the chilled pastry with non-stick foil or baking paper and weigh down with baking beans.

Bake for 10 minutes before removing the paper and beans and cooking for a further 10 minutes or until golden.

Put to one side to cool while you make the filling.

Now make the filling: beat together the butter and sugar until smooth and whippy.

Beat in the eggs.

Stir in the flour and baking powder.

Fold in the ground almonds and chopped cherries.

Stir in the milk to slacken the mixture.

Spoon into the pastry case and flatten well to ensure there are no air pockets.

Level the surface and scatter over the flaked almonds.

Bake for approximately 20 minutes or until a skewer inserted into the almond sponge comes out clean.

Leave to cool, in the tin, on a wire rack.

When the cake is cool make the icing: add warm water, a teaspoon at a time, to the icing sugar and mix until you have a thick, white, glossy icing.

Use a spoon to drizzle over the almond sponge.

Leave to set.

Cut into generous finger-shaped slices – I got 18 fingers.

Eat on its own with a big cup of tea.

Bask in the glory of the wonderful thing you have created.

Eat.


Sunday, 27 October 2013

Blueberry cream cheese tart


This is what happens when you spend too much time thinking about what to bake!  I planned to make a blueberry tart or pie – nice and simple...but then I saw blueberry cream cheese tarts and my attention was well and truly grabbed.


My ‘baking with cream cheese’ vista has expanded recently as, after years of claiming he didn’t like it, the CCD (Caked Crusader’s Da) has discovered that he does.  Just thinking of all those years he’s erroneously denied himself cheesecake makes me want to weep.  If we were in a Doctor Seuss book he would be the unnamed character and I would be Sam I Am...and the tart would be green eggs and ham...which doesn’t sound quite so good for a baking site!


Anyway, back to the tart!  I loved making this one – the pastry looked like it was going to be a nightmare but then behaved impeccably; the filling looked scant but, when I dropped the blueberries in, filled the pastry case.  Blueberries never disappoint!


The cream cheese filling has a lovely acidity to it due to the addition of soured cream.  It works well against the juicy blueberries and the crumbly, biscuit pastry.  Surprisingly, the overall effect is light and easy to eat – it’s not like a heavy slice of cheesecake.  It tasted really fresh as the blueberries soften but don’t turn mushy and pop deliciously in your mouth.


I served it as a dessert with pouring cream (Mr CC thinks it’s not a dessert unless there’s pouring cream or custard on offer) but it would work just as well as a tea-time treat.  And it keeps for several days in the fridge so there’s no excuse not to make one and eat it all by yourself!


Ingredients

For the pastry:
175g plain flour
85g unsalted butter, cold
30g caster sugar
1 egg yolk
1 tablespoon cold water

For the filling:
115g cream cheese – I used Philadelphia
60g soured cream
3 eggs
½ teaspoon grated nutmeg
1 teaspoon vanilla extract
70g caster sugar
450g blueberries – washed and dried


Method

Start by making the pastry: place the flour, butter and sugar in a food processor and pulse until you have fine crumbs.

Add the egg and pulse again then – only if it’s needed to bring the crumbs together – add the water. [NB. If you don’t have a food processor rub the butter into the flour until you have crumbs, stir in the sugar, then the egg then the water]

At this point, you will have claggy clumps – not a uniform ball of pastry.

Tip the clumps out onto a work top and bring together into a ball using your hands.  Only handle the pastry as much as is necessary to form a ball.

Roll out the pastry between two sheets of clingfilm until it is large enough to line a 25cm loose bottomed flan tin.  Don’t grease the tin – the pastry is buttery enough not to stick.

If the pastry tears, patch it carefully as you don’t want any holes for the filling to leak out of.

You will have just enough pastry to line the tin and patch – don’t expect any leftovers!

Prick the bottom of the pastry case several times with a fork – this will stop the pastry rising during baking.

Place the pastry case in the fridge for approx 30 mins.

Preheat the oven to 200°C/fan oven 180°C/400°F/Gas mark 6.

Line the pastry case with baking paper and baking beans and bake for 10 minutes.

Remove the paper and beans and return to the oven for a further 10 minutes or until pale golden.

Put to one side while you make the filling.

Lower the oven to 180°C/fan oven 160°C/350°F/Gas mark 4.

Now make the filling: Beat together the cream cheese, soured cream, eggs, nutmeg, vanilla and sugar until thick and well combined.  It’s easiest to use the whisk rather than paddle attachment.

Pour into the pastry case and then scatter the blueberries over the top – some will disappear into the liquid, others will remain visible.

Bake for 25-30 minutes or until the cheesecake element is set, but retains a bit of a wobble.  It will continue to set during cooling.

When completely cool, refrigerate until you wish to serve.

Serve either as dessert with pouring cream, or on its own as a tea-time treat.

Bask in the glory of the wonderful thing you have created.


Eat.

Sunday, 1 September 2013

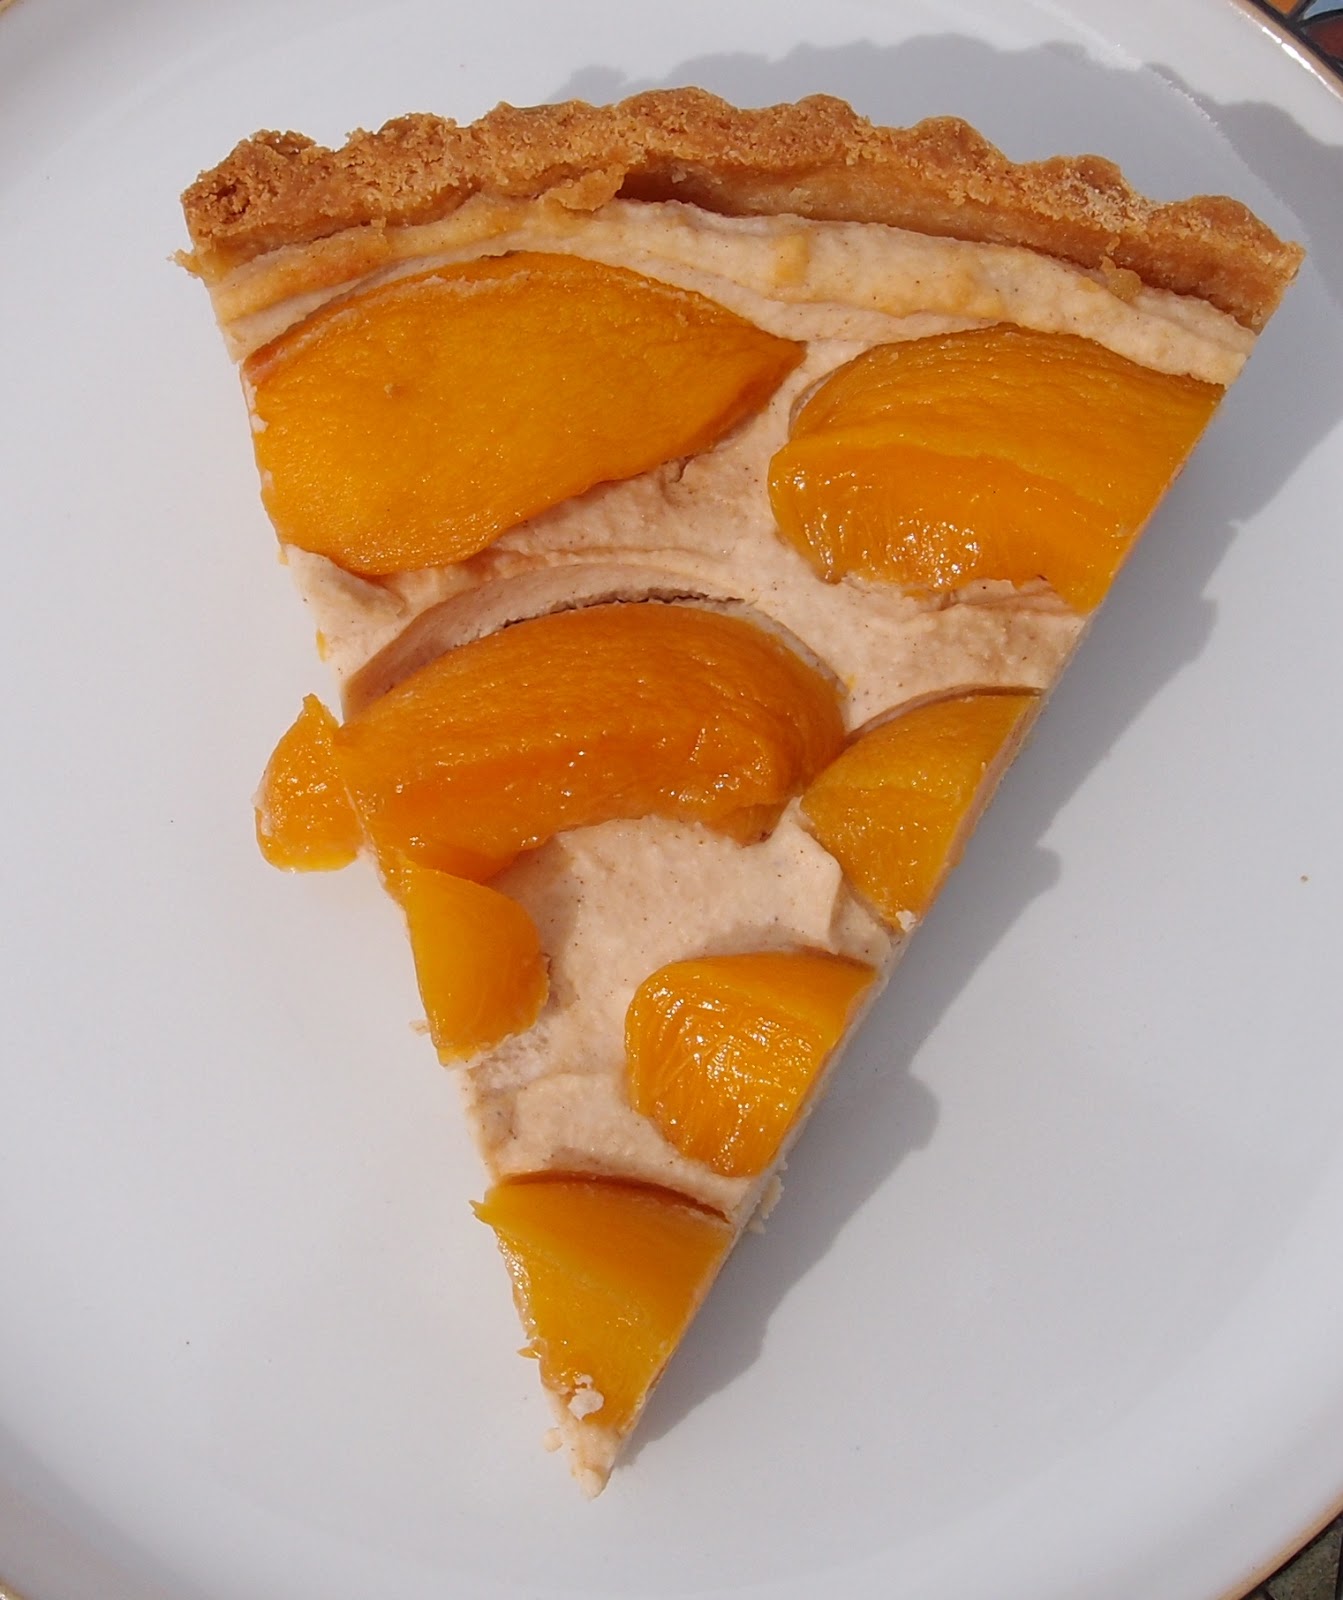
Peach and spiced ricotta tart


I think this tart looks a lot more complicated, and a lot more work than it actually is.  The roasted, lightly caramelised peaches sitting on a pillow of gently spiced ricotta work so well with the sweet, buttery vanilla pastry.  But honestly – if you can line a pastry case, the rest is plain sailing.


You’re probably meant to use fresh peaches or nectarines for this recipe but if you’ve followed my blog for any length of time you will know just how much I love tinned peaches.  How tinning a peach makes it better (both flavour and texture) I do not know...but it does.  So I used tinned peaches.  Using tinned peaches at the height of soft fruit season...I must be a contrarian baker!


When I trimmed the pastry I, of course, tasted the off cuts and was surprised how sweet it was.  It made sense when I tasted the ricotta filling which is not that sweet at all.  It’s all about balance.


I’m not sure roasting the tinned peaches was strictly necessary but I did it anyway and they did look and feel softer afterwards but they didn’t caramelise as much as I’d hoped.


This is the sort of tart you’d see in a lovely deli shop window; it’s not fine or delicate patisserie but it looks inviting and wholesome.  I was particularly proud of this one.  And I really need to reiterate – it’s easy to make!


Ingredients

For the pastry:
115g unsalted butter, at room temperature
75g caster sugar
1 egg yolk
1 teaspoon vanilla extract
Pinch of salt
185g plain flour

For the peaches:
3-4 peaches or nectarines, peeled and cut into half – stone removed.  I used tinned peaches...because I love them!  My peaches were small so I used 4
1 tablespoon brown sugar
20ml water

For the ricotta filling:
450g ricotta
40g caster sugar
½ teaspoon ground cinnamon
½ teaspoon ground ginger
1 egg
1 tablespoon brown sugar, for sprinkling on top


Method

Make the pastry – this is an unusual method but results in a rich, buttery pastry easier to work with than you might imagine: beat together the butter and sugar until pale and fluffy.

Add the egg yolk, vanilla and salt and beat until combined.

Add the flour and mix until the pastry just starts to clump.

Tip out onto a sheet of clingfilm and bring together into a ball.

Flatten into a fat disc and wrap in clingfilm.

Refrigerate for one hour.

Roll the pastry out between two sheets of clingfilm until it is 3-5mm thick.

Line a 23cm loose bottomed flan tin with the pastry.

Refrigerate for a further 30 minutes.

Preheat the oven to 180°C/fan oven 160°C/350°F/gas mark 4.

Cover the pastry with a sheet of baking paper or non stick foil and hold in place with baking beans.

Bake for 15 minutes, before removing the paper and beans and baking for a further 5 minutes until golden.

Leave to cool before trimming any overhanging pastry away.

Now roast the peaches: place the halves in a roasting tin.

Sprinkle the sugar over the peaches and pour the water into the bottom of the tin.

Roast for approximately 12 minutes or until they are soft and golden.

Leave to cool before cutting into wedges.

Now make the ricotta filling: beat together all the ingredients until well combined.

Spoon into the pastry case and arrange the peaches on top.

Sprinkle over the brown sugar.

Bake for 20-25 minutes or until the ricotta is golden and firm to the touch.  Mine took longer – nearer 40 minutes.

Remove from the oven and leave to cool for five minutes before removing from the tin.

Serve either warm, from the oven, or leave to cool completely.

Bask in the glory of the wonderful thing you have created.


Eat.

Sunday, 4 August 2013

Caramel custard tart


This is a sensation of flavour and texture – it’s also pretty full on in terms of indulgence...not one for the faint hearted!  The buttery, crumbly pastry works beautifully with the sweet, rich custard filling.  I am pleased I added the plain whipped cream on top as it lightens the dish.


I do love tinned caramel.  I’ve always found making caramel a little bit hit and miss and this takes all the stress out of it.  I don’t struggle with making the caramel it’s usually what follows – this recipe contained the instructions for making caramel but then told you to stand the pan in cold water before whisking in cream.  I did that...and my caramel set hard at the bottom of the pan!  Oh how I enjoyed cleaning up after that little mishap....not!


This is sweet.  And I’m saying that.  Best to serve in smaller slices and let people have more if they want it.  Sigh. This is the sort of thing I type when I try to be populist...who am I kidding?  Of course I don’t recommend serving it in small slices – serve it in big slices!  Always big slices!


The cream balls on the top caused a bit of a stir.  Luckily, they came out looking cute but I cannot claim this was the intended design.  Having selected a plain piping tip, I didn’t really have a plan so started piping dumpy little balls...and then kept on going!  I was asked what they were and explained that you could now buy whipped cream balls that came on a sheet and you just peeled them off and placed them.  I did not expect this to be believed.  But it was.  Twice.  My relatives are gullible!


Please check out the result from my cake mould giveaway
 – if you’re Liz, please get in touch with your address!


Ingredients

For the pastry:
225g plain flour
50g icing sugar
150g unsalted butter, straight from the fridge
1 egg

For the custard filling:
375g caramel – I used a tinned, ready made version
4 egg yolks
150ml double cream
150ml full fat milk
1 teaspoon vanilla extract

To decorate:
300ml double cream


Method

Preheat the oven to 200°C/fan oven 180°C/400°F/gas mark 6.

Place the flour, sugar and butter in a food processor and blitz until you have fine crumbs.

Add the egg and blitz again until the pastry just starts to come together.

Tip out onto a sheet of clingfilm – don’t panic, the pastry is very soft at this stage.

Form into a disc, wrap in clingfilm and refrigerate for 20 minutes.

Roll out between two sheets of clingfilm and then line a 23cm loose bottomed tart tin.  There is no need to grease the tin.

Don’t worry if you need to patch the pastry – it’s very good natured!

Refrigerate for a further 20 minutes.

Line the pastry case with baking paper or non stick foil and weigh down with baking beads.

Bake for 15 minutes, then remove the beads and paper and bake uncovered for a further 5 minutes.

Leave to cool.

Reduce the oven to 160°C/fan oven 140°C/325°F/gas mark 3.

Now make the filling: tip the caramel into a small pan and heat gently to loosen it up.

In a large bowl beat the egg yolks until they are pale and fluffy.

In another pan, bring the double cream and milk just to the boil, before adding the vanilla.

Beating the whole time, pour the cream and milk over the egg yolks.

Still beating, add the warm caramel.

Pour through a sieve back into the saucepan you heated the cream in.  This is important as it will ensure there are no lumps of caramel.  Use a wooden spoon to push the caramel through.

Stir over a gentle heat until the custard coats the back of the spoon and you can draw a line through it with your finger.

Pour into the pastry case and bake for approximately 35 minutes or until the custard is set but still has a wobble in the centre.

Leave to cool completely.

Whip the double cream and pipe over the top of the tart.

Serve in generous slices.

Bask in the glory of the wonderful thing you have created.


Eat.

Sunday, 14 April 2013

Apple and blueberry tart


Apple and blueberry is such a beautiful combination in look and taste.  This tart looks quite fancy but is very easy to make.  It’s a twist on a bakewell tart really if you think about it – pastry, fruit, frangipane.  The main difference being that the fruit is fresh and sits on top of the frangipane rather than underneath in the form of jam.


It’s deceptive, but that’s really just one apple covering the top of the tart.  The trick is to slice it thinly.  I found the trickiest artistic decision placing the blueberries and making sure they were evenly distributed!  It took a steady hand to transfer the tart to the oven without making the blueberries roll all over the place!


I suppose this tart is more autumn than spring but who cares?  I fancied something comforting and fruit and almonds always hit the mark with me.  As with anything laden with almonds, the tart keeps well and actually improves with age.


Sometimes, you make a pastry and the whole time you’re making it you’re thinking “this is going to be such a nightmare to roll out”.  This was such a pastry.  When I bought it together to form a ball of dough my heart sunk.  It was so sticky.  It looked and felt like marzipan and I couldn’t see how this was going to become a lovely tart case.  The key is refrigeration:


After two hours in the fridge it rolled like a dream – I didn’t use any flour to roll it out (I don’t like changing the texture of the pastry by adding more flour), it didn’t crack or tear and I didn’t have to patch it in the tin.  Oh, and did I mention how delicious it is?  The almond gives it an almost shortbread like texture and flavour.


Ingredients

For the pastry:
125g unsalted butter, at room temperature
125g golden caster sugar
1 egg
250g plain flour
30g ground almonds

For the filling:
150g unsalted butter, at room temperature
150g golden caster sugar
150g ground almonds
2 tablespoons plain flour
3 eggs
1 dessert apple – I used pink lady but any apple such as golden delicious, granny smith, gala, braeburn etc would work
125g blueberries

Optional: icing sugar for dusting
To serve: cream


Method

Start by making the pastry: place the butter and sugar into a food processor and blitz until smooth and creamy.

Add the egg and blitz again.

Add the flour and almonds and blitz until a dough just starts to form.

Tip out onto a sheet of clingfilm and, using your hands, bring to a sticky ball of pastry.  Don’t worry that it is so sticky – it should feel more like marzipan than pastry at this stage.

Shape into a fat disc and wrap in clingfilm.

Refrigerate for approximately 2 hours.

Preheat the oven to 190°C/fan oven 170°C/375°F/gas mark 5.

Roll out the pastry between two sheets of clingfilm until it is big enough to line a 23cm loose bottomed flan tin.  No need to grease the flan tin – the pastry is buttery enough that it won’t stick.

Line the pastry case with baking paper and baking beans and bake for 15 minutes.

Remove the paper and beans then return to the oven for a further 5 minutes or until the pastry is golden.

Now make the filling: beat together the butter and sugar until smooth and creamy.  It won’t turn pale and fluffy because of the ratios and the fact it’s golden caster sugar.

Add the ground almonds and flour and beat again.

Beat in the eggs one at a time until you have a smooth cream.

Peel and core the apple, before cutting it into thin slices.  I cut the apple into quarters and aimed for at least four slices from each quarter.

Pour the almond mixture into the pastry case and spread out until it is even.

Place the apples on top.

Scatter the blueberries over the apple and almond.

Bake for 45-50 minutes or until it looks golden, risen and set in the middle.

Leave to cool, in the tin, on a wire rack.

If desired, dust with icing sugar.

Either serve warm with ice cream for dessert, or at room temperature with cream for afternoon tea.

Bask in the glory of the wonderful thing you have created.

Eat.

Sunday, 3 March 2013

Creme Brulee tart


I come from a family whose passion for custard knows no bounds.  I married a man whose passion for custard frankly makes me think we were just playing at it.  Mr CC’s ‘dairy stomach’ is the stuff of legends and can be called into play after any huge meal meaning that dessert can be enjoyed.  In truth, I envy it!



When I found this recipe for crème brulee tart I knew it was a winner.  If there is crème brulee on a dessert menu Mr CC never reads beyond it.  Therefore, I knew I couldn’t waste his time and make only one tart that he’d have to share with my family...I made two meaning that he has enough to see him through the next few days!


There is nothing intrinsically tricky in this recipe but what it needs is time, and that might not be apparent from a quick scan of the recipe.  The pastry has to be chilled twice (total of 1 hour fridge time), the custard has to be left to cool (30 mins), the tart bakes at a low temperature (at least an hour), and the baked tart has to cool before you can brulee it (yet another hour).  Don’t make this one if you are pushed for time!


Also, the pastry is incredibly short.  I consider myself pretty experienced in the ways of shortcrust pastry but found this a tricky one to roll and handle.  However, it does patch and I don’t want to put you off it because it is yummy with its inclusion of custard powder.  Don’t do what I did and chill it for an hour and then watch it turn into crumbs when you start rolling it out – 30 minutes is plenty! 


Here’s the tart fresh from the oven, pre brulee:


I prefer a thin brulee topping as I don’t like my teeth getting gunged up with a thick layer of sugar.  I like a brulee that needs a sharp tap to get in, but then eats nicely adding a little crunch without dominating the custard.  If you like a thick brulee then simply increase the amount of sugar you sprinkle over the top of the tart.


I struggle with getting a nice even brulee topping – my grill isn’t powerful or even enough in its heat, and my blow torch started to die part way through.  What I’m trying to say is...the topping tasted better than perhaps it looks!


Ingredients

For the pastry:
225g plain flour
2 tablespoons custard powder
125g unsalted butter – cold
1 egg yolk
1 tablespoon cold water – you may need more
An extra egg yolk for patching – if needed

For the filling:
5 egg yolks
75g caster sugar
1 vanilla pod
450ml whipping cream
80ml milk

For the topping:
2 tablespoons caster sugar


Method

Start by making the pastry: put the flour, custard powder and butter into a food processor and blitz until you have bread crumbs.

Add the egg yolk and blitz again and add enough water until the pastry forms clumpy crumbs. (NB. You could make the pastry by hand using the rubbing in method i.e. rub the butter into the flour, then stir in the custard powder, egg and water).

Tip the pastry out onto a sheet of clingfilm and handle as little as possible to form a fat disc.

Wrap in clingfilm and refrigerate.  Normally I’d say chill for an hour but this is a very short pastry and would be unworkably crumbly.  Chill for 30 minutes only.

Roll out the chilled pastry between two sheets of clingfilm – this saves having to add any flour.

Use the pastry to line a 24cm loose bottomed flan tin.  No need to grease the tin as the pastry is buttery enough not to stick.

Don’t panic if you need to patch the dough – it is very short and will crumble, but it does patch and there’s enough spare pastry to do this.

Pop the pastry back in the fridge for a further 30 minutes.

Preheat the oven to 200°C/fan oven 180°C/400°F/gas mark 6.

Line the pastry case with either non-stick foil or baking paper and use baking beans to weigh the pastry down i.e. so it won’t rise.

Bake for 10 minutes, then remove the paper and beans and bake for a further 10 minutes or until the pastry is lightly golden.

NB. If at this point you notice cracks or holes in your pastry it is important to deal with them otherwise the custard will fall straight through.  I painted on whisked egg yolk to close up any tiny cracks and put the pastry back in the oven for a further 5 minutes.  It did the job!

While the pastry case is cooling, make the filling: In a large bowl whisk together the egg yolks and sugar until they are pale and thick.

Meanwhile, slice open a vanilla pod and scrape out the seeds.  Put the pod and seeds into a saucepan and pour over the cream and milk.

Warm the cream and milk over a gentle heat until approaching boiling point.

Remove the vanilla pod.

Pour over the whisked egg yolks and continue to whisk to ensure the egg doesn’t scramble.
Pour through a sieve into a jug or pan and leave to cool a little.

Preheat the oven to 150°C/fan oven 130°C/300°F/gas mark 2.

Pour the cooled custard into the pastry case and bake for approximately 1 hour or until the custard is set.  You can tell if you gently shake the baking sheet and the custard has only a faint wobble.  Mine took just over the hour.

Leave to cool completely.

Now make the topping:  Sprinkle the sugar evenly over the tart.

There are two options for creating the brulee topping:
  • You can put your grill to the highest setting and pop the tart under it for 2 minutes or until the sugar has melted and turned brown.  It might be sensible to cover the edges of the pastry with a collar of foil to stop it burning.  If the sugar hasn’t melted completely sprinkle some water on top and pop it back under the grill.
  • You can use a blow torch – this is what I did.  I prefer this method as my grill never seems to get hot enough to melt sugar, and I feel more in control holding the torch!


Leave to cool before putting in the fridge.  It will need to go back into the fridge for at least 30 minutes before serving as the heat from the brulee-ing process will soften the custard.  If you want to cut nice clean slices it needs to re-set.  I made and bruleed my tart the day before serving and that was too far in advance and the brulee lost some of its crispness...so be warned!

Bask in the glory of the wonderful thing you have created.

Eat.