Sunday 30 January 2011

Coconut and raspberry cupcakes decorated with coconut macaroons


If you spend as many hours a day pondering cake as I do most thoughts are of the “I could really eat a slice of sponge right now” variety. Some however, are slightly more creative, take root and won’t allow themselves to be forgotten. This recipe is such an example.


I came across a recipe for old-fashioned coconut macaroons – the sort of macaroons that ruled the bakery/patisserie counter before the more glamorous upstart macarons came on the scene. Much as the photo made me drool, I knew I didn’t want to make just macaroons…but, as a cupcake decoration….that was a different story!


Coconut and raspberry is one of my favourite flavour combinations and I wanted the flavours represented in both the sponge and Swiss meringue buttercream. Being a coconutophile (I have invented a word) I boosted the flavour in my cupcakes by adding coconut extract, but it’s optional.


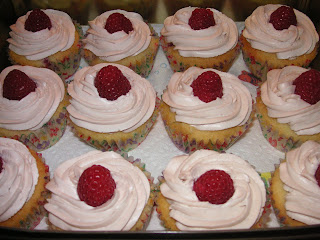
The delicate pink of the buttercream contrasts beautifully with the macaroon decorations. While the flavours can be enjoyed by everyone, I think the finished look is rather girly!


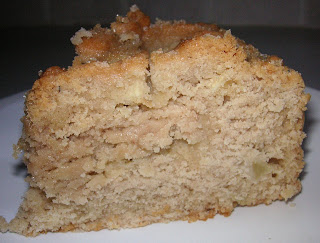
Here are the sponges before they were decorated:


I piped a flat layer of b
uttercream onto the cake and pushed the raspberry into it; this was to ensure that the buttercream filled the cavity of the raspberry. I could’ve stopped here as they looked stunning...:


...but I didn’t, as that’s not my nature! I piped more buttercream to enclose the raspberry:


The raspberry added good support for the macaroon topping!

Incidentally, the macaroon recipe below will also work as a particularly fine coconut bakewell if you make a pastry case, line it with jam and then put this on top. The quantity set out in the ingredients makes more macaroons that you need for the cupcakes but I didn’t find that a problem! Why not dip the spares in some melted chocolate for a bite size treat?

Ingredients

For the coconut macaroons (this will make more than you need to decorate the cupcakes – if you only want enough for decorations with no spare consider halving the quantities):
100g caster sugar
2 egg whites
200g desiccated coconut

For the cupcake sponge (this will make 12 cupcakes):
125g unsalted butter, at room temperature
125g caster sugar
2 eggs
125g self raising flour
3 tablespoons desiccated coconut
1 teaspoon coconut extract
2 tablespoons milk
150g fresh raspberries (if you prefer, you could put some raspberry jam into the cupcake batter after you’ve spooned it into the paper cases)

Swiss meringue buttercream (enough for 12 cupcakes):
4 egg whites
250g caster sugar
250g unsalted butter, at room temperature
1 teaspoon coconut extract
1 heaped tablespoon raspberry jam (seedless)

Optional: 12 raspberries


Method

Start by making the coconut macaroons: preheat the oven to 180°C/fan oven 160°C/350°F/Gas mark 4.

Line two baking sheets with baking paper.

Whisk together the sugar and egg whites until fluffy; you don’t need peaks but just something that is starting to hold its shape and look a bit whippy.

Stir in the coconut until the mixture is well combined.

Spoon teaspoon sized amounts onto the baking sheet, leaving a small gap between them. You can use the teaspoon and a knife to shape them into little balls.

Bake for approximately 10 minutes or until the macaroons are just starting to brown, then remove from the oven and leave to cool on a wire rack (remove the macaroons from the tray when cool - if you try beforehand they might break).

To make the cupcakes, increase the oven to 190°C/fan oven 170°C/375°F/Gas mark 5.

Line a cupcake pan with paper cases.

Beat together the butter and sugar until light and fluffy.

Beat in the eggs, flour, desiccated coconut, coconut extract and milk.

Fold in the raspberries – some might break down but don’t worry.

When the mixture is smooth and well combined, spoon into the paper cases.

If you’re using raspberry jam instead of fresh raspberries, spoon a scant teaspoon into each cupcake and smooth a little batter over the surface so the jam won’t burn.

Bake for 12-15 minutes or until a skewer inserted into the cupcakes comes out clean. Mine took 13 minutes.

Leave to cool on a wire rack and remove from the tin when cool enough to handle. (You can make up to this point a day before serving – simply store the macaroons and cupcake sponges in an airtight container. Make the Swiss meringue buttercream on the day you wish to serve the cupcakes)

Now make the Swiss meringue buttercream: Place the egg whites and sugar in a bowl over a pan of simmering water. Stir pretty much constantly to prevent the egg from cooking.

After 5-10 minutes, when the sugar has dissolved (when you cannot see any crystals on the back of the spoon), remove the bowl from the pan of simmering water and whisk until the meringue has puffed up and is cool.

Add the butter and coconut extract to the meringue and whisk until the butter is completely incorporated into the meringue. At first it will look a disaster – it will collapse and look curdled but don’t worry – just keep going! Stop when the mixture is smooth, light and fluffy.

Beat in the jam.

Pipe the Swiss meringue buttercream over the cupcakes in glamorous swirls.

If using, push the raspberries into the buttercream and cover with more piped buttercream.

Set the macaroons gently into the buttercream so that they will hold their position.

Bask in the glory of the wonderful thing you have made.

Eat.

Starting out….a beginner’s guide

I received an email from a student named Sam, part of which was as follows:

I used to enjoy making cakes at home and would actually quite like to bake something... but I don't have the first clue what to buy.

I suppose this is a request for a sort of 'beginners start up guide' post for your blog. What inexpensive kit to buy but will do the job, what key ingredients do you think every cake maker needs in his/her cupboard, that sort of thing. Then maybe a recipe to go with those things....

This got me thinking. Although my baking obsession began only maybe about 5 years back it’s amazing how much kit I’ve acquired (I can be very focussed when I want to be!) so I’ve tried recall what I started out with and what I think you need to make nice cakes…and it’s surprisingly little.

The first thing I’d say is that if you’re on a tight budget forget kitchenware shops or department stores. Don’t get me wrong, they sell gorgeous stuff but they’re not known for being cheap. Ruling out options like charity shops or car boot sales (because you can’t guarantee what you’ll find on any given week) I think good quality but cheap kitchenware can be found in the following places:

  • Wilkinsons or any equivalent general household goods store – many high streets have such a shop, many are independent rather than chains.
  • Pound shops – used selectively. I’m not sure I’d buy my cake tins here but a set of plastic measuring spoons or a wooden spoon does the same job however much it costs.
  • Supermarkets – a superb source of kitchenware at great prices. Electronic handheld whisks can be picked up for £6 (often cheaper in the sales). I buy virtually all of my everyday cake tins from Tesco.
  • Robert Dyas – forget that it’s a DIY shop, it has a good selection of cookware often with special offers like 2-for-1 on cake tins
  • Ikea

So, that’s where I’d head, but what should be on your shopping list? I’ve tried to be concise and cover all aspects of baking such as cakes, cupcakes, biscuits and pastry – obviously, if you have no plan to make pastry, ignore the stuff relating to pastry…sorry if that sounds patronising but I don’t want to scare anyone by the length of the list! Some of these items might already be in your kitchen as they are multi-use.

If you hunt around and choose wisely I think you can easily get everything for under £40, and you won’t need all of it straightaway. The list is intended as a “starting from scratch” guide, but you’re more than likely to have some of it already.

  • 2 x 20cm round springform tins i.e. the kind that do up with a clip. This tin is the workhorse of the kitchen and you’ll use it for practically every cake you bake. Why two? They are the same diameter as sandwich tins (the sort you need to make layer cakes such as Victoria sponges) so, if you have two, you can save yourself having to buy extra tins for that purpose.
  • 1 x cupcake pan i.e. the pan with 12 little indents. Non stick is always best because, while you won’t need it for cupcakes as they sit in paper cases, you will if you decide to make mince pies or jam tarts in it.
  • 1 x baking sheet – a flat tray perfect for biscuits or scones.
  • 1 x large mixing bowl – metal, glass or ceramic it’s up to you; they’ll all do the job just as well. I’m always drawn to metal as a big stainless steel bowl is light to move around the kitchen and won’t smash if you drop it.
  • 1 x wooden spoon – try to get one with a nice long handle as it’s easier to use.
  • 1 x large metal spoon – you need this for folding. It has a sharper edge so cuts through the ingredients more crisply; again, a long handle will make it easier to use.
  • 1 x spatula – now if you’re going to use this in hot pans get a silicone one; however, I use mine only to scrape cake batter from the bowl. I’m cheap where spatulas are concerned – I hate the fancy ones with rigid wooden handles. I like a nice one piece plastic effort that is flexible; from memory, mine is by Kitchencraft and cost no more than £2.
  • 1 x metal sieve – handy for sifting flours and icing sugar but also useful for straining fruit to make coulis and egg mixes used to make custard.
  • 1 set of measuring spoons – don’t pay much for these; I have a great set that came from a Christmas cracker last year! You can use your ordinary household spoons in the cutler drawer but these are more precise for half spoon measures.
  • 1 x cake skewer for testing when the cake is done. However, if you already have metal or wooden kebab skewers you can use those instead.
  • 1 x electronic hand whisk – yes this sounds extravagant but I have seen them in my Tesco for £5. It will repay its cost so many times over the first time you try to whip egg whites or cream! Personally, I reckon all sponges taste lighter when you get air into the creaming process – why break a sweat when this piece of kit will do it for you?
  • 1 set of scales – I would go for electronic and, again, I’ve seen them in Tesco for around the £5 mark. Choose one with a nice big bowl that can handle wet and dry ingredients.
  • 1 x wire cooling rack. Still the best way to cool cakes and get air flow round them. I like the old fashioned rectangular kind as you can fit two tins on it at a time.
  • 1 x measuring jug – many cakes contain milk or oil and measuring this accurately can make or break a recipe. Plastic will be cheapest but if you’re going to use it for other cooking with hot ingredients (i.e. making up stock) then choose glass.
  • 1 x biscuit cutters – plastic are cheapest and I’ve bought whole sets in Pound stores.
  • 1 x rolling pin – if you wish to make pastry, biscuits or scones then you’ll need one of these; go simple and pick the plainest wooden one you can find – make sure it has a bit of weight to it.
  • Baking paper – sold where the foil and clingfilm is in the supermarket. Line your cake tins with this and nothing will stick or tear on removal.
  • Clingfilm – use this to roll out biscuit dough and pastry and you won’t need to use any extra flour.

You have the kit but what will you use it for? There are staple ingredients I think every baker should have in their kitchen. With these you’ll be able to bake a huge array of cakes and biscuits and, when a recipe catches your eye and needs something additional, you’ll only have to buy that one extra item:

  • Unsalted butter – always unsalted. You should be in charge of any salt in your baking
  • Caster sugar – the one ingredient you’ll use again, and again and again!
  • Icing sugar – for icings and buttercreams, and some pastry recipes
  • Plain flour – for pastry, biscuits and some cakes
  • Self raising flour – for cakes
  • Baking powder – the most common raising agent
  • Eggs –I always use large eggs
  • Milk – I only use semi skimmed, it’s a nice halfway house as it isn’t too fatty but still has flavour
  • Jam or nutella – nice for filling sponges
  • Cocoa powder – will turn any sponge batter into a chocolate sponge batter
  • Vanilla extract – gorgeous in sponges, biscuits and custard

The perfect recipe to put all this into action? Start with a classic and marvel at baking skills you didn’t know you had – it’s got to be a Victoria Sponge, and you can find the recipe here.

If you think I’ve missed out anything important please leave a comment!

Thursday 27 January 2011

Jelly two ways: Rhubarb jelly and orange jelly


After the success of my lovely
Christmas jelly, I vowed to make more jellies in 2011.


The rhubarb jelly is the most gorgeous colour of any foodstuff I have ever created. The delicate pink is delightful and makes you smile just eating it!


While you can set your jelly in any glass, plastic, ceramic or tin dish (don’t use anything with a non-stick coating – the acidity will damage it) I think something this pretty a colour demands clear glass so you can see its beauty from all angles!


You cook the rhubarb with orange and ginger to add depth to the flavour. I’m not sure you’d know they were there – they don’t add obvious flavour but I think they do something in the background, and the orange provides extra juice.


The rhubarb should be soft and cooked, but still retain its shape. These pink chunks then go into the serving dishes to be encased in jelly:


The rhubarb juice is pink and fruity. Here it is after the gelatine has been whisked in – it should be completely lump free:


But what if you want lovely home-made jelly but don’t have time for cooking and straining the fruit? Simple. Buy the best quality fruit juice you can and use that instead.


This orange jelly didn’t taste like any orange jelly I’d had before; it tasted like solid fruit juice. Amazing. It lost none of its zingy fruit quality and the texture was amazingly soft and wobbly. Just to be a bit retro, I added mandarin segments but you don’t have to!


The quantities given below can easily be doubled up. Please don’t be put off by the length of the method below – this is the method for BOTH jellies!


Ingredients:

For the rhubarb jelly:
1kg rhubarb (I used forced rhubarb i.e. the really pink stuff, grown indoors)
40g fresh ginger
2 small or 1 large orange
280g caster sugar
300ml water
7 leaves gelatine


For the orange jelly:
1 litre orange juice (I used Tropicana smooth)
75g caster sugar – optional, but jelly sets less sweet than it tastes as liquid. I added the sugar and the finished jelly wasn’t too sweet
9 leaves gelatine
1 small can of mandarin segments

To serve: ice cream or double cream


Method (rhubarb jelly first, then the orange jelly)

Rhubarb: Trim ends off rhubarb and wash, then cut into 2-3cm chunks and place in a large saucepan.
Cut the orange into slices; peel ginger and cut into slices and place both in the saucepan with the rhubarb.
Add the sugar and water.
Put the lid on and cook over a gentle heat until the rhubarb is just tender – you don’t want it to collapse. Check it every 5-7 minutes so that you catch it at the right time.
Strain the rhubarb over a small saucepan so you don’t lose the juice.
Pick out the orange and ginger from the rhubarb and discard.
Place the leaf gelatine in a bowl of cold water for 10 mins.
Gently heat the rhubarb juice until it is almost boiling. Remove the pan from the heat.
Squeeze all the water out of the gelatine leaves and then whisk into the hot rhubarb juice to dissolve.
Spoon the cooked rhubarb between 6 glasses (obviously this depends on the size of your glasses) or 1 large bowl.
Sieve the rhubarb juice and gelatine mixture and then pour over the rhubarb in the glasses.
Refrigerate for at least 6 hours to set, or ideally overnight.
Serve with vanilla ice cream or double cream.

Orange jelly: place approximately 1/3 of the orange juice in a saucepan and add the sugar, if using.
Place the leaf gelatine in a bowl of cold water for 10 mins.
Heat the orange and sugar until the sugar has dissolved and the orange is hot but not boiling.
Remove from the heat, squeeze all the water out of the gelatine leaves and then whisk into the hot orange juice to dissolve.
Add the remaining orange juice to the saucepan and whisk to ensure that the gelatine is completely dissolved.
Spoon the mandarin segments between 8 glasses (obviously this depends on the size of your glasses) or 1 large bowl and then pour the orange jelly into the bowls.
Refrigerate for at least 6 hours to set, or ideally overnight.
Serve with vanilla ice cream or double cream.
Bask in the glory of the wonderful thing you have made.
Eat.

Sunday 23 January 2011

Apple butter cake


Apple cake holds a special place in my cakey affections – it’s just the most perfect of flavour and texture combinations ; the sweet, yet still pleasingly tart, soft apple teamed with crumbly sponge. This one has the added joy of subtle warming spices – perfect to cheer up a cup of tea!


Often apple cake is paired with buttercream and – don’t get me wrong, there is absolutely nothing wrong with that! – but this time I wanted something simple and crumbly. This recipe fit the bill particularly because it uses Demerara sugar, which always gives a delightful crunch to a batter. Incidentally, and this may sound nerdy, but “Demerara” is one of my all time favourite words to type. If you do it quickly and smoothly it almost feels like music under your fingertips!


The apple is chopped up and distributed through the cake so that each bite bursts with flavour. It also keeps well....not that it’s a major problem! Here is my apple, skilfully peeled and chopped by Mr CC; it’s nice to leave the apple quite chunky as then you get a lovely textural contrast with the cake:


One thing to stress about this cake is that it’s a very ugly batter; Mr CC entered the fray to placate me as he now recognises my unhappy wail (i.e. muttering, mild swearing and blackening the name of whoever wrote the recipe) when I think a recipe’s gone wrong! Much as I knew the apple would release juice during cooking and that the batter would be drier to accommodate it, I wasn’t expecting this:


Look at it! The batter is so firm that it was an effort stirring the apple into it...even Mr CC with his rippling manliness struggled. It also looked like there was way too much apple for the cake. After about the first 20 minutes of baking it still looked like scone batter with random bits of apple dotted on it. Then, the Miracle of the Oven occurred and the batter yielded and blended with the apple to make a rather fine cake! I suppose what I’m trying to say is.....


.... I don’t want to hear any muttering, mild swearing, or blackening my name if you make this cake because I have warned you that – until it comes out of the oven – this ain’t gonna be no beauty!


Apologies that the photos aren’t great this week – it was a dull, damp day; the sort of day it never feels like it actually gets light. I had to rely on flash to get any photos at all.


Ingredients

170g unsalted butter, at room temperature
170g Demerara sugar, plus an extra 2 tablespoons to sprinkle on top
2 eggs
335g plain flour
3 teaspoons baking powder
1 teaspoon nutmeg
1 teaspoon ground cinnamon
3 apples, chopped fairly roughly – use eating apples rather than cooking apples; I used 2 pink ladies and 1 granny smith

Method

Preheat the oven to 180°C/fan oven 160°C/350°F/Gas mark 4.

Line a 20cm round springform tin with baking paper.

Beat together the butter and sugar until light– don’t skimp on this stage; while the mix will never get pale and fluffy with a granular sugar such as Demerara it will turn noticeably lighter in colour and texture.

Beat in the eggs, one at a time

Fold in the flour, baking powder and spices.

Stir in the chopped apples; please don’t panic that the batter is stiff and it’s hard work to get the apples into it. This is necessary to ensure that, when the apples release their juice during cooking, the cake doesn’t become soggy.

Spoon into the prepared tin and level the surface.

Sprinkle over the additional tablespoons of Demerara sugar.

Bake for approximately 30 minutes or until a skewer inserted into the cake comes out clean. Mine took longer at 40 minutes but I was baking two at the same time.

Place the cake, still in its tin, on a wire rack and remove the tin as soon as it’s cool enough to handle.

Leave to cool completely before storing in an airtight container.

Serve in generous slices, with a steaming mug of tea!

Bask in the glory of the wonderful thing you have made.

Eat.

Sunday 16 January 2011

Rich chocolate cupcakes with Crème de Menthe buttercream


I recall telling you about my festive “puff pastry aberration” in Tesco. I suppose the other random Christmas purchase I should ‘fess up to is a bottle of Crème de Menthe. Hard to explain really – one minute it was on the shelf with its comrades, the next it was in my trolley planning a new life with me. These things happen.


Everybody smiles fondly if you show them a bottle of Crème de Menthe – it has retro chic in spades - but no one actually wants to drink it. Mr CC and I tried sipping small glasses of the green elixir and, while it wasn’t horrible, it wasn’t exactly lovely either. On the plus side though our mouths felt fresher as a result.


Mint can be an overpowering flavour in baked goods and desserts; I like a hint of mint rather than the sensation that I’m eating toothpaste. That’s why I recommend that, if you include them, use standard chocolate chips in my cupcakes; if you are a mint addict you could use chopped After Eights left over from Christmas, however, the notion of “leftover” chocolate is alien to me …it is simply chocolate I am yet to eat.


I tweaked my standard chocolate cupcake recipe by using half milk, half crème de cacao. This is a cocoa flavoured liqueur and it enhanced the chocolatiness of the cake – the texture of the batter was more like a chocolate mousse and tasted just as rich. I recommend using this if you have it. Maybe because there was less milk in the batter, we all noticed that the sponge was lighter in texture than usual.


The Crème de Menthe gave the buttercream a delicate greenness and you could enhance this with colouring. I chose not to but I admit I’m funny about adding colour and try to avoid it if possible and yes, I know that Crème de Menthe is only green because of colourings but that’s out of my control!

I find that most things with mint are best made a day or so in advance, so the flavour can soften and mellow; it can be harsh if tasted straight away.


I preferred these to my other attempt at mint cupcakes for two reasons: firstly, I found the Crème de Menthe to have a gentler, more rounded flavour than peppermint extract and, secondly, this buttercream gave a light feel in the mouth which had the effect of softening the mint.

Ingredients

For the chocolate cupcake:
125g unsalted butter, at room temperature
125g caster sugar
2 eggs
100g self raising flour
3 tablespoons cocoa powder
2 tablespoons milk – I used 1 tablespoon milk and 1 tablespoon crème de cacao but I wouldn’t buy it especially for the recipe
Optional: 50g chocolate chips

For the buttercream:
125g unsalted butter, at room temperature
200g icing sugar, sifted

2-3 tablespoons Crème de Menthe liqueur
Optional: green colouring

Decorate: purely optional, I used chocolate leaves to contrast against the buttercream

Method

Preheat the oven to 190°C/fan oven 170°C/375°F/Gas mark 5.

Line a cupcake pan with paper cases.

Beat together the butter and sugar until light and fluffy.

Beat in the eggs, flour, cocoa and milk.

When the mixture is smooth and well combined, stir in the After Eights or chocolate chips.

Spoon the batter into the paper cases.

Bake for 12-15 minutes or until a skewer inserted into the cupcakes comes out clean. Mine took 15 minutes.

Remove from the tin as soon as possible and leave to cool on a wire rack – removing from the tin is important, as the heat of the tin will mean that the cupcakes continue to (over)cook.

Now make the buttercream: place the butter into a mixing bowl and beat until it is whipped, light and pale. Don’t be afraid if this takes 5 minutes or more – it will depend on how soft your butter is at the start.

Add half of the sifted icing sugar and beat again.

Add half of the crème de menthe and beat again.

Repeat with the remaining icing sugar and crème de menthe.

Pipe the buttercream on top of each cupcake. If you refrigerate the finished cakes the buttercream will harden.

Decorate as desired.

Bask in the glory of the wonderful thing you have made.

Eat.

Sunday 9 January 2011

History corner – Prune Special


It’s the new year and we’re all meant to be health conscious and vowing that the excesses of the previous few weeks must NEVER be repeated...so what better than prune cake? I must confess to cheating – prune cake would be just too hard a sell to my family – and used a dried fruit orchard mix that contained prunes, pear, peach and apple.


This temptingly titled “prune special” cake is from the 1948 “What’s Cookin’?” book, subtitled, “A teen age cookery book.” Of course, you knew already it was for the youth as soon as you spied the missing “g” on “Cookin’”. I am intrigued that teenage is spelled as two separate words. If you’re wondering what the typical “teen ager” of 1948 looked like, it was like this:


Or, to put it into words – kind of middle aged. The book was written by a cast of thousands including the appropriately named Iris Weigh. Seeing as its aim is to engage with the youth, it’s rather stodgily written in places. Take, for example the dedication (note the interesting use of “them” rather than “you”): Dedicated to All Young People...in the hope that Cooking may hold more interest for them after the advent of this Book.


I can’t possibly convey the brilliance of this book in a single post; I adore everything about it – particularly the little vignettes of fiction surrounding the recipes; take for instance the story of Humphrey and his wife (whilst remembering that this book is for teenagers...and try not to get too disturbed at Humphrey’s – the teen age husband – outfit):


Humphrey likes sponge cake. There. His secret is out. His wife struggles to make him his desired Sunday sponge due to rationing of eggs (this is 1948). Dorothy, friend to Humphrey’s wife, has a cunning recipe that involves sieved dried egg and cold water, and the tension hangs on whether Humphrey will know the difference (he doesn’t, which makes me rather doubt his credentials as a sponge fancier).


Much as I love Humphrey and his old man dress sense, my heart belongs to Jake. It was difficult for Jean to make friends when her family moved to London, even though she did all the right things, such as joining the local tennis club. Jean’s mum decides that her daughter must host her own party in order to win friends – after all “had Jean not shone at domestic science at school?” Jean invites Jake after a wonderful game of tennis. Jake had a “smashing service and an infectious smile.” Are you sensing romance in the offing? Jean’s mum goes to a lot of trouble for the party to be a hit: “the flat was made to look festive with leaves from a friend’s garden. The carpet was taken up and they hired a radiogram for dancing.”


It’s actually Jean’s dad who swings it for her; after Jake has admired her “wizzo spread” (not a euphemism – don’t be smutty) Jean’s dad tells him that, “Friday night is going to be ping-pong night here. You’ll always be welcome.” This is the clincher and Jean knew that “she was well on the way to being the special friend of Jake!” The story ends thus: “soon they were engaged because Jake knew that the Girl he loved was a wizard cook!” It fair brings a tear to one’s eye.

Old books also highlight how language changes. Here are some teen agers (ignore that they all look well into their 40s) showing gratitude because the occasion is a “gay one”:


The Prune Special cake I have chosen is from a chapter entitled, “Friends to tea” and begins, “People who love to pop in for a chat and a cup of tea are something of a nuisance nowadays.” While it goes on to explain that rationing means ingredients are scarce and a host requires advance notice of when extra mouths will need feeding, I do love it as an opening sentence to a chapter on making cake and sandwiches for a social gathering!


Not doing much of a PR job on this cake the book dismisses it as a “plain cake”. After Christmas when we’ve all eaten so much rich food, I decided a plain cake was in order. We all liked the simplicity of flavour and that the sweetness was provided mostly by the dried fruit rather than added sugar; the batter is not at all sweet. Being a sugar addict, I fretted that the cake wasn’t all that nice but Mr CC saved the day by suggesting we should treat it more as a fruit bread or scone. We tried it with some butter...


... and it brought the whole cake to life. Ditto when we tried it with cream and jam. During the tough post-war years this probably wouldn’t have been an option so we should consider ourselves lucky to live in such a bounteous age.


My big mistake with this one was using a tin that was too big. Old cookery books rarely provide what size tin to use so, based on the quantities I used a standard 20cm tin...and got a very thin cake (I’m desperately
trying to avoid saying “flat”). If you wish to use a 20cm tin I would double the quantities – unless you are in the market for a shallow (aka flat) cake! I’d use a much smaller round tin or a small loaf tin next time.


The texture is heavy sponge – somewhere between a scone and a tea bread, but don’t let that put you off. With the addition of butter or cream and jam it’s particularly nice with a cup of tea. If I served it to Jake he would no doubt describe it as “wizzo”. Humphrey, on the other hand, would probably prefer something made out of water and dried egg!


Postscript: for those of you with husbands/partners/relatives/friends etc who moan that a lot of what you bake is too sweet this recipe may be the answer. Mr CC genuinely didn’t understand my complaint that this was not sweet enough and he enjoyed it plain. He is happy to be quoted in saying that this was his favourite bake of mine for a long time. I’m off to check his birth certificate to see if his real name is actually Humphrey!


Ingredients

225g plain flour
115g unsalted butter, from the fridge
115g chopped dried prunes – I used a dried fruit orchard mix from M&S containing prune, pear, peach and apple
2 teaspoons baking powder
60g caster sugar
1 egg
150ml milk – add more if the mix is too dry and heavy

To serve: butter or cream and jam

Method

Preheat the oven to 190˚C/fan oven 170˚C/375˚F/gas mark 5.

Line the smallest round springform tin you have with baking paper; if using a 20cm tin double the recipe quantities. A small loaf tin would work if you plan on slicing and buttering the cake.

Rub the butter into the flour until you have fine breadcrumbs. I find this quicker and easier to do in a food processor.

Stir in the prunes, baking powder and caster sugar.

Beat the egg and stir into the dry ingredients.

Stir in the milk until well combined. Add more milk if the mix is too try - you're aiming for heavy sponge batter consistency.

Spoon into the prepared tin and level the surface.

Bake for approximately 1 hour or until a skewer inserted into the cake comes out cleanly. Mine took exactly one hour.

Leave to cool in the tin on a wire rack. Don’t be depressed as the cake will sink a little on cooling.

When cool enough to handle, remove from the tin, and leave to cool completely on the wire rack.

Serve on its with butter or jam and cream.

Bask in the glory of the wonderful thing you have made.

Eat.

Wednesday 5 January 2011

Modesty is NOT my middle name....

Well, looky here...what do we have? Why it's the February 2011 edition of the BBC's rather splendid Olive magazine:


Page 7 is particularly good this month, I think....


I would like to thank my family, my friends, the eaters of my cake who don't expressly fall into the first two categories and all my readers - without you such an honour would not have befallen me! I'm welling up.......