Sunday, 18 July 2010

Coconut sandwich cake with coconut buttercream


Whilst rummaging through my larder cupboard this week I found something I’d bought a while back and not really considered since: cream of coconut. I got it from a large off-licence and it’s meant for making cocktails, hence the rather snazzy squeezy bottle. Far more practical too as, once you open a tin how do you store any leftover coconut cream?


But what to do with my coconut cream? As I pondered the question the Universe revealed the answer to me. Maybe Noel Edmonds was right with his ‘
cosmic ordering’. Maybe I have stumbled upon a baker’s belief system ‘cosmic cake ordering’? For no sooner did I think of how to use my ingredient than I came across this recipe!


I would describe this cake as a classic crumbly coconut sponge teamed with a rich, flavoursome buttercream. The addition of the jam adds a fruity kick and stickiness that works well with the sponge.


We all agreed that the buttercream to sponge ratio was spot on – usually you wouldn’t top a sponge sandwich with buttercream but this is so flavoursome with coconut that the more the better! I love it when you fill a sponge with jam and buttercream and the two start to amalgamate – mouth wateringly yummy!
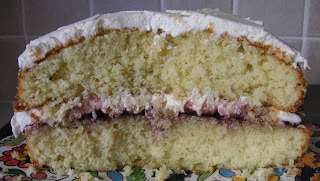

And that concludes another successful day’s baking:


Ingredients

For the cake:

175g unsalted butter, at room temperature
175g golden caster sugar
175g self raising flour
1 ½ teaspoons baking powder
3 eggs
50g desiccated coconut
2 tablespoons coconut cream

For the buttercream:

280g icing sugar
100g unsalted butter, at room temperature
3 tablespoons coconut cream

For the filling:

5 tablespoons raspberry jam

Method

Preheat the oven to 180˚c/fan oven 160˚c/350˚f/gas mark 4

Line the base of two 20cm round sandwich tins with baking paper.

Place the butter, golden caster sugar, flour, baking powder and eggs into a food processor and blitz until completely smooth. You can also do this with an electric mixer.

Stir in the coconut and coconut cream.

Spoon the mixture into the two prepared pans and level the surfaces.

Bake for approximately 25 minutes or until a skewer inserted into the centre of the sponges comes out clean.

Cool in the tins for 10 minutes and then turn out the sponges to cool completely on a wire rack.

The cakes can be stored in a tin at this point and kept for a day until you fill them.

Now make the buttercream: place all the ingredients in a bowl and mix until smooth and light.

Now you can assemble the finished cake: place one sponge (flat side up) on a plate and spread the jam over it.

Spread just under half the buttercream on top of the jam and top with the other sponge (flat side down).

Spread the top with the remaining buttercream.

Bask in the glory of the wonderful thing you have created.

Eat.

Wednesday, 14 July 2010

Mrs Portions' Potables

My dear friends, Mr and Mrs Portions, have finally – after much encouragement from me (i.e. nagging) – set up their own blog: Mrs Portions’ Potables

Why not say hello and check out their liqueur-making exploits?

Sunday, 11 July 2010

Chocolate and almond cake


This is a Delia recipe is actually called ‘
moist chocolate and almond cake’. I can’t help that feel ‘moist’ is superfluous in a cake’s title because who wants to bake a dry cake?


Anyway, pedantry aside, I had a hankering for a chocolate cake this week; it had to be sinful enough so I my need for naughtiness was sated, but not so rich that I couldn’t eat lots of it!
This recipe fitted the bill perfectly.


I recommend serving the cake with cream as the cream really brought out the richness of the chocolate and added some lightness. I used Chantilly cream which is a sweetened vanilla cream:


The almond adds flavour and richness to the texture.
I don’t think you’d actually know the almond was there – it keeps in the background but does good work! You can see flecks of chocolate and almond in this photo; I’d cut the cake through to turn it into a sandwich cake:


First layer of chocolate ganache going on:


I was a little disappointed that the chocolate didn’t make the cake batter turn dark brown – maybe it would work better if it was melted rather than grated? To combat this I replace 15g of the flour with cocoa powder and that created the darker batter I was hoping for. Here’s the cake unadorned:


Cut and ready to take into work tomorrow – it’s one way to win over your work colleagues!


Ingredients

For the cake:

110g unsalted butter
175g golden caster sugar
4 eggs, separated
110g dark chocolate, grated (I blitzed mine in the food processor)
110g ground almonds
6 tablespoons milk (whole or semi skimmed)
175g self raising flour (I used 160g self raising flour and 15g cocoa powder)

For the topping:

175g dark chocolate
1 tablespoon double cream
Optional: Toasted flaked almonds

Method

Preheat the oven to 220˚c/fan oven 200˚c/425˚f/gas mark 7

Line a 20cm round springform tin with baking paper.

Beat together the butter and sugar until they are light and fluffy. Don’t skimp on this stage as it’s the key to success!

Add the egg yolks a tablespoon or so at a time and beat well to ensure the mixture doesn’t curdle.

Lightly fold in the ground almonds, the milk and the grated chocolate. This is always easiest to do with a metal spoon as you get a nice cutting edge to fold the mix.

In a separate bowl whisk the egg whites until they are at the soft peak stage.

Fold the whites into the chocolate mix – it’s best to start with just a spoon of egg white as this will slacken the mix and make folding in the rest easier.

Fold in the flour.

Spoon into the prepared tin and level the surface.

Place in the oven and immediately reduce the heat to 170˚c/fan oven 150˚c/325˚f/gas mark 3 – bake for approximately 1 hour 10 minutes or until a skewer inserted into the cake comes out clean (for this kind of cake the skewer can have a little on it just not raw batter). Mine took exactly this time.

Allow the cake to cool on a wire rack until the tin is cool enough to handle. Remove the tin and leave the cake to cool completely on the wire rack.

At the point you can store the cake in an airtight container until needed – it will keep 2-3 days without any problem as the almonds make it mega moist.

Now make the topping and filling: break the chocolate up and place in a bowl above a pan of simmering water. Or microwave it – I’ve started doing this and find it just as good.

When the chocolate has melted and is smooth and glossy leave it to cool for a couple of minutes.

Stir in the double cream.

Cut the cake into two and use half the chocolate/cream mix to sandwich it together. Spread the rest over the top.

If required, scatter some toasted flaked almonds on top.

Bask in the glory of the wonderful thing you have created.

Eat.

Sunday, 4 July 2010

History corner – Coronation Pineapple layer cake


Now if I were to tell you that this pineapple layer cake comes from a booklet of recipes to celebrate the coronation you would probably think I was talking about Queen Elizabeth II’s coronation in 1953. And you’d be wrong! This recipe comes from a souvenir supplement presented with “Woman’s World” magazine in January 1937 and it relates to the coronation of King George VI, who was the father of our current queen.


There are many fascinating recipes contained in this slim pamphlet and many have evocative names such as “empire cake”, “Ladies in waiting”, “Windsor cake”, and “Princess Elizabeth cakes”. It was tough to pick just one recipe but the pineapple cake interested me because there is no icing between the layers, just finely chopped pineapple and this struck me as rather tasty!


It’s amazing to make a recipe and know that a housewife was making exactly the same cake over 70 years ago; I know it would have been a woman baking it as the foreword makes it quite clear:
“there will be few wives and mothers who are not called upon to see to the preparations for a party”.

I forgive them a bit when, further on, they add: “the first thing that take one’s eye on entering a room with the table laid for a party tea are the plates of tempting-looking cakes and pastries.” Here is a hard-working lady making her cake; the simple line drawing tells us so much about the age– her clothes and hairstyle, the equipment on her counter top...it may just be a pamphlet to some, but I see it as social history:


As with many older recipes there’s little guidance as to oven temperature, cooking time or which size tins to use, so I’ve added this based on what I know from my baking. Also, to my eyes, the original quantities looked mean so I’ve gone for 1.5x the quantities and it is these that are listed below. The recipe also measures liquid in cups; I’m pretty certain they don’t mean the US cup measurements but rather teacups. Luckily, I have a teacup so used that and then poured it into a measuring jug to find out the quantities which I have listed in the recipe below.


The finely chopped pineapple filling was a revelation – when you eat the cake it tastes like pineapple jam but without any of the effort of making jam! The one thing I would say is that next time I would use twice as much pineapple filling. It added a fresh zinginess to the rich sponge. I’m glad I used pineapple juice in the glace icing too as this added an extra dimension of flavour.


The icing was a glorious smooth dome – appreciated by those of us with a sweet tooth!


There is often a trade-off with sponge; if it’s crumbly and light to eat it’s a pain in the backside to cut neat slices! I would always rather the taste and texture was right – hence these rather crumbly, raggedy looking slices!


This photo of the cake on my fork shows the light, airy texture of the sponge:


Ingredients

For the cake and filling:
170g vegetable fat – I couldn’t face this and used unsalted butter!
300g caster sugar
3 eggs, separated
340g self raising flour
1 ½ teaspoons baking powder
100ml milk
50ml pineapple juice or syrup – I used juice and found I needed a little extra
Some pineapple rings or chunks – not hugely helpful! I used a small can with a drained weight of 260g (next time I would use double this amount)

For the icing:
340g icing sugar
Dash of vanilla extract
2-3 tablespoons water – I used pineapple juice

To decorate (optional) – pineapple rings or chunks

Method

Preheat the oven to 180°C/fan oven 160°C/350°F/Gas mark 4.

Line the bases of two 20cm loose bottomed round sandwich tins.

Beat together the butter and sugar until thick and creamy and well combined.

Beat in the egg yolks.

Sift together the flour and baking powder then beat into the egg mixture.

Beat in the milk.

Beat in the pineapple juice or syrup – don’t be afraid to add a dash more if the batter feels heavy.

In a separate bowl whisk the egg whites to stiff peaks, then fold into the batter.

Spoon into the prepared tins and level the surfaces.

Bake for 30-40 minutes or until a skewer inserted into the cakes comes out clean. Mine took 40 minutes.

Place on a wire rack until the tins are cool enough to handle, then turn out of the tins and leave to cool completely.

Cut the pineapple as finely as possible, ideally so it’s in shreds.

Place one of the sponges on a plate, flat side up and scatter the pineapple over the top.

Place the other sponge, flat side down, on the pineapple to sandwich.

Now make the icing: place the icing sugar in a bowl and add the vanilla.

Add enough pineapple juice or syrup to make a smooth, thick paste that will spread nicely over the sponge.

Pour the icing over the sponge and allow to set. Don’t worry if it drizzles over the sides.

When the icing is set, decorate with some pineapple (optional)– don’t do this too early of the pineapple might ooze into the icing and make a mess.

Bask in the glory of the wonderful thing you have made.

Eat.

