Saturday, 31 January 2009

Sticky apple gingerbread pudding

Early update for you this week, my little cakeophiles, as I’m off on my travels for work.


Apple and gingerbread is not a combination I have ever tasted before but as soon as I read this recipe I knew it would work – I could taste the sweet, sticky gingerbread with its kick of heat and the acidity of the apple cutting through it.


The other reason I picked this recipe is because I am a sucker for a cake that’s made in a saucepan – it just feels so wrong! The whole gingerbread is made in one saucepan; how cool is that? I was tempted to try baking it in the saucepan too but realised that the handle meant it wouldn’t fit in any of my air tight containers for storing overnight.


One thing I will say about this, so you don’t panic when you make it, is that the batter is UGLY. I mean ug-ly. It looked most unsavoury – it was lumpy and runny and well, I won’t even describe it the way I want to lest I turn your stomachs.


The CCB (Caked Crusader’s Brother) claimed it was “a perfect winter pud” in a way that made it sound like he was desperate to be quoted. We all mocked him but I’m quoting him anyway because he was right. It’s warming and tasty and comforting.


Ingredients:
125g unsalted butter
125g caster sugar
350g golden syrup
2 eggs
250g plain flour
3 heaped teaspoons ground ginger
1 level teaspoon mixed spice
1 teaspoon bicarbonate of soda
250ml hot water
3 small eating apples, peeled, cored and diced

To serve: custard, ice cream or cream

How to make:

- Preheat oven to 160°C/fan oven 140°C/315°F/ Gas mark 2-3. (Note: if I made this again I would do it on 180°C as, in my oven, this took too long and started to dry the apple out)
- Grease a 2ocm square loose bottom tin and line the base.
- Put the butter, sugar and golden syrup into a saucepan – make sure the saucepan is large enough to hold all the other ingredients. Heat gently until the butter and sugar have melted and you have a smooth, thick mixture. (My tip for weighing out golden syrup, treacle or anything sticky like that is to put the bowl or saucepan on the scales and pour it straight into that, rather than weigh in the scales’ pan and then have to scrape it out into the other bowl).
- Remove the saucepan from the heat and allow to cool slightly.
- While the mixture is cooling weigh out all the dry ingredients i.e. flour, ginger, spice, bicarbonate of soda, and prepare your apples.
- Using a wire whisk, beat the two eggs into the butter mixture.
- Sieve half of the dry ingredients into the butter mixture and stir in.
- Add half of the hot water and stir in.
- Stir in the rest of the dry ingredients, followed by the rest of the water.
- At this point the mixture will be fizzing due to the bicarbonate of soda and it is quite hard to get the wet and dry ingredients to mix. Be gentle and stop stirring as soon as they are combined; over-mixing will make the gingerbread tough.
- Pour the ugly, lumpy batter into the prepared tin and scatter the chopped apples over the top.
- Bake for 1 hour and 15 minutes but check after 1 hour. It is ready when a skewer inserted into the gingerbread comes out cleanly. Mine took 1 hour and 45 minutes and, because of this, the apple started to dry a little on the top – next time I would bake at a higher temperature.
- Leave in the tin and cool completely on a wire rack. This pudding is better if made a day in advance as it becomes fuller flavoured and stickier overnight.
- Cover with foil and reheat in a gentle oven – approximately 160°C/fan oven 140°C/315°F/ Gas mark 2-3 for 20 minutes and serve with custard, cream or ice cream.
- Bask in glory at the wonderful thing you have made.
- Eat.

Madeira cake

I made this cake a little while back; it wasn’t that I didn’t have any faith in my Brussel Sprout cake...but I thought it couldn’t hurt to have a standby item, just in case everyone who tried it started convulsing and frothing at the mouth.


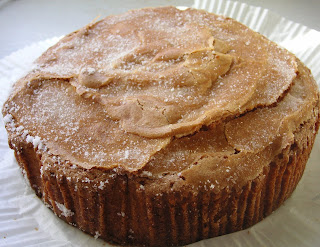
There isn’t really much you can say about Madeira cake. There are only five ingredients – it’s simple and plain yet it’s perfection in cake form. The buttery soft sponge is both satisfying and easy to eat; no need for forks or spoons or cream accompaniments. If contentment were a cake it would be a Madeira. Who am I kidding??? Of course contentment is a cake....it might well be this actual one:


Traditionally Madeira cake is flavoured with lemon. This is a vanilla version but you could easily substitute the vanilla with the same volume of lemon juice and some finely grated zest.

The cake isn’t named after the Madeira islands but rather the wine that was served with it. See? This site is educational; it's not all about lusting at cake. (Official stats just in: site is 0.5% educational, 99.5% lusting at cake)


One interesting serving suggestion is to submerge stale Madeira cake in piping hot custard. The only problem I foresee is that I can’t ever imagine having any stale Madeira cake; believe me, this is not a cake that hangs around for long!

Look at the luscious crusty sugar topping:


Ingredients:
180g unsalted butter, at room temperature
175g caster sugar plus an additional 2 tablespoons for sprinkling on top
3 eggs
165g self raising flour
2 teaspoons vanilla extract


How to make:

- Preheat the oven to 160°C/fan oven 140°C/315°F/Gas mark 2-3.
- Line a 20cm springform tin with baking paper.
- Start by beating together the butter and sugar until light and fluffy.
- Beat in the eggs gradually, adding a little of the flour if the mix looks like it’s curdling.
- Beat in the vanilla.
- Fold in the flour.
- Spoon into the prepared tin and level the surface.
- Sprinkle the additional caster sugar over the top.
- Bake for approximately 1 hour or until a skewer inserted into the cake comes out clean. Mine took 55 minutes.
- Leave to cool for 20 minutes in the tin before turning out and allowing to cool completely on a wire rack.
- Bask in glory at the wonderful thing you have made.
- Eat.
Sunday, 25 January 2009

Chocolate and custard sponge sandwich


This recipe caught my eye because it looked like my favourite type of doughnut – custard filled with chocolate icing – but in a sponge sandwich format. Try as I might, and I’ve given it a lot of thought, that remains the best way to describe this cake!


Ah, the sponge sandwich; just typing those two words makes me feel happy...and hungry. It’s so perfect – two layers of lovely sponge with something delicious in between (and on top too if you’re lucky).


The sponge is very yellow because of the addition of custard powder to the batter.


My favourite part of this recipe was actually the glaze which was quite the tastiest I’ve had. It’s sweet and smooth but retains an intensely chocolate flavour. I will certainly be using it to top cupcakes in the future.

The glaze drips down the side of the cake and puddles invitingly at the base:


The glaze does set but remains soft and luscious – you can see what I mean from this slice:


UPDATE: OK, there have been a few comments enquiring whether I have breached my own commandments regarding the daisies. I can assure you all that the daisies are 100% edible and are made from a rice papery/wafery substance.

Ingredients:
For the cakes:
200 plain flour
200g caster sugar
½ teaspoons bicarbonate of soda
2 teaspoon baking powder
225g unsalted butter, at room temperature
4 eggs
3 tablespoons custard powder (I used Bird’s)
2-3 tablespoons milk

For the buttercream:
125g icing sugar
4 teaspoons custard powder
75g unsalted butter, at room temperature
1 ½ teaspoons boiling water

For the chocolate glaze:
60ml water
2 tablespoons golden syrup
125g caster sugar (50g only if using milk chocolate)
175g dark or milk chocolate
Sprinkles of your choice – I used chocolate vermicelli

How to make:

- Preheat the oven to 180°C/fan oven 160°C/350°F/Gas mark 4.
- Line two 20cm loose bottomed sandwich tins with baking paper making sure that the paper comes up 2-3cm above the top of the tin.
- Start by making the cake: Place all the ingredients, except the milk, in a mixing bowl and beat until smooth and well combined. You can also do this in a food processor.
- Add the milk a tablespoon at a time until you have a batter that drops from the spoon easily. You may not need all the milk.
- Divide the batter between the two prepared tins and level the surface.
- Bake for approximately 20 minutes or until a skewer comes out cleanly. Mine took 30 minutes. The sponge will be quite puffy because of the cornflour in the custard powder.
- Let the cakes cool for 15 minutes in the tin before turning out and leaving to cool completely on a wire rack. The cakes can be made a day in advance and kept in an airtight container.
- Now make the buttercream: this can be done with either a stand mixer or in a food processor. Sieve the icing sugar and custard powder together into a bowl.
- Beat in the butter.
- Beat in the boiling water.
- Use the buttercream to sandwich together the two sponges.
- Now make the chocolate glaze: Put the water, golden syrup and sugar together in a saucepan and stir, over a low heat until the sugar has dissolved.
- Let the mix come to the boil and then remove the pan from the heat.
- Cut the chocolate into small pieces and add to the pan. Stir a little to ensure that all the chocolate is covered by the hot liquid.
- Leave to melt for a few minutes before whisking into a smooth and shiny glaze. Whisk for a good few minutes, because if you pour over the cake when it’s too runny you will lose it all down the sides!
- Pour over the buttercream filled cake and let it run down the sides.
- Sprinkle with the decoration of your choice before the icing sets.
- Bask in glory at the wonderful thing you have made.
- Eat.

Vanilla butter biscuits

Sometimes the simplicity of a biscuit or cake is what makes it so special. That’s the case here. These little vanilla biscuits are heavenly. You could dress them up if you wanted to – you could pipe the biscuit dough and then, when baked, dip the ends in melted chocolate; one day I will probably do that. But for now, I just wanted a lovely plain biscuit that was crumbly and buttery and had a hint of vanilla.


I used vanilla to flavour these but the basic butter biscuit recipe would suit any flavour. You could use any flavoured sugars instead of plain caster sugar, and when baked there are infinite ways you could decorate these. You could even make a buttercream and sandwich two of the biscuits together.

The biscuits are crumbly and buttery like shortbread, but unlike some shortbreads they are not gritty.


As the recipe included quantities in cups, I have set them out in the ingredients list below.

Ingredients:
115g (1.5 cups) unsalted butter, at room temperature
3 tablespoons icing sugar
150g (1.25 cups) plain flour
2 teaspoons vanilla extract

To sprinkle on top before baking: 4 teaspoons vanilla sugar

How to make:

- Preheat the oven to 180°C/fan oven 160°C/350°F/Gas mark 4.
- Line two baking trays with baking paper.
- Beat the butter and sugar until light and fluffy. This will take a few minutes so don’t skimp!
- Beat in the flour and vanilla and mix until you have a dough.
- Take teaspoons of the dough and roll into balls. Put a maximum of 12 balls on each baking sheet as the biscuits expand a little when baking.
- Using a fork, gently press down onto the biscuit balls to flatten. Don’t press too hard.
- Sprinkle the vanilla sugar over the biscuits making sure that some settles into the grooves left by the fork.
- Bake for 15-20 minutes or until the biscuits are golden brown. Mine took 18 minutes.
- Leave to cool on the baking sheet for 10 minutes before moving onto a wire rack to cool completely. This is because biscuits are always fragile straight from the oven and need to harden up.
- Bask in glory at the wonderful thing you have made.
- Eat.

