Sunday, 25 May 2014

Peanut butter chocolate truffles


These delicious truffles could not be simpler to make but they do require a bit of planning as the ganache needs time to chill properly in the fridge.  I was inspired to make these after Mr CC and I were served them with our tea/coffee at the end of very nice dinner to celebrate Mr CC’s birthday. 


The ones we were served in the restaurant had been rolled in cocoa powder, which I’m not a fan of in its raw form, so I used digestive crumbs instead.  Curses!  I am typing this post at mid point in the process – my ganache is cooling in the fridge.  Unusually, Mr CC is sitting next to me while I’m typing and has noticed that I’ve chosen not to roll them in cocoa....long story short, half will now be in biscuit crumbs, half in cocoa!


I have noticed a curious thing about digestive biscuits: when I buy them to put in my biscuit tin and wish them to stay whole I will open the packet and find several broken, even though I have carefully laid them in the top of one of my bags of shopping and treated them as though they were made of glass.  When I buy digestive biscuits to turn into a cheesecake base or any other recipe that involves smashing them into crumbs I will casually toss them into any of my bags of shopping – in with the potatoes and milk?  Why not? They will be doing the work for me! – and they will come home with not so much as a crumb chipped away. 


Peanut butter and chocolate is a lovely combination for anyone who enjoys that salty/sweet flavour mix.  I challenge anyone to stop at one truffle!  I tried cutting one in half to try and convey the rich, dense texture but it looked a bit crumbly because I cut it straight from the fridge thinking it would give a cleaner cut.  Moral of this story?  When in doubt, bite it in half:


Ganache making is a wonderful process; I never quite trust that the chocolate will mix in but it’s wonderful how it does!


I used a small melon baller to scoop the ganache into individual truffles.  You can tidy the balls up by rolling them in your hands but don’t waste a lot of time on this because, once they are rolled in cocoa or crumbs they look smooth and round anyway.  I made mine quite small – I like a truffle that you pop into your mouth whole and treat like a shot!  This mixture made me over 60 truffles....hurray!  Don't limit yourself to serving them as chocolates - how about using them as decadent cupcake toppers, or cheesecake decorations....in fact, any chocolate dessert?


Ingredients

300ml double cream
6-8 tablespoons smooth peanut butter – depending how peanutty you want it
200g dark chocolate, broken into squares
100g milk chocolate, broken into squares
8 digestive biscuits
6 tablespoons cocoa powder, you may need more


Method

Place the cream and peanut butter in a saucepan and bring slowly to the boil.

Remove from the heat and add both the dark and milk chocolate.

Leave to stand for a couple of minutes before gently stirring to combine into a thick, glossy ganache.

Pour into a heat proof dish and leave to cool before refrigerating until set (at least 4 hours – I left it overnight).

Blitz the digestive biscuits to crumbs either in the food processor or by placing in a bag and bashing with a rolling pin.

Take a melon baller scoop (or a  teaspoon if you don’t have a melon baller) of ganache and roll into a ball.

Repeat until all the ganache is used up.  If the ganache in the dish or the rolled balls start to get too soft return to the fridge for 10 minutes before resuming.

When all the balls are rolled, roll them individually in the biscuit crumbs or the cocoa powder.

Place in a petit four paper case and refrigerate until you wish to serve.  I got over 60 truffles...which made me very popular with everyone!

Bask in the glory of the wonderful thing you have created.


Eat.

Sunday, 18 May 2014

Custard creams


If I’m offered a selection tin of biscuits to choose from my first thought will always be to look for the custard creams and the pink wafers.  OK, that’s a lie; my first thought is actually ‘how many can I take without it looking greedy/weird/unusual/rude?’  I’m always glad if someone else has gone first and set the bar high!


What I’m trying to say is that I love custard creams.  Unless you’re rocking some serious high end chocolate biscuits in your tin, these babies are top of the tree.  Some of you will recoil in horror, others will frantically nod in agreement, but I love dunking them in a mug of tea just long enough so that the creamy filling becomes softer and the biscuit is on the cusp of soggy.  It is a reckless person who ‘over dunks’ and loses their biscuit to the sad resting place at the bottom of the mug.  Mushy biscuit at the bottom of a mug is a sign of bad biscuit management.


I will freely admit that the homemade version lacks the ornate squiggles so loved on the commercially farmed version, but what’s the point in a homemade version looking the same?  Isn’t the point of homemade that it does look different?  The big benefit of making them at home is that you get to control the size of the biscuit.  I have used the, ‘I only had one biscuit’ line many times failing to explain that the biscuit was the size of a dinner plate.  I’m exaggerating (honestly) but you get my drift!


To aim for some sort of uniformity I used my kitchen ruler to determine the biscuit size.  I may sound a bit OCD but I have a ruler in my kitchen which is handy for so many things, most commonly measuring cake tins because I often forget their dimensions.  This ruler has been my trusted culinary companion for years now; to save you straining to see what it is, it’s got all the cantons of Switzerland on it.


Ingredients

For the biscuits:
175g unsalted butter, at room temperature
50g golden caster sugar
50g icing sugar
2 egg yolks
2 teaspoons vanilla extract
300g plain flour

For the custard filling:
100 unsalted butter, at room temperature
140g icing sugar
2 tablespoons custard powder
3 teaspoons vanilla extract
Optional: a few drops of yellow food colouring – I used Dr Oetker natural gel colouring


Method

Preheat the oven to 200°C/fan oven 180°C/390°F/gas mark 6.

Line three baking sheets (if you only have two line those but be prepared to rotate the sheets for the second batch) with either baking paper or non stick foil.

Start with the biscuit dough: Beat together the butter, both sugars, egg yolks and vanilla until they are well combined and creamy looking.

Add half the flour and mix well.

Add the remaining flour and mix well; use your hand to bring the dough together.

Roll the dough out between two lightly floured sheets of clingfilm – aim for the thickness of a £1 coin.

Use the cutter of your choice to cut the dough then place the biscuits on the prepared trays.  Leave a little room for expansion although they do not spread much during baking.  (NB. If, like me, you’re using a ruler lightly flour it so it doesn’t stick to the dough).

Bake for approximately 8-10 minutes or until golden in colour.  Don’t worry if they take longer – trust your eyes more than your timer!

Leave the biscuits on the baking sheet to crisp up before you move them to a wire rack to cool completely.  If you try and move them too soon they can crumble.

Now make the filling: Beat all the ingredients together until smooth and whippy looking.

Either pipe or spread some of the filling onto one biscuit, and use another biscuit to sandwich.

Repeat until all the biscuits are paired up.

Bask in the glory of the wonderful thing you have created.


Eat.

Sunday, 11 May 2014

Condensed milk and nut cake


This is a recipe that caught my eye in one of those little “30 best recipe books”.  I liked that the recipe appeared so simple for an unusual looking end product.  It looks almost like a cheesecake but it isn’t – that creamy topping is made purely of baked condensed milk. This is a really quick, low effort bake, but I think the results suggest otherwise.  Please note the small squares I have cut it into – this is sweet and rich.  Think tasty little nibble to be enjoyed with a cup of tea/coffee rather than a big slice!  Don’t say I didn’t warn you!  


I don’t tend to keep condensed milk in my store cupboard and buy it only when I need it, which isn’t often.  This is probably just as well as I only have to taste a little bit off the lid of the can to fall head over heels in love with the stuff.  It’s sweet, creamy, thick and sticky texture is so sinfully good that I wonder why more baked goods don’t use it.  I really need to try it in an ice cream recipe – I bet it’s amazing.


I’ve stuck to the recipe as it used some of my favourite ingredients of chocolate, coconut and walnuts to add texture and flavour; I suspect however that the recipe is a bit of a blank canvas and any other nut, type of chocolate, or even dried fruit would work just as well; probably best though not to choose anything too sweet.


It’s also a good dish to use if you want to work out the age of people.  If, like me, you’re a child of the 1970s you won’t be able to hear the words ‘condensed milk’ without thinking of Lenny Henry and his condensed milk sandwiches on Tiswas.  I had a little chuckle the other day at work about how our popular culture references pinpoint us quite precisely age-wise.  A colleague was chatting to a younger colleague and made a passing reference to Percy Thrower (famous gardener and in charge of the Blue Peter garden; if you grew up in the 1970/80s apart from Zammo ODing in Grange Hill, the vandalism of the Blue Peter garden was about the most shocking thing that blighted your childhood).  She looked at him blankly and said, ‘who?’  She’ll be claiming she’s never heard of Morph and Chas next…..


Ingredients

For the base:
100g digestive biscuits
50g unsalted butter

For the topping:
150g chocolate, finely chopped – I used half milk, half dark chocolate
70g desiccated coconut
150g walnuts, finely chopped
379g sweetened condensed milk

Optional: icing sugar for dusting


Method

Preheat the oven to 180°C/fan oven 160°C/350°F/gas mark 4.

Line a 18cm square cake pan with baking paper or non stick foil.

Put the biscuits in a food processor and blitz until you have fine crumbs.

Add the butter and blitz again until the mixture resembles damp sand. (NB. If you prefer the manual method place the biscuits into a thick bag, tie the top, and hit with the rolling pin until you have crumbs.  Melt the butter and then stir the crumbs into it.)

Press the crumb mix into the base of the tin and press down firmly, ensuring the base is of even thickness.  Initially you will think there isn’t enough biscuit to cover the base, but be patient and keep pressing it down and out and there is.

Sprinkle over the chocolate, coconut and walnuts.

Slowly pour the condensed milk over the top taking care to disturb the chocolate, coconut and walnuts as little as possible (some movement is inevitable) – do not stir.

Bake for 35-40 minutes until the mixture is set but not rubbery (think baked cheesecake or baked custard texture – a bit of a wobble in the centre!)

Leave to cool completely in the tin, on a wire rack, before de-tinning and cutting into small squares.

Refrigerate until about 20 minutes before serving.

Bask in the glory of the wonderful think you have created.


Eat.

Sunday, 4 May 2014

Norfolk vinegar cake


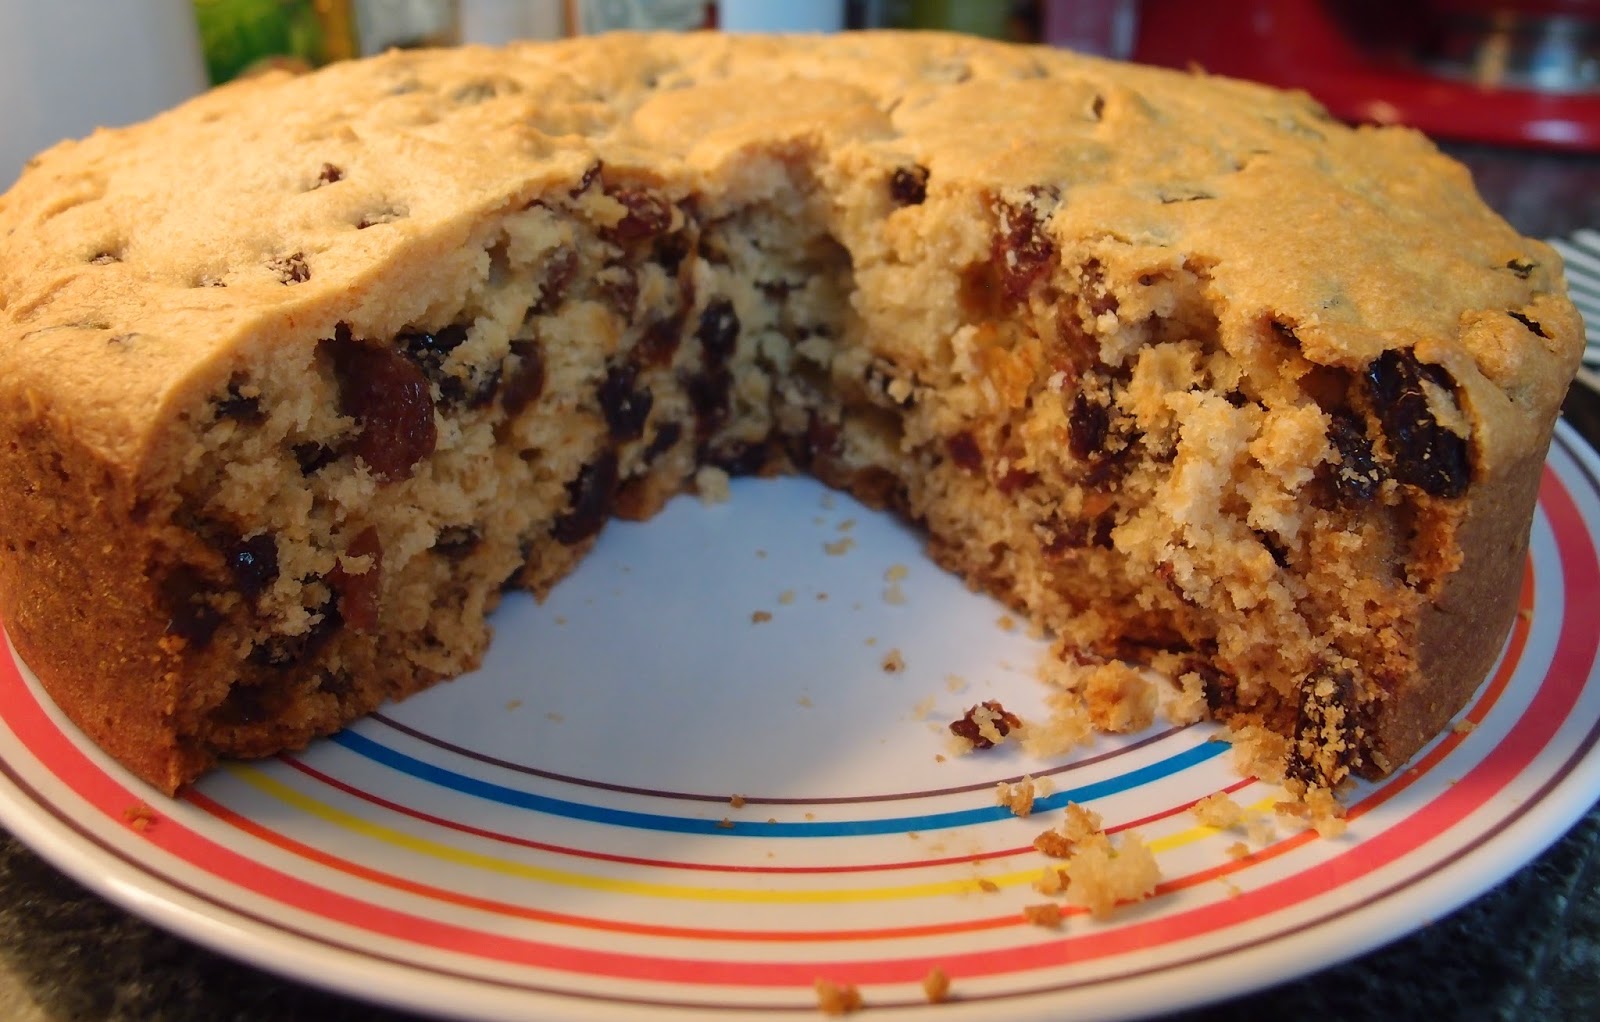
There cannot be many words less appealing to see included in the title of a cake than vinegar.  Corned beef perhaps?  Mustard?  Socks?  I think the vinegar is added to turn the milk into a buttermilk i.e. the acidity curdles the milk a little.  Rest assured; the cake does not taste of vinegar…now that would be a tough sell! (Although perhaps not so much to me as I adore vinegar and will put it on virtually any savoury item given the chance – try it on cabbage for a taste sensation; you’ll never look back.)


This is a light fruit cake – it’s not a full on ‘house brick in your stomach’ slab of Christmas cake.  It’s actually like a cross between light fruitcake and bread pudding.  Mr CC is always partial to a light fruit cake so I thought I would make it for him to enjoy over the Bank Holiday weekend.  He did admit he was repelled by the word ‘vinegar’ in the cake’s name but he got past it when a glorious sweet smelling fruit cake emerged from the oven.  My photos probably make it appear over-crumbly because I cut it when it was still slightly warm; normally I bake the day before I cut but couldn’t this time.


Fruit cake has its haters and I can understand that if dried fruit’s not your thing then this is probably not your dream cake, but for me it’s a perfect concoction of cake and fruit, both of which I love.  I also like its unfussy nature – no icings or buttercreams, no fancy preparation and no fancy equipment needed.  It’s the sort of recipe our ancestors would’ve enjoyed and I take comfort in that.  A fruit cake is like a big hug from the past.


It also keeps well.  The only thing better than cake is more cake.  There is nothing as pleasing as having a cake in the tin you can cut from every day until it’s gone and it keeps getting better!  Did I mention it’s a big cake? And egg free, so people with egg allergies can enjoy it too.  Hurray!


Ingredients

450g plain flour
225g unsalted butter
225g golden caster sugar
225g raisins
225g sultanas
275ml milk
2 tablespoons cider vinegar
1 teaspoon bicarbonate of soda

Method

Preheat the oven to 180°C/fan oven 160°C/ 350°F/ gas mark 4.

Line a 23cm round springform tin with baking paper.

Place the flour in a bowl and rub in the butter until you have a mix that resembles breadcrumbs.  You can do this in the food processor if you have dexterity issues.

Stir in the sugar, raisins and sultanas.

Measure out the milk then remove one tablespoon of it into a small bowl.

Add the cider vinegar to the larger amount of milk.

Stir the bicarbonate of soda into the tablespoon of milk and ensure it is fully dissolved.

Add to the milk and vinegar mix.  Nothing much will happen initially but then a gentle frothing will occur and the liquid will puff up  - so make sure you’re using a jug that can accommodate some growth!

Add the milk mix to the dry ingredients and stir only enough to combine; don’t over mix.  At first you will think there isn’t enough liquid, but there is and you will end up with a lovely soft cake mix.

Spoon into the prepared tin and level the surface.

Bake for 30 minutes before reducing the oven temperature to 150°C/fan oven 130°C/ 300°F/ gas mark 2.

Bake for a further hour or until a skewer inserted into the cake comes out clean.  Check the cake after 40 minutes anyway, and if it’s browning too quickly cover loosely with foil for the rest of the cooking time.

Leave to cool in the tin on a wire rack for 30 minutes, or until it is cool enough to safely handle.

De-tin and leave to cool completely.

Bask in the glory of the wonderful thing you have made.


Eat.