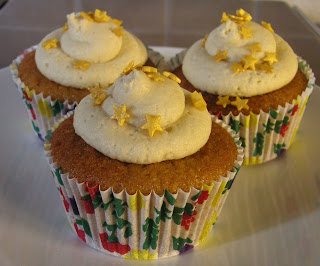
I wish I could take the credit for this lovely photo but, alas, I cannot. This was taken by the CCBF (Caked Crusader’s Boyfriend) who many of you will know as our ace Iron Cupcake London photographer. He was experimenting for the upcoming Christmas challenge (for details click here) and my little cupcake benefitted!
This recipe has been lingering on my “to bake” list for a while. I’ve read mixed reviews of it on the blogosphere but finally got round to having a go this weekend.
The recipe is from Nigella and there is only one aspect of her recipe I disagree with; she says that when you have burnt your butter it will solidify pretty quickly. I did not find this to be the case. I made the cupcakes and the buttercream separately and for the latter, I burnt the butter the night before and then made the buttercream the following morning – this seemed the right amount of time as the butter was solid but still soft.
By burning the butter (you don’t really burn it – just let it darken a little) you are making – in effect – clarified butter. This gave the cupcake an incredibly light, soft, spongy texture quite unlike an ordinary sponge. I loved it. Here are the cakes fresh from the oven:
The buttercream uses burnt butter and golden icing sugar which combine to give a light caramelly-butterscotch flavour. It’s sweet but not too sweet. Golden icing sugar is a horror to find in the shops but luckily I had the CCM and CCD (Caked Crusader’s Ma and Da) on the case and they tracked it down for me in Waitrose.
I include this photo to show you the importance of sieving the burnt butter before cooling...you don’t want this in your cupcakes:
Just a final thought: the chances are if you’re reading this, you are a baker of some sort. We all have cupboards full of gadgets, tins, decorating aids etc and I find that sometimes I’ll buy something knowing, in my heart of hearts, that I’m never going to use it. Other times I’ll buy something and anticipate using it all the time. Often I am wrong. The nicest outcome is buying something you expect never really to use and then find that it becomes a ‘go to’ item. I’d like to nominate this as my example:
It’s a stand for holding your icing bag whilst you fill it i.e. leaves you with both hands free. It only has this use – no other, yet I cannot ever imagine icing a cake and not using it. I bought it on a whim thinking it was a solution to a problem I didn’t really have and have bonded with it big time.
Confession corner: What items do you have that either disappointed in how little you use them or have amazed you in how important to you they have become?
Ingredients
For the cupcakes:
150g unsalted butter
60g golden caster sugar
65g light muscovado sugar
1 teaspoon vanilla extract
2 eggs
125g self raising flour
1 teaspoon baking powder
2-3 tablespoons milk
For the buttercream:
150g unsalted butter
250-300g golden icing sugar (I found I only needed 250g)
1 teaspoon vanilla extract
2-3 tablespoons milk
Method
- Preheat the oven to 200°C/fan oven 180°C/400°F/Gas mark 6.
- Line a 12 hole cupcake pan with paper cases.
- Start by making the cupcakes: place the butter in a saucepan and melt over a medium heat, stirring all the time. You will notice the butter turning darker – the darker you let it turn the stronger the smoky, nutty element of the flavour. I let mine turn to a darker buttery colour – not as dark as amber.
- Remove the butter from the heat and sieve into a bowl. Let the butter solidify but remain soft. In my flat this took several hours – plan ahead. I must admit for the cupcakes I used the butter while it was still runny and it didn’t seem to have any bad effect.
- You have two options making the cupcakes – you can either place all the ingredients except for the milk into a food processor and blitz, then add the milk gradually until you have a nice dropping consistency, or use the old fashioned method like me:
- Beat together the butter, sugars and vanilla until light and fluffy. Don’t skimp on this stage as this is when you get lots of lovely air into your sponge.
- Beat in the eggs gradually, add some of the flour if it looks like it might curdle.
- Stir in the flour and baking powder until the mixture is smooth and well combined.
- Beat in the milk.
- Spoon into the paper cases and bake for 15-20 minutes or until a skewer inserted into the centre of the sponge comes out clean. Mine took 15 minutes.
- Leave to cool in the tins for about 5 minutes before turning out and leaving to cool completely on a wire rack.
- I advise making the cupcake sponges a day in advance and store in an airtight tin. They seemed to settle down a bit and have a nicer flavour on the second day.
- Make the buttercream as close to serving as you can as it develops a slight sugary crust on standing. Not at all unpleasant but I want you to be aware of it so you can decide for yourself!
- Burn the butter, just like before. When it’s solidified beat together with about half the icing sugar until you get a thick, rather solid paste.
- Beat in the milk and enough of the remaining icing sugar to make a nice, soft and spreadable buttercream.
- Either spread or pipe over the sponges and decorate as desired. I used little golden sugar stars.
- Bask in the glory of the wonderful thing you have made.
- Eat.


