Sunday, 30 June 2013

Cherry almond sponge cake


I do love a good sponge; it has always been a weakness of mine.  This week I decided to keep it really simple – a lovely sponge with thick white icing.  Given it’s turned out to be the hottest weekend of the year so far, it was a good choice – definitely not the time to be making delicate buttercreams!


I toyed with calling this a bakewell sponge, but it is more bakewell influenced in that it borrows the idea of almond, cherry and icing.  There is something about adding almond to a sponge that elevates it to a higher level of delight – particularly the day after baking when all the nutty richness has been released.


I have finally realised – embarrassingly late, perhaps – how much better hot water is than cold when making a white icing/glaze.  Not sure why, but my thought would be that the hot water (I used boiled, straight from the kettle) melts the sugar on impact giving a smoother finish, and then sets quicker.  Am I imagining it, or do you agree?


This recipe is similar (but not identical) to a previous bakewell sandwich cake that I made.  In that recipe I made the cake in two sandwich tins and used jam and icing.


Ingredients

For the cake:
265g unsalted butter, at room temperature
265g caster sugar
4 eggs
265 self raising flour
½ teaspoon baking powder
35g ground almonds
1 teaspoon almond extract
5 tablespoons soured cream

For the icing:
200g icing sugar
2-3 tablespoons hot water, or enough to make a thick, but pourable, icing

To decorate: glace cherries


Method

Preheat the oven to 180°C/fan oven 160°C/350°F/gas mark 4.

Line a 20cm square pan with baking paper.  If you prefer, you could use a 30cm x 20cm traybake tin but you will get a ‘flatter’ sponge.

Beat together the butter and sugar until pale, light and whippy.  It should look almost like whipped cream.

Beat in the eggs one at a time.  If the mixture looks like it might curdle beat in some of the flour.

Stir in the flour, baking powder, ground almonds, soured cream and almond extract.

Spoon into the prepared tin and level the surface.

Bake for approximately 45 minutes or until a skewer inserted into the cake comes out cleanly.  Start checking the cake for ‘done-ness’ after 40 minutes.  NB, if you are using the shallower traybake tin only bake for approximately 30 minutes before checking.

Leave to cool for 10 minutes in the tin; the cake will settle a little.

Remove from the tin and leave to cool completely on a wire rack.

Now make the icing: beat together the icing sugar and water until you have a thick but pourable glaze.  Always add the water gradually – it’s easy to add more, but harder to correct a too runny consistency.

Pour the glaze over the cake and leave to set.

Before fully set decorate the top of the cake with glace cherries.  I chose to leave them whole so they stood proud from the icing.

Bask in the glory of the wonderful thing you have created.


Eat.

Saturday, 22 June 2013

Nutella friands/financiers


I was very pleased to be offered a copy of Nutella: The 30 best recipes (published by Jacqui Small) to feature on my site, and even more pleased to be able to offer all readers the chance to buy the book at a special price which is cheaper than amazon (see below).  The book is shaped like a jar of Nutella - as if it needed making any more appealing, given the subject matter!


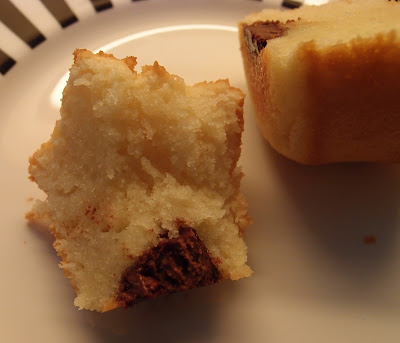
The recipe which caught my eye was the financier recipes.  As I didn’t have a financier tin (I know!  I was as surprised as you!) I decided to deploy my seldom used friand tins.  These must be much deeper than a financier as the recipe said it would make 18, whereas I only got 6 friands!


Soft light-but-close-textured almond sponge with a generous pocket of Nutella is never going to be a tough sell; the Nutella sank but it did in the photo in the book too so I didn’t feel bad about it.  The smell of them baking alone was enough to draw Mr CC to the kitchen like a Bisto kid!


Given the almond content, friands are always better the day after baking.  It takes time for the almond oils to seep out.  But it is pretty tough leaving them to find this out!


Cute-but-at-the-same-time-aggravating thing I learned during writing this post?  Word autocorrects friands to friends.  Nutella friends...now there’s a concept!


Special offer (cheaper than Amazon!) available to all readers of my blog:

To order Nutella: The 30 Best Recipes (published by Jacqui Small) at the discounted price of £7.00 including p&p*, telephone 01903 828503 and quote offer code JS232. Or send a cheque made payable to: Littlehampton Book Services Mail Order Department, Littlehampton Book Services, PO Box 4264, Worthing, West Sussex BN13 3TG. Please quote the offer code JS232 and include your name and address details. 
*UK ONLY - Please add £2.50 if ordering from overseas.


Ingredients

70g unsalted butter
50g plain flour
130g icing sugar
70g ground almonds
4 egg whites
50g (approx) nutella


Method

Preheat the oven to 200°C/fan oven 180°C/400°F/gas mark 6.

Grease financier pans, friand pans, or muffin pans.  The recipe stated it will make 18 (fairly shallow) financiers but I made full depth friands and only got 6!

Melt the butter over a gentle heat and put to one side to cool.

In a large bowl mix together the flour, icing sugar and almonds.

Beat the egg whites, one at a time, into the dry mix.

Gradually beat in the melted butter.  The mix will be very runny.

Pour the mix into the prepared moulds.  Half fill each hole.

Add approximately ½ heaped teaspoon of Nutella to each cake.

Bake for approximately 12 minutes (for shallow financiers) or longer for deeper cakes; my friands took 22 minutes.  They’re ready when a skewer inserted into the cake comes out clean.

Leave to cool in the tin for 15 minutes as they are very soft and fragile straight from the oven.  They will sink a little as they cool so don’t panic.

Turn out onto a wire rack and leave to cool completely.

Bask in the glory of the wonderful thing you have created.


Eat.

Wednesday, 19 June 2013

Ginger oat biscuits


I suspect I am not alone but the amount of companies contacting me wishing to provide products or items to review on my site has rocketed lately.  While I am pleased as it means my blog is on a lot of companies’ radars, it does create a dilemma as to what to accept and what to politely decline.


I don’t carry any advertising and that is a conscious decision as I want to retain complete control as to what appears on my site.  However, when you review a product you are automatically promoting it - it's the reason I decline far more products than I accept.  I’ve decided not to overthink things (how convenient!) – if it’s a brand I love I will feature it; if it isn’t I won’t.  Therefore when Opies contacted me I was delighted to accept.  I adore Opies products and love that they are still a family business.


I use Opies stem ginger as my ‘go to’ ginger for baking, but also use their pickled walnuts in savoury cooking.  One of Mr CC and mine’s favourite dinners is steak topped with sticky onions slow cooked with pickled walnuts and the vinegar from the jar, with a dash of mustard and chilli.  It takes sweet and sour to a new level of awesomeness!


These ginger oat biscuits aren’t going to win any beauty contests but they have great inner beauty.  The texture is best described as crunchy flapjack with little pockets of heat from the ginger.  Crispy on the outside, chewy in the centre they are a seriously tasty addition to a cup of tea.  If you can bear the wait, they taste even better on subsequent days.


They didn’t spread quite how I expected them to – I never seem to make biscuits that spread; I always have to press down on them to flatten them!


Ingredients

240g unsalted butter
1 tablespoon golden syrup
240g plain flour
120g caster sugar
240g porridge oats
½ teaspoon bicarbonate of soda
3 balls stem ginger, finely chopped


Method

Preheat the oven to 200°C/fan oven 180°C/400°F/gas mark 6.

Line three baking sheets with baking paper or non stick foil.

Place the butter and golden syrup into a small saucepan and melt over a gentle heat.

Leave to cool slightly.

Place all the remaining ingredients into a large mixing bowl and stir together.

While still stirring, pour in the melted butter and syrup.

The mix will clump but not form a ball of dough.  It will be of the texture that if you squeeze it, it will hold its shape.

Take small amounts and roll into balls – about the size of a cherry tomato.  I used scant tablespoons of mix and got 26 biscuits.

Place on the baking sheets with space to spread – I put 12 per baking sheet.

Flatten with your fingers.

Bake for approximately 12 minutes or until golden and firm.

Leave to cool on the baking sheet for 15 minutes before transferring to a wire rack.

Bask in the glory of the wonderful thing you have created.


Eat.

Sunday, 16 June 2013

Apple and spice loaf cake


Today is Father’s Day, and therefore I tried to choose a cake that the CCD (Caked Crusader’s Da) would favour.  He likes the more old-fashioned fruit cake style of baking but I didn’t want to make a dark and heavy fruit cake as I think of those as Christmas specialities.


This recipe uses plenty of dried fruits but is lightened by the addition of apple and almond.  It’s lovely plain but I prefer it with a generous layer of butter spread over it; that touch of saltiness brings out all the flavours.  The gentle spicing makes it moreish and comforting.


I’m not sure you’d know there was grated apple in the loaf but it did provide a softer and lighter texture than other tea loaf cakes I have tried in the past.  The quickest way to make a cake look professional?  Jam glaze:


I definitely need to make more loaf cakes – they have to be the easiest cakes to cut; none of this ‘have I found the centre of the cake’ faffing and producing huge slices on one side of the cake and tiny ones on the other!


Happy Father’s Day CCD!


Ingredients

175g unsalted butter, at room temperature
175g light muscovado sugar, plus an extra tablespoon
1 teaspoon lemon juice
1 dessert apple – I used a Pink Lady
3 eggs
1 teaspoon vanilla extract
200g mixed dried fruits – I used raisins and sultanas
85g ground almonds
1 teaspoon baking powder
175g plain flour
1 teaspoon ground cinnamon
½ teaspoon freshly grated nutmeg
optional: 1 tablespoon apricot jam

To serve: butter


Method

Preheat the oven to 180°C/fan oven 160°C/350°F/gas mark 4.

Line a 900g (2lb) loaf tin with baking paper.

Beat together the butter and sugar until pale and light.  I left my stand mixer to do this while I prepared the apple.

Place some cold water in a bowl and add the lemon juice (this is purely to stop the apple browning).

Peel the apple and cut into quarters.

Remove the core and slice two of the quarters thinly, placing in the lemon water.

Place the remaining two quarters into the water.

Beat the eggs, one at a time, into the butter mix.

Beat in the vanilla.

Remove the two quarters of apple from the bowl and stand them on kitchen paper to soak up the water.

Add the dried fruits and almonds to the batter and stir in.

Grate the two quarters of apple into the batter.  I did it directly over the mixing bowl so I didn’t lose any of the juice on the work top.

Stir thoroughly.

Add the baking powder, flour, cinnamon and nutmeg and fold in.

Spoon into the prepared baking tin and level the surface.

Place the apple slices across the top of the loaf.

Sprinkle over the extra tablespoon of sugar.

Bake for 45 minutes then reduce the oven temperature to 140°C/fan oven 120°C/275°F/gas mark 1.

Cover the cake with foil and bake for a further 45 minutes or until a skewer inserted into the cake comes out clean.  (NB. If at the end of the cooking time the cake batter is still uncooked, increase the temperature back to the original 180°C/fan oven 160°C/350°F/gas mark 4, remove the foil and give it a further 10 minutes – I had to do this).

Leave to cool in the tin on a wire rack.

If you wish to give the cake a shiny top, heat the apricot jam until it is runny.

Brush it over the top of the cake and leave to set.

Serve in generous slices either plain or with butter.

Bask in the glory of the wonderful thing you have created.


Eat.

Sunday, 9 June 2013

Individual marble bundt cakes with ganache glaze


I watch an awful lot of cookery shows on television.  A frightening amount.  At risk of sounding grouchy and non-trendy (oh, the very thought!) I am getting increasingly fed up with British television’s (and my finger is pointing mostly at you, BBC) mania for blurry shots where perhaps just one item might be in focus, swooping shots that make you feel ill and focussing the camera on the presenter’s face so they can smile at us when we’d rather be watching what’s happening in the saucepan or bowl.   Don’t even get me started on the deafening background music, the fake little tableaux of ‘friends’ arriving for supper or travelling around town on a scooter.  It’s a cookery show – show us cooking!  Is it just me?  Am I the only one who longs for a return to the school ma’am-ish presentation of Delia Smith?  Am I so uncool and out of touch??? (NB.  I also have a spin-off rant about cookbooks with more photos of the cook/chef than the actual recipes.)


Anyway, what I’m building to is saying how much more ‘instructional’ I find North American cookery shows.  My current favourite is Anna Olson whose shows are perfect little master classes in baking.  No blurry shots, no flirting and coyness, no catering for gatherings.  Just common sense and good clear instructions.  Bravo!


It is from ‘Bake with Anna Olson’ shown on the Food Network that this recipe comes.  I think I’ve only used my Wilton individual bundt pan once before so this looked a good opportunity to dig it out!


I converted the recipe from the original cups (there is a link for the original recipe below) but please note that I added two tablespoons of milk to the chocolate batter as it was so thick it was like a truffle filling and I worried it might bake a bit hard.  I used my own ganache recipe, and I also added some cream cheese frosting on a whim...as you do!  I’m glad I added the frosting as the cakes might have been a little heavy going without it.


I didn’t wait long enough for my ganache to cool so had to do a double-dip.  I like how the chocolate layers came to rest at different levels; very pretty:


If you would prefer the original recipe in its original cup measurements it can be found here


Ingredients

For the cakes:
85g dark chocolate
115g unsalted butter, at room temperature
200g caster sugar
2 eggs
160ml sour cream
2 teaspoons vanilla extract
190g plain flour
1 teaspoon baking powder
½ teaspoon salt
2 teaspoons cocoa powder, sifted
1-2 tablespoons milk, if needed

For the ganache glaze:
70ml whipping cream
1 tablespoon caster sugar
65g dark chocolate

For the cream cheese frosting:
50g unsalted butter, at room temperature
150g cream cheese – I used Philadelphia
50g icing sugar
1 teaspoon vanilla extract

If you would prefer the original recipe in its original cup measurements it can be found here.


Method

Preheat the oven to 180°C/fan oven 160°C/350°F/gas mark 4.

Take a 12 hole mini bundt pan and spray with cake release or grease with butter and then dust with flour.

Break the chocolate into chunks and place either in a bowl sitting over a pan of simmering water (but not touching it) to melt, or in a covered bowl in the microwave giving it 30 second bursts until melted.  Leave to cool.

In a large bowl beat together the butter and sugar until light.

Beat in the eggs one at a time, followed by the sour cream and vanilla.

Add the flour, baking powder and salt and beat until combined.

Spoon about 1/3 of the batter into a separate bowl – I did this by eye, because there’s no need for it to be exact.

Into this 1/3 of batter, stir in the melted chocolate and the cocoa powder.  At this point, I found the chocolate batter a little dry so stirred in some milk to slacken it.  It will be firmed than the vanilla batter, so don’t panic.

Spoon a heaped tablespoon of vanilla batter into each bundt hole – I used a knife to make it into 2 blobs which I dropped on opposite sides of the bundt.

Take a level tablespoon of chocolate batter and, again, drop in two separate blobs in the pan, filling the gaps left by the vanilla.

If there’s any batter left of either colour add it to any bundt holes that look like they have some spare capacity.  You can fill the moulds almost to the top as they don’t rise greatly.

Use a skewer or toothpick to swirl the two colours of batter together.

Bake for approximately 20 minutes or until a skewer inserted into the cakes comes out clean.  Mine took exactly 20 minutes.

Leave to cool in the moulds for 30 minutes before turning out and leaving to cool completely on a wire rack.

If your cakes are uneven you can trim a layer off the bottom to ‘smarten’ them up.  I rather liked leaving them as they were as I like how the edges went crispy.

When the cakes are cool you can make the ganache: Place the cream and sugar in a saucepan and bring to almost boiling point.

Remove from the heat and add the chocolate.

Leave it to stand for a minute before stirring and bringing the chocolate and cream together.  At first it will look runny but keep stirring and it will become thick and glossy.

Leave to cool for five minutes or the glaze might be too runny to hold on the cakes.  I learned this to my cost and had to dip them all again once the ganache had cooled down more.

Dip the top of the cakes into the glaze and then put them back on the cooling tray to set.  The glaze will cover the top of the cake but the sides should remain clean so you can see the sponge....of course, the odd drip or spill is not going to offend anyone!

When the glaze has set you can make the frosting: beat the butter in a bowl until smooth and soft.

Add all the other ingredients and beat together until smooth and light.

Pipe or spoon into the well in the centre of each bundt cake.

If you will be serving the cakes more than four hours after completing them, put them in the refrigerator where they will keep for up to 2 days. (Remove from the fridge at least 1 hour before serving)

Bask in the glory of the wonderful thing you have made.


Eat.

Sunday, 2 June 2013

Tea-infused prune cake with honey buttercream


Prunes seem a divisive fruit, possibly because of bad childhood memories of bowls of stewed fruit so favoured by elderly relatives.  Perhaps I was an odd child (and adult) as I have always loved them.  I love their sticky sweetness and dark glossy looks.  With the dark sugar in this recipe, the prunes actually taste a lot like dates.  The CCD (Caked Crusader's Da) thought it was a sticky toffee cake...and I know what he meant;  only the spice suggests otherwise.


When I told Mr CC I was making a tea-infused prune cake this weekend his expression suggested I was joking and would I please tell him what I was really planning on making?  When he realised I wasn’t joking his expression changed to horror.  This occasionally happens re my choice of cake and invariably, a couple of days later Mr CC will try said cake (often at work, as he takes any leftovers in for his colleagues) and report ‘I tried a bit of [insert cake here] and do you know it was actually quite nice.’ This is always said in a tone that implies he finds this the most surprising thing in the history of the universe!


It seems odd adding teabags to a cake...remember to remove them before baking!  NB. I have two teabags in this photo as I doubled the quantities and made two cakes - the recipe below stating one bag is correct.


Perhaps I’m easily entertained but I always enjoy watching the bubbles created when I add bicarb to something:


This is a cake that smells great whilst baking – it’s fruity and the dark sugar gives off toffee aromas.  The cake settles on cooling but this isn’t an issue as it’s a big domed loaf when you take it out the oven.  The settling just makes it normal sized!


The recipe originally had a coffee buttercream and I didn’t see the point in pairing a tea-infused cake with such a flavour.  I changed it to a honey buttercream and thought the combination worked really well.


Ingredients

For the cake:
225g prunes – de-stoned and chopped
250ml water
1 teabag – use whichever tea you prefer, I used English breakfast
½ teaspoon bicarbonate of soda
85g unsalted butter, at room temperature
175g dark brown sugar
2 eggs
175g self raising flour
50g walnuts – very finely chopped
1 teaspoon mixed spice

For the buttercream:
110g unsalted butter, at room temperature
3 tablespoons honey
250g icing sugar


Method

Preheat the oven to 180°C/ fan oven 160°C/350°F/gas mark 4.

Line a 900g (2lb) loaf tin with baking paper.

Place the prunes and water into a saucepan (choose one a little larger than you think you need as the mix will bubble up when you add the bicarbonate of soda) and bring to the boil over a medium heat.

Remove from the heat and add the teabag.  Stir the mix so the teabag is buried under prunes.

Leave to infuse for five minutes.

Remove the teabag and stir in the bicarbonate of soda.  It will bubble up considerably.

Put to one side.

Now make the cake batter: beat together the butter and sugar until creamy.  It won’t become whippy or really light because of the ratios involved and the fact that it’s dark brown sugar rather than caster.

Beat in the eggs one at a time, adding a little of the flour if it looks like it might curdle.

Fold in the flour, walnuts and mixed spice.  You will have a very thick batter at this point – don’t worry!

Stir in the prunes (the liquid as well) and make sure that you mix it well, using a spatula to bring the thick batter up from the bottom of the bowl.

Pour (I used a ladle for greater control) the batter into the prepared tin.  The mix will be liquid enough to level itself.

Bake for approximately 40-50 minutes or until a skewer inserted into the cake comes out clean.  Don’t worry if it takes a little longer.

Leave to cool for 20 minutes in the tin, before removing from the tin and leaving to cool completely on a wire rack.

When the cake is cold you can make the buttercream: beat the butter and honey together until smooth and soft.

Add the icing sugar and beat – on a low speed at first – until the buttercream is smooth and has no hint of grittiness to it.  Grittiness is a sign that you haven’t beaten the buttercream enough to dissolve the sugar.

Pipe or spread the buttercream over the cake.

Serve in thick slices with a mug of tea.

Bask in the glory of the wonderful thing you have created.


Eat.