Sunday, 22 November 2015

Jam steamed sponge pudding


Today is my birthday but, as I’ve been really busy the last few days (lunches, cocktails, even the opera daaaaaaahling), I find myself in the position of having precisely zero birthday cakes. I know!!! I will rectify this shameful situation when I have time (an interesting ginger concoction has caught my eye) but for now all I really fancied was a steamed sponge pudding.


Whenever I post a steamed sponge I get requests for a step by step in pictures.  My method is considered old fashioned now, in that I place a steamer above a pan of simmering water; the modern method seems to be to place an upturned bowl or saucer in the bottom of the pan containing the water to elevate the pudding.  This is not the way I do it but, if you’re interested, the BBC Goodfood website has two tutorials:


I have metal pudding bowls with clip on lids.  I bought them from Amazon almost 10 years ago and find them so much less faff than glass pyrex dishes where you have to make a pleated lid out of baking paper and foil, and then tie it up with string making a handle at the same time.  I have never been dextrous with knots.  The second tutorial link above covers the paper and string method. (NB.  Amazon don’t seem to stock them anymore but they do have a different range of lidded pudding basins if you search the site)


Compared to making a sponge mix, spooning it into a cake tin and baking in the oven for 30 minutes or so steaming could look like a lot of time and effort but please, please, please give it a try.  Firstly, it’s no more time to prep the pudding for steaming than it is a cake for the oven, and while the cooking time is a lot longer you don’t really need to do anything during that time.  Nothing that comes out of the oven will ever match a steamed sponge in terms of lightness.  It’s like eating spongey air.


I grease my pudding bowl and place the jam in the bottom:


Spoon in the batter:


Clip on the lid.  Place in the steamer, over a pan of simmering water:


Leave for 1.5 – 2 hours.  It’s not precise like a baking time and the pudding won’t suffer for being left to steam longer than actually needed to cook it so don’t feel pressured by the cooking time or guess when it’s ready.  I always give it two hours.


Turn out and enjoy!


NB. Do not adjust your monitor – I did serve rather large portions.  In my defence it was my birthday and freezing cold; I feel either of these facts alone would excuse me but - together - form a rock solid argument.  A pudding this size will serve 6 people easily....just because I cut it into quarters doesn’t mean you have to!


Ingredients

4 tablespoons jam – whichever flavour you prefer
115g unsalted butter, at room temperature
115g caster sugar
2 eggs
115g self raising flour
1-2 tablespoons milk

To serve: custard


Method

Place a large saucepan on the hob and fill 3/4s with water – test that the steamer basket will not touch the water.  Bring the water to a gentle simmer while you are making the pudding.

Grease, with butter, an 850ml pudding bowl (either metal, ceramic or heatproof glass).  If it has a lid, grease that too.

Spoon the jam into the bottom of the pudding bowl.

Now make the sponge: beat together the butter and sugar until light and whippy.

Beat in the eggs one at a time.

Stir in the flour.

Beat in enough milk to ensure a light dropping consistency.

Spoon into the pudding bowl and level the surface.

Clip on the lid or, if your bowl doesn’t have a lid, cover the bowl with a piece of baking paper and a piece of foil, pleated across the middle to allow for expansion.  If you are using the paper/foil option tie string around the bowl to keep it in place and then loop the string over the top to make a handle, which will help you lift the pudding out of the steamer.

Place the steamer basket over the pan of simmering water.

Place the pudding bowl in the steamer basket and place the lid on top to ensure the pudding is enclosed in it’s own personal sauna!

Leave to steam for anywhere between 1.5-2 hours; I always leave it for two hours.

The water level may need topping up after the first hour – it depends on the size of the saucepan.  Simply boil a kettle of water and then lift the steamer basket off of the pan, top up the water lever, and replace the steamer basket – this will not hurt your pudding at all.

Run a knife around the edge of the pudding and turn out onto a plate.

Serve with custard.

Wrap any left over pudding in foil and enjoy the next day – it reheats like a dream in either the oven or the microwave.

Bask in the glory of the wonderful thing you have created.

Eat.


Sunday, 15 November 2015

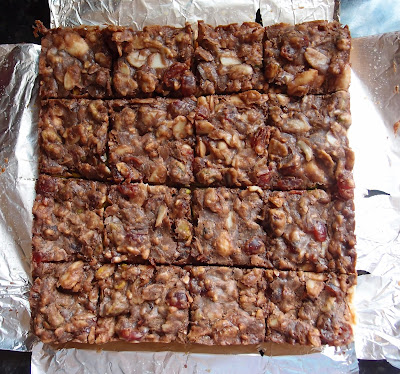
Florentine biscuit bars


This recipe is adapted from the one in the BBC Good Food 25th birthday edition.  As soon as I saw the combination of florentines and shortbread I was sold!  I always associate florentines with Christmas as that’s the only time of year we ever used to have them; I don’t know whether they have any particular association with Christmas but, growing up, I remember they always used to form part of M&S’s confection/biscuit range.  M&S used to make a mixed box i.e. milk, dark and white chocolate.  Tactically I would always eat the milk first as I was the only one in my family to like white chocolate so I didn’t have to rush with those!


This is a good recipe to use up all the odds and ends of nuts a baker always seems to have in their cupboard; I buy a bag of nuts for a particular recipe and then don’t use them all.  I seem to have endless bags with about 20-30g of nuts left in them – this is where they get to step into the spotlight!


The cherries and pistachios look so pretty in amongst the nuts and chocolate.  You could make it look extremely festive by using red and green cherries…although I try not to think too hard about what they do to turn those poor cherries such a vivid green.  Some questions are best left unanswered.


Ingredients
For the base:
200g unsalted butter, at room temperature
100g golden caster sugar
200g plain flour
100g ground rice flour


For the topping:
25g unsalted butter
75g golden caster sugar
1 tablespoon plain flour
75ml double cream
50g flaked almonds
25g whole blanched almonds
75g chopped nuts of your choice – I used a mix of pistachios and chopped hazelnuts
75g glace cherries, halved
100g chocolate chips


Method
Line a 20cm square tin with baking papermaking sure the paper comes up high enough that you can use it to lift the finished bake up out of the tin.

Use a food processor to blitz together the butter and sugar.

Add the flour and rice flour and pulse until it starts to come together – don’t overwork it or your biscuit will be tough rather than crumbly.

Press into the base of the tin taking care to distribute the mix evenly.

Prick all over with a fork, cover with clingfilm and refrigerate for at least 30 minutes (or up to 2 days).

Preheat the oven to 180°C/fan oven 160°C/350°F/gas mark 4.

Bake the biscuit base for 25 minutes.

While the base is cooking start work on the topping: place the butter, sugar and flour in a pan large enough to take all the other topping ingredients and gently melt together stirring all the time.

When all the sugar crystals have dissolved add the cream and stir until smooth.

Stir in all the nuts and cherries.

Stir in the chocolate chips.   If you prefer, you can omit the chocolate chips and instead melt the chocolate and drizzle over the baked bars.

Spoon the hot nut mixture over the just-baked base and ensure it is well spread out.  Be gentle – a spatula or the back of a spoon works well.

Return to the oven and bake until the top is firm but retains a little squidge; this will take anywhere between 10-20 minutes but it can catch quickly so check every 5 minutes.

Leave to cool, in the tin, on a wire rack.

Cut into fingers.

If you didn’t add chocolate chips, decorate by melting 100g chocolate by your preferred method i.e. microwave or hob, and drizzle over the cold bake. (I like to do this after I’ve cut the fingers as then the chocolate isn’t disturbed with cutting)

Bask in the glory of the wonderful thing you have created.


Eat.

Sunday, 8 November 2015

Oat and pear traybake with pecan crumble topping


I’m such a clichĂ© but the first whiff of winter and I’m cracking open the spice jars like nobody’s business!  I found the recipe for the oat sponge and crumble topping on a recipe sharing website and decided that it needed an extra element.  Oats, spice and pecans led me to the very easy decision to add some pear to the mix.  Pear is one of my absolute favourite fruits to bake with.


The pear is fruity and juicy and stops the sponge being too dry or heavy.  The nutty crumble topping adds texture and richness; the dark sugar seeps into the cak almost like a sauce.  I served the cake at room temperature with a cup of tea but it would work so well warm with ice cream or custard.  You could even bake it in individual pudding moulds for a fancy dessert (but reduce the cooking time accordingly).


Adding fruit to a batter always increases the wetness during baking so it’s worth draining the tinned fruit and patting it dry with kitchen paper.  I think that without the addition of the fruit the sponge may have been a bit dry; the juice was absorbed by the oats making an almost fragrant sponge – imagine an oaty bread pudding and you’re pretty close.  Have I mentioned how much I love baking with pears?


I suspect it won’t be an issue, but the cake keeps really well for several days.  The pear keeps the cake soft, and the nuts in the crumble topping improve with age (unlike the baker!).


I took a photo of a slice and went for my obligatory ‘fork shot’.  Then I went for another...and another....and it ended up like this:


NB.  The crumbs were left on the plate for artistic purposes and were polished off the moment I put the camera down!  Waste not, want not etc.......


Ingredients

For the cake:
100g porridge oats
330ml boiling water
115g unsalted butter, at room temperature
220g dark brown soft sugar
2 eggs
2 teaspoons vanilla extract
1 teaspoon cinnamon
1 teaspoon baking powder
½ teaspoon bicarbonate of soda
215g plain flour
1 tin diced pears – the tin was 410g with a drained weight of 225g

For the crumble:
100g dark brown soft sugar
10g plain flour
½ teaspoon cinnamon
½ teaspoon grated nutmeg
40g unsalted butter – cold
100g pecan nuts – roughly chopped


Method

Preheat the oven to 190C/ fan oven 170C/ 375F/ gas mark 5.

Grease a 30cm x 20cm traybake tin.

Cover the oats with the boiling water and put to one side.

Now make the crumble topping: Mix together the sugar, flour, cinnamon and nutmeg.

Rub in the butter until you have lumpy crumbs.
Stir in the chopped pecans.

Place in the fridge until needed; a cold crumble is always easier to scatter over the top as your hands won’t melt the butter as much.

Now return to making the cake: Beat the butter and sugar until soft and well combined – it will never go fluffy and whippy when you’re using dark sugar.

Beat in the eggs, vanilla and cinnamon.

Fold in the baking powder, bicarbonate of soda and plain flower.

If there is any, drain any unabsorbed liquid away from the oats and fold them into the mix.

Spoon the batter into the prepared tin. 

Drain the pears and pat them dry with some kitchen paper.

Scatter the diced pears over the batter and gently press down into the batter.

Sprinkle the chilled crumble over the top of the batter.

Bake for approximately 30-40 minutes or until a skewer inserted into the cake comes out clean.

Leave to cool in the tin before de-tinning and storing in an airtight container.

Bask in the glory of the wonderful thing you have created.

Eat.


Sunday, 1 November 2015

Chocolate orange carrot cake


I’ve never baked (or indeed seen, or eaten) a chocolate carrot cake before.  It seemed the perfect cake given the increasingly autumnal feel in the air – soft sponge with chocolate and spice; it would be a good Bonfire Night cake too.  Funny how we associate flavours with seasons/events.


Being a carrot cake this is a very light sponge.  The brown sugar adds a caramel sweetness which always works well with spice.  The cocoa adds a chocolately depth.  The sultanas are entirely optional but, in my world, always make everything better so I added some!  I ‘ummed and aaaaahed’ over whether to make this as a single sponge or to make as a sandwich style cake.  In truth, I think it would work as either, but I was in the mood for a little cream cheese frosting so whipped up an orange one to compliment the zest in the cake.


I like it when bakes evolve like this, with a series of little decisions being made along the way to create the finished item.  This was a very popular cake and something a little bit different which, 8 years into my blog, feels increasingly difficult to achieve!


The flavours of this cake work well together but all remain identifiable because they hit your palate at different times.  The initial hit is the chocolate sweetness; this is cleaned away by the sharp cream cheese frosting and you are left with a fruit orange spice flavour.  It comes in three distinct waves.  Once I spotted this I took my time over each mouthful (unlike me) and ticked the stages of flavour off each time...this is how I entertain myself!


Mr CC was very sceptical about this cake initially.  When I said to him I was making a chocolate orange carrot cake he gave me a look which I can only describe as a ‘what you talking bout Willis?’ look (a reference that you will need to be a certain age to get!) but, when he tasted it, he really liked it!


Ingredients

For the sponge:
280g soft light brown sugar
200g self raising flour
80g cocoa powder
½ teaspoon bicarbonate of soda
1 teaspoon mixed spice
1 teaspoon ground cinnamon
Optional: 50g sultanas
zest of 1 orange (save the rest of the orange for the buttercream)
4 eggs
200ml sunflower oil – or any flavourless oil, I used light olive oil suitable for baking
100ml milk
200g carrots, grated – this equates to approx 3 medium carrots

For the buttercream:
350g cream cheese – I used Philadelphia
50g unsalted butter, at room temperature
160g icing sugar
1 -2 tablespoons orange juice

To decorate: chocolate sprinkles


Method

Preheat the oven to 180C/fan oven 160C/350F/gas mark 4.

Line two 20cm loose bottomed round sandwich tins with baking paper.

Place all the dry ingredients in a bowl and mix together e.g. light brown sugar, self raising flour, cocoa, bicarb, mixed spice, cinnamon and – if using - sultanas.

Place all the wet ingredients in a large jug e.g. orange zest, eggs, oil, milk and carrots and beat together.

Pour the wet ingredients into the dry and mix together.

Divide equally between the cake pans.

Bake for approximately 40 minutes (start checking after 30 minutes) or until a skewer inserted into the cake comes out clean.

Leave to cool in the tins, on a wire rack, for about 30 minutes before turning out and leaving to cool completely.

Now make the filling: Beat the cream cheese and butter until soft, light and whippy.

Add the icing sugar and beat well.

Add the orange juice – start with just one tablespoon – and beat until you have a light, spreadable buttercream.  Add more orange juice if required.

Place one sponge on the serving plate and spread about 1/3 of the buttercream over the top.

Place the remaining sponge on top.

Cover the top and sides with the frosting.

Cover the top with chocolate sprinkles.

Refrigerate until about 20 minutes before serving.

Serve in generous slices with a cup of tea.

Bask in the glory of the wonderful thing you have created.


Eat.