Sunday, 24 April 2011

Famous Faces’ Favourite Fancies – Fruit cake and marzipan


Chances are if you’ve ever been at home during the week and turned on the television, you will have come across the legend David Dickinson hosting either Bargain Hunt or, more recently, Dickinson’s Real Deals. What this man doesn’t know about antiques simply isn’t worth knowing but it’s his flamboyant style and eccentric turns of phrase that have made him such a well-loved TV personality. Items aren’t a bargain they’re “cheap as chips” and female contestants are always called ‘girls’ regardless of their age.


I knew that any cake selected by ‘The Duke’ would be a right bobby dazzler and he didn’t disappoint. He sent a very lovely reply to my query re his favourite cake written with a proper ink pen in artistic and flowing handwriting – it really made my day receiving it!


David selected a Christmas cake. He reminisces about his grandmother making the fruit cake a couple of months before Christmas, then later making the marzipan. I love the way he describes licking out the bowl as “heaven” – a sentiment I can totally understand! This was the cake that stood out in his memory but he adds that having an ‘old fashioned’ gran, he was never short of wonderful cake. Yet again, it highlights to me that cake is so cemented in our psyches probably as much for the people we connect it to as the actual cake.


To set about making The Duke’s request I used my Christmas fruit cake recipe and a new marzipan recipe to make a Simnel cake. Simnel cake is a traditional Easter cake comprising of fruit cake with a marzipan topping. The marzipan balls on top symbolise the apostles (minus Judas). I’m not really one for religious symbolism so jazzed the design up with some chicks. Incidentally, when the CCD (Caked Crusader’s Da) saw the cake he asked why it had pickled onions on it!


The recipe for the cake can be found here.


Now anyone who read my recent Battenberg cake post will know that I sometimes struggle with marzipan. Not any more! I came across this easy-peasy recipe and, what do you know? It produces awesome marzipan in a matter of minutes, and it’s all made in one bowl – no heating eggs in bowls balanced on saucepans. The only small issue to point out is that it contains raw egg, so anyone slightly vulnerable with health issues shouldn’t eat it. The recipe is set out below.

My other Easter bakes were :


Easter biscuits (recipe can be found HERE) – they’re so tasty I have to make them every year!


Strawberry, blackberry and raspberry cheesecake (recipe can be found HERE) – no reason other than it’s delicious!


Ingredients

For the marzipan:

230g ground almonds
115g icing sugar
115g caster sugar
2 teaspoons almond extract
2 eggs, separated

Method

Place the almonds and both sugars into a bowl and stir until combined. I did this in my Kitchenaid mixer.

Add the egg yolks and almond extract and mix until well combined.

Add a spoonful of the egg white and beat, continue to add tablespoonfuls of egg white until the marzipan forms into a firm ball.

Roll the marzipan out between two sheets of clingfilm – this means you don’t have to add any more icing sugar to it, plus peel off only one sheet of clingfilm when you wish to position on the cake – you have far more control over it while the clingfilm supports it (obviously put it face down on the cake i.e. so the clingfilm is on top!)

Peel off the clingfilm.

Cut the marzipan to size.

For this cake I rolled out about half of the marzipan to cover the top of the cake and used the rest for the balls.

Bask in the glory of the wonderful thing you have made.

Eat.

Sunday, 17 April 2011

History corner – Golden crunch cake


This history corner is the ‘youngest’ book I’ve featured – it’s “A Spoonful of Sugar” issued by the British Sugar Bureau in 1973. Two very good things happened for the world of cake in 1973; firstly, this booklet was published and, secondly I was born! Now you see why I opened with how this is the most recent book I’ve featured in history corner......


This cake is a simple sponge with a coconut meringue topping baked onto it. It’s far less complex to make than you might think because both the cake and topping bake at the same time. I was sceptical as to how well this would work but I shouldn’t have worried – it’s a doddle, a very delicious doddle!


The booklet features a surprising number of savoury recipes and, while we all know that a spoonful of sugar can help regulate the acidity of tomatoes and bring out the flavour of carrots I’m not sure I want to add sugar to dishes such as devilled prawns with egg mousse...even I think that’s taking things too far!


Sugar has many uses beyond eating; I think the British Sugar Bureau was just (some might suggest cynically) trying to get people to use as much sugar as possible so I can’t vouch for any of the following “Sugar Hints” printed inside the cover:

  • A cube of sugar in your biscuit tin will help keep biscuits fresh and crisp

  • A cube of sugar is just the answer if you’ve run out of candles for a birthday cake. Drain a small can of apricot halves and arrange them around the cake, putting the cut side uppermost. Soak some sugar lumps in lemon essence, put one on each apricot and light with a match [I love the notion that you’re so disorganised you’ve run out of candles, yet will have tinned apricots, sugar cubes and lemon essence in your cupboard! They might as well have suggested that you use albatross feathers!]

  • A spoonful of sugar added to the water in a vase of flowers will make them stay fresh longer

  • Three of four cubes [they really increased the “hard sell” with this one!] of sugar put in a suitcase will prevent damp odours when storing

  • A spoonful of sugar in water used for washing a linoleum floor will give it an extra shine [and no doubt attract all the neighbourhood ants and wasps!]


The quantities looked a bit mean so I’ve doubled them; the doubled amount is what’s set out below. I also made two tweaks to the recipe; firstly I added coconut extract to the sponge (but vanilla or almond would work just as well) and secondly, I dotted some jam on top of the batter to add an almost bakewell vibe to it. Feel free to leave both out if you want to be a purist about it (but, when I make the cake again, I will definitely repeat both those modifications). It didn’t need much jam:


The cake sunk a little in the middle during cooling but the topping didn’t. I wonder if that was caused by my adding jam to it – whatever the reason it had no effect at all on flavour.


This cake is awesome! It’s the sort of cake that, however much of it you eat, you want just a tiny slice more. The topping is crunchy and coconutty and the cake is soft and spongy – the extra egg yolks make it wonderfully golden in colour and give it an almost custard-like flavour. I think it’s one of the best cakes I’ve eaten in a long while as it packs so much flavour and texture into such a simple recipe.


I finish how I began: 1973 was a very, very good year for cake!


Ingredients

For the cake:
170g unsalted butter, at room temperature
170g caster sugar
2 eggs
2 egg yolks (keep the whites for the topping)
230g self raising flour
2 tablespoons milk (either whole or semi skimmed)
Optional: 1 teaspoon of coconut, vanilla or almond extract

Optional: 2-3 teaspoons raspberry jam

For the topping (which bakes at the same time as the cake):
2 egg whites
115g desiccated coconut
115g Demerara sugar

Method

Preheat the oven to 160°C/fan oven 140°C/325°F/Gas mark 3.

Line a 20cm round springform tin with baking paper.

Beat the butter and sugar together until they are pale, light and fluffy. Don’t skimp on this stage as it’s where you get all the air into your sponge.

Beat in the two eggs and two egg yolks along with one tablespoon of the flour.

Fold in the remaining flour and milk and – if using – coconut extract.

Spoon the mixture into the prepared tin and level the surface.

If using, dot the jam over the surface of the batter.

Now make the topping: whisk the egg whites until they are stiff and then fold in the coconut and sugar.

Spread on top of the cake batter.

Bake for approximately 30 minutes or until a skewer inserted into the cake comes out clean. I found this far too short a time and mine actually took 55 minutes – although, thinking about it, I did double the quantities so it actually makes sense!

Leave to cool, in the tin, on a wire rack until the tin is cool enough to remove safely.

Leave the cake to cool completely on a wire rack.

Serve in thick slices – no accompaniment is needed.

Bask in the glory of the wonderful thing you have created.

Eat.

Friday, 15 April 2011

Meet Me at the Cupcake Café by Jenny Colgan

If you are looking for a warm and witty novel with lots of cake in it then look no further than Jenny Colgan’s latest masterpiece, “Meet Me at the Cupcake Café” . I have snaffled my photo from Amazon where you can purchase the novel for a bargain price of only £4.49.


Why am I so proud of this book? Well, if you read the acknowledgements you will notice a certain Caked Crusader is mentioned…and if you can resist starting reading the novel straight away and turn to the back, you will notice a guide to baking your first cupcakes…written by yours truly.

I was thrilled to be asked to contribute to this book and hope it leaps to the top of the bestsellers chart. Why wouldn’t it? Romance, humour and cake – sounds like a winning formula to me!

Sunday, 10 April 2011

Rhubarb and date cake


The CCD’s (Caked Crusader’s Da) rhubarb plant has sprung into action just at the same time I came across this recipe. Nature really knows what it’s doing!


I’ve never seen rhubarb and dates partnered up before but it makes sense because the sweet, toffee quality of the dates act as a perfect natural sweetener for the acidic, fruity rhubarb. It works beautifully – both the rhubarb and dates keep their flavour but they hit your palate at different times. I just can’t believe I’ve not seen the combination before.


The rhubarb and dates are cut into small chunks and stirred into the batter. Mr CC was in charge of this and did a lovely job – he’s very careful in his chopping with the result being uniformly sized chunks. He did protest that the food processor could do it better but when he realised that argument wasn’t going to get him anywhere, he manned up and got chopping!


Garden rhubarb is not as sweet a forced rhubarb (the gloriously pink thin sticks that look like flamingo legs!) so I added a sugar topping to the cake to address this. I used this gorgeous sugar from The East India Company – it’s a cane sugar from the island of Guadeloupe and I loved the delicate sweetness and crunchy texture; the large granules were perfect for a cake topping. It’s not cheap but the glass jar it comes in is sealed with an old fashioned wax seal – undoing the jar made me feel like I was unpacking an exotic relic from the past!


When I first read the recipe I was concerned that the cake may be dry – don’t worry about this; rhubarb releases so much juice as it cooks that the one thing this cake will never be is dry or stodgy! The texture of the cake is a spongy, light bread pudding – it’s very moist, almost sticky but not dense.


I served the cake at room temperature with thick cream, but it would be divine warm with custard for dessert.


We’re enjoying amazingly sunny and bright spring weather at the moment; the temperature this weekend has been warmer than Istanbul. I love it when weather forecasters share this information – the location they pick is always so utterly random and obviously chosen simply because it’s colder than us. Anyway, wherever we’re warmer than at the moment, I do like a cake dappled in sunshine – it makes for such a cheery photo!

Ingredients

340g plain flour
1 teaspoon baking powder
170g unsalted butter, straight from the fridge
230g caster sugar
450g rhubarb, chopped into small cubes
230g stoned dates, chopped into small pieces
2 eggs
120ml milk (either whole or semi skimmed)

Optional: extra sugar to sprinkle on top

Method

Preheat the oven to 190°C/fan oven 170°C/375°F/Gas mark 5.

Line a 23cm round springform tin with baking paper.

Place the flour and baking powder into a bowl.

Cut the butter into cubes and rub it into the flour using your fingertips until you have a mixture that resembles breadcrumbs. You can also achieve the same result using a stand mixer or food processor.

Stir in the sugar.

Stir the chopped rhubarb and dates into the mixture.

Combine the eggs and milk in a jug and beat a little; stir into the cake mix until well combined.

Spoon the batter into the prepared cake tin and level the surface.

If using, sprinkle 2-3 tablespoons of sugar on the top of the cake.

Bake for approximately 1 - 1½ hours or until a skewer inserted into the cake comes out clean – best check on it after an hour. Mine took 1 hour 15 minutes.

Leave to cool on a wire rack until the tin is cool enough to safely handle.

Remove the cake from the tin and leave to cool completely on the wire rack.

Serve in generous slices with thick cream.

Bask in the glory of the wonderful thing you have created.

Eat.

Sunday, 3 April 2011

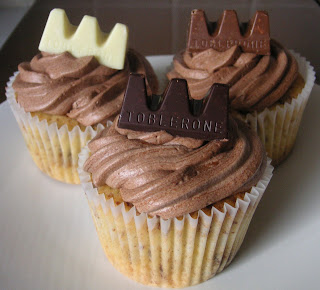
Toblerone cupcakes – a Mothers’ Day special


How better to spoil your mother on Mothers’ Day than with chocolate and cake all rolled into one? I have long thought that the flavours of Toblerone would lend themselves to a rather special cupcake, and this recipe is my attempt to prove it! The CCM (Caked Crusader’s Ma) is a fan of the triangular delight and subtly commented last week, “I really love cupcakes,”…a hint if ever I heard one!


I wanted to balance the chocolate and almond rather than make something that was dominated by chocolate. That’s why I stuck with my plain cupcake sponge mix adding almond extract and chopped up Toblerone to it. This is what Toblerone looks like when it’s been put through the food processor:


The chocolate kick came from a lusciously rich Ganache topping – if you chill it you can whip it up as you would a buttercream and pipe it. It tastes divine and has the texture of chocolate velvet! One word of warning, and it’s a tough lesson learned by me this morning – if you’re making a double batch of these cakes, the sponge doubles up no problem but make the Ganache as two individual batches because the doubled up amount just wouldn’t whip up to a thick enough consistency whatever I tried. When I started again and made it in two batches, it was fine. It wasn’t a lesson I would have chosen to learn on the morning of Mothers’ Day but hey ho...lessons learned like that aren’t quickly forgotten!


Tiny Toblerones completed the homage to chocolate and almond and proved to be just about the most popular cupcake topper I’ve used!


I’ve always loved Toblerone; growing up there was always a large bar amongst my Christmas presents (the CCM’s doing, of course!) but nowadays I associate it more with heading home. I used to travel a lot for work and you could always rely on spotting a bar of Toblerone in the duty free shop – just one sighting of the triangular bar meant you were homeward bound! Plus, what’s not to love about something that’s so crisply cornered that you can play Tetris with it when stacking it in your cupboard?


The cupcake sponge was delicious and worked so well with the Toblerone inside, acting as chocolate chips. We all agreed that we would happily eat the sponge without any topping:


Happy Mothers’ Day CCM, and all the other mothers out there, not least the CCMIL (Caked Crusader’s Mother in Law)!


Footnote:
If I know you like I think I do, several of you will be lusting after the mini cake stand designed for one cupcake! I bought it in Lakeland and it costs £9.99 - you can find it on line here


Ingredients

For the cupcake sponge:
125g unsalted butter, at room temperature
125g caster sugar
2 eggs
½ teaspoon almond extract
125g self raising flour
2 tablespoons milk
100g Toblerone, chopped into small chunks – I used the original Toblerone and pulsed it in the food processor

For the chocolate Ganache (this is probably enough for 24 cupcakes, or 12 with some left over if you’re greedy...like me) :
300ml whipping cream
1 tablespoon liquid glucose
200g plain chocolate, roughly chopped (I actually used ½ dark, ½ milk chocolate)

To decorate: triangles of Toblerone or, if you can find them, tiny Toblerone

Method

Preheat the oven to 190°C/fan oven 170°C/375°F/Gas mark 5.

Line a cupcake pan with paper cases.

Beat together the butter and sugar until light and fluffy. Don’t skimp on this stage as you want to get lots of air into the mixture. Stop beating when the butter and sugar looks almost like thick whipped cream.

Beat in the eggs, almond extract, flour and milk.

Stir in the chopped Toblerone.

When the mixture is well combined, spoon into the paper cases.

Bake for 12-15 minutes or until a skewer inserted into the cupcakes comes out clean. Mine took 15 minutes.

Leave to cool on a wire rack and remove from the tin when cool enough to handle.

To make the chocolate Ganache: Bring the cream to the boil in a saucepan.

Remove from the heat and stir in the liquid glucose.

Place the chocolate in the cream and stir until the chocolate melts.

Leave to cool and then place in the fridge for 20 minutes or so before whisking to lighten the texture. How long this takes will depend on how much you have cooled the ganache mix – so don’t panic if it doesn’t seem like it will whisk, either keep going, or chill some more and try again in 15 minutes!

If it isn’t firm enough to pipe, refrigerate for 30 mins and try again. Don’t let it sit for too long in the fridge or it will harden.

Pipe or spread over the chocolate cupcakes.

Decorate with tiny Toblerone or individual triangles of Toblerone.

Bask in the glory of the wonderful thing you have created.

Eat.

Baked & Delicious Magazine giveaway - Winner!

Thank you for all your entries for my "Baked & Delicious" Magazine giveaway.

All comments were entered into the lucky dip and the winner is...drum roll please....Lisa, with this comment:

Lisa said...

A wonderful moist, light coffee and walnut cake with a creamy butter cream filling and topping, with big plump walnuts to decorate the top. Photographed with a slice being removed on a shiny silver cake slice. Can you tell I have thought about this? It is my very favourite cake and I always use your light recipe. Readers of the magazine would not believe how easy it is to make with such lovely results. Mmmm.