Sunday, 29 November 2009

Burnt butter brown sugar cupcakes


I wish I could take the credit for this lovely photo but, alas, I cannot. This was taken by the CCBF (Caked Crusader’s Boyfriend) who many of you will know as our ace Iron Cupcake London photographer. He was experimenting for the upcoming Christmas challenge (for details click here) and my little cupcake benefitted!

This recipe has been lingering on my “to bake” list for a while. I’ve read mixed reviews of it on the blogosphere but finally got round to having a go this weekend.

The recipe is from Nigella and there is only one aspect of her recipe I disagree with; she says that when you have burnt your butter it will solidify pretty quickly. I did not find this to be the case. I made the cupcakes and the buttercream separately and for the latter, I burnt the butter the night before and then made the buttercream the following morning – this seemed the right amount of time as the butter was solid but still soft.

By burning the butter (you don’t really burn it – just let it darken a little) you are making – in effect – clarified butter. This gave the cupcake an incredibly light, soft, spongy texture quite unlike an ordinary sponge. I loved it. Here are the cakes fresh from the oven:

The buttercream uses burnt butter and golden icing sugar which combine to give a light caramelly-butterscotch flavour. It’s sweet but not too sweet. Golden icing sugar is a horror to find in the shops but luckily I had the CCM and CCD (Caked Crusader’s Ma and Da) on the case and they tracked it down for me in Waitrose.

I include this photo to show you the importance of sieving the burnt butter before cooling...you don’t want this in your cupcakes:

Just a final thought: the chances are if you’re reading this, you are a baker of some sort. We all have cupboards full of gadgets, tins, decorating aids etc and I find that sometimes I’ll buy something knowing, in my heart of hearts, that I’m never going to use it. Other times I’ll buy something and anticipate using it all the time. Often I am wrong. The nicest outcome is buying something you expect never really to use and then find that it becomes a ‘go to’ item. I’d like to nominate this as my example:

It’s a stand for holding your icing bag whilst you fill it i.e. leaves you with both hands free. It only has this use – no other, yet I cannot ever imagine icing a cake and not using it. I bought it on a whim thinking it was a solution to a problem I didn’t really have and have bonded with it big time.

Confession corner: What items do you have that either disappointed in how little you use them or have amazed you in how important to you they have become?

Ingredients
For the cupcakes:
150g unsalted butter
60g golden caster sugar
65g light muscovado sugar
1 teaspoon vanilla extract
2 eggs
125g self raising flour
1 teaspoon baking powder
2-3 tablespoons milk

For the buttercream:
150g unsalted butter
250-300g golden icing sugar (I found I only needed 250g)
1 teaspoon vanilla extract
2-3 tablespoons milk

Method

- Preheat the oven to 200°C/fan oven 180°C/400°F/Gas mark 6.

- Line a 12 hole cupcake pan with paper cases.

- Start by making the cupcakes: place the butter in a saucepan and melt over a medium heat, stirring all the time. You will notice the butter turning darker – the darker you let it turn the stronger the smoky, nutty element of the flavour. I let mine turn to a darker buttery colour – not as dark as amber.

- Remove the butter from the heat and sieve into a bowl. Let the butter solidify but remain soft. In my flat this took several hours – plan ahead. I must admit for the cupcakes I used the butter while it was still runny and it didn’t seem to have any bad effect.

- You have two options making the cupcakes – you can either place all the ingredients except for the milk into a food processor and blitz, then add the milk gradually until you have a nice dropping consistency, or use the old fashioned method like me:

- Beat together the butter, sugars and vanilla until light and fluffy. Don’t skimp on this stage as this is when you get lots of lovely air into your sponge.

- Beat in the eggs gradually, add some of the flour if it looks like it might curdle.

- Stir in the flour and baking powder until the mixture is smooth and well combined.

- Beat in the milk.

- Spoon into the paper cases and bake for 15-20 minutes or until a skewer inserted into the centre of the sponge comes out clean. Mine took 15 minutes.

- Leave to cool in the tins for about 5 minutes before turning out and leaving to cool completely on a wire rack.

- I advise making the cupcake sponges a day in advance and store in an airtight tin. They seemed to settle down a bit and have a nicer flavour on the second day.

- Make the buttercream as close to serving as you can as it develops a slight sugary crust on standing. Not at all unpleasant but I want you to be aware of it so you can decide for yourself!

- Burn the butter, just like before. When it’s solidified beat together with about half the icing sugar until you get a thick, rather solid paste.

- Beat in the milk and enough of the remaining icing sugar to make a nice, soft and spreadable buttercream.

- Either spread or pipe over the sponges and decorate as desired. I used little golden sugar stars.

- Bask in the glory of the wonderful thing you have made.

- Eat.


Sunday, 22 November 2009

One Victoria sponge recipe...two ways...for two birthdays!


Today is my birthday (I know, I know – I don’t look a day older!) and in the coming week it is the CCBFM’s (Caked Crusader’s Boyfriend’s Mother – are you keeping up with this?) birthday. We both like sponge but whereas I like it with bells and whistles the CCBFM is a purist.

So here, for your delectation, are two birthday cakes both made using the same Victoria sponge recipe set out below. I’ve embellished mine with a coconut and raspberry swiss meringue buttercream and coconut covered marshmallows but the CCBFM’s is sandwiched only with jam. You pays your money and takes your pick.

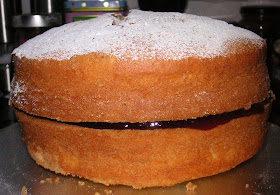
Here is the CCBFM’s cake (purist):

Here is mine (bells and whistles):

One thing I would like to point out – this is the first time I’ve made a two-flavour buttercream i.e. raspberry and coconut. It worked REALLY well!

This is a nice generous sponge recipe – no thin layers here, just lovely deep golden sponge.

Happy birthday CCBFM, and happy birthday me!

Ingredients
For the cake:
250g unsalted butter, at room temperature
220g caster sugar
1 teaspoon vanilla extract
4 eggs
80ml milk
300g self raising flour

To sandwich the sponge:
110g raspberry jam (I used seedless; this amount is a guideline – use what you think looks right)

Swiss meringue buttercream (optional):

4 egg whites

250g caster sugar

250g unsalted butter, at room temperature

1 teaspoon coconut extract
1 tablespoon raspberry jam (seedless)
Optional: dash of red colouring

Method

- Preheat the oven to 180°C/fan oven 160°C/350°F/Gas mark 4.

- Line the bases of two 20cm loose bottomed sandwich tins with baking paper.

- Start by making the cakes: Beat together the butter, sugar and vanilla until light and fluffy. Don’t skimp on this stage as this is when you get lots of lovely air into your sponge.

- Beat in the eggs gradually, add some of the flour if it looks like it might curdle.

- Beat in the milk.

- Stir in the flour until the mixture is smooth and well combined.

- Spoon into the prepared tins and level the surface.

- Bake for approximately 30 minutes or until a skewer inserted into the centre of the sponge comes out clean. Another good sign is if the sponge is just pulling away from the edge of the tin.

- Leave to cool in the tins for about 20 minutes before turning out and leaving to cool completely on a wire rack.

- You can make the sponges a day in advance and store in an airtight tin.

If you’re using it, now make the swiss meringue buttercream: Place the egg whites and sugar in a bowl over a pan of simmering water. Stir pretty much constantly to prevent the egg from cooking.

- After 5-10 minutes, when the sugar has dissolved (when you cannot see any crystals on the back of the spoon), remove the bowl from the pan of simmering water and whisk until the meringue has puffed up and the mix is cool.

- Add the butter and coconut extract to the meringue and whisk until the butter has been completely incorporated into the meringue. At first it will look a disaster – it will collapse and look curdled but don’t worry! Stop when the mixture is smooth, light and fluffy.

- Beat in the jam and colouring, if using.

- Take one of the sponges and cover with the jam. If you are using the buttercream also spread some of this over the jam before placing the other sponge on top.

- If you are making the simple version dust the top with icing sugar and you’re done! Otherwise cover the cake with the rest of the buttercream and decorate as you wish.

- Bask in the glory of the wonderful thing you have made.

- Eat.


Afternoon tea birthday treat


I think the CCBF (Caked Crusader’s Boyfriend) knows me pretty well and knows that anything involving oodles of cake will make me happy. He booked afternoon tea, for my birthday, at the very posh Browns Hotel in Mayfair instantly earning lots of Brownie points – who wouldn’t want to go for a lovely tea...especially at the winner of the Tea Guild’s “Best Afternoon tea 2009” title?

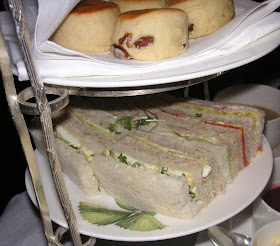
The cake stand had yummy little finger sandwiches on the bottom tier, warm scones (the jam and cream came in little china bowls) on the middle tier, and a selection of divine little pastries and sweet meats on the top:

We managed two platefuls of sarnies and scones but could only manage one plate of the pastries!

The mini scones were delicious and still warm so that the jam oozed over them:

The pastries had a lot of finesse to them; here’s a rundown. Some of the pictures aren't great, it was a gloomy day and I was torn between taking great photos and eating great cakes...you can probably tell which option won!

Apple cream filled macaron – quite exquisite; the apple cream was so fruity and tangy.

Lemon curd mousse sponge with meringue topping – the CCBF tackled this one and seemed to enjoy it a lot!

Pistachio sponge filled with a light chocolate cream – it was made in a mini bundt mould and the sponge was so rich and moist.

Chestnut cream tart – very pretty. All the creams were whipped and light as air. Didn’t get a great photo of this one, you can just see it poking out from behind the pistachio sponge:

Chocolate mousse with pear – this one had the CCBF’s name all over it (not literally, that would’ve been weird) as he adores any chocolate desserts. It came in a tiny glass but he said it was exceedingly rich. Yes, that's his spoon plunging into it!

We finished the lovely day off with cocktails at the Skylon bar, part of the Royal Festival Hall complex on the South Bank – here’s my favourite, a Prunelle:

Thank you CCBF for a wonderful day!


Tuesday, 17 November 2009

Iron Cupcake London Challenge VII - Christmas

The Caked Crusader would like to announce the December challenge with festive cheer and goodwill to all

Newsflash just in....Father Christmas will be attending to give presents to bakers who have been good...remember, he'll know if you've been naughty......

Second newsflash just in....Father Christmas will be awarding a special prize to the baker of his favourite cupcake. That means that there are three awesome prizes up for grabs on the night - winner, runner up, Father Christmas's choice.....

Requirements: Make a minimum of 12 cupcakes that interpret the theme of Christmas in any way you wish – if you can make more please do…the more you make, the more people can taste your delicious creation (and vote for you!)Please feel free to enter as many types of cupcake as you wish, I only ask that you have at least 12 of each.

On the night everyone will have a say in declaring the winner, who walks away with the ICL Winner’s rosette plus a cupcake themed goody bag (presented in the much-coveted ICL bag!).As our bakers are special people their votes count three times more than the eaters’ votes plus bakers go FREE! That’s right, only eaters pay the £5 entry fee.

Please let me know if you plan to enter the competition so we can gauge numbers – thanks.

Event details: Monday 7th December 2009

6.00pm – 9.00pm

Venue – The Cuban Bar, Citypoint, One Ropemaker Street, EC2Y 9AY

For a map click here

Although the address is Ropemaker Street it’s actually on the Citypoint plaza. Just behind the Moorgate tube station entrance that’s in the row of shops including HMV, Hotel Chocolat, Eat and Clinton Cards, you’ll see a very tall building. That’s the Citypoint Tower. Head towards it and you’ll see a paved plaza-type area. Near the base of the tower you will see a small newsagent kiosk and a Costa, to the left of these (if looking at the tower) are The Rack & Tenter, then Prets. Head towards Prets into a covered walkway at the base of City point. This is where the Cuban bar is. We’ll be in the basement.

Entry fee for eaters: £5 (Entry fee includes tea or coffee). Bakers enter for FREE!

Timetable of events:

6.00-6.45pm – Entries are labelled and plated up
6.45 onwards – Eating and voting commences

Incidentally, The Caked Crusader and, consequently, ICL are now on Facebook and Twitter. Why not befriend Samantha Cake on Facebook – it’s me!!!! And then become a fan of the Caked Crusader page. We will be using this to post news of upcoming events, have discussions, in fact anything fun involving cake. To make it even easier here’s a link. On Twitter you can find me as CakedCrusader. So there’s no excuse not to stay in touch.

As the event expands it has become necessary for us to set out some disclaimers relating to the event namely that, as we are hosts of the event and don’t actually oversee any of the baking, we take people at their word as to the ingredients of the cupcakes and the environment in which they are prepared. It is unlikely that any entries are prepared in nut-free kitchens and anyone with allergies or intolerances should bear that in mind. Similarly, if an entrant tells us that an entry is vegan-friendly we believe them – feel free to chat to them on the night before sampling if you have any concerns. Your entry fee entitles you to free tea and coffee. Of course you can also sample all the cupcakes, for which we accept no liability.

Sunday, 15 November 2009

Pear and almond upside down cake


This was meant to be a plum and almond upside down cake but my supermarket let me down and didn’t have any tinned plums....yes, I’m naming and shaming you, Tesco! So I improvised with these beautiful Cape pears.


I made two of these cakes and had a piece of one at room temperature (delicious – spongy and sticky and fruit) and then one warmed a little and served with hot custard (also delicious). The CCB (Caked Crusader’s Brother) commented that the sponge was so light it had the taste of a steamed sponge pudding.


One tip if you make this; line both the inside and outside of the tin with non-stick foil. When the cake cooks the caramel becomes rather runny and will leak out over your oven given the opportunity. I say this from bitter experience – I only lined the outside of the tin – and spent some frantic time sponging thick caramel off the oven floor and shelves. It’s worth it though – look at the sticky pear:

Another tip would be to use more fruit than I did. I used 240g of pears (drained weight) and would double this next time.

Use any fruit you wish, I’m sure it would work. Ok, maybe not olives or tomatoes but I’m sure you understand what I’m saying. I think peaches, cherries, plums (boo to Tesco), apples, pineapple, bananas - I could go on – would all work well

Ingredients
For the caramel:

50g unsalted butter, at room temperature
110g soft brown sugar

For the cake:
480g drained fruit of your choice – I used Cape pears
125g unsalted butter, at room temperature
275g caster sugar
1 teaspoon vanilla extract
3 eggs
110g self raising flour
110g plain flour
180ml milk
120g ground almonds

To serve:
Thick cream or custard

Method

- Preheat the oven to 180°C/fan oven 160°C/350°F/Gas mark 4.

- Wrap a 20cm loose bottomed square tin with non-stick foil – inside and out. Take your time to ensure that there are no gaps through which the molten caramel can seep.

- Start by making the caramel: place the butter and sugar in a saucepan and stir over a low heat until the sugar has melted and you have a smooth rich caramel.

- Pour into the base of the cake tin.

- Arrange your fruit in the caramel taking care not to burn your fingers. Put to one side.

- Now make the cake: Beat together the butter, sugar and vanilla until light and fluffy.

- Beat in the eggs one at a time.

- Stir in both the flours and the milk in two batches i.e. half the flour, half the milk, half the flour, half the milk.

- Stir in the ground almonds.

- Spoon the batter over the fruit taking care not to disturb it.

- Level the mixture in the tin and bake for approximately 50 minutes or until a skewer inserted into the centre of the cake comes out clean.

- Leave to cool on a wire rack for 15 minutes, then turn the cake out (invert it i.e. so it cools how you will serve it with the fruit on top). It is very important to do this while the cake is still hot otherwise the caramel will set making it difficult to get out of the tin.

- Serve either warm with custard or at room temperature with thick cream.

- Bask in the glory of the wonderful thing you have made.

- Eat.


Sunday, 8 November 2009

Greek yoghurt cake


I fancied something plain this week i.e. no buttercream or fillings. Inspired by the entries for the Iron Cupcake London Spice challenge I decided to jazz up a plain yoghurt cake with some cinnamon.

You can make this cake plain i.e. leave out everything in the recipe I label as “optional”. However, I think it does need something adding to it flavourwise – it could be any spice of your choice, vanilla, alcohol etc. The crunchy cinnamon topping worked really well and gave a nice extra texture. I think it would also be nice with flaked almonds scattered on top.

This is definitely a ‘cut and come again’ cake; one slice is not enough...well, unless you cut it reaaaalllly big!

The addition of yoghurt to the cake gives a nice close textured sponge which manages to be firm and dense but not heavy.

Two photos I came across this week that have made me laugh. I hope they cheer you up too on this bleak, wintry evening!

funny pictures of cats with captions
see more Lolcats and funny pictures

This one's entitled "couldn't possibly another muffin"

Fails Dogs: Couldn't Possibly Another Muffin
more Fail Dogs

Ingredients
125g unsalted butter, at room temperature
220g caster sugar
3 eggs, separated
300g self raising flour
½ teaspoon bicarbonate of soda
1 teaspoon cinnamon (optional)
40g ground almonds
280g Greek yoghurt (any plain yoghurt of your choice will do)

Optional topping:
½ teaspoon cinnamon
1 teaspoon caster sugar

Method

- Preheat the oven to 180°C/fan oven 160°C/350°F/Gas mark 4.

- Grease and line a 30cm x 20cm traybake tin with baking paper. You can also use a 20cm round springform tin to achieve a deeper cake but this will probably need longer cooking time.

- Beat together the butter and sugar until light and fluffy.

- Beat in the egg yolks.

- Stir in the sifted flour and bicarbonate of soda and, if using, the cinnamon. The batter will appear turgid and feel heavy at this point.

- Stir in the almonds and yoghurt.

- In a separate bowl whisk the egg whites until they form soft peaks.

- Fold the egg whites into the yoghurt batter.

- Spread into the prepared tin and level the surface.

- If using the optional topping mix together the cinnamon and sugar and sprinkle over the surface of the cake.

- Bake for approximately 35 minutes or until a skewer inserted into the cake comes out clean. If you’re using the round tin it will take longer as the tin is deeper.

- Leave to cool on a wire rack and remove from the tin when cool enough to handle.

- Serve either on its own or with spooning cream

- Bask in the glory of the wonderful thing you have made.

- Eat.