Sunday, 31 March 2013

Easter cheesecake


I know Easter time is associated with many flavours in baking – spices, almonds, dried fruit etc as illustrated by Mr CC’s fine hot cross buns...but let’s be honest, the dominant flavour for most of us at this time of year is chocolate.


The cheesecake recipe comes from the latest in the series of “30 best loved recipes” books, which features Bahlsen Choco Leibniz biscuits.  It intrigued me because the cheesecake topping is so simple: just cream cheese, sugar and chocolate.  Normally with non-bake cheesecakes there’s some cream in there too.  The absence of cream made this a rich, dense almost truffle-y cheesecake.


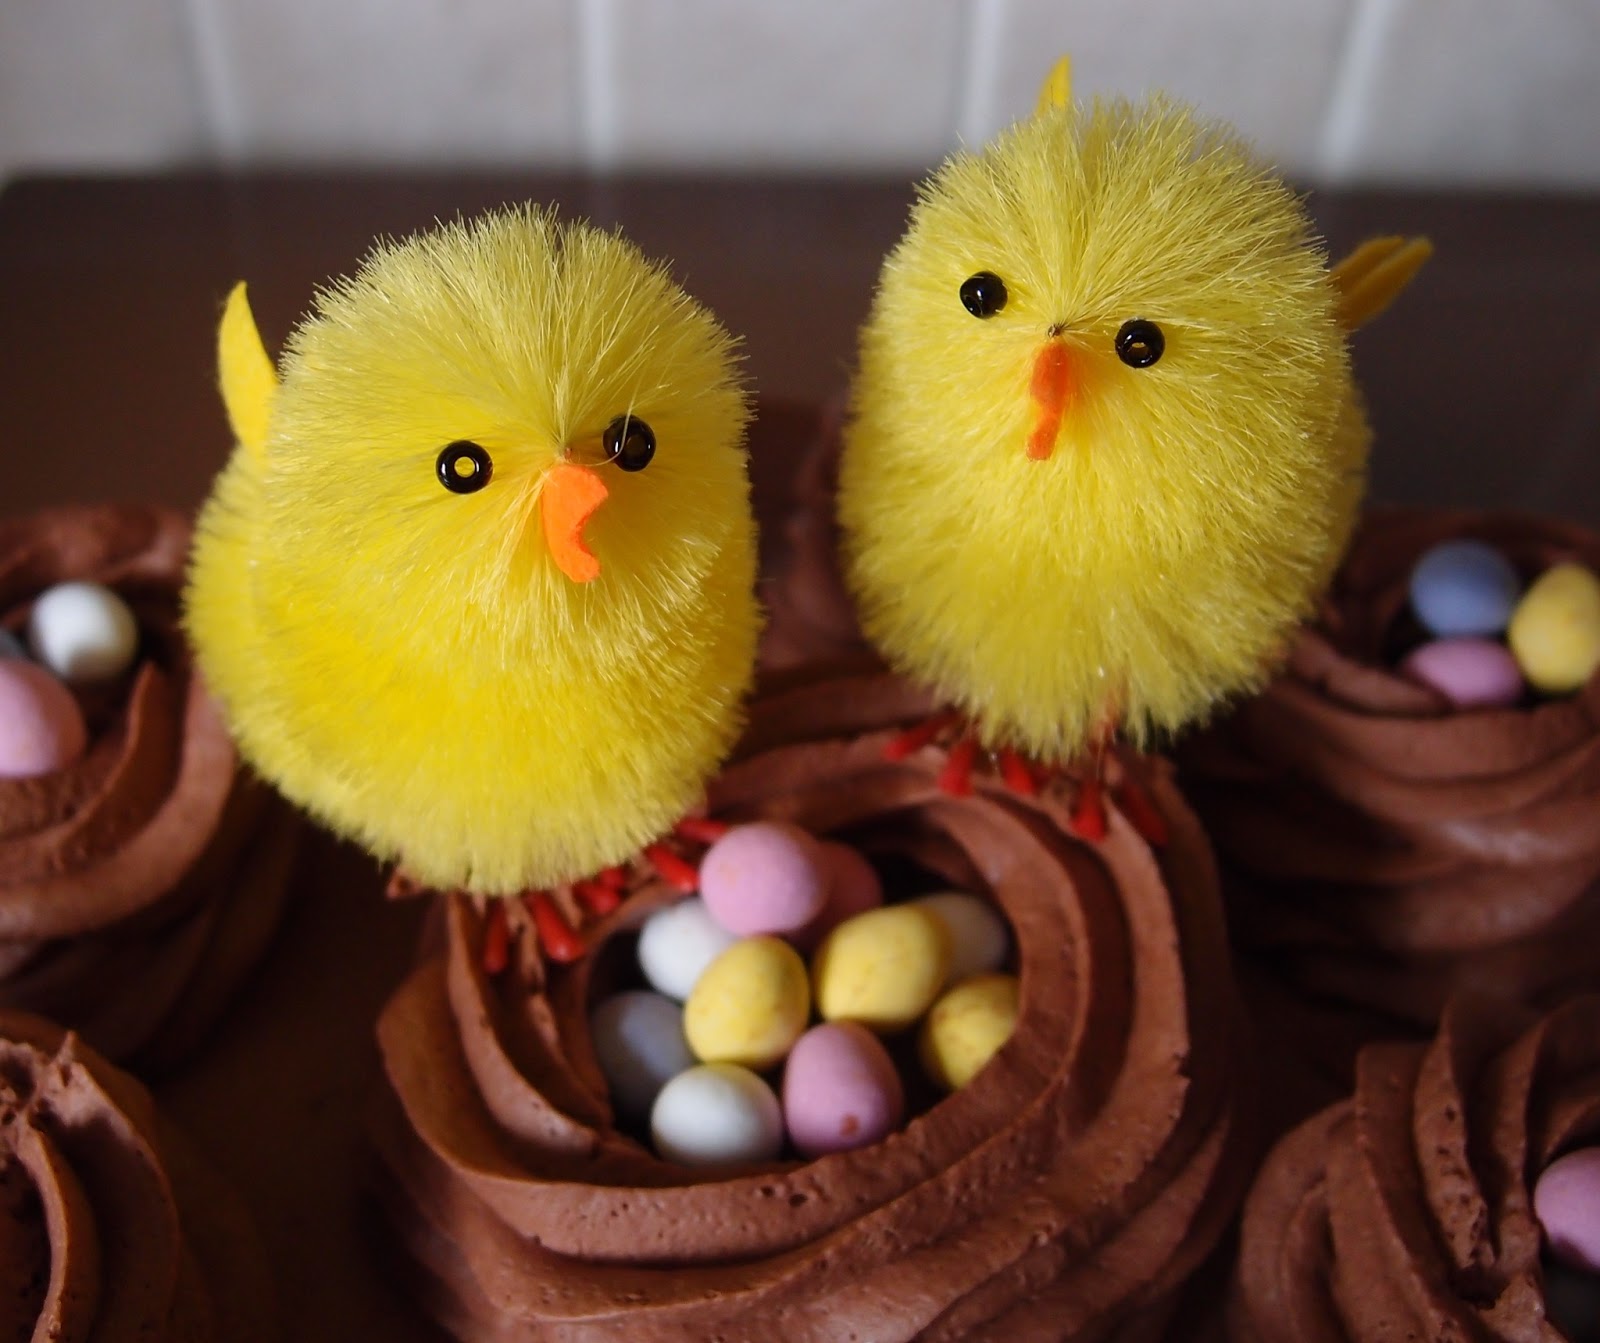
As this was my celebration easter Sunday bake I jazzed up the cheesecake with mini chocolate eggs and fluffy chicks.  This type of fluffy chick has been around all my life and – every year – I buy at least one box...and then only use about three of the chicks.  I put the rest in a drawer or cupboard safe for next year, by which time I have forgotten where I put them and buy another box.  I suspect I have most of the world’s production of small fluffy easter chicks stashed in my kitchen cupboards; they are a veritable battery farm of easter chicks.


Using chocolate biscuits for the base meant that the base felt and tasted far more integrated into the cheesecake.  I liked the extra hit of chocolate; the only downside was that the base was less solid than a normal cheesecake base.  It was more delicious but difficult to cut and plate nicely...there is always a price to pay in life, or as Curiosity Killed The Cat sung so profoundly: there’s a bind for every kind.


Happy easter everyone!


Ingredients

For the cheesecake base:
4 125g packets of Bahlsen Choco Leibniz biscuits – I used a mix of milk and dark
100g unsalted butter, at room temperature

For the cheesecake topping:
300g chocolate – I used a mix of milk and dark
700g Philadelphia cream cheese, at room temperature
100g icing sugar

For the ganache nests:
300ml double cream
200g chocolate – I used a mix of milk and dark

To decorate: easter chicks and mini eggs!


Method

Start with the cheesecake base:  Place a 21cm ring on the plate you wish to serve the cheesecake from.  An adjustable dessert ring is perfect but a springform tin with the base removed will also work.  I like to line the ring with baking paper to ensure I can de-tin it easily.

Start by making the base: blitz the biscuits in a food processor until you have crumbs.  It will look like you have too much but it presses down pretty firm.

Blitz in the butter – no need to melt it if you’re doing it in the food processor.  If your crushing the biscuits by hand i.e with the bag and rolling pin method, it’s easier to melt the butter.

Press the crumbs onto the plate ensuring that you have an even layer pushed right up to the edge of the mould.

Refrigerate while you make the topping.

Melt the chocolate – I favour short bursts in the microwave, stir, another short burst until the chocolate is melted but if you prefer melting in a bowl over a saucepan of simmering water that’s fine!

Let the chocolate cool for about five minutes.

In a large bowl beat together the cream cheese and icing sugar.

Gradually beat in the melted and cooled chocolate until evenly incorporated into the mix.

Spread the topping over the chilled biscuit base and refrigerate for at least two hours.

Now make the ganache: heat the cream in a pan until just starting to bubble.

Remove from the heat and break the chocolate into squares and drop into the cream.

Leave to stand for a couple of minutes before stirring. 

Keep stirring until all the chocolate has melted and is incorporated.

Leave to cool (refrigerate if you’re in a hurry) and then whisk to thicken – it needs quite a high speed to thicken it so best to use an electric whisk if you have one.  If it doesn’t thicken enough to pipe, spoon into the piping bag and pop back in the fridge for 5-10 minutes.

Pipe nest shapes on top of the cheesecake and put back in the fridge.

Remove from the refrigerator about 15 minutes before serving and decorate with the eggs and chicks.

Bask in the glory of the wonderful thing you have created.

Eat.

Friday, 29 March 2013

Hot cross buns – Mr CC guest blogs…..


A rare guest post on my site in which Mr CC puts me to shame and shows his mastery of yeasted buns...OK, now I've typed that it just sounds weird, so I'll say no more and hand over to Mr CC:


Inspired by the “Great British Bake Off” Easter masterclass show on BBC2, I decided that I would make Hot Cross Buns this Easter, as they have always been a favourite of mine.  I used Paul Hollywood’s recipe on the programme’s website and followed the recipe’s instructions.  As both Mrs CC and I aren’t big fans of mixed peel I left it out of the recipe, but everything else is the same.

All the ingredients were mixed, kneaded and left to prove in warm room for an hour, but I was disappointed to find that there was very little rise in the dough and it was nowhere near the doubling in size that the recipe suggested would happen. Leaving it for another half hour made little difference, but I decided to carry on regardless. I divided the dough into 12 roughly equal parts and placed on a baking tray to prove for another hour.


Again, there was very little increase in size after an hour and my patience was beginning to wear quite thin at this point. Assuming that something terribly wrong had occurred in my preparation and in a fit of pique, I tore the recipe into satisfyingly small pieces and binned them…then I had my lunch and forgot about the buns.

I looked in on them about an hour later and, by some miracle, they had risen and were getting quite friendly with each other on the baking tray.

I piped the crosses (not the neatest of jobs, I like to think of them as being impressionistic) and put them in the oven. They seemed to darken quite quickly and had to be removed after 19 minutes to stop them from burning. Whilst still warm, melted apricot jam was bushed on them to give a shiny glaze.


Despite my efforts and the problems encountered, the buns came out fine and went down very well with a cup of tea.


So what went wrong with the dough? Answers found whilst searching around on the Internet seemed to suggest that the milk was too hot when I added it to the mix. This might have had the effect of killing some of the yeast, which would have reduced the rise in the dough. That might be why it took so long to rise.

Sunday, 24 March 2013

Chocolate chip oat biscuits


Where have these biscuits been all my life?  They take the buttery deliciousness of shortbread and add an oaty crunch – imagine shortbread, crossed with hobnobs, with some chocolate chips added for good measure....yes, that good!


When I make these again (in about a day or two!) I will swap the chocolate chips for sultanas.  I’m a sultana addict and think they’ll work really well with the buttery oat texture.


I made these reasonably small – normally my biscuits could be used as dinner plates – and I advise you to do the same as the biscuit is densely textured and rich.  When I try and make small biscuits (i.e. normal sized) I start with good intentions then look at the tray when I’ve finished only to see the later biscuits are twice the size of the earlier ones...I can’t help myself!  So this time, I weighed the first ball of dough, and made sure all the others were the same (44g, if you’re interested).  For the first time ever I have created normal biscuits!


These are lovely warm from the oven (well, you have to check, don’t you?) and also lovely cold and crumbly.  For the work of minutes they are quite wonderful!


Ingredients

225g unsalted butter, at room temperature
110g caster sugar
1 teaspoon vanilla extract
275g plain flour
30g porridge oats
100g chocolate chips – I used milk

Method

Preheat the oven to 200°C/fan oven 180°C/400°F/gas mark 6.

Line two baking sheets with baking paper or non stick foil.

Beat the butter in a bowl until soft and whippy.

Beat in the sugar and vanilla.

Stir in the flour, oats and chocolate chips.

Take small balls of mix, roll then place on a baking sheet leaving about 1cm for spreading whilst baking.  I got 16 biscuits, each weighing 44g uncooked.

Flatten the balls.

Bake for approximately 15 minutes or until golden and starting to look biscuity at the edges.

Leave to cool on the baking sheet before transferring to an airtight container.

Bask in the glory of the wonderful thing you have created.

   Eat.


Sunday, 17 March 2013

White chocolate tart with rhubarb and mini eggs


I saw a recipe for white chocolate pots with rhubarb in the Sainsbury’s magazine (in my opinion, the best of the supermarket magazines) and used it as the basis for this tart.  I added a biscuit case and simplified the rhubarb element and came up with a rather smart dessert.  The ring of rhubarb makes it look like the tart is wearing a flamboyant feather boa!


I think the flavours would work well for an Easter dessert so decided to decorate it with an Easter theme using my Lakeland egg moulds for which I have provided a link but am sad to see they are a discontinued item.  What a shame.  Oh well.


The filling for the tart is sweet so I decided to leave the rhubarb on the tart side for contrast.  The filling and rhubarb are both soft so the biscuit base and the chocolate eggs add some welcome texture.


This is a pleasing tart which would work well as dessert for an Easter dinner.  I chose to serve it with a cup of tea as a mid-afternoon treat but that’s always my preference for cakes and bakes!  I think next time I might add another leaf of gelatine to get a cleaner slice.  It would be lovely without any fruit topping...


...but I can’t resist rhubarb:


I could probably have made it look neater by cooking the rhubarb less – when you’re baking things and blogging you often have a trade off between making it look nice for the photo/presentation and making it how you like it.  Here, I went for how I like it and it does look a bit untidy.  Never mind, thankfully I don’t come from a family who look at food for too long!


Ingredients

For the base:
300g hobnob biscuits – use digestives if you prefer
60g unsalted butter

For the filling:
150ml milk
600ml double cream
75g caster sugar
1 vanilla pod, split and seeds scraped out
3 leaves of gelatine – I used 3 but would advise using 4
100g white chocolate

For the rhubarb:
500g rhubarb, trimmed and cut into short pieces (about 2cm)
30g caster sugar, add more to taste
2 tablespoons water
Optional: 1 teaspoon grenadine

For the eggs:
100g white chocolate, plus a little extra to stick together

Method

Start by making the base: blitz the hobnobs and butter together in a food processor.  If you don’t have a processor, put the biscuits in a bag and beat with a rolling pin then stir into melted butter.  Either way, you’re aiming for a grainy wet sand feel.

Press the crumbs into a 25cm pie plate or flan tin.  I used a disposable foil pie plate that was 3cm deep.  Take care to bring the biscuit mix up the sides of the tin or plate as you need it to be bowl shaped to hold the filling – this filling will be runnier than cheesecake and you need a good structure to retain it!

Refrigerate.

Now make the filling: place the milk, cream, sugar and vanilla seeds along with the vanilla pod into a saucepan and bring to almost boiling point.

While you are waiting for the milk to heat, place the gelatine leaves in a bowl of cold water to soften.

When the milk is almost at boiling point remove from the heat and add the white chocolate.  Use a whisk to ensure it melts.

Squeeze all the water from the softened gelatine leaves and whisk into the milk mixture. 

When you are happy that both chocolate and gelatine have completely melted, leave the pan to cool for 20 minutes.

Stir the mixture before pouring into the chilled biscuit case.  Don’t worry if you can’t fit all the filling in – simply pour any extra into glass dishes for a bonus dessert!

Once you have filled the case return to the refrigerator rapidly – the biscuit crust is not completely watertight and you want the filling to start setting as soon as possible.  Setting will require a minimum of 4 hours but ideally overnight.

Prepping the rhubarb can be done at the same time, but I don’t advise putting it on the tart until you’re ready to serve as the juices might seep and look messy.

Place the chopped rhubarb into a saucepan along with the sugar and water.  Heat gently until the rhubarb starts to break down and soften.  Take care to watch this process as you don’t want the rhubarb to become mushy.  I like the rhubarb to become a little pulpy but with some pieces kept whole – but do it how you like it.

When the rhubarb is ready, drain it before returning to the pan and stirring through the grenadine (if using).  If you have grenadine I advise using it as it adds a sherbet flavour.

Taste the rhubarb at this point and add more sugar if needed.

Keep the rhubarb in the fridge until ready to finish the tart.

To make the easter eggs simply melt the chocolate and spoon into the egg moulds.

Refrigerate until set then turn out of the mould and use a little extra melted chocolate to stick the halves together.

To build the finished tart spoon the rhubarb chunks over the top and dot the eggs all over.  If the rhubarb has oozed a lot of liquid it is advisable to strain it again before putting it on top of the tart.

Bask in the glory of the wonderful thing you have created.

Eat.