Sunday, 25 August 2013

Umm Ali


I have featured this dessert before; I first made it back in July 2008 after my job had taken me on a trip to Qatar and I sampled dessert heaven.  Sorry if you’ve seen it before, but I suspect most of my current readers weren’t with me back then.


This is a perfect dessert in many respects – it has texture, creaminess, and that stomach-filling quality that all good stodgy desserts should have.  Imagine a bread and butter pudding but without the greasy butteriness and a bit of crunch from nuts and you’re pretty close to this. I love the vanilla and pistachio heady scent released on baking - it's so fragrant.

Last time, when baking the sheet of puff pastry, I forgot to fork it to stop it puffing up too much.  I remembered this time and...it didn’t seem to make much of a difference:


At first, it feels strange to cut up cooked puff pastry (the bottom corner is missing – Mr CC is thorough in his quality control):


Any leftovers can be reheated or eaten cold.  The creamy mix is effectively a panna cotta sans gelatine and baked rather than set.  It is important to let the creamy mix soak into the pastry.  Here it is pre-soaking:


Here it is post-soaking.  Quite a difference:


I don’t feature many things on my site twice...but goodness me, this one is worth it!


Ingredients:

250g baked and crushed puff pastry (I used ready-made)
50g sliced almonds, plus some extra for sprinkling on top
30g chopped pistachios
30g chopped pine nuts or raisins/sultanas
600ml whipping cream
200ml milk
50g caster sugar
1 vanilla pod

Method:

Roll the puff pastry out until it’s about 0.5cm thick.  Place on a baking sheet lined with baking paper or non-stick foil.


Prick it all over with a fork.


Bake the puff pastry according to the instructions on the packet. Mine required 15-20 minutes at 220°C/fan oven 200°C/425°F/Gas mark 7.

Cut the cooked puff pastry into small squares and place in a 20cm ovenproof dish. My dish was a ceramic lasagne dish and the sides were sloped so that the top of the dish was bigger. If your dish has straight sides you might want to use one slightly bigger than 20cm.

Scatter over the nuts and raisins.

Preheat the oven to 250°C/fan oven 230°C/500°F/Gas mark 10.

Put 300ml of the whipping cream, the milk, sugar and vanilla pod (cut and scrape the seeds out) into a saucepan and bring to the boil.

As soon as it starts to boil, remove from the heat and pour, through a sieve, over the pastry in the bowl. Tidy up the pastry so that it is all covered by the cream – when you pour it over, it can get disturbed.

Leave to soak for 5 minutes.  You can make it up to this point several hours in advance of cooking.  Place it in the fridge if it’s more than a couple of hours ahead of time.

Whip the remaining cream (300ml) and spoon onto the creamy pastry mix.


Bake until golden brown and bubbling at the edges – this will take approximately 15 minutes.

Scatter some chopped nuts over the top. I used almonds.

Allow to cool slightly before serving.

It is nice to have some additional cream to pour over – this is optional.

Bask in glory at the wonderful thing you have made.

Eat.

Sunday, 18 August 2013

Sour cream cake with butter glaze


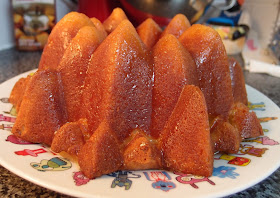
I leave home for work quite early in the morning and – odd though this is to say in August – the air has had a distinctly Autumnal smell the last few mornings; that unmistakable yet hard to describe wet, burnt leaf smell.  I don’t mind this at all – Spring and Autumn are by far preferable to Summer and Winter, but it did make me hanker after a comforting no-frills sponge cake.  The sort of cake you need to pair with a big mug of tea.  This is the cake!


I don’t use my ‘fancy’ cake pans as often as I should, tending to automatically reach for my 20cm round springform tin.  But a plain cake benefits from the jazziness a fancy pan can provide.  This is a Wilton pan – I think it’s from the Dimensions range.  I like how every slice of bundt cake looks like a piece of abstract art!


This cake has a dense sponge texture – tiny air bubbles and a small crumb:


The butter glaze is what elevates it to something very special.  Part of the glaze sinks into the cake, while the rest sits on top giving a sticky crunch not dissimilar to a lemon drizzle cake. 


If this cake were a time of the week it would be 5pm on a Sunday when all cooking and chores are done and you’re lazing about waiting for Antiques Roadshow or Countryfile to come on the television!


Ingredients

For the cake:
190g unsalted butter, at room temperature
270g caster sugar
2 teaspoons vanilla extract
3 eggs
270 plain flour
1 ½ teaspoons baking powder
Pinch of salt
225g sour cream

For the butter glaze:
100g caster sugar
50g unsalted butter
4 tablespoons water
1 teaspoon vanilla extract

Method

Preheat the oven to 180°C/fan oven 160°C/350°F/gas mark 4.

Spray a 2.5litre (10 cup) bundt pan with cake release spray.  Mine was a Wilton Dimensions pan, but any equivalent sized bundt will work.  If you don’t have a bundt tin of this size, a 900g (2lb) loaf tin and a 450g (1lb) loaf tin will do the job!  That’s two cakes from one mix – although perhaps reduce the cooking time to maybe 30 minutes.

Start by beating together the butter and sugar.  Take time over this and beat until it is pale, light and fluffy.

Beat in the vanilla.

Beat in the eggs one at a time, adding some of the flour if it looks like it might curdle.

Beat in half the flour.

Beat in half the sour cream.

Beat in the remaining flour, along with the baking powder and salt.

Beat in the remaining sour cream.

Spoon the mix into the prepared tin and bake for approximately 40 minutes, or until a skewer inserted into the cake comes out clean.

Leave to cool for an hour in the tin, before turning out onto a wire cooling rack.

Now make the butter glaze: place all the ingredients in a saucepan and heat until the butter has melted.  Stir frequently.

Bring to the boil and let boil for about a minute before reducing the heat to a simmer for about five minutes – this is to the thicken the glaze.  If it isn’t thicker at this time (you’re aiming for runny honey type texture) simmer for another few minutes  - it’s not an exact thing.

Remove from the heat and brush half the glaze over the cake – this will let the sponge absorb it.

Leave the rest of the glaze to cool for about 10 minutes.

Spoon the remaining half over the cake and leave to set.

Serve in thick slices with a mug of tea.

Bask in the glory of the wonderful thing you have made.


Eat.

Sunday, 11 August 2013

Orange and almond cupcakes


Orange adds such a freshness to cakes, particularly buttercreams.  It’s been a while since I baked with orange so when I saw this recipe in one of the food magazines I moved it right to the top of my “to bake” list!


For only two tablespoons of orange juice these have a lovely sweet citrus taste and it works really well with the tangy cream cheese frosting.  I could’ve just eaten the frosting in a glass for dessert!


The almonds make the sponge soft and flavourful but not at all dense.  For a cake containing almond, and a cream cheese frosting, it’s amazing how light the resultant cupcake is – these were very well received by all my eaters.


When you take the lid off the storage tin the most wonderful aroma of orange and almond hits you – I love it when a cake smells of its flavour; it builds a happy expectation of the joy to come!


The other big plus these cupcakes have (aside from their deliciousness) is how quick and easy they are to make.  No fancy methods here – if you can weigh stuff out and beat stuff you will end up with a lovely cupcake.  They could be jazzed up with a bit of decoration but I’m rather a purist (or lazy, take your pick) where my cakes are concerned and like them left clean and unfussy.


Ingredients

For the sponges:
225g unsalted butter, at room temperature
225g golden caster sugar
3 eggs
190g plain flour
75g ground almonds
2 teaspoons baking powder
zest of 1 orange, plus 2 tablespoons orange juice (keep the remaining juice for the frosting)
1 teaspoon almond extract

For the frosting:
200g unsalted butter, at room temperature
450g icing sugar
200g cream cheese – I used Philadelphia
2 tablespoons orange juice
optional: orange food colour


Method

Preheat the oven to 170°C/fan oven 150°C/340°F/gas mark 3.5

Line two cupcake pans with 18 paper cases.

Start by making the sponge: beat together the butter and sugar until light and pale.

Beat in the eggs, one at a time.

Beat in the flour, almonds, baking powder, orange zest, juice and almond extract.

Spoon into the paper cases.

Bake for approximately 22 minutes, or until a skewer inserted comes out clean.

Leave to cool.

Now make the frosting: beat the butter until soft.

Add the icing sugar and cream cheese and stir together manually before going back to the stand mixer – this stops the icing sugar clouding up!

Beat until well combined.

Beat in the orange juice and – if using – orange colouring.

Spoon into a piping bag and, if the frosting is very soft, don’t be afraid to chill it for ten minutes before piping.

Pipe over the cupcakes.

Refrigerate until 30 minutes before serving.

Bask in the glory of the wonderful thing you have created.


Eat.

Sunday, 4 August 2013

Caramel custard tart


This is a sensation of flavour and texture – it’s also pretty full on in terms of indulgence...not one for the faint hearted!  The buttery, crumbly pastry works beautifully with the sweet, rich custard filling.  I am pleased I added the plain whipped cream on top as it lightens the dish.


I do love tinned caramel.  I’ve always found making caramel a little bit hit and miss and this takes all the stress out of it.  I don’t struggle with making the caramel it’s usually what follows – this recipe contained the instructions for making caramel but then told you to stand the pan in cold water before whisking in cream.  I did that...and my caramel set hard at the bottom of the pan!  Oh how I enjoyed cleaning up after that little mishap....not!


This is sweet.  And I’m saying that.  Best to serve in smaller slices and let people have more if they want it.  Sigh. This is the sort of thing I type when I try to be populist...who am I kidding?  Of course I don’t recommend serving it in small slices – serve it in big slices!  Always big slices!


The cream balls on the top caused a bit of a stir.  Luckily, they came out looking cute but I cannot claim this was the intended design.  Having selected a plain piping tip, I didn’t really have a plan so started piping dumpy little balls...and then kept on going!  I was asked what they were and explained that you could now buy whipped cream balls that came on a sheet and you just peeled them off and placed them.  I did not expect this to be believed.  But it was.  Twice.  My relatives are gullible!


Please check out the result from my cake mould giveaway
 – if you’re Liz, please get in touch with your address!


Ingredients

For the pastry:
225g plain flour
50g icing sugar
150g unsalted butter, straight from the fridge
1 egg

For the custard filling:
375g caramel – I used a tinned, ready made version
4 egg yolks
150ml double cream
150ml full fat milk
1 teaspoon vanilla extract

To decorate:
300ml double cream


Method

Preheat the oven to 200°C/fan oven 180°C/400°F/gas mark 6.

Place the flour, sugar and butter in a food processor and blitz until you have fine crumbs.

Add the egg and blitz again until the pastry just starts to come together.

Tip out onto a sheet of clingfilm – don’t panic, the pastry is very soft at this stage.

Form into a disc, wrap in clingfilm and refrigerate for 20 minutes.

Roll out between two sheets of clingfilm and then line a 23cm loose bottomed tart tin.  There is no need to grease the tin.

Don’t worry if you need to patch the pastry – it’s very good natured!

Refrigerate for a further 20 minutes.

Line the pastry case with baking paper or non stick foil and weigh down with baking beads.

Bake for 15 minutes, then remove the beads and paper and bake uncovered for a further 5 minutes.

Leave to cool.

Reduce the oven to 160°C/fan oven 140°C/325°F/gas mark 3.

Now make the filling: tip the caramel into a small pan and heat gently to loosen it up.

In a large bowl beat the egg yolks until they are pale and fluffy.

In another pan, bring the double cream and milk just to the boil, before adding the vanilla.

Beating the whole time, pour the cream and milk over the egg yolks.

Still beating, add the warm caramel.

Pour through a sieve back into the saucepan you heated the cream in.  This is important as it will ensure there are no lumps of caramel.  Use a wooden spoon to push the caramel through.

Stir over a gentle heat until the custard coats the back of the spoon and you can draw a line through it with your finger.

Pour into the pastry case and bake for approximately 35 minutes or until the custard is set but still has a wobble in the centre.

Leave to cool completely.

Whip the double cream and pipe over the top of the tart.

Serve in generous slices.

Bask in the glory of the wonderful thing you have created.


Eat.

Saturday, 3 August 2013

We have a winner!


We have a winner of the wonderful I Heart Cake mould from Mustard, the funky homeware site.


The winner – drawn at random - is Liz!  Liz’s comment was:
Liz said...
I'd share a heart-shaped piece of cake with my lovely husband, as he always appreciates my baking.

This cake looks lovely, I really love berries in cakes, and gooseberries makes a change from the usual.

Please email me your address Liz (My email button is on the right hand side of the screen) and I will forward it to Mustard, who will send you your mould.


Congratulations, and thanks to everyone else who entered.