Sunday, 29 January 2012

Sultana and cinnamon sandwich cake


I really crave comforting, old fashioned baking at the moment – if you can imagine it on the kitchen table of a farmer’s wife in an Enid Blyton book then I want a slice of it!


Sandwiching this cake is a classic buttercream given a bit of punch by adding some cinnamon. I thought about using a different filling but it’s wrong to mess around with a cake like this – sometimes classic is the way to go.


So many people don’t like sultanas (or raisins, or currants) and I never understand why; they have such a flavoursome fruity sweetness and I love their squidgy texture when baked. They are one of my dessert island ingredients – give me sultanas and I’m happy! We all have favourite ingredients that will tempt us to bake/buy/order a cake – so come on, share... what’s yours?


This cake sums up the power of simple pleasures to me – it’s heavenly to eat; the crumbly sponge populated with juicy sultanas and a faint spark of cinnamon. Add to that the whipped, smooth buttercream and I’m in cake heaven.


This isn’t a traditional sponge – it’s more of a cross between a sponge and a rock bun; therefore I recommend eating it on the day of baking as it the texture will get harder. Of course, because it’s crumbly and delicious it’s a total nightmare to try and photograph. I spent ages trying to get a nice clean slice...but I shouldn’t complain too much – it was fun eating the rejects!


Ingredients

For the sponge:
175g unsalted butter, at room temperature
175g caster sugar
2 eggs
225g self raising flour
2 teaspoons ground cinnamon
225g sultanas
milk to mix

For the buttercream:
175g unsalted butter, at room temperature
300g icing sugar
1 teaspoon ground cinnamon


Method

Preheat the oven to 180°C/fan oven 160°C/350°F/gas mark 4.

Line two 20cm round loose bottomed sandwich tins with baking paper.

Make the cake on the day you wish to serve it, otherwise it may get a bit hard (like rock buns do). Beat together the butter and sugar until the mix is pale, light and fluffy – don’t skimp on this stage as this is where the air gets into the sponge.

Gradually beat in the eggs, one at a time.

Fold in the flour and cinnamon.

Stir in the sultanas.

Stir in enough milk to make the batter a dropping consistency – I needed 2 tablespoons.

Spoon into the prepared baking tins and level the surfaces.

Bake for 30-35 minutes, or until a skewer inserted into the cake comes out clean. Mine took just over 30 minutes.

Remove from the oven and leave to cool in the tins.

When cool enough to safely handle, de-tin and leave to cool completely on a wire rack.

Now make the buttercream: place all the ingredients in a bowl and whisk until light and fluffy.

Place the first layer on the serving plate and spread the buttercream over it.

Place the second layer on top and gently press down to ensure the layers have adhered to the buttercream.

Serve in generous slices with a cup of tea.

Bask in the glory of the wonderful thing you have created.

Eat.

Thursday, 26 January 2012

White chocolate, cranberry and oatmeal biscuits


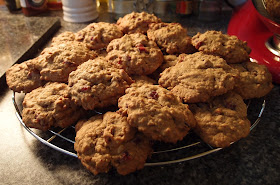
Last night I had a strong hankering for a soft oaty biscuit. So much so, that my final act, before turning off the light to go to sleep, was to write, “oats, dried cranberries/raisins?” on a post-it note and leave it by my bedside. When I read it this morning I understood what needed to be done (I always obey notes I leave myself, particularly when they involve food)...so, braving the rain I ventured out to purchase porridge oats and dried cranberries.


Luckily (hah! As if luck had anything to do with it!) I had a bar of white chocolate in the fridge and thought its mild creaminess would work very well with the cranberries; even though the cranberries I bought were sweetened, they still had a degree of tartness to them.


These biscuits are the work of minutes to make and are incredibly moreish. Normally I prefer a crisp biscuit but there is something comforting about the soft chewiness of these – they’re like a cake/biscuit/flapjack hybrid and probably even a bit healthy because of the oats and cranberries.


They stay soft and lovely for days after baking too...I am slowly working my way through them (obviously, I let Mr CC have some!)


Ingredients

150g unsalted butter, at room temperature
150g dark brown sugar
2 eggs
150g dried cranberries (I used sweetened)
100g white chocolate, cut into small chunks
1 teaspoon bicarbonate of soda
120g porridge oats
200g plain flour


Method

Preheat the oven to 190°C/fan oven 170°C/375°F/gas mark 5.

Line three baking sheets with baking paper.

Beat together the butter and sugar until light and airy – as it’s brown sugar the mix will not whip as light as if caster sugar, but it will turn noticeably paler.

Beat in the eggs gradually.

Stir in the cranberries and white chocolate.

Stir in the bicarb, oats and flour.

Place rounded teaspoons of mix on the baking sheet leaving approximately 2-3cm between biscuits as they spread as they bake.

Bake for approximately 12 minutes or until the biscuits are golden. I checked them after 10 minutes and turned the tray for the remaining baking time.

Leave to cool on the baking sheets as they are very soft when warm.

When completely cool, store in an airtight container.

Bask in the glory of the wonderful thing you have created.

Eat.

Sunday, 22 January 2012

Famous Faces’ Favourite Fancies – Raspberry bakewell cake


Paula Radcliffe is undoubtedly one of England’s most famous and successful female athletes of all time –and not just for that incident in the 2005 London marathon (I won’t go into it here, but it has a paragraph devoted to it on her Wikipedia biography).


She has won more marathons than I’ve probably eaten (vintage chocolate joke for you there, admittedly it would be wittier if they hadn’t changed their name to Snickers).


Paula is currently the world record holder for the marathon with a time of 2 hours, 15 minutes and 25 seconds. She has won the London marathon three times, the New York marathon twice and the Chicago marathon once. All this is even more amazing when you learn that she suffers with asthma.


When I was selecting who to write to for my Famous Faces feature, I tried very hard to ensure a good balance of celebrities, politicians, sports people, journalists, musicans etc but, have to admit, I didn’t expect an athlete to eat cake...let alone have a favourite! Paula’s choice of raspberry and almond cake is a choice very close to my own heart as it’s a combination I love too.


I decided to pick this bakewell cake recipe as it is packed with raspberries; so often bakewell tart recipes use jam rather than fruit but in cake form the fruit works better. The rich, soft almond cake contrasts so beautifully with the sharp, squidgy pockets of baked raspberries. The flaked almonds on top add some crunch but mostly this is soft, indulgent comfort baking at its best.


NB. I know I say in the recipe that the batter is very thick and don’t panic, but here’s some photographic proof!


Ingredients

210g unsalted butter, at room temperature
210g golden caster sugar
3 eggs
1 teaspoon almond extract
210g ground almonds
210g self raising flour
325g raspberries
3 tablespoons flaked almonds

To serve: dusting of icing sugar, thick cream

Method

Preheat the oven to 180°C/fan oven 160°C/350°F/gas mark 4.

Line a 20cm springform round tin with baking paper.

Beat together the butter and sugar until it is light, pale and fluffy; as you are using golden caster sugar it won’t turn as pale as ordinary caster sugar but you will notice the batter change as you beat. Take your time over this stage as this is where you get the air into the cake.

Gradually beat in the eggs, followed by the almond extract.

Fold in the ground almonds.

Fold in the flour.

Spoon a generous half of the mix into the prepared cake tin and level the surface. Your batter will be quite stiff but this is necessary to support all the raspberries which will collapse and ooze juice on baking.

Scatter over all but a scant handful of the raspberries then spoon the remaining cake batter on top. Take care, when levelling the surface, not to disturb the raspberries.

Gently press the remaining raspberries into the top of the batter.

Scatter over the flaked almonds.

Bake for approximately 50 minutes or until a skewer inserted into the cake comes out clean.

Place the cake, still in its tin, on a wire rack and leave to cool. I find almond cakes are very soft and vulnerable to break when warm so I advise de-tinning only when the cake is completely cool.

Store in an airtight container until ready to serve. Don’t panic if, overnight, it looks like your cake has sunk a little in the middle – the almonds release oil, and the baked raspberries get squidgy and this seems to concentrate in the centre. Your cake will be all the more delicious for it!

Serve with a dusting of icing sugar and some thick cream.

Bask in the glory of the wonderful thing you have created.

Eat.

Sunday, 15 January 2012

Blue Hawaiian cupcakes


I am rather partial to a cocktail or two, but have never been able to bond with very creamy cocktails. There’s just something about their inherent gloopiness that turns me off. That said, I love the idea of the flavour combinations in creamy cocktails so decided to adapt a cocktail recipe into a cupcake.


The Blue Hawaiian cocktail (not to be confused with the Blue Hawaii, which is totally different) is a classic blend of white rum, coconut, pineapple juice and Blue Curacao. The latter ingredient turns the drink a rather shocking shade of blue and the whole mix of flavours is exotic– the taste of a being on a tropical beach somewhere lovely.


When you think about it (trust me, I have...) cocktails share several similarities with cupcakes – both are pretty, decorated, attention-seeking and designed to be quick hits of happiness. I remember once reading an old book of cocktail recipes and the barman explained that you should drink your cocktail quickly or, as he termed it, “while it is still winking at you”. Cupcakes are the same.


I had to use the Blue Curacao in the buttercream, as the chance to make shocking blue buttercream was too fabulous to resist...but as you will see, that didn’t happen and instead I got a delicate, fresh green. That left the coconut, rum and pineapple for the sponge; I used Malibu, which is a coconut rum, but ordinary rum would be just as nice. I opted for a coconut sponge filled with pineapple curd – this added extra texture and kept the flavours separate. Here they are loaded with curd...


...and this is how it looks in the finished cupcake:


The flavours worked really well in this cupcake and they looked ever so pretty without a lot of effort on my part. These are the perfect cupcakes for January – they’re little hits of happiness!


For those of you nervous about making Swiss meringue buttercream here’s my step by step guide.


Ingredients

For the pineapple curd:

2 egg yolks (keep the whites for the buttercream!)
200ml pineapple juice
50g caster sugar
25g cornflour

For the cupcake sponge (this will make 12 cupcakes):
125g unsalted butter, at room temperature
125g caster sugar
4 tablespoons desiccated coconut

2 tablespoon Malibu (coconut rum)
2 eggs
125g self raising flour
1 tablespoon milk

For the swiss meringue buttercream:
4 egg whites
250g caster sugar
250g unsalted butter, at room temperature
3-4 teaspoons Blue Curacao

To decorate: maraschino cherries


Method

Start by making the pineapple curd; this can be done several days in advance: place all the ingredients into a saucepan and stir, over a low heat, until the mixture thickens and starts to bubble. Don’t panic and think yours isn’t working – it can take 10 minutes or more before, in an instant, it thickens and turns into curd.

Remove from the heat and leave to cool, then refrigerate until needed. It will thicken further as it chills.

To make the cupcakes, increase the oven to 190°C/fan oven 170°C/375°F/Gas mark 5.

Line a cupcake pan with paper cases.

Beat together the butter and sugar until light and fluffy.

Mix together the coconut and Malibu so that the coconut absorbs some of the rum. Normally, I’d add this after the eggs but I wanted to ensure it was added early and well distributed in the batter.

Beat in the eggs, flour, and milk.

When the mixture is smooth and well combined, spoon into the paper cases.

Bake for 12-15 minutes or until a skewer inserted into the cupcakes comes out clean. Mine took 16 minutes.

Leave to cool on a wire rack and remove from the tin when cool enough to handle.

On the day of serving, use a corer or knife to remove the central core of the cupcake sponge out, taking care not to go right down to the bottom of the cupcake.

Now make the swiss meringue buttercream: Place the egg whites and sugar in a bowl over a pan of simmering water. Stir pretty much constantly to prevent the egg from cooking.

After 5-10 minutes, when the sugar has dissolved (when you cannot see any crystals on the back of the spoon), remove the bowl from the pan of simmering water and whisk until the meringue has puffed up and the mix is cool.

Add the butter to the meringue and whisk until the butter has been completely incorporated into the meringue. At first it will look a disaster – it will collapse and look curdled but don’t worry! Stop when the mixture is smooth, light and fluffy.

Now add the Blue Curacao gradually and beat until the colour of the buttercream is evenly blue.

Fill the whole with half a teaspoonful of pineapple curd.

Pipe the buttercream on top of the cupcake and top with a maraschino cherry.

Bask in the glory of the wonderful thing you have made.

Eat.

Wednesday, 11 January 2012

Coconut and chocolate biscuits


If there was a prize for heavenly baking smells, I think coconut might just pip vanilla to the gold medal slot. I sit typing this in January’s Stygian gloom and yet the smell wafting down the hallway is of sunshine and tropics – divine!


I’m drawn to biscuits at the moment. I think they have stealth qualities that are admirable at this time of year e.g. you can sneak a biscuit out of the tin and eat it before you’ve even cut a slice of cake; you can walk around doing stuff whilst eating a biscuit – there’s no need for a plate or a fork. Most importantly of all, you can totally lie to yourself about how many you’ve eaten – when you opened the tin there were several in there, when you closed the tin there were several in there...who’s counting?


The recipe may have made two more biscuits than are shown here; I cannot confirm nor deny it.....


Chocolate and coconut is a perfect marriage of flavours and pack these biscuits full of flavour. Coconut always gives baking a nice, short texture; a comforting crumbliness. The texture doesn’t change as the biscuit ages either – they stay crisp and crumbly for several days.


Ingredients

225g unsalted butter, at room temperature
140g caster sugar
1 egg yolk
280g plain flour
100g desiccated coconut
100g milk chocolate chips


Method

Preheat the oven to 190°C/fan oven 170°C/375°F/ Gas mark 5.

Line two baking sheets with baking paper or non-stick foil.

Put the butter and sugar in a bowl and beat until light, whippy and pale in colour.

Beat in the egg yolk.

Stir in the flour.

Stir in the coconut and chocolate chips. The dough will be stiff but not firm enough to roll out.

Take tablespoons of the dough and shape gently into balls – don’t squeeze!

Place the ball on the prepared baking sheet and flatten the top slightly

Place the balls about 2-3cm apart to allow for them spreading whilst baking.

Bake for 10-15 minutes or until the biscuits are a light golden brown. Don’t panic if yours take a little longer; mine took 20 minutes (possibly because I made them bigger than the recipe said!)

Remove from the oven and place the trays on wire racks to cool. Don’t attempt to remove the biscuits from the trays until they have cooled as they will be crumbly when hot.

The biscuits will store in an airtight tin for several days.

Bask in the glory of the wonderful thing you have created.

Eat.

Saturday, 7 January 2012

Cashew puffies

Early update this week as Mr CC and I are out and about on Sunday!


This recipe is from Rose Levy Beranbaum’s “Rose’s Christmas Cookies” book. It caught my eye for two reasons: firstly, I haven’t used cashews in a cake or biscuit recipe, and secondly, most of my male relatives are cashew-obsessed!


Making these biscuits really is the work of minutes. They looked so cute all puffy and fresh from the oven, and what a bonus that you get so many of them from one batch (this photo is only one tray from the three that I got)!


The biccies are subtly flavoured – you don’t get the big hit of cashew I anticipated, but the flavour does build in your mouth as you eat. Like anything with nuts they are best made a day in advance to give the nut time to develop its flavours. The biscuits aren’t oily or greasy in texture – my one complaint when eating cashews is that they are a particularly greasy nut - but here, the baking seems to mitigate that.


They keep like a dream in an airtight container and, unusually for biscuits, get better with age. In that respect I wish I was a cashew puffy!


Ingredients

115g unsalted butter, at room temperature
190g light brown sugar
1 egg
1 teaspoon vanilla extract
120g sour cream
290g plain flour
1 teaspoon baking powder
1 teaspoon bicarbonate of soda
185g unsalted cashew nuts, coarsely chopped

Method

Preheat oven to 190°C /fan oven 170°C /375°F/Gas mark 5.

Line three baking sheets with greaseproof paper – if you don’t have three, don’t panic – just bake the biscuits in batches and then reuse the baking sheet.

Beat together the butter and sugar until light and whippy.

Beat in the egg and vanilla extract.

Beat in the sour cream and ensure that all the ingredients are well combined.

Add the flour, baking powder, bicarbonate of soda and cashew nuts and beat – very gently – until just combined.

Take a heaped teaspoon of the dough and place on the baking sheet. Place the next teaspoonful approximately 4-5cm away. Continue until the tray is full.

Bake for 10-15 minutes or until golden brown. I baked for 10 minutes, then turned the tray for any subsequent baking – it guarantees even baking.

Leave the biscuits to cool, still on their tray, on a wire rack.

When they are cool enough (and firm enough) to handle, lift them off and place them directly onto the wire rack to cool.

Store in an airtight tin.

Bask in the glory of the wonderful thing you have created.

Eat.
Wednesday, 4 January 2012

Snowball jellies


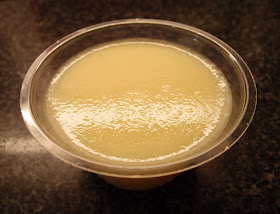
The saddest sign that Christmas is well and truly over is the empty Advocaat bottle. Yes, I know you can buy Advocaat all year round but, for me, it is THE seasonal drink. A snowball
is such a wonderful thing – like drinking fizzy custard –that I rue the end of its season.


But what to do if you have some Advocaat left over? My suggestion is snowball jellies! This idea came to me one day, probably when I should have been thinking about something far more important, but hey, never look a gift horse in the mouth!


For the uninitiated, a snowball is a drink made up of Advocaat, lemonade with a twist of lime (7up or Sprite is perfect) and it is served in a long glass over ice. At least that’s how Mr CC and I enjoy it. Make sure you stir it well because the Advocaat is much more viscous than the lemonade and it has a tendency to settle out leaving you with a thick layer of pure Advocaat in the bottom of your glass (oh, the horror!)


The trick with this jelly is to add the Sprite as late as possible then get it in the fridge as quickly as possible. Manage that and you have the strange sensation of fizzy jelly – a bizarre feeling on your tongue. But nice...and boozy!


Ingredients

8 gelatine leaves
250ml Advocaat
660ml i.e. 2 cans of 7up or Sprite – I used Sprite Zero

Method

Place the gelatine leaves in a bowl of cold water to soften.

Pour the Advocaat into a saucepan, which is large enough to take all the Sprite.

Bring the Advocaat gently to the boil, then remove from the heat.

Squeeze all the water out of the gelatine leaves and whisk into the Advocaat. You will be able to see when all the gelatine has dissolved.

Leave the Advocaat to cool before adding the Sprite – this is to try and keep some fizz in the finished jelly.

Gently whisk in the Sprite and leave it for a couple of minutes for the froth to calm down.

Ladle the jelly into small bowls or ramekins (I got 6 out of mine) and place in the fridge straight away – again, this is to try and retain some fizz.

Leave to set for several hours or, preferably, overnight.

Serve straight from the fridge as required and top with some cream but this isn’t necessary.

Bask in the glory of the wonderful thing you have created.

Eat.

Sunday, 1 January 2012

Spiced treacle cake


There’s something about spice that is so wintery and festive. This recipe caught my eye because it uses a large quantity of black treacle but no sugar or eggs. Black treacle is an appealing ingredient instantly reminiscent of traditional Christmas cakes and puddings.


I consider this a “Christmas come-down” cake – by which I mean it’s that time of year when you know that the festive feasts have finished and you shouldn’t really still be polishing off as many Quality Street as you are on an hourly basis, but you do actually rather fancy a bit of cake. This one hits the spot with its strong flavours and easy to eat, no-fuss simplicity!


This cake gave me the chance to test out my fab new nutmeg grater
, a Christmas present from the CCM and CCD (Caked Crusader’s Ma and Da):


It’s a one handed device similar in look to those hand-strength building devices – it seems to get mixed reviews but I love it. The nutmeg sits in the middle and a simple squeeze of the handles deposits a nice amount of nutmeg in your batter!


Weighing treacle is so much easier when you weigh it straight into the pan or bowl – here’s my in-no-way-precarious set up:


The cake is topped with a simple white glace icing. I chose not to flavour this as there was a lot of spice in the cake and I didn’t want it to compete. I made a largish amount of icing for the size of the cake – this was at the behest of the CCM who is partial to a thick layer of icing!


Happy New Year to all my readers; may all your cakes turn out splendidly, and may your biscuit tin never be empty!


Ingredients

For the cake:

130g unsalted butter
330g black treacle
375g plain flour
1 teaspoon baking powder
1 teaspoon bicarbonate of soda
2 teaspoons mixed spice
1 teaspoon ground cinnamon
2 teaspoons ground ginger
½ teaspoon grated nutmeg
½ teaspoon ground allspice
300ml boiling water


For the icing:

225g icing sugar
2 tablespoons warm water, to start – you may need more

Decoration: anything you choose! Silver or gold balls would be nice, but I had some wafer snowflakes left from Christmas so used those.


Method

Preheat the oven to 180°C/fan oven 160°C/350°C/Gas mark 4.

Line a 20cm round springform tin with baking paper.

Place the butter and treacle in a saucepan and gently heat until the butter has melted and combined with the treacle. Stir occasionally. I find that weighing the treacle directly into the saucepan makes life a lot easier i.e. replace your scales’ dish with the saucepan for weighing it out.

Place the flour, baking powder, bicarbonate of soda and all the spices into a large bowl and make a well in the centre.

Pour in the butter and treacle and the boiling water and mix until you have a smooth batter. Take care at this point as the batter will be piping hot – don’t use a plastic spatula unless you’re sure it’s heatproof (trust me – this was an awful lesson to learn, not on this cake but an earlier one!)

Pour the batter (it will be gloopy) into the prepared cake tin and bake for approximately 35 minutes or until a skewer inserted into the cake comes out clean.

Place the cake, still in its tin, on a wire rack and leave to cool – the cake will be delicate until cool so I let it cool completely in the tin before turning out.

Don’t panic when your cake sinks a little – it will not stay as high as it does when first out the oven. It won’t sink with a hole in the middle, but the whole top will settle. Very sticky treacle and spice cakes always seem to do this – it’s a sign of how delicious it will be to eat!

On the day of serving, place the cake on its serving plate.

Now make the icing: place the icing sugar in a bowl and gradually beat in water. You can always add more water if needed so be sparing!

When you have a thick, opaque but still pourable consistency it is ready to be poured over the cake.

Ensure that the whole top of the cake is covered and let the icing drizzle down the sides.

Decorate as required.

Bask in the glory of the wonderful thing you have created.

Eat.