Tuesday, 27 December 2011

Christmas cake


I hope you all had a lovely Christmas and will have a happy new year too. I stuck to my classics this Christmas, with mince pies, gingerbread men and Christmas cake. I’ve posted them all many times before so thought I’d spare you another trip down memory lane!


I did make some tweaks with my Christmas cake this year so thought I should document them...if only to aide my aging brain come October 2012 when I’m desperately trying to recall what I did!


I stuck with my classic Christmas cake and fondant icing recipe and used brandy as the spirit in the cake this year. The holly decoration is made from leftover fondant icing coloured red and green – I used Dr Oetker natural colouring.


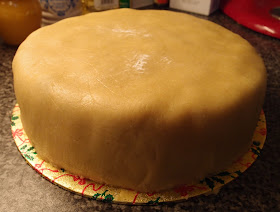
For the marzipan I used the dead easy no-faff recipe that I first tried at Easter with my simnel cake – it tastes divine and is sooooo good natured to roll out. I’ve never had such a lovely smooth covering:


Normally, I only cover the top of the cake, but this year I decided to do a full covering...I have to admit it does look nicer when you cut a slice. I think the key to it is getting the marzipan and icing thin enough so that it doesn’t over power the cake.


Apologies for the slightly fuzzy photos, but it was rather late on Christmas day when I suddenly realised, “oh bother, I am yet to photograph my Christmas cake”. Yes, that’s exactly how the thought formed in my mind.....!

Sunday, 18 December 2011

Father Christmas honey and almond biscuits


I’m not much of a cake decorator and when I look at beautifully decorated cakes and biscuits my reaction is always, “wow, that’s gorgeous....but what a faff.” However, when I saw these biscuits in a magazine (can’t remember which one) I loved them so much I decided I had to make them. And do you know what? For something so cute, they’re pretty low faff (nb. do not equate “low faff” with “speedy”!)


The biscuits are tasty - like a gingerbread without any ginger. They’re not a crisp biscuit but neither are they chewy – they’re somewhere in between, almost a cakey biscuit. You can’t really go wrong with the subtle honey and almond flavour and the brown sugar adds an almost caramel/toffee element; they could also take a smidge of spice, should you so wish.


The hat and gloves in the original recipe were made with ready rolled icing. I’m not a fan of that – to me, it’s just an irritant you have to pick off before you can start eating...but chocolate appealed to me! (in other shock news, I can report that the sun will be rising tomorrow morning).


In a rare moment of foresight, I looked up whether you can add food colouring to white chocolate and it all seems rather complex. The short answer is “no you can’t”– I think liquid food colouring would make the chocolate seize i.e. go grainy and stiff, but I can’t see why gel or powdered colouring would be an issue. Anyway, to eliminate any risk, I purchased specific chocolate colouring which did the job (details in the ingredients list below).


If this was the real Father Christmas then I think I've just ended his present delivering days....


Happy Christmas everybody! May your festive period be full of tasty treats and happy times with those you love.


Ingredients

For the biscuits:
250g clear honey – I ran out of honey so used 150g honey, 100g golden syrup
100g soft light brown sugar
150g unsalted butter
2 egg whites
500g self raising flour
100g ground almonds

To decorate:
200g white chocolate, melted
Red colourant suitable for chocolate – I bought mine from Cakes, Cookies and Crafts

1 small tube of white icing (and black icing if you’re making the eyes, I used ready made eyes)
Gold ball decorations – I used Dr Oetker
Red balls or cupcake sprinkles for the nose

Method

First make the dough: Place the honey, sugar and butter into a saucepan and melt over a gentle heat, stirring often. You will know when it’s ready because the ingredients will be well combined and there won’t be any sugar granules on the back of your spoon.

Pour into a bowl and leave to cool.

When cool, stir in the egg white.

Stir in the flour and ground almonds and mix to a dough. It will be a very soft dough – quite gloopy and you may think you’ve done something wrong....you haven’t!

Divide the dough in two, and wrap each part in clingfilm. If you shape the dough like a fat disc it makes rolling out easier.

Refrigerate for at least 30 minutes but an hour is better.

Preheat the oven to 190°C/fan oven 170°C/375°F/gas mark 5.

Line 4 baking sheets with baking paper. If you don’t have 4 baking sheets, use what you have and bake your biscuits in batches. It doesn’t really matter as it turned out I needed 6 trays!

Take one of the discs of dough from the fridge and roll out between two sheets of clingfilm – this stops you needing to use any additional flour. However, if your dough still feels really soft put a fine sprinkling of flour on the clingfilm

You want the dough quite thin – remember that it contains self raising flour and will rise a little whilst baking.

Using a large 5 pointed star cutter cut out the stars and leave 2-3cm between biscuits on the baking sheet.

Re-roll the trimmings (it’s an incredibly good natured dough and re-rolls with ease as many times as necessary) and then repeat with the second ball of dough.

Bake for 10-12 minutes or until golden. As the biscuits have angular points, they will catch so it’s best to turn the tray halfway through baking. It doesn’t matter if you forget – just make sure they’re the points you dip in chocolate!

Leave to cool, on the baking sheets, on a wire rack – the biscuits will be soft when they come out of the oven. Wait until they have firmed up before removing the baking sheet.

To decorate the biscuits melt the white chocolate (i do it in the microwave) and add the colouring per the instructions on the colouring’s packet. If you don’t wish to use chocolate, you could decorate with sugar paste or icing.

Dip three of the star’s points in the red chocolate – one for the hat, the other two for mittens.

Place each dipped biscuit on a sheet of baking paper to set.

When set, pipe white icing around the edge of the hat and gloves for fur trim. Also, pipe on the beard.

Use the white icing to fix the eyes and the gold balls for buttons and hat bobble. For the noses I picked the red dots out of a packet of cupcake sprinkles.

Bask in the glory of the wonderful thing you have created.

Eat.

Sunday, 11 December 2011

Maraschino cherry and banana loaf


Most tasks in life have either a sensible or a silly order in which to tackle them; let’s take the totally random example of baking:

Sensible order – ooh, that recipe looks nice; I’ll go out and buy the ingredients to make it

Silly order – ooh, that enormous jar of maraschino cherries is irresistible. I have to buy it...I’m sure I’ll find a recipe to use it somehow.


I was perusing my local market this week and came across the bargain groceries stall; most markets will have a similar stall selling stock that they’ve bought up cheap –it might be well known brands but with foreign labels, or orders that fell through and the manufacturer just wants rid. Anyway, long story short, I found myself in possession of a kilo jar of Belgian maraschino cherries (for £1.50 – bargain of the year or what?). I figured I’d either find a nice cake recipe or Christmas for Mr CC and I would be a cocktail-tastic blur!


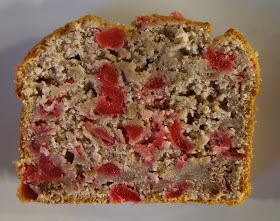
For those of you unsure what a maraschino cherry actually is it’s that festively red cherry you will find floating about in your cocktail. It’s a sweetened, preserved cherry and I think when they’re candied they become glace cherries. I should also warn you that chopping up maraschino cherries is a terribly sad task – it feels like chopping up hundreds of tiny clown noses:


Without being too obviously so, I think this is a festive looking cake. It packs a great flavour, hardly surprising when you consider it contains a lot of cherries plus banana and walnuts. It’s also a plain cake, by which I mean it doesn’t need cream, buttercream or any other jazzy accompaniment.


If, like Mr CC, you’re not mad about bananas in cake but, like me, have an impulse-purchase jar of maraschino cherries you’d like to use you could do worse than make my Madeira cake recipe and simply add 250g of cherries to it! The recipe can be found
here.


So, both cakes made and a whole jar of cherries emptied. Of course, what a truly crazy person would do is go back to the market stall and buy another jar....mwah hah hah ha!

Ingredients

300g maraschino cherries, plus 2 tablespoons of the syrup from the jar
110g unsalted butter, at room temperature
110g light muscovado sugar, plus 2 tablespoons extra to sprinkle on top
2 eggs
3 ripe bananas
225g plain flour
2 teaspoons baking powder
50g walnuts, chopped

Method

Preheat oven to 180°C/fan oven 160°C/350°C/Gas mark 4.

Line a 900g (2lb) loaf tin with baking paper.

Drain the maraschino cherries, reserving 2 tablespoons of the syrup.

Cut the cherries into quarters and put to one side.

Beat together the butter and sugar until they are smooth and whipped.

Beat in the eggs and reserved syrup until the ingredients are thoroughly combined.

In a separate bowl, mash the bananas – recipes always say to do it with a fork but I think it’s easiest to do this with your potato masher.

Stir in half the flour to the butter mix followed by half the bananas.

Add the remaining flour plus the baking powder, followed by the remaining bananas.

Stir in the chopped cherries and walnuts.

Spoon into the prepared tin and level the surface.

Sprinkle the additional 2 tablespoons of sugar over the top and bake for approximately 1 hour or until a skewer inserted into the centre of the cake comes out clean. Mine took 1 hour 10 minutes.

Place the cake, still in the tin, on a wire rack until it is cool enough to handle and remove the tin. Then leave to cool completely on the wire rack. The cake will keep for several days in an airtight tin.

Bask in the glory of the wonderful thing you have created.

Eat.

Sunday, 4 December 2011

History Corner - Coconut and almond cake


I am well aware of the old adage, “you can’t judge a book by its cover”, but I completely disregard it when considering the purchase of a vintage cookbook. The cover for “Home Cookery illustrated” is so fab I wouldn’t have cared if the book was just blank pages. Except for the child with the red horns at the front, this picture could be a portrait of Mr CC and me when I’m preparing dinner. I still can’t work out the husband’s expression; is it one of delight, horror or surprise at what’s in the pan?


There is no date anywhere in the book but online resources place it in the region of 1955-57. I like the subtitle of “A practical guide for the beginner and the experienced housewife” and wonder what purpose it serves, why not just “a practical guide for housewives”?


Published in the 1950s this book highlights that Britain, even post rationing, was still an austere place. The introduction to the book, which covers buying, preparing and cooking food stresses:
“Nowadays it is more a question of making the most of what is available than choosing what we prefer.” It goes on to suggest it is the housewife’s duty to ensure that shops sell all their stock: “Whenever you see a plentiful supply of any kind of perishable food, buy that in preference to goods that will keep. If the shopkeepers do not sell that food it may mean that it may have to be wasted. Help avoid that by buying.”


I chose this recipe because I am a fiend for coconut, plus I loved the inclusion of ratafia essence in the ingredients list. I’d heard of ratafia biscuits but not essence; some hunting around online told me that ratafia essence is made from peach, almond and apricot kernels and is no longer available. The closest modern substitute is good quality almond extract as that contains ground up bitter almond kernels – so that’s what I used!


This is a versatile cake – you can have it, as we did today, plain with a cup of tea, but Mr CC was mooting adding some jam to it. Tomorrow night I’m going to warm two slices and serve as dessert with custard.


Coconut and almond is a lovely combination and this flavoursome, light, cumbly sponge is a worthy teatime treat in any era – austerity or otherwise! It is a plain cake...but in a good way! The coconut is the dominant flavour with a hint of almond coming through at the end. The one aspect of austerity cooking I couldn’t let lie was the meagre quantities; my quantities below are double those of the book.


Ingredients

230g / 8oz unsalted butter, at room temperature
170g / 6oz caster sugar
2 eggs
1 teaspoon almond extract (or ratafia essence – but good luck finding it!)
340g / 12oz self raising flour
115g / 4oz desiccated coconut
6 tablespoons milk

Method

Preheat oven to 180°C/fan oven 160°C/350°F/gas mark 4

Line a 20cm round springform tin with baking paper.

Beat together the butter and sugar until you have a soft, whippy, pale cream. Don’t be tempted to skimp on this stage as this is where you get the air into the sponge.

Beat in the eggs one at a time, followed by the almond extract.

Beat in the flour.

Beat in the coconut and milk.

Spoon into the prepared baking tin and level the surface.

Bake for approximately 1 hour. It’s done when a skewer, inserted into the centre of the cake, comes out clean. Mine took 1 hour 5 minutes.

Leave to cool, still in the tin, on a wire rack.

Remove from the tin and store in an airtight container.

Bask in the glory of the wonderful thing you have created.

Eat.