Sunday, 25 September 2011

Macmillan Cancer Support Coconut Cake


You may have seen adverts or mentions for the “World’s Biggest Coffee Morning” on Friday 30th September
; now in its 21st year this event encourages people to take some time out with their nearest and dearest, enjoy a cup of coffee (or tea!) and perhaps a slice of lovely cake whilst raising money for Macmillan Cancer Support.


This year, even if you can’t hold or attend an event you can do your bit by buying Macmillan’s Little Book of Treats from any M&S Cafe – the book is amazing; it’s only £3 and has 31 recipes in it...and I honestly want to make ALL of them! And if that isn’t for you, you can simply buy any from a range of nine products in an M&S Cafe and they will donate 10p to Macmillan for each purchase.


So, faced with a book where I wanted to make all 31 recipes what did I pick? I followed my heart and went with one of my true loves – coconut! The moist coconut cake recipe is lovely and I made minimal tweaks to it.


The cake has an interesting method in that you soak the desiccated coconut in the milk for a few hours to plump it up before adding to the cake batter. Not only does this soften the coconut, but it also infuses the milk a bit too. I will definitely be using that tip again.


Textures are important in this cake; the soft, moist sponge is one of the lightest I’ve ever made – you’d almost swear it was made with only the white from the egg (it isn’t). The white icing was thinner than I’m used to and set with an almost crisp, shell-like quality. I loved it – cake perfection!


I really rate this tip I picked up from watching Ina Garten
– stand the cake on 4 squares of paper or foil before pouring on runny icing. These protect the plate from having a puddle of icing – simply remove i.e. pull out when the icing is set! Here are the three stages:


If you’re hosting a coffee morning on 30th September you won’t go far wrong with this cake. I could eat it forever if there was a continual supply of cups of tea!


Ingredients

For the cake:

100g desiccated coconut
150ml milk
110g unsalted butter, at room temperature
250g caster sugar
2 eggs
250g self raising flour

For the icing:

25g desiccated coconut – or you can use sweet tobacco (it’s just a name – it isn’t tobacco), available from sweet shops – it’s toasted shredded coconut tossed in cocoa powder
200g icing sugar
75ml water or lemon juice – I used water


Method

2-4 hours before you wish to start baking, soak the coconut in milk.

Preheat the oven to 170°C/fan oven 150°C/340°F/gas mark 3.

Line a 20cm round springform tin with baking paper.

Beat together the butter and sugar until light and fluffy. It won’t go creamy as it normally would because the amount of butter has been reduced to accommodate the milk.

Beat in the eggs one at a time.

Gently stir in the flour, coconut and milk.

Spoon into the prepared tin and level the surface.

Bake for approximately 1 - 1 hour 15 mins or until a skewer inserted into the cake comes out cleanly. Check it after an hour and cover the top with foil if it’s browning too much.

Leave to cool, in the tin, on a wire rack. When the cake is cool enough to handle de-tin it and leave to cool completely on the wire rack.

Now make the icing: sprinkle the desiccated coconut into a dry frying pan and toast gently. It will burn quickly so don’t leave it unattended. I used sweet tobacco from a sweet shop (it doesn’t contain tobacco)

Tip onto a plate and leave to cool.

Place the icing sugar in a bowl and gradually beat in the water/lemon juice – you may not need it all. Beat until you have a glossy, thick, lump free icing. You want a consistency that will ooze but not run...if that makes sense!

Stand the cake on 4 squares of paper or foil – this will collect any icing and stop it pooling on the plate. Simply remove when the icing is set.

Drizzle the icing over the cake and allow it to ooze down the sides a little.

Sprinkle the toasted coconut on top.

Bask in the glory of the wonderful thing you have created.

Eat.
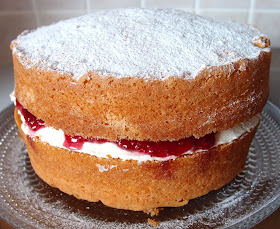
Famous Faces’ Favourite Fancies – Classic Victoria sponge…with buttercream


This is a repost of something originally posted in July 2011. I know blogger had a “mishap” and posts were lost on many peoples’ blogs. I didn’t think I had been affected until I tried to locate this post. Sadly, all your lovely comments have been lost. Probably some other posts of mine have also been lost and – if I become aware – I will repost those too. This week’s new post will follow shortly!)


I can’t tell you how thrilled I was to receive a reply from Julie Walters, and I was even more thrilled that she chose the queen of cakes, a Victoria sponge.


Julie Walters – a bona fide National Treasure – needs no introduction from me. If you need any reminder of her work she is (depending on your age, geographic location etc):

Mrs Overall in Acorn Antiques (I can still never say the word “macaroons” without turning it into a Mrs O impression);
Pauline Mole aka Adrian Mole’s mum;
Rita in Educating Rita (one of my all time favourite films);
Ron Weasley’s mum in the Harry Potter films;
Annie, one of the naughty WI ladies in Calendar Girls (I can’t advocate using cakes that way!);
Billy Elliot’s dance teacher in…er…Billy Elliot;
Rosie in Mamma Mia.


A classic victoria sponge has two key elements. Firstly, the weight of the ingredients is determined by the weight of the eggs in their shells. Secondly, it must be sandwiched only with jam – no cream or buttercream. It was with the second point that I hit a snag; when I told Mr CC I was making a classic victoria sponge thus could only use jam he said quietly, in a wounded puppy kind of way, “but I like buttercream”. To cut a long story short (if it isn’t already too late) – my classic victoria sponge now has added buttercream. I know this means it can’t be deemed a classic victoria sponge…so feel free to omit it if you’re more of a purist than me.


It did feel weird weighing the eggs in their shells and then using this measurement for all the other ingredients, but if it’s good enough for Mrs Beeton it’s good enough for me!


The sponge was different to the more modern sponge recipes with prescribed quantities; it was richer, more buttery, yellower and had a moist rather than crumbly texture.


Here’s my top tip for transporting a sandwich cake; I have found that – in transit – the top layer can slide off the buttercream filling making a bit of a mess. By wrapping the cake in a collar of baking paper it holds everything in place. I think I might start wearing a collar of baking paper...


My nephew, The Boy Wonder, has a lovely dog called Monty. He’s in late puppyhood and is about to celebrate his first birthday. We offered him some sponge (the first cake he’s ever had) to see what he thought; here he is inspecting it...


...before deciding that it really was pretty tasty stuff:


Finally, if you want to see a masterclass in comic timing from Julie Walters then please watch this classic sketch from “Victoria Wood as Seen on TV”. It has entered our family language as a description of when it’s difficult to walk i.e. “my back was so sore and stiff I was walking like Two Soups.” Click here to see the "Two Soups sketch".

Ingredients

For the sponge:
4 eggs
Unsalted butter, at room temperature
Caster sugar
Self-raising flour
1 tsp vanilla extract
A little milk, if necessary

For the buttercream, if using:
75g unsalted butter, at room temperature
150g icing sugar
1 teaspoon vanilla extract

To assemble the cake:
Raspberry jam
Icing sugar or caster sugar, for dusting

Method

Preheat the oven to 180˚C/fan oven 160˚C/350˚F/gas mark 4.

Line two 20cm sandwich cake tins with baking paper; just to be sure, I line the base and sides of the tin.

Weigh the eggs in their shells – this will tell you the weight for the butter, sugar and flour. Mine weighed 267 grams.

Whatever the weight of your eggs (in their shells) weigh out the same amount of butter, sugar and flour.

Beat the butter until it is light and whippy, then beat in the sugar until light and fluffy. Don’t skimp on this stage as it’s the key way of getting air into your sponge.

Beat in the eggs one at a time; if you whipped the butter and sugar enough there shouldn’t be any curdling, but if there is add some of the flour to correct it.

Beat in the vanilla extract.

Fold in the flour.

If the batter is thick and won’t easily drop from the mixing spoon, fold in a tablespoon of milk. It may need a further tablespoon. Add enough milk to reach “dropping consistency”.

Spoon the batter into the prepared sandwich tins and gently smooth the tops with a knife.

Bake for 25-30 minutes, or until a skewer inserted into the centre of the sponge comes out clean.

Leave to cool in the tin for a couple of minutes, then turn out on to a wire rack to cool completely.

Now make the buttercream: beat the butter until it is light and whippy. It will start to look almost like whipped cream.

Add the icing sugar and beat until soft, light and airy looking.

Add the vanilla and beat again.

To assemble the cake turn one of the sponges upside down on the serving plate, so the flat surface is uppermost.

Spread the buttercream over the sponge.

Take the other layer of sponge and generously spread the flat side with jam.

Place the jammy sponge, flat side down on top of the buttercream and press gently to ensure the layers have stuck.

Dust the surface with icing sugar or caster sugar before serving.

Bask in the glory of the wonderful thing you have made.

Eat.

Sunday, 18 September 2011

Cheesecake fortress – a birthday cake


As my nephew, The Boy Wonder, is what I admiringly term ‘a cheesecake hoover’, he warmly received my idea of a cheesecake fortress for his 14th birthday cake. This idea developed from his initial request of “the biggest cheesecake you have ever made”.


Raspberry:


These cheesecakes are all made from the same “no bake” cheesecake recipe. It’s quick and easy to make and you end up with a light, delicious cheesecake that can hold its own alongside any fancier recipes.


Blackberry:


The recipe below sets out the basic quantities to make a 20cm cheesecake, but I doubled those to make the base, a 27cm beast! I then made a double batch and divided it up before adding different flavours to make the turrets – I simply made foil rings to keep them in shape. I toyed with using food rings but couldn’t face all the washing up when the cheesecakes were freed!


I am very lucky to have a fab foodie friend, the wonderful Miz Ratti
who brought me back a most welcome gift from Germany – Philadelphia cream cheese mixed with Milka chocolate. Why isn’t this available in the UK? Why????? The task of making a chocolate cheesecake suddenly becomes laughably easy!


Chocolate:


Along with the chocolate ‘turret’ cheesecakes, I also made smooth peanut butter flavoured (with chocolate covered peanuts mixed in), blackberry, pineapple (simply a small tin of crushed pineapple) and raspberry flavours. The base (aka the 27cm beast) was a classic vanilla.


Peanut butter:


Pineapple:


You never have to worry about making too much cheesecake (is that even possible? I almost hate myself for typing that!) as it freezes well. To make it even easier, cut the slices and wrap them individually then you only need defrost what you want and the rest is safe for another day.


Happy 14th birthday Boy Wonder!

Ingredients

For the basic cheesecake mixture (this will make a 20cm round cheesecake, or 5 of the mini's I've made here):

250g digestive biscuits
100g unsalted butter
600g cream cheese – I used Philadelphia
100g icing sugar
284ml double cream

Suggested flavourings: Seeds scraped from 1 vanilla pod, 3 tablespoons smooth peanut butter, 3 tablespoons fruit puree, small tin of strained crushed pineapple.

Method

Place the ring from a 20cm round springform tin on the plate you’ll server the cheesecake from. Wrap the ring in either clingfilm or greaseproof paper to ensure that you can free the cheesecake easily.

Butter and bics in the food processor - pulse it until the butter is distributed.

Use the crumbs to line the base of the cheesecake. Press them down onto the plate but not so hard that you create biscuity concrete!

Refrigerate while making the cheesecake.

Slice the vanilla pod in half and remove the seeds. (if you are using any other flavourings this is the time to add them)

Place seeds in a bowl along with the cream cheese and icing sugar and beat until smooth and well combined.

Pour in the cream and beat until the mixture is completely combined.

Spoon over the biscuit base and level.

Leave to set overnight in the refrigerator.

Sunday, 11 September 2011

Lattice topped peach pie


This pie is my one last nod to summer baking, before my thoughts turn to more autumnal flavours. There is something very homely, yet at the same time elegant, about a lattice topped pie.


Normally I will use tinned peaches, but I think here you really need the fresh as you need them to bake down and release juices into the honey; I’m not sure that tinned peaches would behave the same way.


Here are the peaches cooking in honey and cinnamon. It looks a lot but it does cook down quite a lot and you end up with a quantity just enough for a generous pie (the ONLY kind of pie worth having!):


I cannot recommend the “boiling water” tip enough for peeling ripe peaches. The reason I usually use tinned peaches is because they are smooth and perfect, whereas when I’ve tried to peel a peach it comes out looking somewhat butchered. Look how perfect these are:


Simply pouring boiling water over the peaches and leaving them for one minute has a magical effect – rinse the peaches off in cold water and the peel almost falls off between your fingers. One of those strangely enjoyable tasks!


The lattice top isn’t as scary as you’d think as long as you’re methodical and alternate which strips of pastry you lift. At this point I had planned on photographing the progress of my lattice on the pie....however, moments before I started to make the lattice I had dropped almost a pint of thick double cream into my fridge and it kindly decided to pool under the crisper drawers; an area you can only access by removing most of the shelves in the fridge. On the plus side, I did surprise (impress?) myself with just how many swear words I know. Consequently, because of my cream fuelled rage, I totally forgot to take photos. But there are lots of useful aides on youtube and I really liked this one.


I used this pastry wheel to get the nice edge to the lattice strips. One wheel is plain, the other crimped. I was in a “crimped” sort of mood so went for that!


This was a lovely pie/tart – the gentle spicing and the honey mixed with peach juice gave an almost fruity butterscotch element. If you don’t fancy a lattice top you could make a ‘solid’ pastry lid or cut shapes of pastry and just lay them on the top.


Ingredients

For the peach filling:
7-8 fresh ripe peaches, peeled, stoned and sliced into wedges
5 tablespoons runny honey
100g caster sugar
1 ½ teaspoons ground cinnamon
2 ½ tablespoons plain flour

For the pastry (this is comfortably more than you will need, simply either freeze any leftover pastry or make some bonus jam tarts):
500g plain flour
250g unsalted butter, diced
2 teaspoon milk or water (I used milk)
2 eggs

To sprinkle on top of the pie for baking: a handful of caster sugar

To serve: custard or thick cream

Method

Start by making the peach filling: if your peaches won’t peel easily, pour boiling water over them, leave them for a minute or so, then remove them from the hot water, run under the cold tap and voila – easy peeling! You could also microwave them for 15 seconds then leave to stand for 2 minutes before peeling – I haven’t tried this method though.

Place the peach wedges (aim to cut each peach into about 12 slices, more if you can) in a pan along with the honey and cook over a gentle heat until the peaches soften and the honey thickens. Stir occasionally; it will take about 10 minutes.

Stir in the sugar and cinnamon.

Add the flour gradually until the liquid starts to thicken – you might not need it all - and bring the mixture back to a simmer.

Simmer gently until the flour has thickened the liquid – this will take anywhere from 10 to 15 minutes.

Remove from the heat and leave to cool.

Spoon into a container and cover with clingfilm.

Refrigerate for a minimum of 4 hours or, ideally, overnight.

To make the pastry: pulse the flour and butter in a food processor until you have crumbs.

Add the egg and milk and pulse again until the pastry clumps but does not form a ball – be careful not to overwork it.

Tip the dough onto a sheet of clingfilm and kneed it just enough to form a ball.

Cut the ball in half (make one half a bit more generous than the other), then for each ‘half’ - flatten, wrap in clingfilm and refrigerate for 30 minutes.

Roll out the larger half of chilled dough between two sheets of clingfilm. I didn’t need to add any extra flour. Use one sheet of the clingfilm to lift the pastry to line a 25cm pie pan or a loose bottomed flan tin.

There is no need to grease the pan as the pastry is buttery and will not stick.

Press the pastry into the pan and trim off any excess pastry.

Preheat the oven to 200˚C/fan oven 180˚C/390˚F/Gas mark 6.

Spoon the chilled peach filling into the pie case.

Roll out the remaining ball of pastry and cut 14 strips approximately 2cm wide.

Lay the longest strip across the centre of the pie and work outwards ensuring you have a regular under/over pattern. If you need more help then there are many guides on youtube – this is a good one.

Brush some milk, or beaten egg over the lattice top and sprinkle with a handful of sugar.

Bake for approximately 30 minutes, or until the pastry is golden and cooked.

Leave to cool, in the tin, on a wire rack.

Serve either at room temperature with thick cream, or warm with custard.

Bask in the glory of the wonderful thing you have created.

Eat.

Sunday, 4 September 2011

Golden rum cake

Today I celebrate The Caked Crusader’s 4th birthday. It doesn’t feel that long ago that I received an ‘all you need to know about blogging’ masterclass from my friend Soo but I guess time flies when you’re having fun.


Now I’ll admit that I have one or two cookery books in my possession but that doesn’t mean I’ll turn away new ones! When Quirk books kindly offered a free copy of Krystina Castella’s “Booze Cakes” I was delighted; it was a book that had been on my radar for some time. Further, as luck would have it, I’d just purchased a new bundt tin (a Wilton Dimensions Cascade tin) and was desperate to try it out!


The golden rum cake recipe stood out to me as I have a passion for rum cake, borne of many lovely work trips to the Bahamas and memories of the wonderfully aromatic Tortuga Rum Cakes shop.
With some shame, I can confess that, on one trip, I had to buy an extra suitcase while I was out there, in order to bring all my purchases back – a case full of rum cakes (nb. I am not exaggerating for comedic effect; I speak the cold hard truth). This recipe gets pretty close to those heavenly creations.


I have made a rum cake before (recipe can be found here
) but it was more of a nutty rum cake. This one replicates the more yellow, pudding-y rum cakes and has rather more booze in it! You can see the rum saturation in this slice:


From memory, this is the first cake I’ve ever made where I think it needs to come with a “drink and drive” warning. Because the rum glaze contains rum where the alcohol isn’t cooked out, it does pack a punch. Bear it in mind if you’re partaking in this cake and have already had a beverage or two. Be safe out there, people!


I think you could cut back on the quantities in the glaze if you weren’t that into rum. Some of my eaters found it too strong...while others loved it. The cake definitely mellows with age and the punchy strength of the rum softens; the cake is huuuuuge but this doesn’t matter because a) it’s heavenly, and b) it keeps a week in an airtight container.


As the recipes in the book are American, they are only given in cups.
I have converted them to metric but include the cups for anyone who prefers them.

I finish on a more serious note. My friend, Soo, the one I have to thank for getting me into blogging and introducing me to a whole new world is supporting a really important charity – the Canadian Parkinson’s Society. The charity funds research into Parkinson’s and I’m sure you’ll all agree that any findings will benefit sufferers the world over. You can read more about it and make donations via Soo’s site.

Just one last sweetener to add; Soo being Soo, she’s offering great gifts (awesome earrings that she’s made) for anyone donating over $10 (that’s about £6) and also entry into a prize draw for anyone who donates.


Ingredients

For the cake:

230g / 1 cup unsalted butter, at room temperature
400g / 2 cups caster sugar
4 eggs
375g / 3 cups plain flour
1 teaspoon baking powder
½ teaspoon bicarbonate of soda
250ml / 1 cup milk
2 teaspoons vanilla extract
180ml / ¾ cup golden rum – I used Mount Gay Golden rum (oh Tortuga – why don’t you export?)

For the glaze:

60g / 4 tablespoons unsalted butter
200g / 1 cup caster sugar
63ml / ¼ cup water
125ml / ½ cup golden rum

Method

Preheat the oven to 180˚C/fan oven 160˚C/350˚F/Gas mark 4

Grease a 9-10” bundt tin (that’s approx 23-25cm). As bundt tins have fine details and I wanted the cake to retain those, I used a cake release spray – it gets into the nooks and crannies of complicated moulds better.

Cream together the butter and sugar – dedicate a lot of time to this, until the batter turns pale and light textured – almost like whipped cream. I can sometimes spend 10 minutes or more on this stage.

Beat in the eggs one at a time; if it looks like the mix might curdle add some of the flour.

Combine the flour, baking powder and bicarbonate of soda in a bowl.

In a jug, combine the milk, vanilla and rum.

Beat about a third of the flour mix into the batter, followed by a third of the milk mix.

Repeat twice more until all the ingredients are combined.

Pour the batter into the prepared tin and bake for approximately 1 hour or until a skewer inserted into the cake comes out clean. Check the cake after 50 minutes as mine only needed 55 minutes cooking time.

Leave to cool, still in the tin, on a wire rack.

Now make the glaze: melt the butter over a low heat.

Stir in the sugar and water and slowly bring to the boil.

Cook for 5 minutes, stirring all the time.

Remove the pan from the heat and stir in the rum.

Pour the glaze over the cake while it’s still in the tin – this forces the cake to absorb all the liquid. Pour gently and slowly as it’s possible that the cake might not absorb it all in one go and you might have to stop and give it time to recover!

Leave to cool completely (still in the tin) before de-tinning onto a plate and storing in an airtight tin.

Serve in generous slices – I don’t think it needs any accompaniment but whipped cream is an option!

Bask in the glory of the wonderful thing you have created.

Eat.