Sunday, 28 March 2010

Hotel Chocolat Winner

The entries were printed off, they were folded up, put in an envelope and the lucky winner was drawn at random.


Congratulations to.......


For those who can’t quite make out the text in the photo:

Anonymous said...

The egg looks fantastic!!!
I'd like it to be a nice, dark 70% chocolate. As to the delivery? It would have to be my gorgeous partner Bernard!

Christine.


Well done Christine – I hope you enjoy your egg.
Please email me with your address as soon as possible so Hotel Chocolat can post your egg in time for Easter.

Thanks to all the entrants for taking part.

Pineapple fruit cake


My inspiration for what to bake this week came from my current reading material. I am reading “In The Company Of Cheerful Ladies”, which is book six in the series of the
No.1 Ladies Detective Agency series by Alexander McCall Smith. I love the escapism of these novels set in Botswana and the wry humour. I also love the numerous mentions of cake, much adored by the “traditionally built” heroine Precious Ramotswe.


Mma Potokwani is a formidable woman who runs the orphanage. She is known for using her cunning and persistence to get local people and businesses to provide help and services for free. If ever she cuts someone a large slice of fruitcake they know she is about to make an unpalatable request of them, but the fruitcake is so good they cannot resist.


I’m not a huge fan of the heavy fruitcakes served up as Christmas or celebration cakes. I love raisins and sultanas and this fruitcake caught my eye because of the addition of pineapple….lots of pineapple. Pineapple upside down cakes are cropping up all over the blogosphere at the moment; I adore them but have already blogged about
one . This cake sated both my pineapple needs and my need to emulate all the wonderful characters I’ve been reading about!


This was the passage I read on the train, during my daily commute, that made me want to make a fruitcake more than anything else this week:

[Mma Potokwani muses that] ‘Maybe there are people who would say that I eat too much cake.’
‘But you do not eat too much, do you?’ observed Mma Ramotswe.
Mma Potokwani’s response came quickly. ‘No, I do not. I do not eat too much cake,’ She paused and looked wistfully at her now emptying plate. ‘Sometimes I would like to eat too much cake. That is certainly true. Sometimes I am tempted.’
Mma Ramotswe sighed. ‘We are all tempted, Mma. We are all tempted when it comes to cake.’
‘That is true,’ said Mma Potokwani sadly. ‘There are many temptations in the life, but cake is probably one of the biggest of them.’


Later, when they have both finished their cake:

‘Temptation is very difficult,’ said Mma Ramotswe quietly. ‘I do not always resist it. I am not a strong woman in that respect.’
‘I am glad you said that,’ said Mma Potokwani. ‘I am not strong either. For example, right at the moment, I am thinking of cake.’
‘And so am I,’ confessed Mma Ramotswe.
Mma Potokwani stood up and shouted to the girl outside. ‘Two more pieces of cake, please. Two big slices.’

Two women after my own heart!


Pineapple fruit cake is fantastic!
The tropical smell of the pineapple simmering on the hob all mixed in with the sweet dried fruit and toffee-like brown sugar was heavenly. The pineapple chunks and juice produce a super moist cake that will keep for days....unless you have Mma Ramotswe and Mma Potokwani round for tea!

The texture was definitely at the lighter end of the fruitcake scale; I’d say it was halfway between a rock bun and fruitcake.


One thing I would add – make sure you give yourself enough time to make this cake.
Normally one just looks at the cooking time and adds a few minutes prep time on and that will suffice. This cake is simple to make but you have to bring the ingredients to the boil, simmer for 10 minutes then leave to cool before adding the flour. I’d allow about an hour on top of the cooking time for these additional stages. Here are the fruits after simmering away and plumping up with pineapple juice:


Ingredients

185g soft brown sugar (I used dark brown but light brown would work too)
375g mixed dried fruit and peel (I used sultanas and raisins)
125g glace cherries, chopped (I didn’t fancy these so added more sultanas)
125g unsalted butter, diced into cubes
185g pineapple chunks (fresh or tinned, I used tinned)
185ml pineapple juice
2 eggs, beaten
250g self raising flour

Method

Preheat the oven to 170˚C/fan oven 150˚C/325˚F/Gas mark 3.

Line a 20cm springform round tin with baking paper.

Place all the ingredients except for the eggs and flour into a large saucepan and mix.

Gently bring to the boil then, reduce the heat, and simmer for 10 minutes.

Leave to cool.

Add the beaten eggs and flour and mix thoroughly.

Spoon into the prepared cake tin and level the surface.

Bake for approximately 1 ½ hours or until a skewer inserted into the cake comes out clean. Mine took exactly 1 ½ hours.

Place the tin on a cooling rack and leave until you can safely handle the tin.

Remove the cake from the tin and leave to cool completely on the wire rack.

Bask in the glory of the wonderful thing you have made.

Eat.


Sunday, 21 March 2010

Hotel Chocolat Giveaway


What’s better than an easter egg? How about a FREE easter egg!

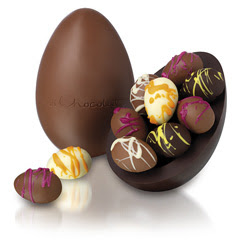
The lovely people at Hotel Chocolat have given me one of their extra thick chocolate eggs to try and have offered to send an egg to the lucky (UK mainland based) winner of my giveaway. Their Easter range is quite stunning.


When Hotel Chocolat say an egg is extra thick they really mean it – look at it!!! That chocolate is soooooo thick it’s a challenge to bite through it….a challenge I met, you’ll be pleased to know!


My egg was the “
Your Eggsellency” extra thick egg – it suits all tastes as one shell is milk chocolate and the other is dark chocolate studded with cocoa nibs – it’s a great egg to share as there’s something for everyone.
If that wasn’t enough, it’s filled with deliciously boozy truffle eggs including champagne and strawberry, rum and caramel, and amaretto. Whoever said “yummy” is spot on!


So, now you are drooling in anticipation of receiving one of these beauties, you’ll be wondering how you can win.
It couldn’t be easier – simply leave a comment telling me who you’d like to deliver your easter egg (it could be a relative, a celebrity, a fictional character or the Easter bunny himself!) and what sort of chocolate the egg would be made from.


Closing date for comments is 11.59pm Saturday 27 March and I’ll make the draw and post details of the winner on Sunday 28.
Hotel Chocolat will send the egg to the winner.

Good luck

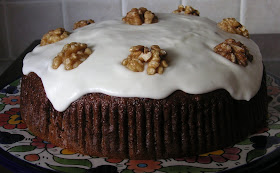
Iced Date and Walnut spice cake

This cake has been on my radar for a while and, as it strikes me as a more wintry cake, I thought I’d better make it pronto…yes, Spring is finally creeping in!


People are strange (that’s a good title – someone should write a song using it) and sometimes it’s all about how you pitch things.
If I produced this for my family and said “ta da! Look at this delicious date and walnut cake” I’d get the following range of responses: “I don’t eat dates”, “I don’t like walnuts”, etc etc. However, producing a “Toffee and nut cake” is met with joyful anticipation.


What stops this being a sticky toffee pudding cake (not that there’s anything wrong with that – I loved
the one I made) is the spice mix that also goes into the batter.
It adds a bit of heat to the flavour which works well with the sweetness of the dates.


This rich dark cake is quite divine – it has crunchy nuts and that sticky, deep toffee-ness that only dates can add.
The white icing calms it down and I would recommend using it. You can make it with lemon juice to add a tart contrast but you know my view regarding lemons.


I’ll admit that this cake uses a lot of ingredients but mostly they’re store cupboard staple items for a keen baker.
The method could not be simpler – or quicker - so please don’t be scared off by the sheer number of ingredients!


One quick comment on the glace icing...it’s made with single cream rather than water.
This produces one of the softest, most flavoursome and gorgeous icings ever – and I don’t give such praise easily. It reminded me very much of a cake from my childhood; Entemann’s used to make a traybake style carrot cake and the white icing was exactly like this. The only note of caution is that because it is made with fresh cream it won’t last as long as a more traditional glace icing.

Ingredients

For the cake:
175g dates, stoned and chopped (I find this easiest if you snip them with scissors rather than a knife)
1 teaspoon bicarbonate of soda
225ml boiling water
25g unsalted butter
1 egg
150g soft dark brown sugar
225g plain flour
2 teaspoons baking powder
1 ½ teaspoons mixed spice
1 teaspoon ground cinnamon
½ teaspoon nutmeg
1 teaspoon vanilla extract
75g ground almonds
75g walnuts, chopped

For the icing:
110g icing sugar
10g unsalted butter, melted
1 tablespoon single cream
1 tablespoon lemon juice (you can use water or more single cream instead, if you wish)

Optional decoration: approx 10 walnut halves

Method

- Preheat the oven to 180˚C/fan oven 160˚C/350˚F/Gas mark 4.

- Line a 20cm springform round tin with baking paper.

- Start by preparing the dates: place the chopped dates in a bowl and pour the boiling water over them.

- Add the bicarbonate of soda and the butter and stir until the butter has melted. Leave to one side to cool.

- Beat the egg and sugar together until well mixed.

- Add the cooled date mixture and all the remaining cake ingredients.

- Stir well to ensure the ingredients are combined thoroughly.

- Spoon into the prepared tin; don’t worry, the mix will be lumpy and rather unattractive.

- Bake for approximately 1 hour or until a skewer inserted into the cake comes out clean.

- Leave in the tin for 20 minutes before turning out and leaving to cool completely on a wire rack.

- Now make the icing: mix together all the ingredients until you have a glossy, thick yet still spreadable icing. You may need to add a little extra liquid to achieve this. You’re aiming for something thin enough to spread and run, but not so runny that you lose it all down the sides of the cake.

- Pour the icing over the cake and allow to run down the sides a little.

- After a few minutes, place the walnut halves on top of the cake. If you do this when the icing is at its runniest they may slide off the top!

- Bask in the glory of the wonderful thing you have made.

- Eat.

Sunday, 14 March 2010

Mother’s Day Coffee and chocolate cakes


It is Mothering Sunday when mothers the land over should be spoiled and pampered....before returning to the more normal state of affairs tomorrow!

The CCM’s favourite cake flavouring by far is coffee. When I looked back over my previous coffee bakes they have all been sponge and some sort of buttercream. Time for something a little different. But not that different as these are sponge too!

This cake is made with a coffee flavoured sponge which, straight from the oven, is brushed with coffee syrup. The recipe said to use all the syrup and their photo showed the cake oozing with liquid. The CCM isn’t mad on that wet a sponge so I only used about half the syrup – but it’s up to you.

I added a chocolate ganache and put some of the coffee syrup into this to provide an extra coffee hit. My top tip for coating cakes in ganache is to place tin foil under the wrack so that, when you’re clearing up, all you have to do is scrunch up the foil rather than scrub your work top clean.


Using brown sugar gave an interesting extra taste and it worked really well.
Coffee is bitter and the brown sugar gave it an almost caramel-y toffee edge that sweetened it but left it unmistakably coffee.


Some more of the coffee syrup went into lightly whipped cream to serve alongside the cakes.
When I create a coffee cake I really put coffee into it!

Ingredients

For the sponge:
3 tablespoons instant coffee granules
4 tablespoons boiling water
180g soured cream
250g unsalted butter, at room temperature
165g soft brown sugar
4 eggs
310g self raising flour

For the coffee syrup (this will make enough to brush over the cakes, use in the ganache and the whipped cream):
4 teaspoons instant coffee granules
330g soft brown sugar
340ml water

For the chocolate ganache:
250g dark chocolate, broken into small pieces
300ml double cream (have extra on standby should it be needed to get the thickness you want)
3 tablespoons of the coffee syrup (recipe above)

Method

- Preheat the oven to 180˚C/ fan oven 160˚C /350˚F/Gas mark 4.
- Have ready 12 mini loaf pans each one with a capacity of 250ml. You could use a cupcake pan but will probably get many more – 24 I should imagine. You can grease the tin but I didn’t and my cakes turned out fine. Make a judgement on how ‘non stick’ you think your pans are!
- Start by making the cakes: dissolve the coffee into the hot water and stir until there are no lumps.
- Allow to cool, then stir in the soured cream. Put to one side.
- Cream together the butter and sugar until well combined and light. It won’t go fluffy because the brown sugar is a heavy and granular sugar.
- Beat in the eggs one at a time.
- Fold in the flour in three batches, alternating with the soured cream coffee mixture.
- Spoon into the tins and level the surface.
- Bake for approximately 25 minutes or until a skewer inserted into the cake comes out clean. Mine sank a little on removing from the oven but this had no effect on the lightness of the sponge.
- About 10 minutes before the cooking time is up make the coffee syrup: Place all the ingredients into a saucepan over a medium heat and stir until the sugar has dissolved – you can tell this by looking at the back of your spoon; no crystals? It’s dissolved.
- Bring to the boil then remove from the heat.
- Brush some coffee syrup over the straight-from-the-oven cakes. If you want a wet, rum baba style cake use most of the syrup. I didn’t, so brushed each cake three times with some syrup barely using half.
- Leave the cakes to cool completely in their tins before turning out. At this point they will keep in an airtight container for three days.
- On the day of serving make the ganache: place the cream and coffee syrup into a saucepan over a medium heat and bring it just to the boil.
- Remove from the heat and add the chocolate. Use a whisk to ensure the chocolate melts.
- At this point you have a choice: continue whisking if you want a fluffy, thick whipped chocolate ganache. I wanted a thick but runny ganache to spoon over my cakes like a glaze so stopped whisking. If the ganache is too thick to run over the cakes whisk in a dash more cream.
- Spoon over the cakes and allow to run over the edges. My tip for avoiding lots of mess is place the cakes on a wire rack over a sheet of foil. Any drips will land on the foil and you can simply throw this away.
- Let set for 20 minutes or so before placing your chosen decoration on top.
- Serve with lightly whipped cream – add some of the coffee syrup to the cream if you wish.
- Bask in the glory of the wonderful thing you have made.
- Eat.

Tuesday, 9 March 2010

Iron Cupcake London

I've have tried to email you all personally, and have also posted on twitter, but just to make sure no one's left out: the April Iron Cupcake London has been postponed until May. Sorry about this but work commitments are taking me away from London.

The theme of the next challenge will still be "Fruit". We are in the process of agreeing dates with our venue and I will let you know them as soon as possible.

Sorry if this inconveniences anyone.

I can't wait for May for more glorious cupcakes!

Sunday, 7 March 2010

Apple tart ‘Maman Blanc’


Raymond Blanc’s current tv show Kitchen Secrets has contained so many delicious recipes but this one stood out for me and Mr CC. Mr CC is not the most demanding of people so when he watched this tart being made and turned to me saying “make it happen” in that wry, tongue in cheek way of his, I knew he must really want to try it!

The recipe is actually one of Ma Blanc’s, hence the title. I’d never used Cox’s apples before but definitely will be from now on – they had a beautiful flavour and turned a lovely soft texture on cooking but retained some bite.

The pastry was a revelation; it contains no sugar but is joyously buttery and flaky. The bonus was how easy it was to work with – I’ve never had such a beautiful, clean looking pastry case. Also, you don’t have to blind bake the pastry case yet the base is crisp and perfect!

The only change I made to the recipe was to double to amount of custard. I’m glad I did because the original amount would’ve been a bit skimpy.

While this tart looks like a lot of work and, admittedly, there are a few stages to it, it’s not difficult nor did it take that long to make. I made the pastry the night before and left it refrigerated– rolled out and ready to fill– in the tin just covering it with clingfilm and it was perfect. This saved me a lot of time on the day.

Here are the beautiful apples glazed and ready for the oven:

To manage the expectations of any work colleagues hoping for a slice tomorrow morning:

Ingredients

For the pastry:

250g plain flour
125g unsalted butter, diced
1 teaspoon milk or water (I used milk)
1 egg

For the apple filling:

15g unsalted butter
½ tablespoon lemon juice
15g caster sugar
½ tablespoon Calvados, or any apple brandy or liqueur
4-5 Cox’s apples, peeled, cored and cut into slices – aim for 8-12 slices per apple

For the custard (this is the amount I used which was double Raymond Blanc’s amount):

200ml double cream
2 eggs
100g caster sugar

Method

- Start by making the pastry: pulse the flour and butter in a food processor until you have crumbs.

- Add the egg and milk and pulse again until the pastry clumps but does not form a ball – be careful not to overwork it.

- Tip the dough onto a sheet of clingfilm and kneed it just enough to form a ball. Flatten, wrap in clingfilm and refrigerate for 30 minutes.

- Preheat the oven to 220˚c/fan oven 200˚c/440˚F /gas mark 7.

- Roll out the chilled dough between two sheets of clingfilm. I didn’t need to add any extra flour. Use one sheet of the clingfilm to lift the pastry to line a 20cm loose bottomed flan tin. Press the pastry into the tin and use the rolling pin to roll over the top and cut of any excess pastry.

- Refrigerate until ready to complete. You can make the tart up to this point the day before. Just make sure you wrap the tin in clingfilm so the pastry doesn’t dry out.

- Now make the filling: start by placing the butter, lemon juice and sugar in a saucepan and heating until the butter has melted and the sugar dissolved.

- Remove from the heat and stir in the calvados. Leave to one side.

- Prepare the apples and then line them in the pastry case in concentric circles, overlapping each piece so the tart is packed with apple. Have a spare apple on standby should you need it – apples vary in size and it’s always worth having extra if needed!

- Bruch the cooled syrup over the top of the apples and place the tart in the oven for 10 minutes.

- After this time, and leaving the tart in the oven reduce the temperature to 200˚c/fan oven 180˚c/400˚F /gas mark 6 and cook for a further 20 minutes or until the pastry is golden and the apples have browned a little on the edges.

- Whisk together the double cream, eggs and sugar until thick and well combined.

- Pour over the apple tart and bake for a further 20 minutes or until the custard has set.

- Remove from the oven and leave to cool for an hour. The custard will puff up in the oven and settle as it cools.

- Serve with clotted cream or ice cream.

- Bask in the glory of the wonderful thing you have made.

- Eat