Sunday, 2 January 2011

Fun with puff pastry and a Christmas round up


This Christmas I showed my ability to learn from past mistakes and grow as a person – by which I mean that I didn’t buy my usual six limes and will thus be spared the sad task of having to throw them away towards the end of January. However, I did have a minor aberration in the Tesco aisle where they stocked the fresh ready-rolled all-butter puff pastry ....and ended up with quite a lot of puff pastry. You may not know what it’s like to look in your fridge and wonder “why on earth did I think I would need that much puff pastry?” so let me tell you it’s a mixture of shame tinged with pride at owning so much puff pastry. Having frozen what I could, I was left with several packs so decided to make palmiers.

No recipe needed here as it couldn’t be simpler. Just spread your filling over the pastry; here is the mincemeat version:


Then roll them up from the sides so they meet in the middle and chill them for 30 minutes before slicing. At this point, they don’t look very palmier-like but don’t panic:


When baked they look like fat villainous Victorian moustaches (to bake them, simply follow the instructions on the pastry packet – mine needed about 15 minutes at 180C):


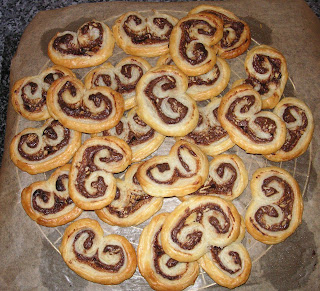
These were such a hit that I repeated the process with nutella, chopped almonds and cinnamon (these were Mr CC’s favourites):

And then – because there was still some pastry to use up, I tried a plainer sugared version. I simply sprinkled caster sugar over the pastry and then egg washed the slices, sprinkling with more sugar (sorry for the rather migraine-inducing photo but I made them in the evening and it was dark, so I needed my kitchen lights on!):


When I get round to tackling my frozen puff pastry mountain there will no doubt be more puff pastry recipes on my site!


Of course, it wouldn’t be Christmas without mince pies. I made my usual pies with decorative pastry toppers and if you’d like to see the recipe it can be found here


I also made a Christmas cake with my usual recipe only this year I used a much darker rum which gave it a richer colour (it was overproof rum and gave the flavour a bit of a kick!).


My cake toppers were from Salzburg and are Krampus and St Nicholas. Their bodies are Mozart Balls– the famous chocolate only available in Salzburg. I liked that they were cute and Krampus doesn’t look too evil!


Happy New Year to you all and here’s hoping your 2011 will be filled with exquisite baked goods!


Wednesday, 29 December 2010

Raspberry jelly and panna cotta


A little while back I remember posting a teaser photo of a dessert I was working on for Christmas – well this is it! It’s a raspberry jelly with vanilla panna cotta. In my family we either don’t like Christmas pud or at that age where it “sits on you” when you’re trying to sleep at night. So I picked this as a light and fruity (but still calorific – don’t fret!) alternative.


Using the gorgeous copper mould Mr CC bought me for Christmas last year I set about making the jelly. Here it is setting in the fridge:


The recipe needs to be started 2 days before serving as you must ensure you’ve left enough time for both layers to set. If you don’t have that much time you could make exactly the same thing in individual moulds and these will set quicker.


It’s by no means a cheap dessert – the raspberries are expensive and all that dairy for the panna cotta isn’t exactly pennies but, for a celebration, it’s worth it. If you consider the price of a good quality dessert from a top food retailer (such as M&S or Waitrose etc) it’s comparable and you know exactly what’s gone into yours – all good stuff! Plus, it’s very rich so serves lots of people.


Homemade jelly is divine; it’s soft and intensely fruity. It’s also a lot less sweet than packet jelly so the fruit really shines through. One thing I would like to point out and I’m sure a science boffin can explain the answer, the liquid jelly mix tastes much sweeter than when it’s set. First time I made this I panicked that it was going to be too sweet so don’t worry if you think the same...it will all be fine!


The fruit in the pan looks glorious; an explosion of colour:


Simmer until it breaks down:


The key to a nice jelly texture is straining out all the fruit seeds. I used a metal sieve – what’s gathering in the bowl is the basis of the jelly:


A piece of equipment I find particularly useful is a straining mushroom. It drives the juice through the sieve. It looks like a darning mushroom (does anyone still use those?) and, when I bought it, I didn’t think I’d ever use it – it’s so effective though, that I use it whenever I sieve fruit:


I love the crisp line where jelly meets panna cotta; it’s important to let the jelly set fully before pouring over the panna cotta otherwise you won’t get this crisp delineation.

Sorry if some of the photos are a bit murky – Christmas day was rather gloomy (weather-wise) and it was impossible to get good light.

Ingredients

Note – this is the basic quantity for the jelly – you can scale it up as required but allow extra setting time. For my giant mould I doubled up the quantities.
5 leaves gelatine
500g raspberries – fresh or frozen, plus an extra punnet to set in the jelly
150g caster sugar
400ml cold water

For the panna cotta recipe click here

Method

Start by soaking the gelatine leaves in cold water until they are soft.

Place the raspberries, sugar and water in a saucepan and heat gently until the sugar has dissolved.

Simmer further and mash the raspberries with a spoon or – and I found this really productive – the masher you’d use to make mash potato.

Pass through a sieve and return the liquid to a clean pan.

Heat gently and then remove the pan from the heat.

Squeeze all the water from the gelatine and whisk into the raspberry juice – it will dissolve very quickly.

Leave the jelly to cool a little.

Pass through a sieve into your chosen mould – sieving again will strain out any seeds that passed through first time.

Drop the extra raspberries into the jelly.

Chill until set – I left overnight.

Now make the panna cotta - for the panna cotta method click here

Pour the panna cotta over the set jelly and press a sheet of clingfilm onto the panna cotta – this stops a skin forming.

Refrigerate overnight to ensure it has set.

To turn out of the mould, dip for 5-10 seconds in warm water then press a plate against the mould and flip. You will hear a release squelch when the jelly has freed itself.

Bask in the glory of the wonderful thing you have made.

Eat.

Friday, 24 December 2010

Gingerbread

I always make gingerbread men at Christmas time – there’s something about the warming spice of ginger that seems festive. This year, I decided to give my trusted recipe a rest, and try a new version; mainly because my recipe is more of a biscuit and I wanted to find a truer ginger-bread.


This recipe intrigued me because of its unusual method; it doesn’t require you to melt the butter and syrup/treacle, and the flour is self raising. It also includes an egg. Using dark treacle (my usual recipe uses the paler golden syrup) produced a darker, spicier biscuit that I particularly enjoyed. I also found the dough easier to work with than some gingerbreads:


Wherever I travel I’m always likely to return with biscuit cutters and cake tins! Salzburg was no exception and I came back with two rather unusual biscuit cutters in my suitcase: a Krampus cutter ...


...and a cutter in the shape of the Stiegl brewery logo...


....oh yes, my Christmas biscuits can be filed under “e” for “eclectic” this year! Just to balance out the weirdness I did go for the more standard Christmas cutters:


It pains me to type this next sentence, but I’ve noticed that – over the Christmas period – people don’t always seem to want cake whereas they’ll always gladly accept a biscuit. Do you think I made enough?


Happy Christmas to you all – I hope your Christmas is filled with sugar and spice and everything nice!

Ingredients

325g self raising flour
3 teaspoons ground ginger – I used a lot more, but this is a guideline amount
1 ½ teaspoons ground cinnamon
85g unsalted butter, from the fridge
115g dark brown sugar
85g black treacle ( I tried a second batch with 45g golden syrup and 40g black treacle and preferred it)
1 egg

To decorate: whatever you choose!

Method

Place the flour, ginger, cinnamon and butter in a food processor and blitz until you have something akin to breadcrumbs. If you don’t have a food processor rub the butter into the flour, then stir in the spices – it will stop your fingers getting stained with the spice!

Place the brown sugar, black treacle and egg in a mixing bowl and beat until runny and well combined. I always place the mixing bowl on the scales when weighing out black treacle as it saves you having to scrape it out of the scale's bowl.

Tip the flour mixture into the treacle mixture and beat until the dough forms clumps.

Tip the dough onto a large sheet of clingfilm and use the clingfilm to help you bring the dough together – I recommend this for three reasons: firstly it saves you over-handling the dough, secondly you don’t get dirty and thirdly, you don’t have to add extra flour to the dough to stop it sticking so the finished biscuit will be softer and moister.

Wrap in clingfilm and refrigerate for one hour.

Preheat the oven to 180˚C/fan oven 160˚C/350˚F/gas mark 4.

Line two baking sheets with baking paper.

Roll out the dough between two sheets of clingfilm – don’t add flour unless necessary – I needed a little flour when I used solely black treacle as I had sticky treacle patches in my dough; it definitely made it harder to re-roll. You’re aiming to roll it about 0.5cm thick. When I used a blend of black treacle and golden syrup no flour was necessary and re-rolling was a dream!

Use the cutters you have chosen to cut out the dough.

Re-roll the scraps and keep on until you have used all the dough. If you’ve dusted the surface with flour, it may be hard to get the gingerbread back into a ball; try wetting your hands a little and kneading the dough – it should do the trick!

Bake for approximately 10-12 minutes or until the biscuits feel firm to the touch.

Leave, in the trays, for 10 minutes to firm up, then transfer to a wire rack to cool completely.

Decorate as desired.

Gingerbread gets better with age – make this several days in advance for a biscuit that packs a punch with its flavour!

Bask in the glory of the wonderful thing you have made.

Eat.

Tuesday, 21 December 2010

Jam roly poly bread and butter pudding


This dessert is a show stopper – it’s the sort of dessert people have to eat more of even if they’re about to burst at the seams! The bonus for you is that all the prep can be done an hour or so in advance and the only real skill involved is slicing bread. It’s the perfect winter warmer for this rotten weather we’re all currently enduring.


Although I describe in the recipe below how to slice the bread I think it’s a good example of a picture being worth a thousand words. Here’s what your loaf needs to end up looking like:


Then slice thus:


The name tells you everything; it really is a combination of two of the best desserts ever! Personally, I find some bread and butter puddings can get a little greasy, but the addition of the jam in this dish stops that happening. Each slice of bread produces two rolls:


We’re all looking for shortcuts in the kitchen; sometimes I don’t sift flour (I know! I’m a rebel!) but one shortcut you should never take is failing to sieve uncooked custard – it will always have eggy lumps in it. See what I mean?


The finishing touch to the dessert is the sprinkling of sugar before putting the dish in the oven to bake; please don’t forget this or decided not to do it as it provides the most delicious sweet crust. The CCB (Caked Crusader’s Brother) requested a dessert made purely of the sugary crusts – they are that good!


The first time I served this I prepared extra custard (Mr CC is a custard addict) but it doesn’t need it at all. The baked custard soufflĂ©s up around the bread and provides soft creaminess. Any left over pud can be covered with foil and reheated when required...but I don’t think it will hang around for that long, to be honest!

If you only make one recipe from my site this year…this could be the one to pick!

Ingredients

100g unsalted butter, at room temperature – it needs to be soft
1 jar (approx 350g) raspberry jam
1 large fresh white loaf – uncut (it will weigh about 800g and it’s best to choose a sandwich type loaf that has a nice flat top)
4 eggs
400ml double cream
400ml milk
85g caster sugar, plus extra to sprinkle on top
1 teaspoon vanilla extract

Method

Butter a 2 litre baking dish – I used a disposable tin tray to save on washing up (I bought mine in Tesco for £1.50)

Spoon about a third of the jar of jam into the bottom of the tray and spread it around.

Using a large serrated bread knife, cut the crusts off the loaf (you can blitz these in the food processor and freeze the crumbs to use in another recipe).

Cut the bread into four long slices i.e. not the way you would slice a loaf to make sandwiches – this is the only slightly tricky part of the process as, without the crust, the bread loses it’s stability. I found that gentle swipes of the knife did the job better than trying to saw through it heavy-handedly.

Butter one side of each slice of the bread.

Turn the slice over and spread the remaining jam on the bread.

Roll up each slice like a swiss roll – I used the bread knife to help lift the buttery bread from my work surface.

Cut each swiss roll through so that you now have 8 dumpy little swiss rolls.

Arrange them in the baking dish jam cut side up so that they look pretty.

Whisk together the eggs, cream, milk, sugar and vanilla.

Hold a sieve above the dish containing the swiss rolls and ladle the custard – through the sieve – into the dish. Ladle some over the rolls so that the bread can absorb the custard. You must sieve the custard as there will be eggy lumps in it.

Depending on the depth of your dish you may not be able to get all the custard in straight away – if this is the case, leave the rolls to absorb the custard then return 20 minutes later and add the remaining custard.

Leave the dish to stand for 30 minutes before baking – this is to give the custard plenty of time to seep into the bread and make it moist and creamy. It wouldn't matter if you let it stand for longer.

Preheat the oven to 160˚C/fan oven 140˚C/320˚F/gas mark 3.

Scatter 2-3 tablespoons of caster sugar over the top of the rolls.

Bake for 1 – 1 ¼ hours but check after an hour – it’s ready when the custard is set and the dessert has a golden brown look to it.

Serve one roll per portion with the surrounding custard – it cuts nicely into squares.

Bask in the glory of the wonderful thing you have made.

Eat.

