Sunday, 14 December 2008

Vanilla custard tart


I’ve made this tart a few times now and featured it on my site twice but have always pretty much followed the recipe (except for changing the pastry to my own trusty shortcrust which I found easier to work with). This time, I felt ready to put my own stamp on it and decided to add lashings of vanilla.

There is something magical about this tart. It looks and tastes unfussy and clean. Unusually for a cold tart it’s comforting, which is something I normally associate with hot food. It’s also the answer I always get when I ask my family “is there anything you’d like me to make at the weekend?”


I can’t stress enough how important sieving the custard is. If you want that luscious creamy suck-through-your-teeth-smooth texture you have to sieve the custard; if you’re making a vanilla tart you have to sieve twice.


This recipe isn’t difficult but it requires concentration. It’s definitely not a bung-it-in-the-oven-within-5-minutes item.


I’ve set out the full recipe below. If you wish to make the classic custard tart the ingredients and method are the same but simply omit all the vanilla.

If you are planning on making the recipe you might want to have a glance at the first and second posts about the tart as they contain some step by step photos that will help you better visualise what I’m wittering on about in the method!


For people who may wonder what I (and family) get up to on Sunday afternoons, the following pictures explain it all fairly succinctly.....


Ingredients:
For the shortcrust pastry:
175g plain flour
120g unsalted butter, cold
3 tablespoons icing sugar
2 egg yolks
2 teaspoons vanilla extract

To glaze: 2 egg yolks, beaten

For the filling:
9 egg yolks
75g caster sugar
500ml whipping cream
2 vanilla pods, cut in half lengthways and the seeds scraped out
3 teaspoons vanilla extract
Nutmeg, for grating

How to make:

- Start by making the pastry: put the flour, butter and icing sugar into the food processor and blitz until you get fine breadcrumbs.
- Add the egg yolks and vanilla and blitz until the pastry just starts to come together.
- Turn out onto a lightly floured surface and bring together into a ball of dough, handling no more than is absolutely necessary.
- As this dough is very soft and it is going to line quite a deep flan ring, wrap in clingfilm and chill the dough for 30 minutes so it is firmer to work with when you roll it out.
- Line a baking tray with baking paper. Grease a 18cm pastry ring or loose bottom flan tin and stand it on the tray. Whatever ring or tin you use, try to find a deep one (ideally 3.5cm) as this will give a lovely deep tart and a luscious thick layer of baked custard.
- Roll out the pastry between two sheets of lightly floured baking paper and use to line the flan ring. Don’t worry if you have some tears, the pastry is good-natured and patches easily.
- Let the pastry overhang the edges. Take some of the surplus pastry off and put to one side – you may need this for patching later on.
- Chill the pastry for a further 30 minutes once the tin is lined to minimise shrinkage when baked.
- Preheat the oven to 190°C/fan oven 170°C/375°F/Gas mark 5.
- Line the chilled pastry with a sheet of baking paper and cover with baking beans.
- Bake in the oven for 10 minutes.
- Beat the two egg yolks and when the 10 minutes is up, remove the pastry from the oven and remove the paper and beads. Have a look at the pastry and use the spare that you put to one side to patch any little holes or cracks that you can see. When happy, brush all of the egg yolk over the interior of the pastry case and return to the oven for 5 minutes. This seals the pastry so that it won’t go soggy when you add the custard.
- Remove the pastry from the oven and leave to cool. When it is cool enough to handle trim the excess pastry away using a serrated knife. Leave the pastry in the ring/tin. I wrapped the tin in foil so that if there were any leaks the custard wouldn’t escape too far!
- Reduce the oven temperature to 150°C/fan oven 130°C/300°F/Gas mark 2.
- From now on it’s all easy! Make the custard by whisking together the egg yolks and sugar. Add the cream and vanilla extract and whisk again.
- Pour through a sieve into a heavy saucepan. Don’t skip this stage as there’s lots of eggy bits that will get caught by the sieve and would make the custard lumpy in texture if not removed.
- Add the vanilla pods and seeds to the mixture.
- Heat the custard over a low heat stirring all the time. When it gets to 37°C remove it from the heat.
- Pouring through a sieve, pour as much of the custard into the pastry case as possible. I got all of mine in but it will depend on how deep your ring/tin is. Cover the surface with grated nutmeg. If you’re not confident that you’ll get the tart into the oven without spilling the custard, put the tray (with the tart case on it) onto the oven shelf and then pour the custard in. I would’ve done this but when I pull my oven shelf out it dips slightly so I could not have got all the custard in.
- Bake for 45-50 minutes or until the custard looks set but still wobbles slightly when the tray is moved. Mine actually took an hour to get to this stage.
- Leave to cool on a wire rack.
- Bask in glory at the wonderful thing you have made.
- Eat.

Sunday, 7 December 2008

Aargau carrot cake

Waiting to board my plane home at Zurich airport, I came across a book called “A little Swiss cookbook” by Jacqueline Martinet, from which this recipe hails.


The recipe for Aargau carrot cake caught my eye as I’d purchased a bag of marzipan carrots in Zurich and didn’t have a clue what I’d use them for!


Aargau is a canton north of Zurich famed for agriculture. This carrot cake recipe is traditional to the region and is different to carrot cakes that I’ve previously come across. If you glance at the ingredients you will notice that there is no oil or fat at all but a hefty slug of ground almonds. My kind of cake! The cake is very moist and incredibly light - it balances perfectly with the sweet icing.


The recipe provided quantities in cups too, so for my American readers I’ve included these in the ingredients list below; I can’t vouch for how accurate the conversion is as I used the metric quantities.


Ingredients:
For the cake:
3 eggs, separated
150g (3/4 cup) caster sugar
Juice and rind of one lemon (I omitted this and used a little milk instead to slacken the mix)
150g (1 cup) grated raw carrot
250g (1 cup) ground almonds
50g (1/4 cup) self raising flour
1 teaspoon baking powder

For the icing:
150g (3/4 cup) icing sugar
1 tablespoon lemon juice (I used water)

To decorate: marzipan carrots

How to make:

- Preheat the oven to 180°C/fan oven 160°C/350°F/Gas mark 4.
- Line a 20cm springform cake tin with baking paper.
- Place the egg yolks and sugar in a bowl and beat until well combined.
- Add the lemon, carrot, almonds, flour and baking powder and mix until thoroughly combined.
- In a separate bowl whisk the egg whites until they form stiff peaks.
- Fold one spoonful of the whites into the carrot mix to slacken the mix and make the rest of the whites easier to fold in.
- Fold in the rest of the whites.
- Spoon into the prepared tin and bake for approximately 45 minutes or until a skewer comes out cleanly. Mine took exactly 45 minutes.
- Leave to cool in the tin on a wire rack.
- When the cake is cold it can be iced. Simply mix the icing sugar and lemon juice (or water) together until you have a thick glossy icing. You may need to add a little more liquid but don’t add too much at a time.
- Pour over the cake and place the marzipan carrots on top.
- Bask in glory at the wonderful thing you have made.
- Eat.

Coconut sandwich


The basic cake recipe was for a 990g loaf cake and served plain. I’m sure that would be delicious but, noticing the quantities were perfect for a sponge sandwich I decided to add some buttercream and make a more elaborate cake.


There’s a reason why the sandwich (or layer) cake has survived for so long – it’s perfect! The layer of filling separating the two sponges and further icing on top is heavenly to eat and guarantees that you get a bit of all the components in every bite.


As I type this my home is filling with the aroma of warm coconut and I know already that this cake will be something special!


I’ve never used Swiss meringue buttercream as a filling before, normally I pipe it on top of cupcakes. I’ve done some piping here too but what struck me was how light the buttercream was as a filling – it worked really well.


Ingredients:
For the cake:
175g unsalted butter
175g golden caster sugar
3 eggs
175g self raising flour
1 teaspoon baking powder
50g desiccated coconut
2 teaspoons coconut extract
3 tablespoons milk

For the buttercream:
4 egg whites
250g caster sugar
250g unsalted butter, at room temperature
2 teaspoons coconut extract

How to make:

- Preheat the oven to 180°C/fan oven 160°C/350°F/Gas mark 4.
- Line two 20cm sandwich pans with baking paper.
- Place the butter and sugar into a bowl and beat until soft and well combined. Due to the ratio of ingredients, the mix won’t get light and fluffy.
- Beat in the eggs one at a time, adding a little of the flour if it looks like the mix might curdles.
- Add the remaining flour, baking powder, coconut and extract and beat until thoroughly mixed.
- Add the milk to loosen the batter.
- Spoon the batter into the two prepared sandwich tins and bake in the oven for approximately 25 minutes or until a skewer comes out clean. Mine took exactly 25 minutes.
- Leave to cool in the tins for at least 10 minutes before turning out and letting cool completely on a wire rack.
- The sponges can be made in advance and stored in an airtight tin.
- Make the buttercream. Place the egg whites and sugar in a bowl over a pan of simmering water (making sure the bowl doesn’t touch the water) and stir constantly to stop the egg from cooking.
- After 5-10 minutes the sugar should have dissolved. You will know whether this has happened by looking at the back of the spoon – if you can see any sugar crystals the mix needs more heating and stirring.
- When no crystals are visible, remove the bowl from the heat and whisk the meringue mixture until it has puffed up and cooled.
- Add the butter and coconut extract to the meringue and continue to whisk. The mixture will collapse initially but don’t panic; keep whisking and it will form a smooth, fluffy buttercream.
- Spread half of the buttercream on to one of the sponges and place the other sponge on top.
- Pipe the remaining buttercream on top of the cake.
- Bask in glory at the wonderful thing you have made.
- Eat.

The spoils of Zurich....

Regular readers will recall that last week I headed off to work in Zurich for a few days. While it was a work trip I managed to sneak in a little bit of shopping and here are the spoils:


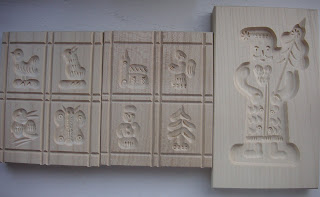
Starting in the top left corner and heading clockwise there are piggy biscuit cutters, icing decorations, Swiss cake cookbooks (in German – I’m going to have to use an online translator!), a terrine mould, marzipan carrots, and hand carved wooden Christmas biscuit moulds.

The cookbooks are by the fantastically named Betty Bossi but a little internet research has revealed that this is not the name of a real person; Betty Bossi is apparently a “fictitious cook”.


I got very excited about the terrine mould as it’s longer and thinner than any I’d seen before. The sticker mentioned “Terrine Weissblech” and my mind filled with ideas of what that could be – maybe something delicious involving white chocolate? I’ve since found out that “weissblech” means tinplate - doh!

Marzipan carrots took up a lot of space in the cake decorating section of the store and, after reading one of my Swiss recipe books, I know why – the traditional Aargau carrot cake is decorated with them. If you want to see an Aargau carrot cake here it is, I made one!

Pigs seem to feature in many European countries’ Christmas traditions but not the UK’s. I couldn’t resist these though and wondered if it would be tasteless to use them on pork pies?


The star of the show, for me anyway, is the hand carved wooden biscuit moulds. Taking traditional Christmas images, each one was truly unique and I had to sort through the box to find the Father Christmas I wanted to come home with me!