Sunday, 28 September 2008

Extreme Lemon tart (Warning: for lemon addicts only!)

Now regular readers will know that I hate lemon. Oddly though, I rather enjoy using it in baking. I never claimed to make sense!


Recently I’ve made quite a few things with almond and the CCM (Caked Crusader’s Ma) has to eat these sparingly because as much as she loves almonds, they don’t reciprocate the love. So this one’s for her!


I found this lemon oil and it’s made solely from pressing lemons. That may sound an obvious comment but often you’ll find additional ingredients to make the expensive ingredient go further – no such tactics here. I bought this lemon oil from Lakeland Limited who state that it takes 330 lemons to make one bottle...that’s a lot of lemons! I added a few drops to the pastry for a subtle lemon tang and some more to the lemon juice just to perk up the zing-factor. You could use lemon zest to achieve the same objective but I wanted the lemon filling to be smooth.


Here’s the beautiful pastry straight from the fridge and about to be baked blind:


As the tart cooled I found that the surface cracked. Admittedly it isn’t desirable but it didn’t effect the flavour or texture, and with judicious cutting (i.e. cutting along the cracks) you can eliminate most of them.


The CCM’s verdict? She was pleased! She claimed that this is a lemon tart for people who never find things lemony enough. It also announced itself with that lemon tickle at the back of the throat – again, I’m reliant on the CCM here but this is apparently a good thing. The CCM also thought this would be a good dessert for people who usually find dessert too sweet.

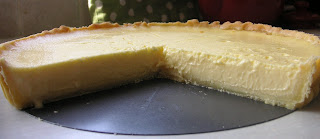
Always sieve a custard-type filling before baking. Why? This photo is probably the best answer!


Ingredients:
For the pastry:
173g plain flour
120g unsalted butter
3 tablespoons icing sugar
2 egg yolks
Dash of lemon oil or, if preferred, the finely grated zest of 1 lemon

For the filling:
5 eggs, beaten
150g caster sugar
Juice of 5 lemons (if required, add the grated zest to the mix as well)
300ml double cream

How to make:

- Put all the ingredients for the pastry in a food processor and whizz together until a soft ball of dough is formed.
- Roll the pastry out between two sheets of baking paper and use to line a 23cm loose bottomed flan tin. No need to grease this, as the pastry is rich and buttery enough. Leave any excess pastry hanging over the edge of the flan tin (it’s always best to leave trimming the pastry until after you have blind baked it).
- Leave to chill in the refrigerator for 1 hour.
- Preheat the oven to 190°C/fan oven 170°C/375°F/Gas mark 5.
- Line the pastry case with baking paper and baking beans, and bake for 15 minutes.
- Remove the paper and beans and return to the oven for a further 5 minutes. Once you have removed the pastry from the oven reduce the temperature to 150°C/fan oven 130°C/300°F/Gas mark 2.
- Meanwhile, start making the filling: mix the eggs and sugar until combined.
- Beat in the lemon juice (and zest or oil, if using) followed by the double cream.
- Sieve the filling before pouring into the pastry case.
- Bake for 30 minutes or until the filling has only a slight tremor if you gently shake the tin. Mine took 35 minutes to reach this stage, but once you’re past the 30 minute mark watch it closely as mine was very liquid still at this point and then set quickly.
- Turn the oven off but leave the tart where it is. Let the tart cool in the oven – leave the oven door ajar. Without cooking the tart further, this helps the filling to firm up.
- When cool, transfer the tart to the fridge and chill thoroughly before serving, ideally 24 hours.
- Serve with cream or crème fraiche.
- Bask in glory at the wonderful thing you have made.
- Eat.

Lumberjack cake

Two things to address straight off regarding this cake:
1. No one seems to know why it’s named after lumberjacks
2. It is impossible to make this cake without Monty Python’s [http://en.wikipedia.org/wiki/Monty_Python] Lumberjack song playing in your mind on an endless loop. If you haven’t seen it here it is, if you have – watch it again – it’s still funny:


For a plain looking cake there’s really quite a lot going on here; this cake is all about flavour. The apple gives acidity and moisture, the dates provide wonderful texture and a toffee sweetness, and the buttery, caramelised coconut topping adds crunch and depth of flavour. It’s an embarrassment of riches!

Just how juicy does this look:


The cake has many elements of sticky toffee pudding i.e. the dates and the caramel sauce used in the topping, but then ups the ante and provides a tropical element with the coconut. The best description I can conjure to help you imagine the taste and texture of this, is to say it’s like a tropical bread pudding.

There is something about dates simmering in a pan that is always a joy – I think it’s partly the warm toffee aroma that’s produced:


One tip re: serving this cake; the texture is dense and the flavours are intense so I heartily recommend that you serve some cream with the cake to lighten it. Trust me – it takes it to a whole other level of pleasure!


As the cake is so moist it does start to sink a little on cutting; don’t worry – just think of all that delicious flavour the cake must contain!


Ingredients:
For the cake:
200g dates, pitted and chopped (200g is the weight you want after taking the stones out)
1 teaspoon bicarbonate of soda
125g unsalted butter, at room temperature
230g caster sugar
1 egg
1-2 teaspoons vanilla extract
2 granny smith apples (any tart eating apple will work), peeled, cored and grated
125g plain flour
60g self raising flour
Optional: Icing sugar to dust, before serving

For the topping:
75g unsalted butter
60g light brown soft sugar
35g dark brown soft sugar
80ml milk (whole or semi-skimmed)
60g shredded coconut (I couldn’t find this, so used flaked coconut that I chopped up a bit finer)

How to make:

- Preheat the oven to 180°C/fan oven 160°C/350°F/Gas mark 4.
- Line a 20cm round springform cake tin.
- Put the chopped dates in a saucepan along with 250ml of water and bring to the boil. Stir in the bicarbonate of soda (the mixture will froth up like mad) and put to one side to cool.
- Cream together the butter and sugar until pale and fluffy.
- Beat in the egg and vanilla.
- Stir in the dates (with all the liquid) and grated apple. Don’t worry if you have an extremely ugly batter at this point – mine would definitely not have won any beauty contests!
- Fold in the flours until combined.
- Spoon the batter into the prepared tin and level the surface. Bake for 40 minutes.
- Meanwhile, make the topping: put all the topping ingredients into a saucepan and stir over a low heat until the butter has melted and the mixture is well combined.
- When the cake has baked for 40 minutes, remove from the oven and gently spoon the topping onto it. Make sure that the topping evenly coats the cake and then return it to the oven for a further 20-30 minutes or until a skewer comes out clean. NB. The cake is wobbly even when cooked so rely on your skewer to tell you when it’s done. Mine required 67 minutes in total.
- Remove from the oven and leave to cool on a wire rack. It is best to let the cake cool completely before removing it from the tin. Even then, I still found that mine sunk a little when I transferred it from the tin.
- If required, dust with icing sugar just before serving. I served it with thick cream.
- The cake will keep for several days in an airtight container – no need to refrigerate.
- Bask in glory at the wonderful thing you have made.
- Eat.

Saturday, 20 September 2008

Moist chocolate cake

Early post this week as I’m heading off for a few days’ hols.


I wasn’t planning on making this cake but then, something clicked inside and I NEEDED chocolate. Needed, I tell you – not wanted or fancied; I’m talking actual, physical need.

This recipe interested me as it uses drinking chocolate instead of cocoa powder or actual chocolate. I bought a posh drinking chocolate and didn’t realise that nowadays, instead of powdery granules you get flakes of chocolate (note the two tone colour as it's half milk, half dark):


This meant the chocolate rippled through the sponge batter rather than turning the whole mix brown. As I wanted the buttercream to be an even chocolatey brown colour I used my mini-chopper to grind the flakes down – same lovely taste but more workable for a buttercream. You can see that it still retained some flecks of chocolate, which I rather like as it makes it look all the more decadent!


Here’s a sandwich tin ready for the batter:


One of my top tips is to have bulldog clips near to hand in the kitchen as they are perfect for holding paper in place. If you leave the baking paper to its own devices, as soon as you start spooning the batter into the tin it flops over and is difficult to hold in place. By using the bulldog clip you avoid all of this – just remember to remove it before putting the tins in the oven.

The glace icing sets very quickly and provides a beautifully smooth finish with very little effort required!


Ingredients:
For the cake:
170g unsalted butter, at room temperature
170g caster sugar
3 eggs
110g self raising flour
85g drinking chocolate
1 tablespoon hot water

For the buttercream:
110g icing sugar
50g unsalted butter, at room temperature
50g drinking chocolate
Water or milk, if required

For the glace icing:
170g icing sugar
50g drinking chocolate
Approximately 2 tablespoons hot water, to mix

Optional: Chocolate sprinkles to decorate

How to make:

- Preheat the oven to 180°C/fan oven 160°C/350°F/Gas mark 4.
- Grease and line two 20cm sandwich tins.
- Start with the cake - cream the butter and sugar together until light and fluffy.
- Beat in the eggs, one at a time and add some of the flour if required to prevent curdling.
- Fold in the flour and drinking chocolate then stir in the hot water.
- Spoon into tins and level the surface. Bake for approximately 25 minutes or until a skewer comes out cleanly. Mine took exactly 25 minutes.
- Leave to cool in the tins before removing the tin and leaving the cakes to cool completely on a wire rack.
- Now make the buttercream filling: beat all the ingredients together until smooth and light. Use to sandwich the sponges.
- Now make the glace icing: beat the ingredients together until a thick paste is formed – you may need more water but add it with caution as you don’t want the icing too runny!
- Using a knife dipped in hot water, spread the icing over the top of the cake. Work fast as the icing sets alarmingly quick!
- Bask in glory at the wonderful thing you have made.
- Eat.

Apple cake

I found this exact recipe in two different cook books, only one called it “Irish Apple Cake” and the other called it “Yorkshire Apple Cake”. I have no idea which is correct so have simply called it Apple cake.


Apple works so well in cake – the acidity and texture adds a depth of flavour and interest to the sweet batter. This recipe uses cooking (rather than eating) apples and provides a beautifully balanced sweet/tart contrast.

I served this cake at tea time with some Chantilly cream but it would be delicious for dessert served warm with custard or ice cream.


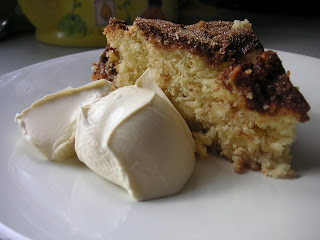
This is one of those satisfying yet simple rustic cakes; the sort of cake you’d expect to see cooling in a farmhouse kitchen. I love all cake but this type is my favourite particularly the cinnamon sugar crunchy topping! This photo shows the topping off at its best:


Ingredients:
For the cake:
225g cooking apples (I used Bramleys), peeled, cored and chopped to 1cm cubes
225g plain flour
1.5 teaspoons baking powder
115g unsalted butter, diced
115g golden caster sugar
1 egg
2-3 tablespoons of milk

For the crunchy topping:
50g golden caster sugar
1 teaspoon cinnamon

How to make:

- Preheat the oven to 180°C/fan oven 160°C/350°F/Gas mark 4.
- Line a 20cm round springform cake tin.
- Rub the butter into the flour and baking powder until it resembles breadcrumbs.
- Stir in the sugar.
- Chop the apples (don’t do this too far in advance or they will turn brown, if you want to do it in advance then cover with some lemon juice to stop discolouration) and add to the bowl along with the egg.
- Mix thoroughly and add milk, as required, to achieve a dropping consistency.
- Spoon the mix into the cake tin. It will be lumpy because of the apple. Level in the pan.
- Now make the topping: Mix together the sugar and cinnamon and sprinkle evenly over the top of the cake.
- Bake for 45-50 minutes or until a skewer comes out cleanly. Mine took 50 minutes.
- Leave to cool in the tin for 20 minutes before turning out onto a wire rack and leaving to cool completely.
- Serve either at room temperature with some whipped cream, or warm with custard or ice cream.
- Bask in glory at the wonderful thing you have made.
- Eat.