Sunday 27 May 2012

Rhubarb and mascarpone tart


The rainy April and early May has been excellent for garden rhubarb but, now the hot weather has arrived it will rapidly dry out and become straw-like.  Before that happens, I’ve just managed to sneak in one more rhubarb recipe!


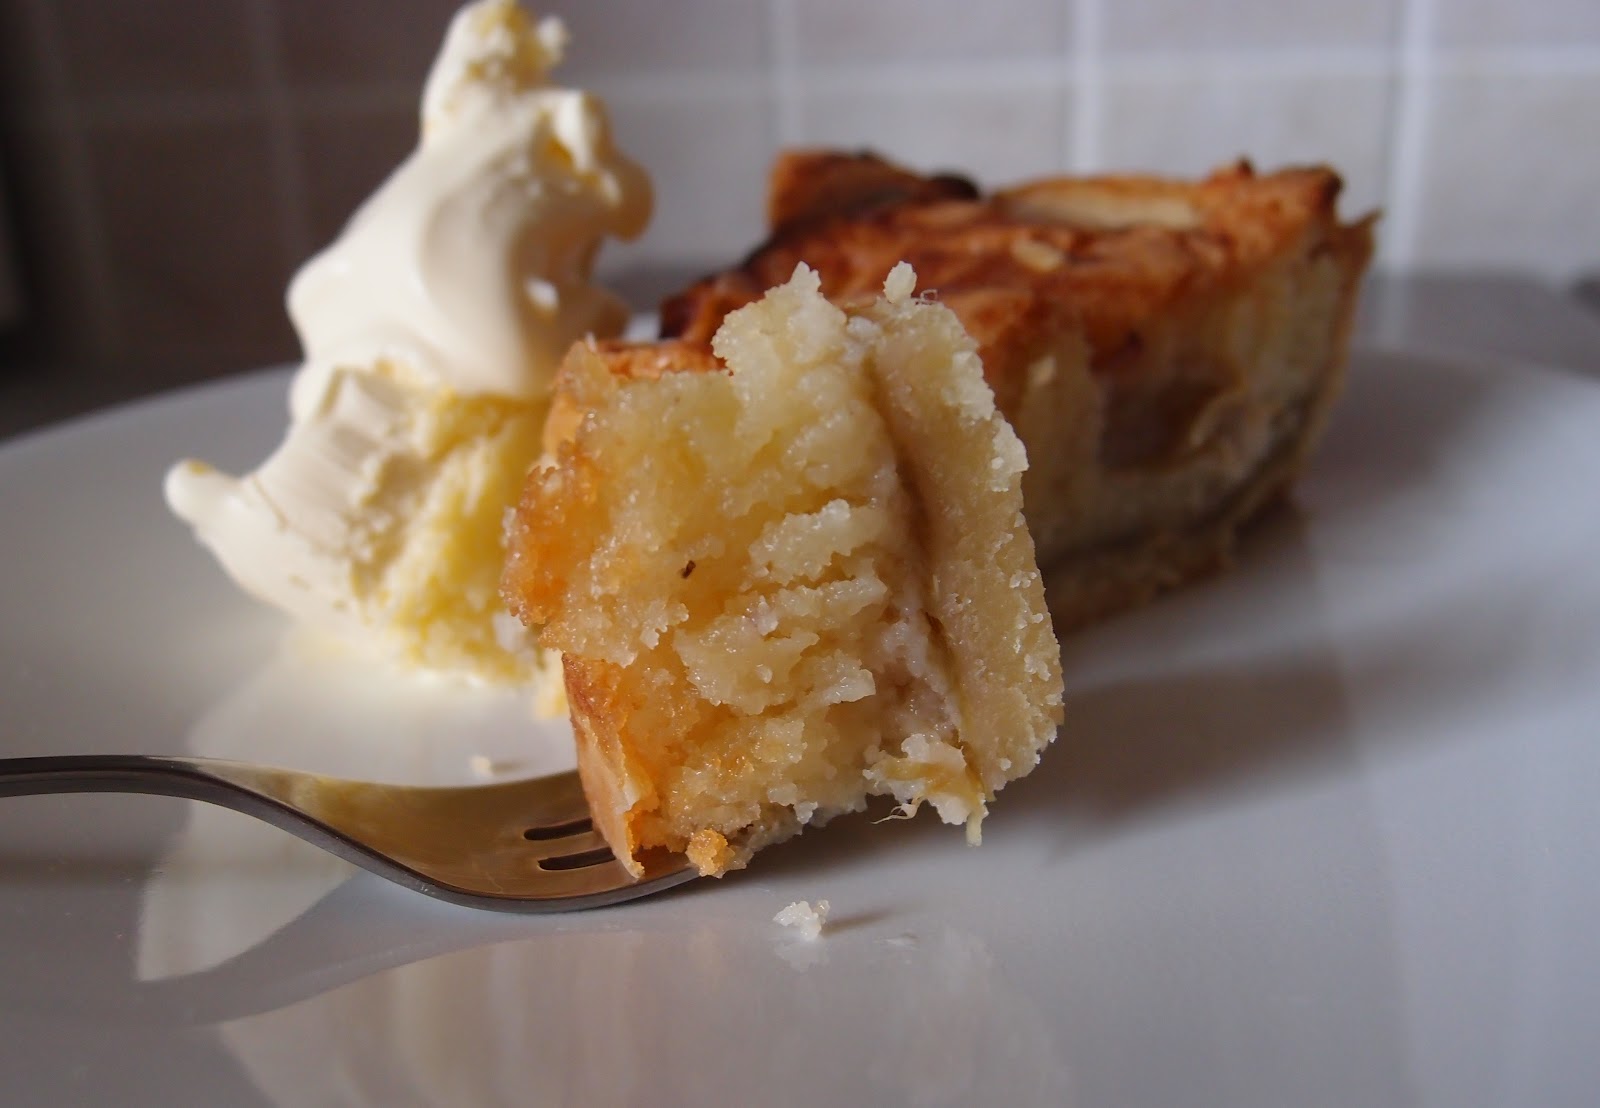
This tart has a shortbread base which is very buttery, very short and very crumbly.  It tastes just like the lightest shortbread biscuit you’ve ever eaten but is soft and tricky to work with, although it does patch well.  The original recipe I adapted said you should bake it blind, as you would pastry i.e. baking paper and beans.  I did this and, after baking, when I lifted the paper out, most of the shortbread went with it!  After laughing at how amusing this was (yeah, right) I found myself scraping soft shortbread off the paper and spreading it back into the tin – just about saving it.  What I’m trying to say is – don’t line the baking paper with beans.  Unless you want heartbreak!


The creamy mascarpone filling is light and creamy.  I will definitely use it for other fruits, such as peach, plum, raspberry or apricot.  It has a hint of cheesecake tang but is lighter and firmer in texture.


For all my rantings about the shortbread tart case it is sooooo worth it!  The buttery crumbly texture is divine and it has that almost granular shortbread texture that gives it more bite and substance than pastry.


Occasionally, I muse on how fun or difficult certain words are to type.   If you’ve missed this fear not, for here’s a summary:

Nice words to type: Demerara (flows like music across the keyboard)
Nasty words to type: Desiccated (is it two S’s or C’s?)

I would like to add “mascarpone” to the nasty words list – after the initial “ma” I always hesitate thinking, “does the ‘r’ come now or after the second ‘a’”.  Just me then.....


Ingredients

For the rhubarb:
500g rhubarb, cut into 2cm chunks
60g caster sugar

For the shortbread base:
135g unsalted butter, at room temperature
65g caster sugar
160g plain flour
15g cornflour
25g brown rice flour

For the filling:
115g caster sugar
30g unsalted butter, at room temperature
225g mascarpone
30g plain flour
2 eggs – separated
100ml double cream

Method

Preheat the oven to 190°C/fan oven 170°C/375°F/gas mark 5.

Place the rhubarb on an oven tray and sprinkle over the sugar.

Roast for approximately 15 minutes or until the rhubarb is soft, but still holding its shape.
Tip into a sieve and leave to cool.

Now make the shortbread base: Place all the ingredients in the food processor and pulse until you have squidgy crumbs that look like they will squeeze together to make a dough.  If you don’t have a processor, make by the rubbing in method.

Tip the dough out onto a sheet of clingfilm and, with as little handling as possible, bring into a ball.

If your dough is very soft refrigerate it briefly.  I didn’t as I feared it would make the shortbread tricky to roll out.  It rolls well soft and patches easily.

Roll out between two sheets of clingfilm until it will line a 25cm loose bottomed flan tin.  No need to grease the tin.

Don’t panic – the pastry will be very thin.

Gently place a sheet of baking paper down onto the pastry but don’t use baking beans – I found the pastry too soft for them.

Bake for approximately 15-20 minutes or until the pastry is just turning golden and biscuity.
Leave to cool, then wrap a foil collar around the outside of the tin – this is to protect the filling from spilling out when it soufflĂ©s during baking.  Not sure it’s really necessary so make your own judgement – all I’ll say it, next time, I won’t bother.

Now make the filling: place the butter, sugar and mascarpone in a large bowl and beat together.

Beat in the egg yolks and cream.

In a separate bowl whisk the egg whites until you have soft peaks.

Fold into the mascarpone mixture and ensure all ingredients are well combined.

Spoon into the cooled pastry case and level the surface.

Place the cooled rhubarb chunks on top.

Bake for approximately 45 minutes or until golden brown.  Another clue it’s ready is that the filling should be firm but with a bit of a wobble when you shake the tin.

Leave to cool – don’t panic that the filling will sink a little.

Serve, at room temperature on its own or – if you must – with cream!

Bask in the glory of the wonderful thing you have created.

Eat.

Saturday 26 May 2012

Baking goodies...

Thank you Mr Postman - look what he brought me!  All these glorious goodies are from Lakeland.


I'm thinking my plan of attack will be as follows: 

  • anything with a crown = jubilee
  • anything with a flag = olympics
Bring on the summer of baking!

Sunday 20 May 2012

Chocolate fudge birthday cake


It is Mr CC’s birthday and time for one of his ‘challenges’ that only serve to prove what a hopeless cake decorator I am!  This year he wanted a chocolate cake (hurrah!  I can do that!) in the shape of Domo (shi....I mean sugar!).  Now Domo is quite a straightforward looking chap...but it’s always the simple characters that are the hardest to get right as there’s nowhere to hide.

Carving is not my forte:


Domo is an international phenomenon with a range of merchandise to rival Hello Kitty.  He is the mascot for a Japanese television station.  If you haven’t come across him, this is what he looks like:

I chose a rich chocolate sponge and this recipe in particular interested me because of the sheer amount of chocolate and cocoa it contains.  It is quite dense almost like a sponge/brownie hybrid – a heavy, but very flavoursome cake.  The addition of sour cream works well and adds a tang to the flavour and stops the whole texture being too cloying.


The chocolate fudge icing couldn’t be simpler – only three ingredients!  Not that you can see much of it, because Mr CC hinted that chocolate sprinkles might replicate Domo’s fur...hence the whole tube of chocolate sprinkles covering the cake!  The icing is a little unconventional and I need to point out how ugly it is when cooled.  Here it is just made and needing to cool (nice):


Here it is cooled and rather icky looking:


Here it is lovely and beaten and ready to spread on the cake.  What I’m trying to convey is don’t lose heart and think you’ve done anything wrong when it’s cooled:


This cake is rich – I’d recommend serving it with some cream to lighten it.  It is also more chocolatey than chocolate; a boast I don’t make lightly (I’d hate you to take me at my word and then be disappointed).  Serve in small slices...this is one to savour!


As it was a cake for Mr CC’s birthday, I didn’t want him to see it before it was finished.  I therefore had to delegate the final inspection to Domo Nerd:


If you don’t want a Domo cake (why wouldn’t you?????) then simply make this cake in a traybake tin and serve that way.  If you are making it like that then maybe halve the icing amounts, as I needed extra to cover the sides of Domo!
Happy birthday Mr CC


Ingredients
For the cake:
300g dark chocolate, broken into pieces
300g unsalted butter
300g light muscovado sugar
150ml hot water i.e. not just boiled but still hot
150ml soured cream
3 eggs, beaten
300g self raising flour
110g cocoa powder

For the icing (this is what I used; if you’re making a traybake consider halving it):
200g dark chocolate
340g condensed milk
200g unsalted butter

To decorate: chocolate sprinkles, fondant icing and maltesers (for the eyes)
To serve: cream

Method
Preheat the oven to 160°C/fan oven 140°C/320°F/Gas mark 3.
Grease a 30cm x 20cm traybake tin.  I actually used a 27cm square disposable foil tin as, once I cut a strip of cake off to make the arms, it left me with a better Domo shape!
Put the chocolate, butter, sugar and hot water into a large saucepan and gently melt together, stirring frequently.
Once melted and combined remove from the heat and leave to cool for 5-10 minutes.
Stir in the soured cream and the eggs.
Transfer the mix to a stand mixer, or a bowl suitable to use an electric whisk in, and add the flour and cocoa.
Beat just until the ingredients are combined.  (NB.  I tried to incorporate the flour and cocoa in the pan using a balloon whisk but it was just too heavy and clumpy for my feeble arms to manage – hence the stand mixer)
Pour into the prepared tin – it will be runny – and bake for approximately an hour or until a skewer inserted into the cake comes out almost clean.  I’d check the cake after 50 minutes as all ovens are different.
Leave to cool on a wire rack.
When the cake is cool you can make the icing: Place all the ingredients in a bowl and place over a saucepan of simmering water.
Leave the ingredients to melt, stirring occasionally.
Remove from the saucepan and leave to cool; you may need to chill it to get it to a spreadable consistency.
If your icing looks a bit gloopy and unspreadable, put it in your stand mixer and beat it for a couple of minutes – this gets the texture just right for spreading.
Either spread the icing over the top of your traybake, or use to completely cover your Domo!
Decorate as required.
Bask in the glory of the wonderful thing you have created.
Eat.

Sunday 13 May 2012

Blueberry, cherry, cranberry and pecan oaties


Fruity oat biscuits and just in time for the first hint of summer!
  Somehow using blueberries, cherries and cranberries rather than the more usual dried fruit fare makes these tasty, fresh and new – a refreshing change for your palette.


These are classic fruity oat biscuits but with an almost hidden secret: pecans.  In all honesty, I’m not sure you’d know the biscuits contained pecans (I chopped mine quite small) but you’d know there was something extra as there is a rich roundness to the flavour that is an unusual, but most welcome, addition to an oat biscuit.


The texture is like a crisp flapjack.  I must warn you that the dough is sticky in its raw state.  Don’t fret when you’re shaping the dough into a fat sausage for chilling – it really firms up in the fridge and is easy to work with.  A good sharp long bladed knife makes the cutting easier – I experimented with a serrated knife and it rather butchered the dough!


A very popular bake this one – the CCB (Caked Crusader’s Brother) commented that they had everything he loved about a biscuit.  When asked what this was, his first (and only) response was that they were, “big”.


Save yourself time and double the quantities for a 24 biscuit batch; they keep well for days and are very pleasing to have in the biscuit tin for emergencies.....such as needing a biscuit urgently.


Ingredients
175g plain flour
½ teaspoon baking powder
85g porridge oats
175g golden caster sugar
1 teaspoon ground cinnamon
140g unsalted butter – straight from the fridge
90g dried fruit – I used blueberries, cherries and cranberries but raisins or sultanas would also work
50g pecans – chopped
1 egg

Method
Place the flour, baking powder, porridge oats, golden caster sugar and cinnamon in a large bowl and mix together.
Add the butter and rub the mixture through your fingertips until the butter is completely incorporated.
Stir in the dried fruit, nuts and the egg.  At this point the mixture will be wet and clumpy but not quite coming together.
Use your hand to bring the dough together then tip out onto a large sheet of clingfilm.
Roll the dough into a fat sausage and flatten the ends.  You’re aiming for a diameter of about 6cm.
Wrap in clingfilm and place in the fridge for about an hour or until the dough has firmed up.
Preheat the oven to 180°C/fan oven 160°C/350°F/Gas mark 4.
Line two baking sheets with baking paper.
Remove the biscuit log from the fridge and unwrap the clingfilm.
Cut the log into 12 fat discs and place on the baking sheets.  Don’t worry if the biscuit log crumbles a bit while you cut it – it will squidge back together.
Bake for approximately 15 minutes or until golden.  Mine took a bit longer – approx 20 minutes.
Leave, on the tray, to cool and firm up.
Store in an airtight container.
Bask in the glory of the wonderful thing you have created.
Eat.


Wednesday 9 May 2012

Sticky peanut butter chocolate cake


There is something about the smell of peanut butter – it’s more peanutty than peanuts!  I could just stand with the jar inhaling it, but eating it...on toast...no thanks; I find the texture too thick and cloying.  Baking with it, however, is a pure unadulterated joy.


This recipe interested me as the peanut butter is only in the filling/topping.  The idea of beating smooth peanut butter into molten chocolate – unsurprisingly – appealed to me and I can’t recommend it enough.  I think it would also work really well as a topping for cupcakes or even as the filling of a biscuit sandwich.


The filling packs a lot of flavour.  Initially you get chocolate and sweetness (I added the icing sugar but not the cocoa) then the saltiness of the peanut kicks in before the chocolate returns.  For a sandwich cake, this isn’t a huge amount of filling but don’t be tempted to double it as I think the flavour would overpower the sponge.  It’s perfectly balanced as it is...and I say that as someone who always thinks more is better!


Sometimes being indecisive can really work in your favour (but not necessarily help your waist line).  I spent so long pondering whether to top the cake with chocolate covered peanuts or nut brittle that, in the end, I went with both!  They added nice texture to an otherwise soft and squidgy cake.


Ingredients
For the sponges:
175g unsalted butter, at room temperature
150g caster sugar
25g light brown sugar
3 eggs
1 teaspoon vanilla extract
150g self raising flour
30g cocoa powder
2 tablespoons milk

For the filling:
45g dark chocolate
45g milk chocolate
125g smooth peanut butter
25g unsalted butter, at room temperature
2 teaspoons icing sugar – optional (depends on how sweet the peanut butter is)
2 teaspoons cocoa powder – optional (depends on how ‘strong’ you like your chocolate)

To decorate: chocolate covered peanuts and broke up nut brittle

Method

Preheat the oven to 180°C/fan oven 160°C/350°F/gas mark 4.

Line two 20cm round loose bottomed sandwich tins with baking paper.

Beat together the butter and sugar until the mix is pale, light and fluffy – don’t skimp on this stage as this is where the air gets into the sponge.

Gradually beat in the eggs, one at a time.

Beat in the vanilla.

Fold in the flour and cocoa powder.

Stir in the milk.

Spoon into the prepared baking tins and level the surfaces.

Bake for approximately 25 minutes, or until a skewer inserted into the cake comes out clean.  Mine took just over 25 minutes.

Remove from the oven and leave to cool in the tins.

When cool enough to safely handle, de-tin and leave to cool completely on a wire rack.

Now make the filling: melt both types of chocolate (I use the microwave) and then leave to cool slightly.

Beat in the peanut butter and soft butter until you have a smooth texture.

Taste the mix – depending on your peanut butter and your chocolate, you may wish to add additional icing sugar or cocoa powder.

If your filling is runny let it stand for a few minutes before building the cake – it’s probably just because you were impatient and didn’t let the chocolate cool sufficiently.  I’m not judging you – I did exactly the same!

Place the first layer on the serving plate and spread half the filling over it.

Place the second layer on top and gently press down to ensure the layers have adhered to the filling.

Spread the remaining mix over the top sponge and then decorate, as desired, with chocolate peanut and nut brittle.

Serve in generous slices with a cup of tea.

Bask in the glory of the wonderful thing you have created.

Eat.

Sunday 6 May 2012

Rhubarb bakewell tart


The mild winter and recent wet weather have been rather good news for the garden rhubarb and this recipe utilises the first crop from the CCD’s (Caked Crusader’s Da) plant.  OK, so garden rhubarb isn’t as pretty as the pink, forced rhubarb but it’s free...and free rhubarb trumps pink rhubarb any day in my world!


This tart plays with the Bakewell formula in that the jam is replaced by rhubarb puree which, while sweetened, is still tart and gives a delicious contrast with the thick, nutty frangipane.  The pieces of rhubarb on top sink into the frangipane during baking and ooze their acidic fruitiness, meaning that each bite is a taste sensation.


Going into the oven, the rhubarb looks like this:


The roasted rhubarb looked so inviting when it came out of the oven:


Half the rhubarb stays in chunks, the other half is mashed with a fork to make a puree (the replacement for the jam in a bakewell):


I chose to boost the almond by making an almond shortcrust pastry; you could just make your preferred classic shortcrust recipe if you wish – this one’s all about the filling!


If you’re pushed for time, you could roast the rhubarb and make the pastry (keeping it uncooked in the fridge) the day before.  There’s nothing tricky here but there are a few stages and ‘waiting for things to cool’ periods!


Ingredients
For the rhubarb:
500g rhubarb – cut into short lengths i.e about 2cm
75g sugar
For the almond shortcrust pastry:
170g plain flour
60g ground almonds
110g unsalted butter, cold
50g icing sugar
2 egg yolks
2 tablespoons cold water
For the frangipane:
150g unsalted butter, at room temperature
150g caster sugar, plus an extra teaspoon for sprinkling
100g ground almonds
2 eggs
½ teaspoon almond extract
1 teaspoon baking powder
50g plain flour
Handful of flaked almonds for scattering on top
To serve: thick cream; I chose clotted.  If you serve the tart warm then custard or ice cream

Method
Preheat the oven to 180°C/fan oven 160°C/350°F/gas mark 4.
Place the rhubarb on a baking sheet and sprinkle the sugar over it.
Bake for 20-40 minutes, or until the rhubarb is soft but still holds its shape.  Mine was garden rhubarb so took 40 minutes, forced rhubarb is thinner and will take less time.
Leave to cool, then tip into a dish – juice and all.  You can do this the day before making the tart if you wish (I made it all the same day).
While the rhubarb is cooling, make the pastry: Place the flour and ground almonds in a food processor and briefly pulse until they are combined.
Add the butter, diced into small cubes, and blitz until the mixture resembles bread crumbs. If you don’t have a food processor you can use the rubbing in method.
Add the sugar and blitz briefly.
Add the 2 egg yolks and water and pulse the processor until the dough just starts to come together.
Tip the dough out onto a sheet of clingfilm and bring together into a soft ball.
Flatten the ball into a disc shape (this will make rolling out easier) and wrap in the clingfilm.
Refrigerate for at least 30 minutes.
Preheat the oven to 180°C/fan oven 160°C/350°F/gas mark 4.
Roll the chilled pastry out between two sheets of clingfilm and use to line a 23cm loose bottomed round flan tin. No need to grease the tin as the pastry is buttery enough not to stick. It is very important that your pastry has no holes in it so patch carefully if need be! Don’t trim the pastry yet – leave the excess hanging over the side.
Line the pastry with a sheet of baking paper and weigh down with some baking beans.
Bake the pastry case for 15 minutes, then remove the beans and paper and return to the oven for a further 10 minutes.
Leave the pastry case to cool and, when cool, trim off the excess pastry.  I use a serrated bread knife as I find it doesn’t tear at the pastry and I have more control.
Return to the cooled rhubarb and pick out about half the number of pieces and place on a plate.  These will go on top of the tart so pick nice pink pieces!
Tip almost all the baking juices away and mash the remaining rhubarb to a puree.  This won’t be tricky as the rhubarb is soft and a fork should be up to the job!
Put both lots of rhubarb to one side.
Now make the frangipane filling: Place all the ingredients in a large mixing bowl and beat until whippy and combined.
Spoon the pureed rhubarb into the bottom of the pastry case.
Spread the rhubarb puree on top and ensure it is evenly spread out – there should be just enough to cover the base; any more than this and the tart will be too sloppy.
Spoon the frangipane onto the rhubarb puree and spread ensuring that it forms a seal with the pastry so no puree will bubble up during cooking.
Arrange the reserved rhubarb pieces on top of the frangipane.
Scatter over a handful of flaked almonds, then finally sprinkle over a teaspoon of sugar.
Bake for approximately 45 minutes or until a skewer inserted into the frangipane comes out clean.
Leave to cool, in the tin, on a wire rack – only remove from the tin just before serving.
Serve either warm with ice cream or custard, or at room temperature with cream.
Bask in the glory of the wonderful thing you have made.
Eat.